
Some of you may want to clone HDD to SSD with Clonezilla. In this post, we will show you Clonezilla Windows 10, how to use Clonezilla to clone your hard drive as well as a Clonezilla alternative – MiniTool ShadowMaker developed by MiniTool Solution. Now, let’s see some information below.
Key Takeaways
- Clonezilla is a free, open-source tool that helps clone HDDs to SSDs on Windows 11/10. However, you need to create a bootable USB drive and navigate a text-based interface during the setup process.
- Ensure that the target drive is equal to or larger than the source drive when using Clonezilla.
- For simple disk cloning, use MiniTool ShadowMaker, which supports cloning to smaller drives and offers an intuitive user interface.
Clonezilla Windows 10/11
Clonezilla is a free and open-source disk imaging/cloning software. With this program, you can perform system deployment, back up system, clone disk, and more.
Clonezilla has 3 different types – Clonezilla live, Clonezilla lite server, and Clonezilla SE. Clonezilla live supports single backup and restore while Clonezilla lite server and SE are suitable for massive deployment – you can use them to clone more than 40 computers at the same time.
Clonezilla supports a range of file systems and it can be used on many platforms including Linux, Windows, macOS, Chrome OS, etc.
When you want to upgrade or replace your hard drive, you may want to perform a disk clone, and Clonezilla can help you. It can migrate your apps, settings, and files from the current installation to a new drive without reinstalling the operating system.
Whether you are managing multiple computers for a business environment in the United States or Europe, or upgrading a personal PC at home, Clonezilla can help create an exact copy.
When to Use Clonezilla for Cloning
Clonezilla can be a practical choice for advanced users who need a free and powerful disk cloning tool. However, it is not ideal for every user. Consider your specific needs and technical experience before using it.
| Situation | Suitability |
| You want to migrate Windows 10 or 11 from an HDD to an SSD at home. | Suitable |
| IT administrators manage multiple Windows computers across an organization. | Suitable |
| Small businesses need to replace, upgrade, or maintain office computers. | Suitable |
| You are familiar with bootable tools and disk partitions. | Suitable |
| You are a beginner looking for a simple solution with an intuitive graphical interface. | Not suitable |
Tips Before Using Clonezilla Windows 11/10
Before cloning an HDD to an NVMe M.2 or SATA SSD, follow these preparation steps to ensure a smooth cloning process.
- Disable BitLocker if your drive is encrypted.
- Back up important files on the target drive to avoid data loss.
- Connect the new drive properly using an adapter.
- Check if the destination drive has enough capacity.
How to Use Clonezilla to Clone Windows 10/11
The operations to clone HDD to SSD with Clonezilla are a bit complicated and you should follow these steps below.
#1. Create Windows 10/11 Clonezilla Bootable Media
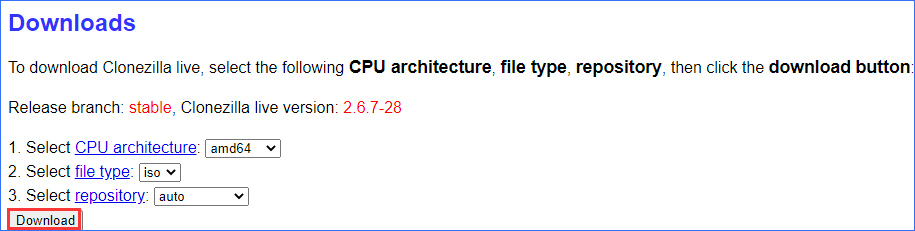
Step 1: Before starting Clonezilla Windows 10/11 cloning, you need to go to the download page, choose iso from the file type section, and then click Download.
Step 2: Then, you need to create a Clonezilla bootable USB drive. Go to the website of Rufus to download and install it on your computer.
Step 3: Connect your USB flash drive to your PC, run Rufus, click SELECT to choose the iso file of Clonezilla you have downloaded, and then click the START button.
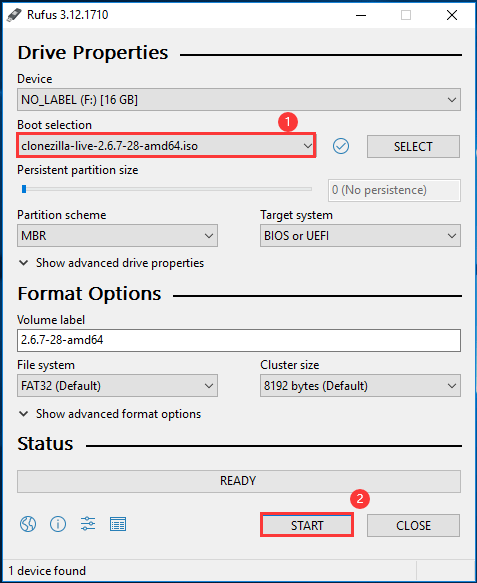
Now, the bootable Clonezilla Windows USB drive is created successfully. Connect the USB drive to your computer, restart the computer, press a specific key to enter the BIOS menu, change the boot order to the USB drive, and then the PC can run from the bootable Windows 10 Clonezilla drive.
#2. Clone HDD to SSD with Clonezilla for Windows 11/10
After booting the computer from the created bootable drive, now you should perform disk cloning by following these steps below. Note that your target disk is connected properly to your computer.
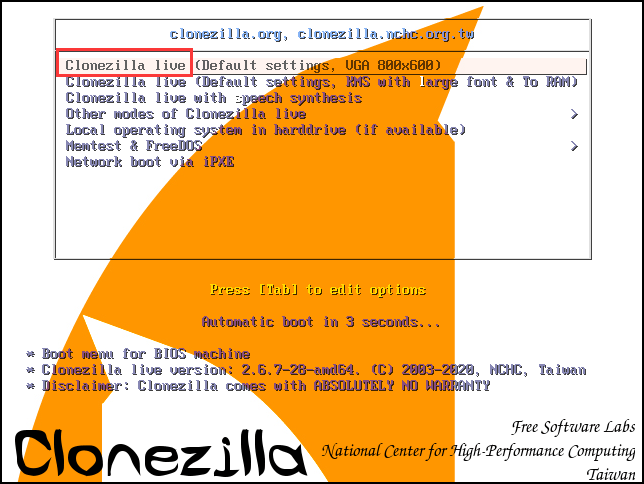
Step 1: In the following interface, choose Clonezilla live.
Step 2: Choose a language and press Enter.
Step 3: Choose a keyboard configuration. You can keep the default keyboard layout and press Enter.
Step 4: Select either start Clonezilla or enter login shell. The first one is recommended.
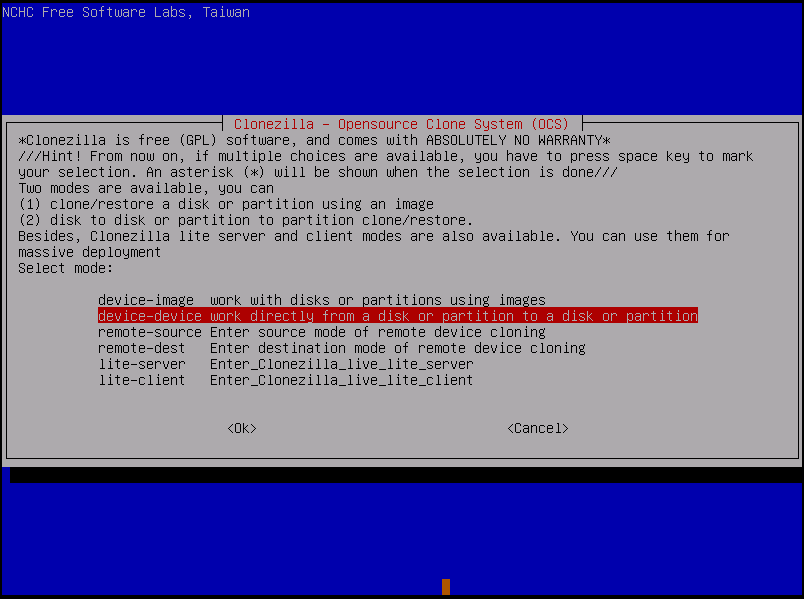
Step 5: You need to choose a mode to continue. Your plan is to clone a hard drive in Windows 10, so here choose device-device work directly from a disk or partition to a disk or partition.
Step 6: Choose a mode to run and here we choose Beginner Mode to continue.
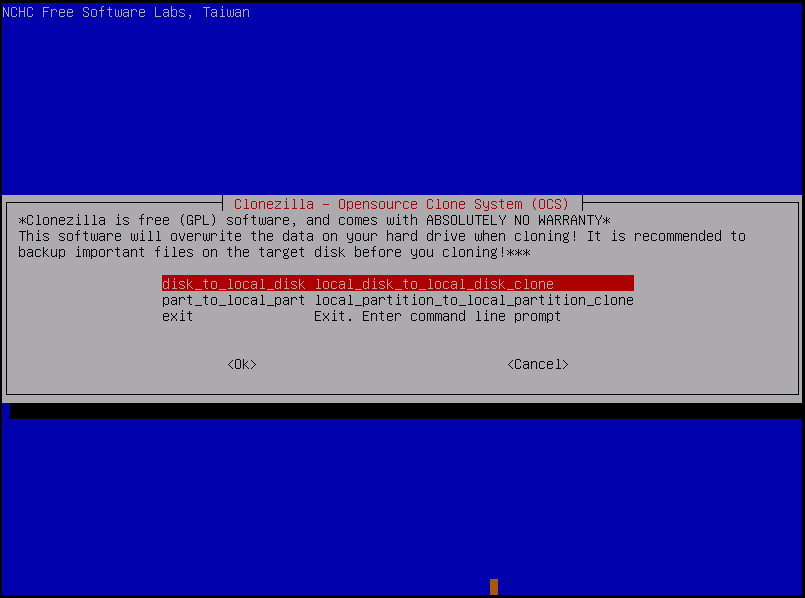
Step 7: In the following window, you see two options: disk_to_local_disk local_disk_to_local_disk_clone and part_to_local_part local_partition_to_local_partition_clone. If you need to clone HDD to SSD, choose the first option to continue.
Step 8: Select a disk as the source drive.
Step 9: Specify a hard drive as the target disk.
Step 10: Set the advanced parameters. If you have no idea, keep the default value – sfck: skip checking/repairing source file system.
Step 11: Choose to reboot/shutdown, etc. when everything is finished.
Step 12: Confirm the operation: type Y and press Enter 3 times to confirm the cloning process, confirm data will be overwritten, and confirm to clone the boot loader (this can make the Windows 10 drive bootable).
Step 13: After finishing these steps, Clonezilla will proceed to clone the data from the source drive to the destination drive. This will take a few minutes, so wait patiently.
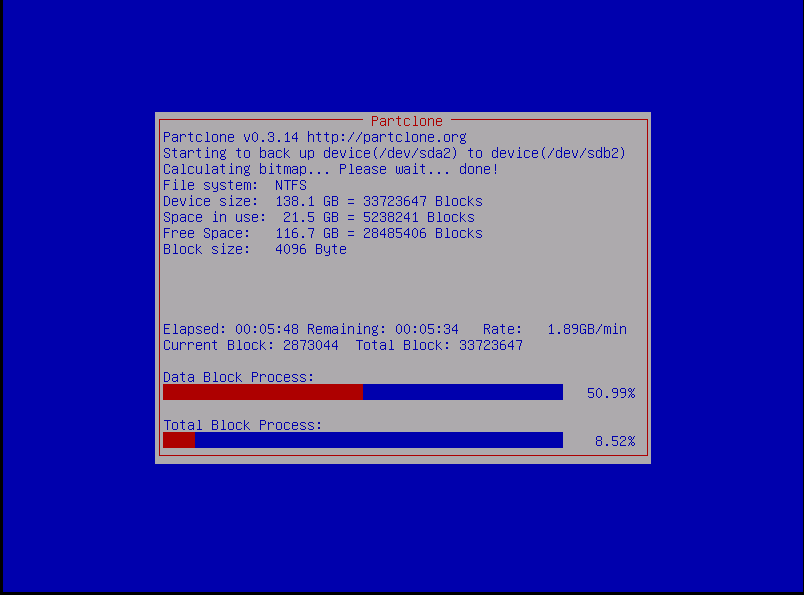
After cloning is completed, shut down or restart the machine depending on your needs. Then, you can replace the old hard drive with the new disk or remove the old one from your computer.
Clonezilla Windows 10/11: Migrate Your OS from an HDD to an SSDClick to Tweet
Now, you know how to use Clonezilla to clone your disk in Windows 10/11. But as you can see from this part, the whole cloning process is very complicated and time-consuming since you need to create a bootable USB drive and then start the cloning by following many wizards.
The operation steps are so multiple, which may let you feel confused. Besides, the target disk must be equal to or larger than the source hard drive.
Actually, you can easily clone your disk to another one without Clonezilla. There are many easy-to-use Clonezilla alternatives in the market, and here we recommend using MiniTool ShadowMaker to clone HDD to SSD, even when the SSD is smaller than the HDD. Just keep reading to learn more information.
Clonezilla Windows 10/11 Alternative – MiniTool ShadowMaker
MiniTool ShadowMaker is an all-in-one backup software for Windows 11/10/8/7. With it, you can create a system, file, folder, disk, or partition backup and perform the recovery operation. Besides, it can be used to sync your files & folders to other locations.
Also, it is an excellent hard drive cloning software that allows you to clone your hard drive to another hard drive with simple steps. Even the source disk is larger than the target disk, you can perform the cloning operation provided that the target disk has enough disk space to hold the content of the source disk.
MiniTool ShadowMaker offers a user-friendly interface, making you clone the disk easily. Now, download this program by clicking the following button and then install it on your computer to start cloning.
MiniTool ShadowMaker TrialClick to Download100%Clean & Safe
Related article: MiniTool Programs Help to Clone Hard Drive to Smaller SSD
See how to clone a hard drive in Windows 10 with MiniTool ShadowMaker.
Step 1: Run this hard disk cloning software to its main interface.
Step 2: To clone a hard drive, go to the Tools page and then choose Clone Disk from the window.
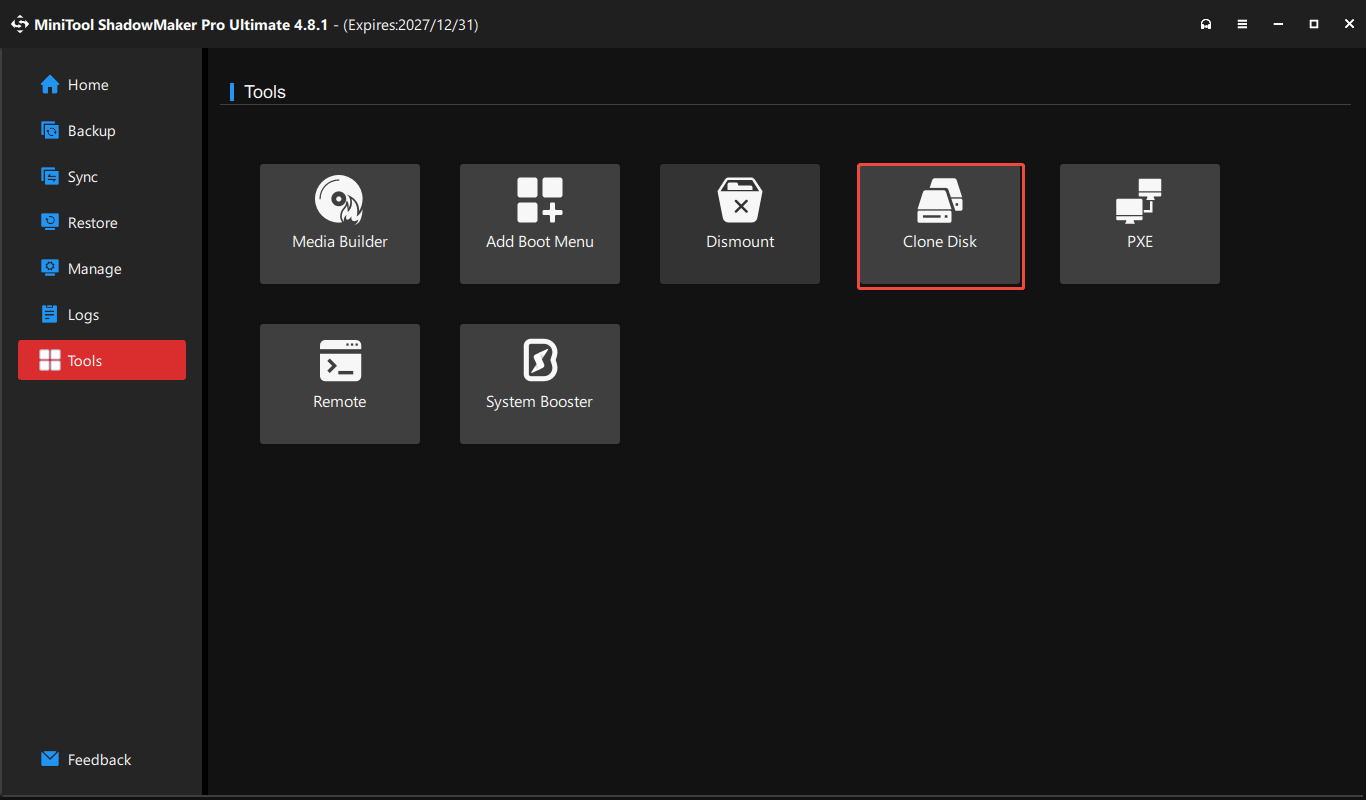
Step 3: In the pop-up window, choose a source disk and target disk. And then, click OK to continue.
Step 4: Now MiniTool ShadowMaker starts cloning the hard drive. This will take a few minutes. After finishing the clone, you can receive a message to tell you what you should do.
If you need to replace your old hard drive with a new disk like SSD, shut down the computer, open the computer case, remove the old disk, and put the SSD in the original place. This post may be what you are interested in – How to Install SSD in PC? A Detailed Guide Is Here for You! If you clone the disk for backup, just remove the new hard drive.
Clonezilla Windows 10/11: Migrate Your OS from an HDD to an SSDClick to Tweet
Clonezilla for Windows 10/11 VS MiniTool ShadowMaker
After learning about these two cloning software, now let’s make a simple comparison between them.
| Feature | Clonezilla | MiniTool ShadowMaker |
| User interface | Uses a text-based interface, which is not user-friendly. | Provides a visual and clear user interface. |
| Disk storage limitation | Typically requires the target drive to be equal to or larger than the source drive. | Supports cloning a disk to a smaller disk as long as it can hold all data on the source disk. |
| Clone process | Requires multiple steps and may be complicated for beginners. | Offers a simple cloning process with fewer steps. |
| Supported operating system | Supports macOS, Linux, Windows, and more. | Mainly designed for Windows users. |
| Partition-to-partition clone | Supports partition clone. | Does not include partition clone. |
Thus it can be seen that MiniTool ShadowMaker is worth recommending. Just get it for backup, sync, or clone in Windows 10/11 now based on your need
MiniTool ShadowMaker TrialClick to Download100%Clean & Safe
Bottom Line
What is Windows 10 Clonezilla? How to use Clonezilla to clone HDD to SSD? After reading this post, you know a lot of information. Cloning a hard drive with this software is complicated and it is time-consuming. Due to this reason, a Clonezilla alternative – MiniTool ShadowMaker is recommended to you. Just get it to perform the disk cloning.
On the other hand, if you have any suggestions for Clonezilla or any questions when using MiniTool software, don’t hesitate to tell us and we will reply to you as soon as possible. Leaving a comment below or contacting [email protected] is supported.
Clonezilla Windows 10 FAQ
About The Author

Position: Columnist
Vera has been working at the MiniTool Team for over 10 years as a technical editor and content writer. She mainly focuses on disk and partition management, data recovery, Windows backup and restore, and PC troubleshooting. Through in-depth software testing and hands-on experience, she has helped users solve a wide range of computer problems and better protect their data on Windows devices.
User Comments :