What Is Core Isolation?
Core isolation is a Windows security feature in Windows 10/11. It uses virtualization-based security (VBS) to isolate critical system processes in memory, protecting them from malware and unauthorized access.
While Memory integrity enhances security, it can trigger a minor performance drop. Some gamers are noting a 3% to 15% drop in frame rates while enabling this feature.
Additionally, some older or less common drivers may not be compatible with Memory integrity. If you enable this feature in this case, it could cause device malfunctions.
On the Core isolation page, there are many options, such as:
Memory Integrity (HVCL)
This is the most common setting. It uses virtualization to prevent malicious code from hijacking high-security processes. It ensures that only verified and signed drivers can access the kernel.
Kernel-Mode Hardware-Enforced Stack Protection
This feature uses CPU capabilities (like Intel CET) to protect system memory from ROP (Return-Oriented Programming)-based attacks and unauthorized modifications.
Local Security Authority (LSA) Protection
This feature helps prevent credential theft by ensuring that only authorized processes can access sensitive login credentials.
Microsoft Vulnerable Driver Blocklist
It automatically prevents known-malicious drivers from loading on your system.
Microsoft Defender Credential Guard
It isolates secrets so that only privileged system software can access them.

Prerequisites of Core Isolation
Not all computers can support the Core isolation feature. Here are the key prerequisites for enabling this feature:
- UEFI Mode: Your system must be in UEFI mode, not Legacy or CSM (Compatibility Support Module)
- Virtualization Enabled: Intel VT-x or AMD-V must be turned on in BIOS/UEFI.
- TPM 2.0: A Trusted Platform Module (version 2.0) is required to store security keys.
- Secure Boot: Secure Boot must be enabled.
- DEP (Data Execution Prevention): This must be supported and typically turned on in the BIOS.
- Compatible Drivers: Every driver on your system must be compatible with Hypervisor-Protected Code Integrity (HVCI).
It is crucial to check the PC specifications to know if you can enable Core isolation.
Follow these steps:
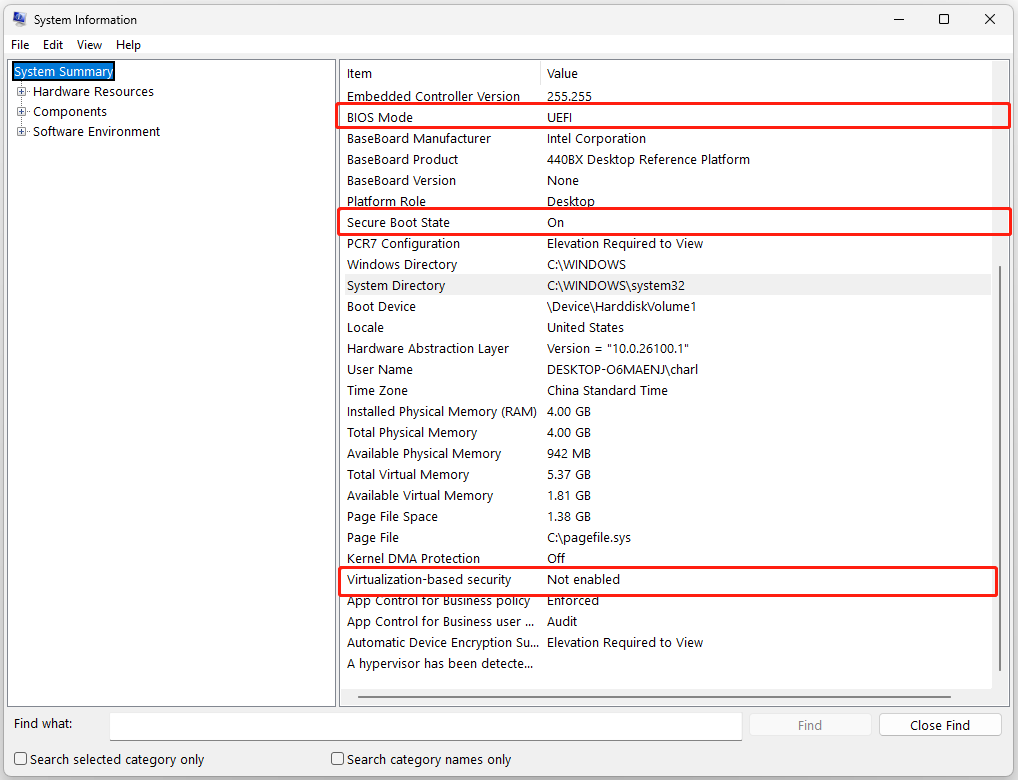
Step 1. Press Win + R to open Run.
Step 2. Type msinfo32 and press Enter.
Step 3. In the prompted System Information window, ensure the following items have the needed status:
- BIOS Mode: UEFI
- Secure Boot State: On
- Virtualization-based security: On
If any of the required features are disabled on your PC, proceed to enable them.
Enable CPU Virtualization
CPU virtualization, specifically Intel VT-x and AMD-V, allows one physical processor to act as several virtual CPUs. This enables multiple operating systems or apps to operate concurrently on the same hardware.
Additionally, this enhances performance and enables security features like Core Isolation, Docker, and Virtual Machines (VMs).
Here’s how to enable it:
Step 1. Boot your computer into the BIOS menu.
Step 2. Navigate to the Advanced or CPU Configuration tab.
Step 3. Enable Virtualization:
- Intel CPUs: Look for Intel Virtualization Technology, Intel VT-x, or VT-d, and enable it.
- AMD CPUs: Look for SVM Mode or AMD-V and enable it.
Step 4. Save the changes and exit the BIOS menu.
Enable Secure Boot
Secure Boot ensures only trusted and digitally signed software loads during startup, preventing malware from infecting the boot process. It is essential to enable Core isolation. Here’s the guide on enabling it:
Step 1. Boot your PC into the BIOS menu.
Step 2. Look for the Security, Boot, or Authentication tab.
Step 3. Find the Secure Boot option and change it to Enabled.
Step 4. Save the changes, exit BIOS, and boot into Windows.
Enable TPM 2.0
TPM 2.0 is a hardware security chip that protects sensitive data like passwords and encryption keys. It is a crucial requirement for Windows 11 to support features like BitLocker and Windows Hello.
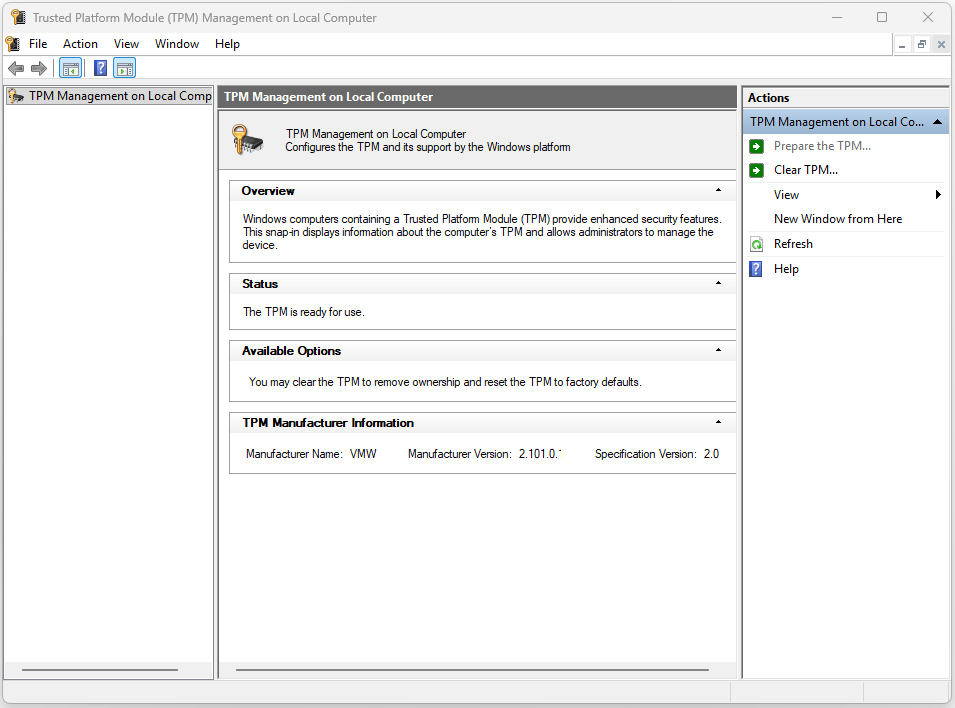
Step 1. Open Run, type tpm.msc, and press Enter.
Step 2. In the prompted Trusted Platform Module (TPM) Management on Local Computer window, you can see the TPM 2.0 status.
- TPM is ready for use: It means TPM 2.0 is already activated, and no further action is needed.
- TPM is not supported: It means your motherboard doesn’t support this tool.
- Compatible TPM cannot be found: It means TPM is supported but not activated in your BIOS or UEFI settings. Now, take the following steps to enable the feature in BIOS.
Step 3. Boot your PC into BIOS.
Step 4. Locate the Security, Advanced, or Trusted Computing menu.
Step 5. Enable Firmware TPM (fTPM) for AMD or PTT (Intel Platform Trust Technology)for Intel.
Step 6. Save changes and exit.
Update All Outdated Drivers
Some old or incompatible drivers may also prevent Core isolation from enabling. Thus, using Device Manager to update all outdated drivers is necessary. Here are the detailed steps:
Step 1. Press Win + X to open the Quick Link menu and select Device Manager.
Step 2. Expand one device category, right-click the outdated driver, and select Update driver.
Step 3. Choose Search automatically for drivers. Then, follow the on-screen instructions to complete the update process.
Step 4. Repeat the above steps to update all outdated drivers.
Recommended: Back Up Your Data with MiniTool ShadowMaker
Although Core isolation improves security, it can cause significant compatibility issues. Thus, backing up your data is critical to avoid loss before enabling this feature.
To achieve that, it is highly recommended to use MiniTool ShadowMaker. This PC backup software can help you perform Windows 10 backup and Windows 11 backup easily.
Step 1. Download and install MiniTool ShadowMaker on your computer. Then, launch it to enter the main interface.
MiniTool ShadowMaker TrialClick to Download100%Clean & Safe
Step 2. Select Backup from the left panel, go to SOURCE, and select Folders and Files.
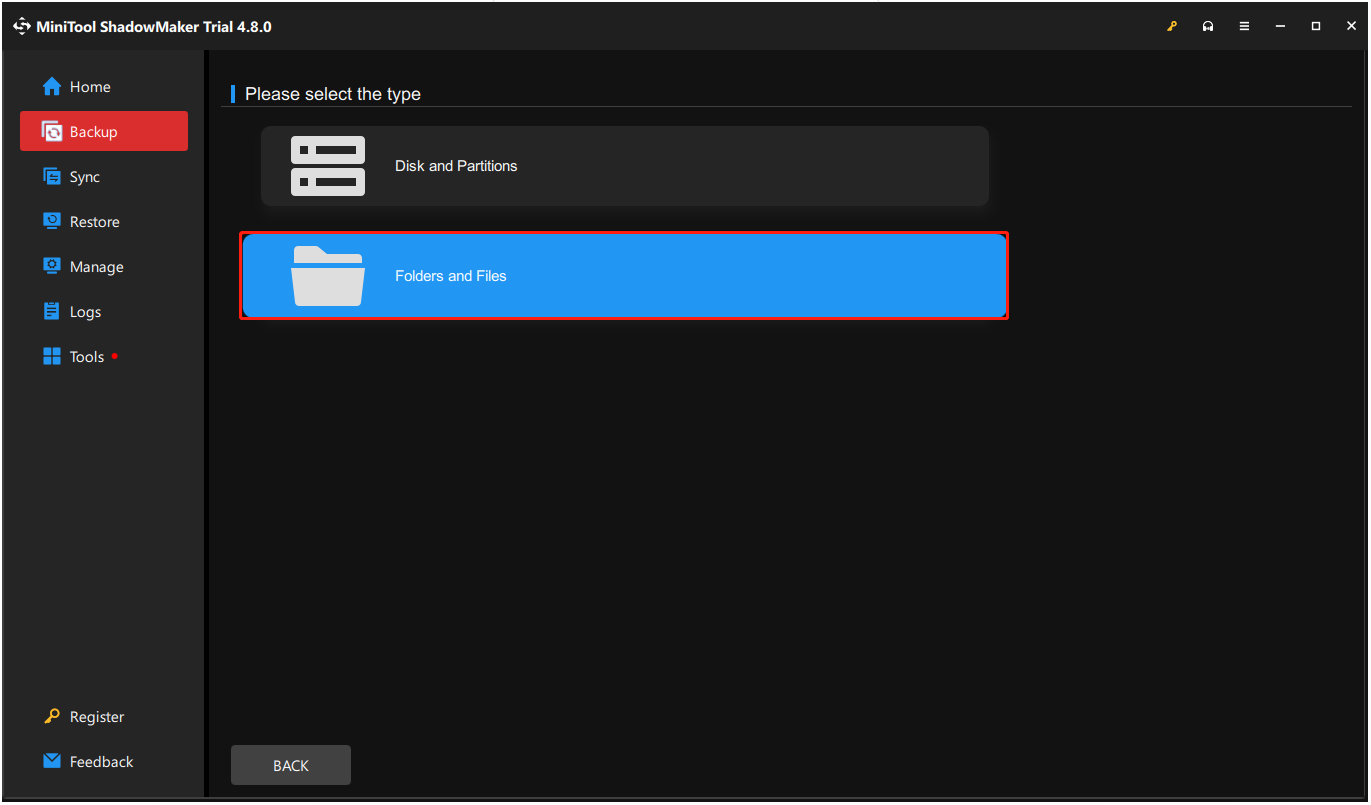
Step 3. Choose the files that you want to back up and click OK.
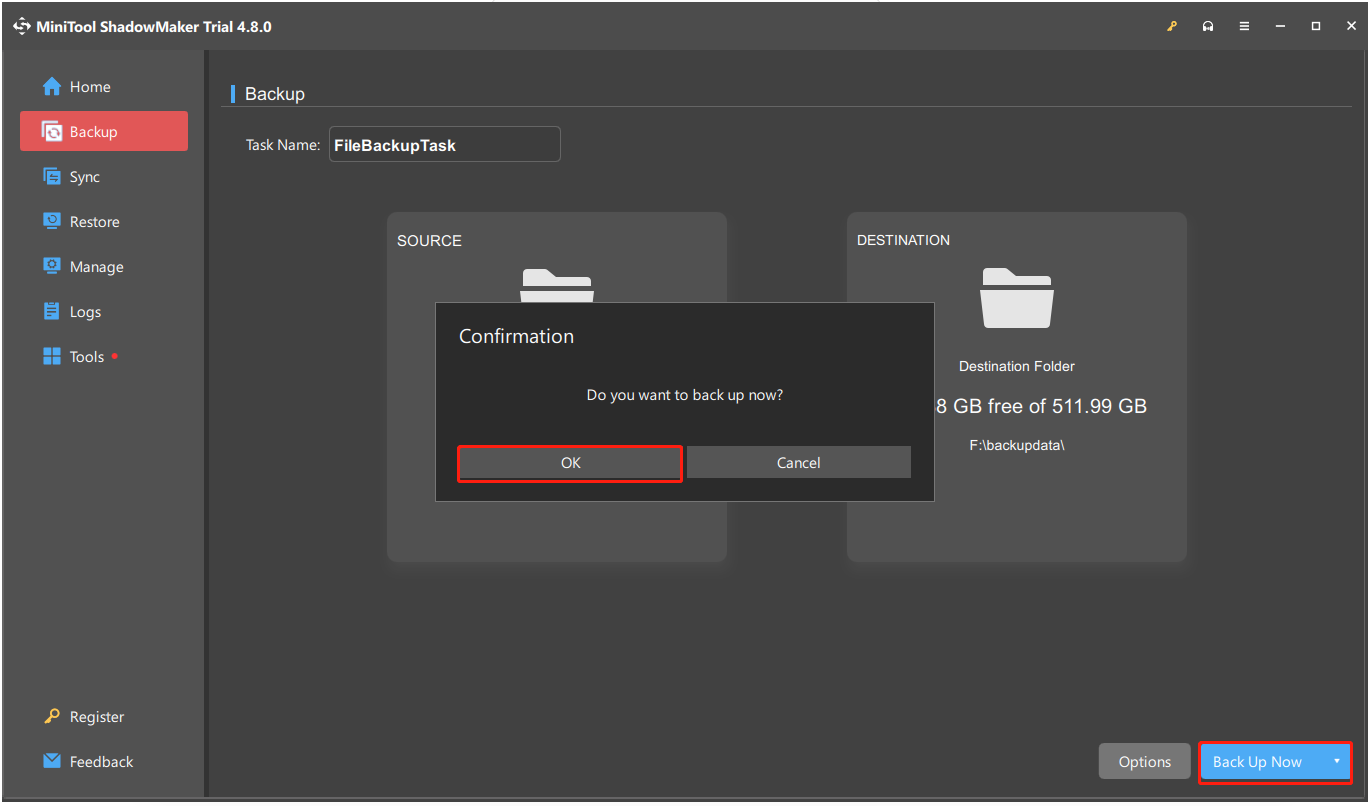
Step 4. Access DESTINATION, choose a storage path, and click OK.
Step 5. Click Back Up Now and OK sequentially to execute the file backup.
How to Enable Core Isolation
After ensuring your computer meets all the prerequisites for Core isolation and doing a backup of important data, enable Core isolation using the two methods:
- Via Windows Security
- Via Registry Editor
Here’s the detailed breakdown:
Method 1. Via Windows Security
Enabling Core isolation via Windows Security is the easiest way. Here’s the guide:
Step 1. Press Win + S to open Search, type windows security, and press Enter.
Step 2. In the prompted window, select Device security.
Step 3. Find Core isolation in the new page and click Core isolation details.
Step 4. Toggle on the switch under Memory integrity.
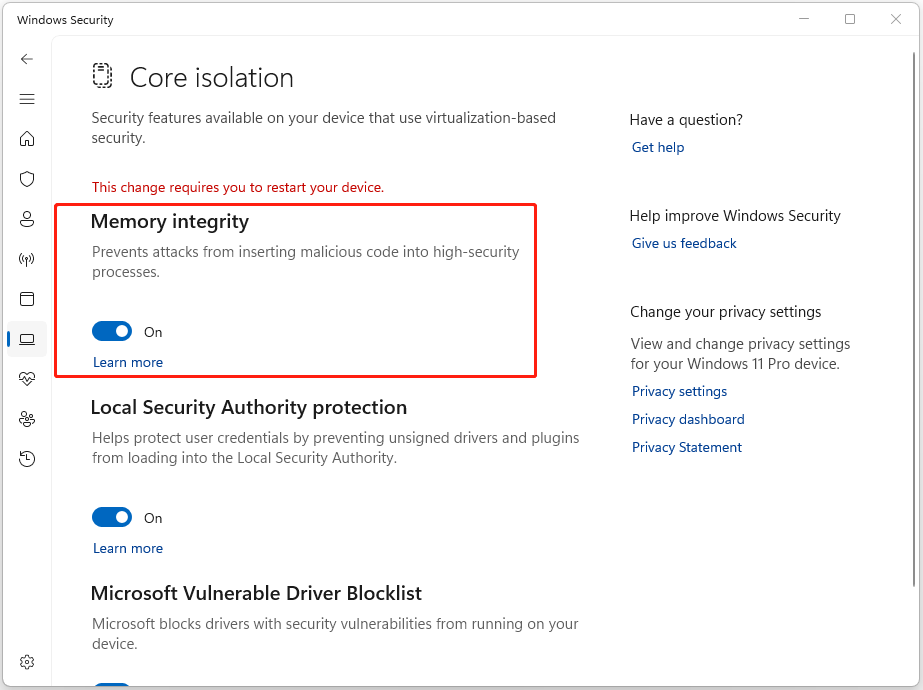
Step 5. Restart your PC to apply the change.
To disable this feature, toggle the Memory integrity switch off on this page.
Method 2. Via Registry Editor
Additionally, Registry Editor can also help you enable Core isolation.
Follow the instructions:
Step 1. Press Win + R to open Run, type regedit, and click OK.
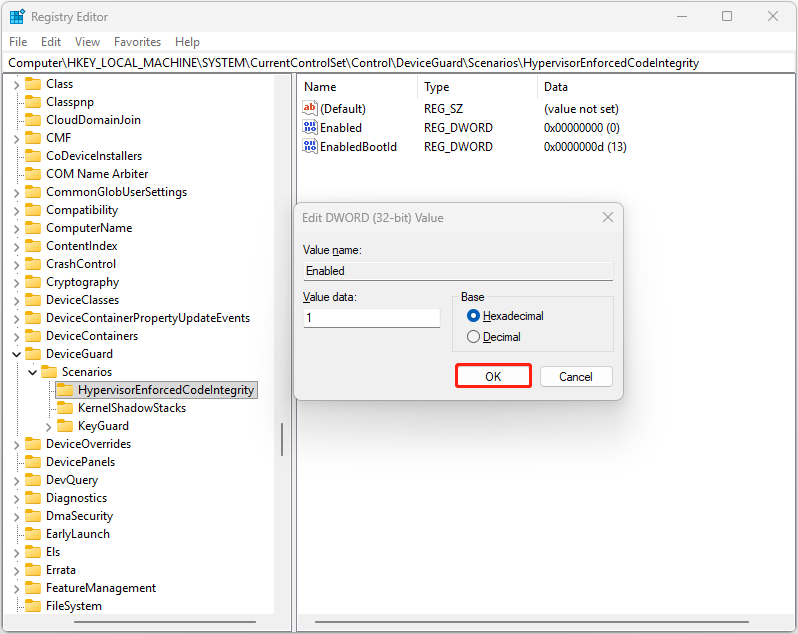
Step 2. In Registry Editor, navigate to this path: HKEY_LOCAL_MACHINE\SYSTEM\CurrentControlSet\Control\DeviceGuard\Scenarios
Step 3. Right-click Scenario and select New > Key, name it HypervisorEnforcedCodeIntegrity.
Step 4. Right-click the newly created key, choose New > DWORD (32-bit) Value, and then name it Enabled.
Step 5. Double-click the Enabled value, set the Value data to 1, and then click OK to save the change.
Step 6. Restart your PC. Then, Core isolation is enabled successfully.
How to Fix Common Core Isolation-Related Issues
You may encounter problems when enabling or using Core isolation. Below are the most common issues and practical solutions.
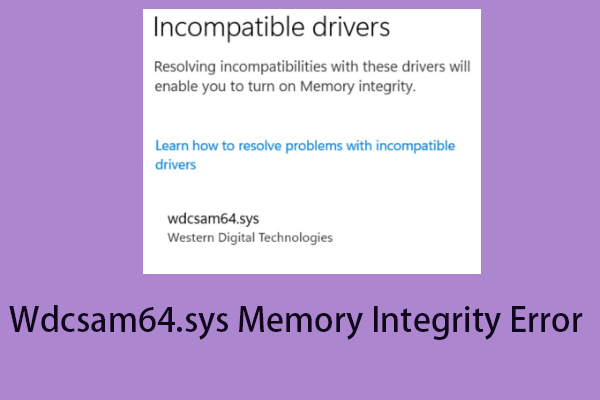
Incompatible Drivers
Incompatible drivers in Core Isolation appear when Windows detects kernel-mode drivers that do not meet security requirements. This usually occurs during system updates, driver installations or updates, or when enabling Memory integrity in Windows Security.
To fix this issue, take the following steps:
- Identify the Incompatible Driver: Go to Windows Security > Device security > Core isolation details. Then, click Review incompatible drivers. Note the driver’s name and path.
- Update the Driver: Go to the manufacturer’s official website, download the latest and compatible driver.
- Remove the OEM Driver Package via PowerShell: Open PowerShell as Administrator. Run pnputil /enum-drivers to list drivers. Next, identify the oemxx.inf file associated with the incompatible driver. Then, run pnputil /delete-driver oemxx.inf /uninstall.
- Remove Hidden Devices: Open Device Manager, click View > Show hidden devices, check for yellow warning icons, and uninstall broken drivers.
- Clean Boot: If you cannot identify the software, perform a clean boot to see if a third-party service is the cause.
If the incompatible driver isn’t essential, uninstall the driver.
To know more about this issue, refer to the Memory Integrity Incompatible Drivers Guide.
Performance Reduction
If you find a performance reduction after enabling Core isolation, the most effective solution is to disable Memory integrity. In addition to that, try the following tips to fix this issue:
- Update Device Drivers: Incompatible or outdated drivers can cause conflicts when Core isolation is on. Thus, check for updates of your drivers. If there are available updates, install them.
- Use Group Policy: If the Memory integrity setting is grayed out, open Group Policy Editor, navigate to Computer Configuration > Administrative Templates > System > Device Guard, double-click Turn on Virtualization Based Security, select Enabled, click Apply, and OK. Next, restart the PC.
- Check for Malware: If malware is interacting with the kernel, Memory Integrity may work harder. Run a full virus scan in Windows Security to fix the issue.
Core Isolation Turned Off by Itself
If Memory integrity is off by itself, it may be caused by various reasons, including incompatible drivers, disabled Virtualization, conflicting software, and corrupted system files.
To troubleshoot this issue, try the following methods:
- Identify and Remove Incompatible Drivers: Go to the Review incompatible drivers page to identify the culprits and update or uninstall them.
- Enable Virtualization in BIOS/UEFI: Restart your computer and enter BIOS. Enable Intel VT-x or AMD-V.
- Run System File Checker (SFC): Run Command Prompt as administrator, type sfc /scannow and press Enter to fix corrupted system files.
- Update or Reinstall Drivers: Open Device Manager, expand the category, and then update or reinstall outdated or incompatible drivers.
- Reset Windows Security App: On Windows 11, go to Settings > System > System components and find Windows Security. Then, click the three dots next to it, click Advanced options, and then click Reset.
- Check for Conflicting Software: Temporarily disable third-party antivirus software to check if they conflict with Core isolation.

Bottom Line
Core isolation is a Windows 10/11 security feature that protects core system processes. Although it enhances security, it may slightly reduce performance in some apps and games.
For data security, it is necessary to back up your important data via MiniTool ShadowMaker before enabling this feature on your PC.
In terms of issues with MiniTool software, contact us at [email protected].
Core Isolation FAQ
1. Performance impact: Shared resources can slow demanding applications.
2. Higher costs: Initial setup can be expensive.
3. Management issues: Improper configurations can cause over-provisioning or under-provisioning, resulting in VM sprawl.
4. Compatibility: Some games or software may conflict.
It may also cause Windows 11 to become unstable or fail to boot, prevent access to encrypted drives (BitLocker), and limit user authentication options.
About The Author

Position: Columnist
Charlotte is a technology columnist with a strong focus on the Windows operating system, specializing in disk management, backup, and data recovery. She is passionate about analyzing computer errors, identifying root causes, and delivering practical solutions. In her free time, she stays updated on the latest developments in computer systems and hardware while continuously learning new technologies to broaden her expertise. Her writing style is clear and easy to understand, making complex technical topics accessible even to users with limited computer knowledge.
User Comments :