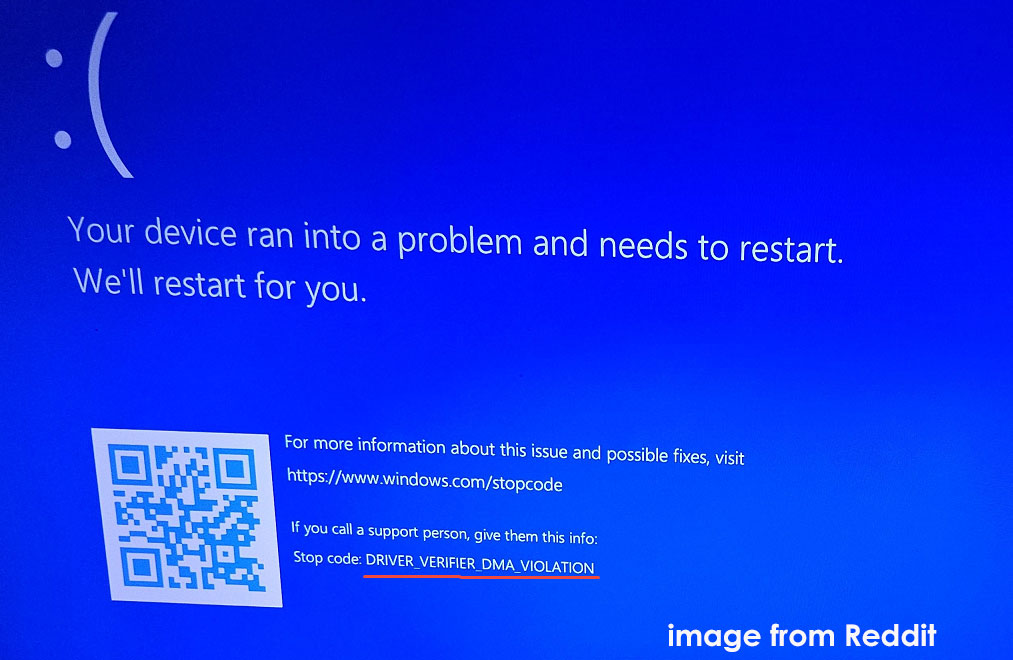
What Does DRIVER VERIFIER DMA VIOLATION Mean
The computer screen may display a stop code: DRIVER VERIFIER DMA VIOLATION or DRIVER_VERIFIER_DMA_VIOLATION during Windows 11/10 startup.
If you restart the system, Windows may load correctly and access the desktop. In some cases, the device may get stuck in the BSOD loop.
What does the DMA error mean?
This blue screen error signifies that a driver has attempted to illegally access system memory using Direct Memory Access (DMA). Meanwhile, this behavior is being monitored by the Driver Verifier tool.

What Causes DMA Violation Blue Screen of Death
BSOD DRIVER VERIFIER DMA VIOLATION can be caused by various reasons, as follows:
- Problematic drivers: This error typically points to a corrupted, outdated, or incompatible hardware driver, especially after a recent update or hardware change.
- Incompatible third-party software: It may install low-level drivers that can conflict with the system.
- Driver Verifier configuration: The Driver Verifier tool, which monitors driver behavior, found the illegal DMA operation.
- BIOS/Firmware issues: An outdated BIOS or SSD firmware can trigger conflicts, leading to the DMA error.
- Corrupted system files: Damaged Windows system files can prevent drivers from performing DMA operations correctly.
- Hardware issues: Incompatible devices or faulty hardware may attempt to bypass DMA rules, resulting in the DMA Violation blue screen error.
Rescue Files Beforehand
A BSOD loop is a persistent crash that may cause potential data loss or corruption. Therefore, we highly suggest that you back up important files before fixing the DMA error.
Additionally, some fixes below, like Windows resetting and BIOS & SSD firmware update, can erase data. So, it is recommended to back up files as a precaution.
As for data backup, you may look for professional backup software. Now, MiniTool ShadowMaker is worth trying.
Specializing in backup and recovery solutions, the all-in-one backup program supports disk/partition/system/folder/file backup and quick disaster recovery.
Even when you are getting overwhelmed by DRIVER_VERIFIER_DMA_VIOLATION, you can use the utility to rescue your important data via its bootable edition. By creating a bootable drive/disc to boot the PC and entering the MiniTool recovery environment, data backup becomes easier.
MiniTool ShadowMaker TrialClick to Download100%Clean & Safe
Step 1: On a working PC, launch MiniTool ShadowMaker, and register it using a license key.
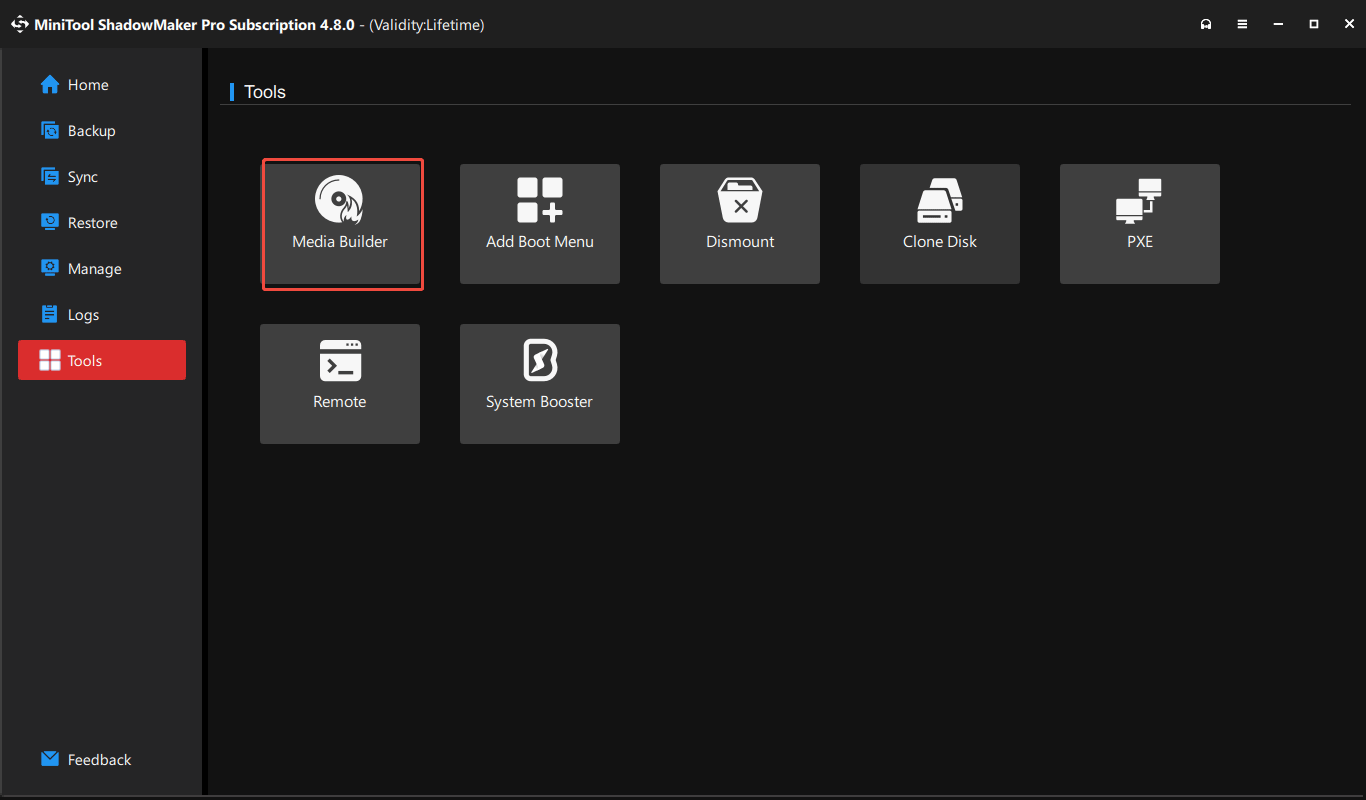
Step 2: Head to its Tool page and hit Media Builder. Then, follow the prompts to create a bootable USB drive or CD/DVD.
Step 3: Connect an external drive to the unbootable PC to save the backups.
Step 4: Restart the system, press F2, Del, or the key specified by your manufacturer to enter the BIOS menu, and set the machine to boot from the bootable drive/disc.
Step 5: Launch MiniTool ShadowMaker Bootable Edition in the MiniTool recovery environment.
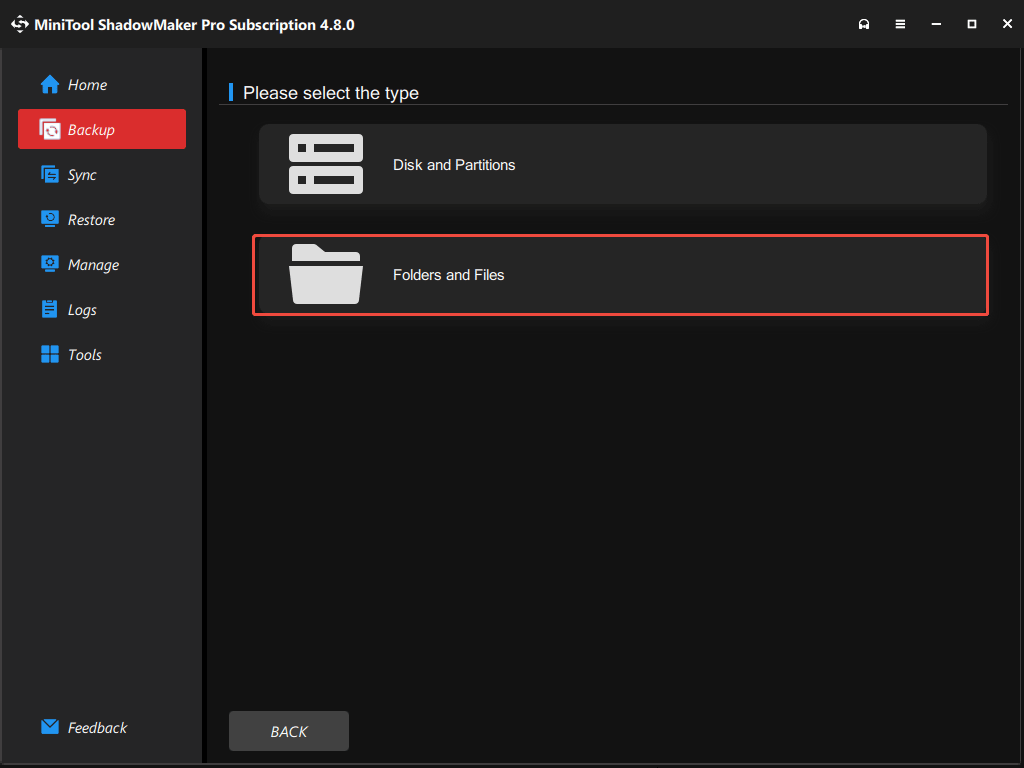
Step 6: Under the Backup tab, hit SOURCE > Folders and Files, choose the files you want to back up, and click OK.
Step 7: Select the external drive to store the backed-up data by hitting DESTINATION.
Step 8: Begin data backup by hitting Back Up Now.
After keeping data safe, it’s time to address your issue.
How to Fix DRIVER VERIFIER DMA VIOLATION Windows 11/10
To solve the BSOD stop code, the most effective steps include disabling Driver Verifier, updating drivers, uninstalling installed software, and repairing corrupted system files. If this issue persists, you can check for hardware problems and clean install Windows 11/10.
Let’s check out how to fix DRIVER_VERIFIER_DMA_VIOLATION.
#1. Disable Driver Verifier
Driver Verifier, a built-in Windows tool that monitors and stresses device drivers, can detect improper behaviors that may corrupt the system.
According to Microsoft, you should only run this tool on computers that are used for testing and debugging, rather than a daily-use PC. Otherwise, this can cause the computer to crash, even if the driver itself isn’t broken.
By disabling Driver Verifier, BSOD DRIVER_VERIFIER_DMA_VIOLATION may go away.
Step 1: In the Search box, type cmd, and hit Run as administrator.
Step 2: Type verifier /reset in the Command Prompt window and press Enter.
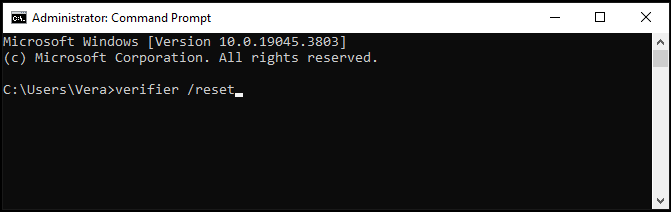
Step 3: Check the sequent message that the command returns.
- The operation completes successfully: This means the tool has been disabled. You can restart the system to check if the Windows stop code still occurs.
- No settings were changed: It indicates Driver Verifier was not active on your computer. It is not the culprit behind the blue screen issue. To solve your error, try the other fixes below.
#2. Update or Roll Back Problematic Drivers
As we stated, the Windows stop code DRIVER VERIFIER DMA VIOLATION has to do with a driver. It may be outdated or incompatible, so make sure the driver is in top shape.
Update the Driver
Step 1: Press Win + X to open the Start menu and choose Device Manager.
Step 2: Look for any devices that have an exclamation point or a yellow triangle. Then, right-click on them one by one and select Update driver.
Step 3: Hit Search automatically for drivers to begin the update.
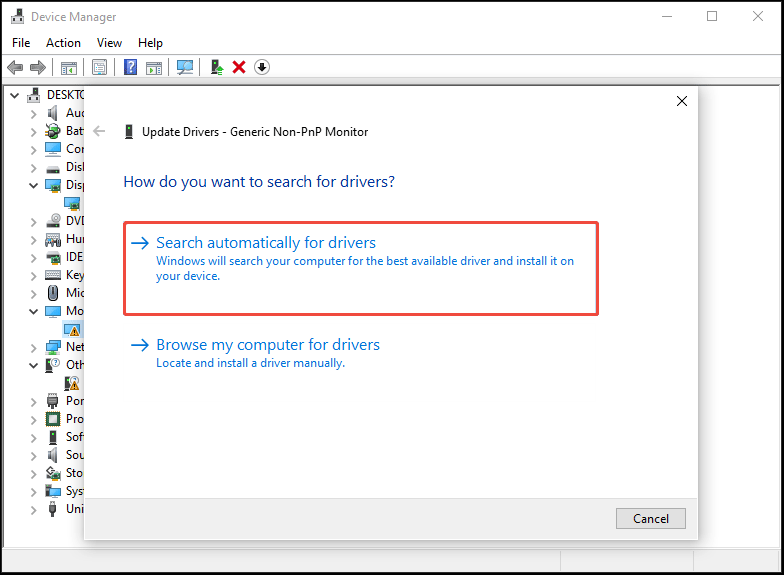
After that, restart the computer and check if the blue screen loop disappears.
If not, try to roll back the driver. The new driver may be the issue if you recently updated a driver and the blue screen error started occurring.
Roll back the Driver
Step 1: Open Device Manager, right-click the problematic device, and choose Properties.
Step 2: Under the Driver tab, click Roll Back Driver and finish the operation by following the prompts.
#3. Uninstall Recently Installed Software
The DMA BSOD error may appear on the screen during startup if you have installed new software. In this case, uninstalling it can be your best bet.
Here is how you uninstall software:
Step 1: Open Control Panel via Search and set View by to Category.
Step 2: Hit Uninstall a program under the Programs section.
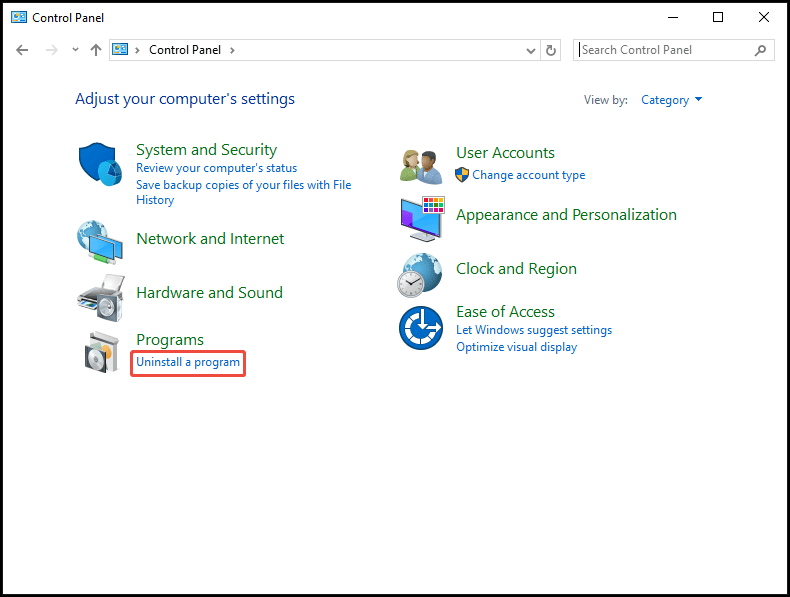
Step 3: Right-click on the recently installed program and select Uninstall.
#4. Run SFC and DISM Scans
Sometimes, corrupted system files may stop a driver from performing a valid DMA operation correctly, resulting in the DMA BSOD stop code. Running SFC and DISM scans are essential to detect any corruption and fix these damaged system files.
Follow the tutorial:
Step 1: Launch an elevated Command Prompt in Windows 11/10 Safe Mode via Search.
Step 2: To run an SFC scan, type sfc /scannow and press Enter to begin the verification.
The scan verifies the integrity of Windows system files by comparing them to a cached copy and then repairs the corruption it finds.
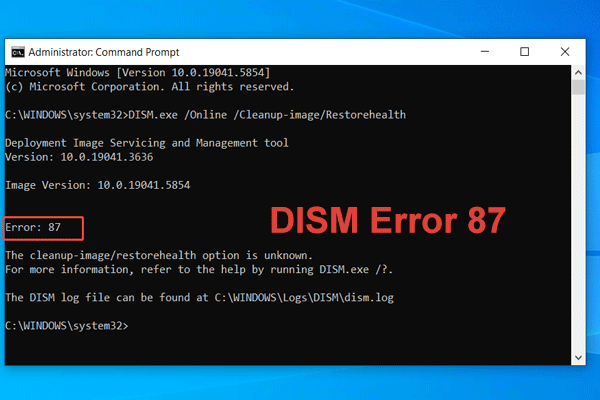
Step 3: Implement a DISM scan by typing DISM /Online /Cleanup-Image /RestoreHealth and pressing Enter.
DISM scans a Windows image for corruption and connects to Windows Update to download & replace any damaged, corrupted missing files. It will take several minutes.
Once completed, restart your computer and see if this method resolves DRIVER_VERIFIER_DMA_VIOLATION.
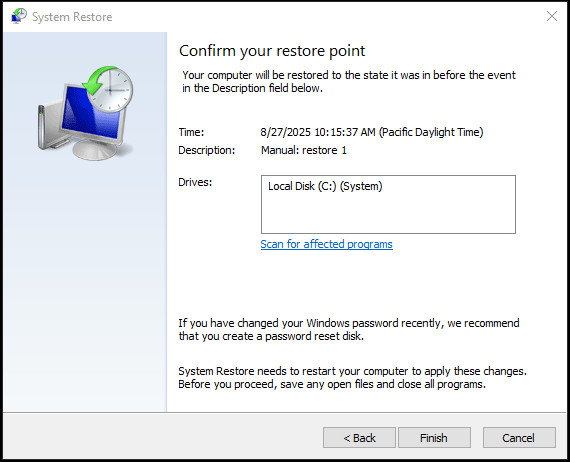
#5. Perform a System Restore
Windows will automatically create restore points before installing a Windows update, program, or driver, or on a regular schedule. Check if there is an available restore point to restore the PC to the state before the BSOD error occurred.
Take these steps:
Step 1: Press Win + R to open Run, type rstrui.exe, and click OK.
Step 2: When you open the System Restore window, click Next.
Step 3: Check the date and time to pick a proper restore point from the list.
Step 4: Hit Finish > Yes to start the system restore.
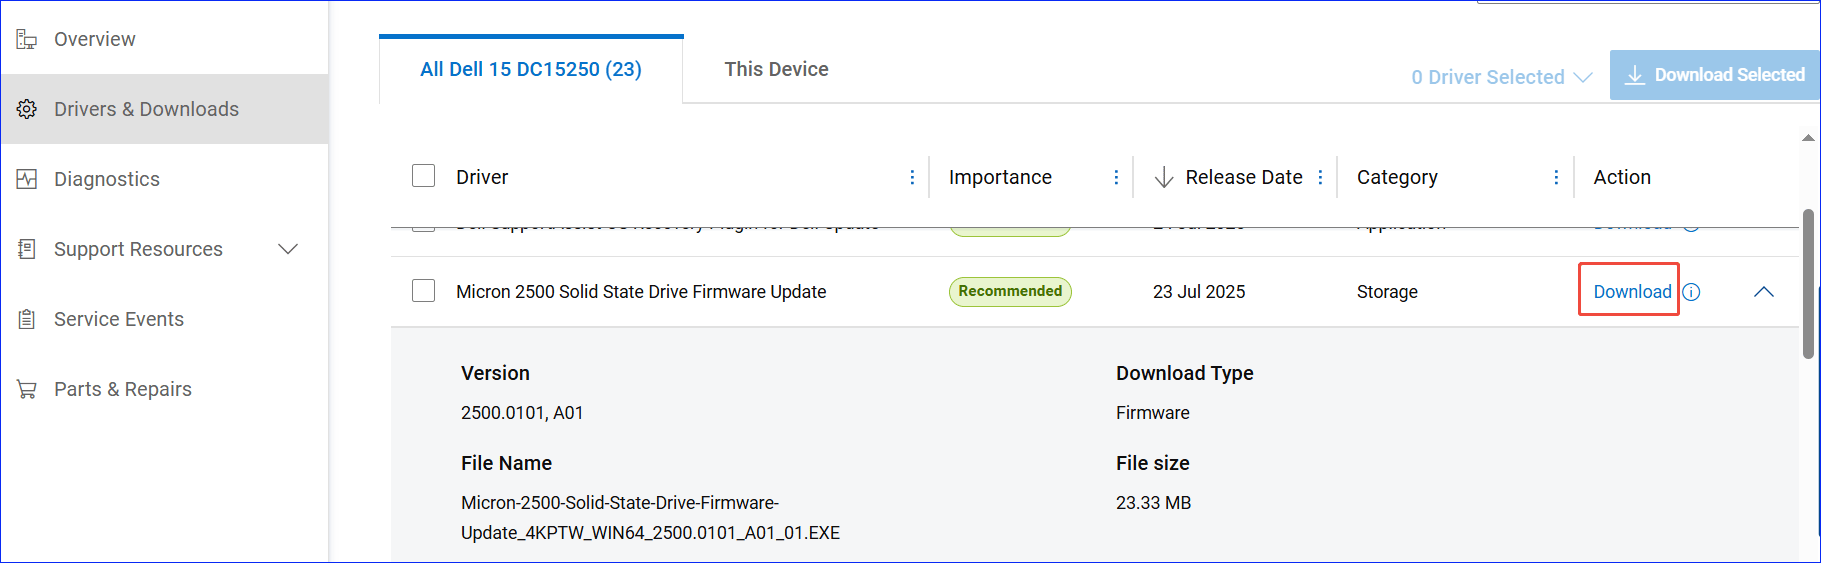
#6. Update SSD Firmware
An outdated firmware can be another culprit of Windows 11/10 DRIVER_VERIFIER_DMA_VIOLATION. If you use an SSD as the primary drive on your PC, you should consider upgrading the SSD firmware.
Be extra careful! Now take these steps:
Step 1: Identify your SSD model by going to Device Manager > Disk drives.
Step 2: Go to the SSD manufacturer’s support website and download the update tool, such as Samsung Magician, Crucial Storage Executive, or Kingston SSD Manager.
Step 3: Run this utility to check for and install the latest firmware.
If there is no dedicated update tool, you can directly download the SSD firmware update file from the official website. Then, run it for the update.
#7. Check for Faulty Hardware
BSOD DRIVER VERIFIER DMA VIOLATION is sometimes attributed to a hardware problem, especially a faulty RAM. We recommend running a memory check.
Step 1: Type Windows Memory Diagnostic in Windows 11/10 Search and press Enter.
Step 2: Click the first option to restart the PC to check for errors at once.
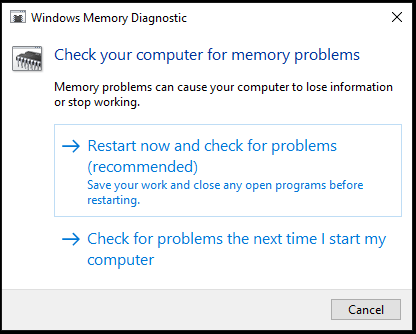
This tool begins detecting your RAM, and you can view the results in Event Viewer.
If the RAM stick is faulty, replacing it with a new one can do the trick.
#8. Disable Kernel DMA Protection in BIOS
As Microsoft describes, if the Kernel Direct Memory Access (DMA) Protection feature is enabled, the system may throw the blue screen error: DRIVER_VERIFIER_DMA_VIOLATION (e6). Usually, this error occurs in Windows Server 2019 or Windows 10, version 1803 and later.
When PCI devices installed in an external chassis attempt Direct Memory Access, this Windows stop code appears.
To resolve this issue, disable Kernel DMA Protection in BIOS.
#9. Update BIOS
An outdated BIOS can give rise to compatibility issues between the hardware and Windows 11/10, triggering DRIVER VERIFIER DMA VIOLATION. To fix the blue screen error, we advise that you upgrade the BIOS to a newer version.
A BIOS update is a relatively risky procedure. Thus, you should be cautious.
Here is a simple guide:
Step 1: Visit your manufacturer’s website and download the latest BIOS version.
Step 2: Copy the downloaded file to a USB stick and insert the drive into your computer.
Step 3: Access the BIOS menu by pressing F2, Del, or another boot key depending on your device model.
Step 4: Launch the BIOS update tool like M-Flash, choose the BIOS file from the USB drive, and begin the update.

#10. Reset/Reinstall Windows
The last resort is to reset or reinstall Windows if the fixes above fail to fix your issue. Before proceeding, use MiniTool ShadowMaker to create a backup for your important data.
Then, boot the system to WinRE, go to Troubleshoot > Reset this PC, and follow the on-screen prompts to finish PC resetting.
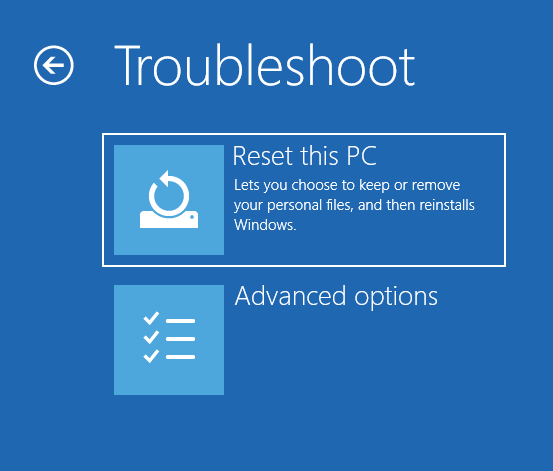
Or, create a bootable USB drive for Windows 11/10 and clean install the system from that drive.
In our guide on how to reinstall Windows 11, you can find detailed steps.
Bottom Line
What is DRIVER VERIFIER DMA VIOLATION? Why does it occur? How to fix the BSOD error? In this comprehensive guide, you can easily find what you need.
By trying these methods, such as disabling Driver Verifier, updating drivers, running SFC & DISM scans, updating BIOS & SSD firmware, and more, your PC can boot correctly.
By the way, in terms of any issues with MiniTool software, feel free to contact us at [email protected].
DRIVER VERIFIER DMA VIOLATION FAQ
1. Disable Driver Verifier
2. Update drivers and BIOS
3. Repair system files
4. Perform a system restore
5. Uninstall recently installed software
1. Update device drivers
2. Uninstall recent software
3. Update BIOS
4. Repair damaged system files
5. Run a clean boot
6. Update SSD firmware
About The Author

Position: Columnist
Vera has been working at the MiniTool Team for over 10 years as a technical editor and content writer. She mainly focuses on disk and partition management, data recovery, Windows backup and restore, and PC troubleshooting. Through in-depth software testing and hands-on experience, she has helped users solve a wide range of computer problems and better protect their data on Windows devices.
User Comments :