How to safely dual boot Windows 10 and Windows server? You may want to handle your work separately on two operating systems. Dual boot is the solution that can help you run tools in other operating systems or create a separate environment to handle your work. This article on MiniTool Website will give you a full guide.
Dual boot is an environment where you can run two operating systems on one PC, such as:
- Windows 10 and Windows server Dual Boot
- Windows 11 and Linux Dual Boot
- Windows 10 and Windows 11 Dual Boot
- Chrome OS and Windows 10 Dual Boot
There are more choices you can organize. It is suitable for many situations when you are prone to tackle works that require different operating systems; when you need to use specialized programs or want to try more experimental operating systems without sacrificing your computer usability.
Dual boot needs enough space for the installation and sometimes you may accidentally make wrongs leading to serious issues. Some risks are demanding our attention, so how to safely dual boot windows 10 and windows server?
How to Safely Dual Boot?
Now, you have understood the potential risks behind the dual boot. Before you start installing the Windows server on Windows 10, you can make some preparations to minimize the risks – back up in advance.
Part 1: Back up in Advance
MiniTool ShadowMaker, a well-known backup program, has been working in this field for many years and won a reputation for its expertise. It is worthwhile to make it your backup guarantee.
First of all, download MiniTool ShadowMaker, and you can get a trial version for free.
MiniTool ShadowMaker TrialClick to Download100%Clean & Safe
Step 1: Click Keep Trial on the top right corner when you open the program.
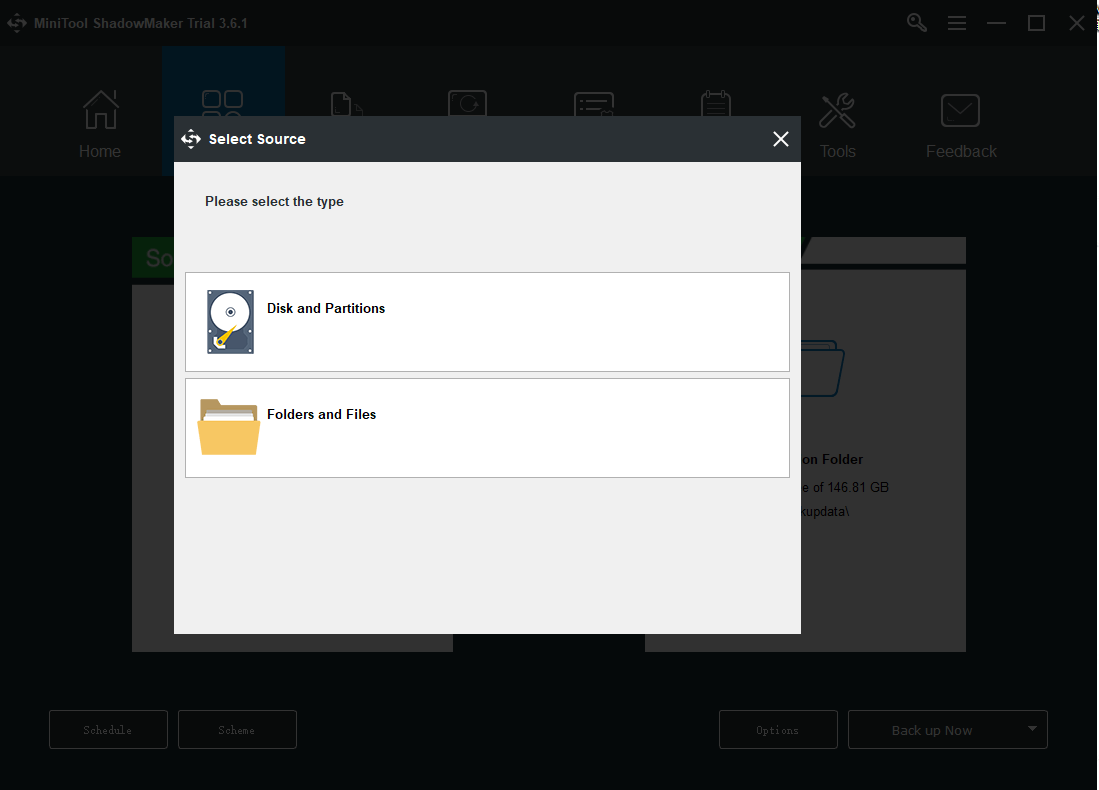
Step 2: Switch to the Backup tab and click Disk and Partition. Here, you can select your backup source, including system, disk and partitions, and folders and files, in which the system is set by default.
Step 2: Go to the Destination Folder part where you can see four options containing the Administrator account folder, Libraries, Computer, and Shared. Choose your destination path.
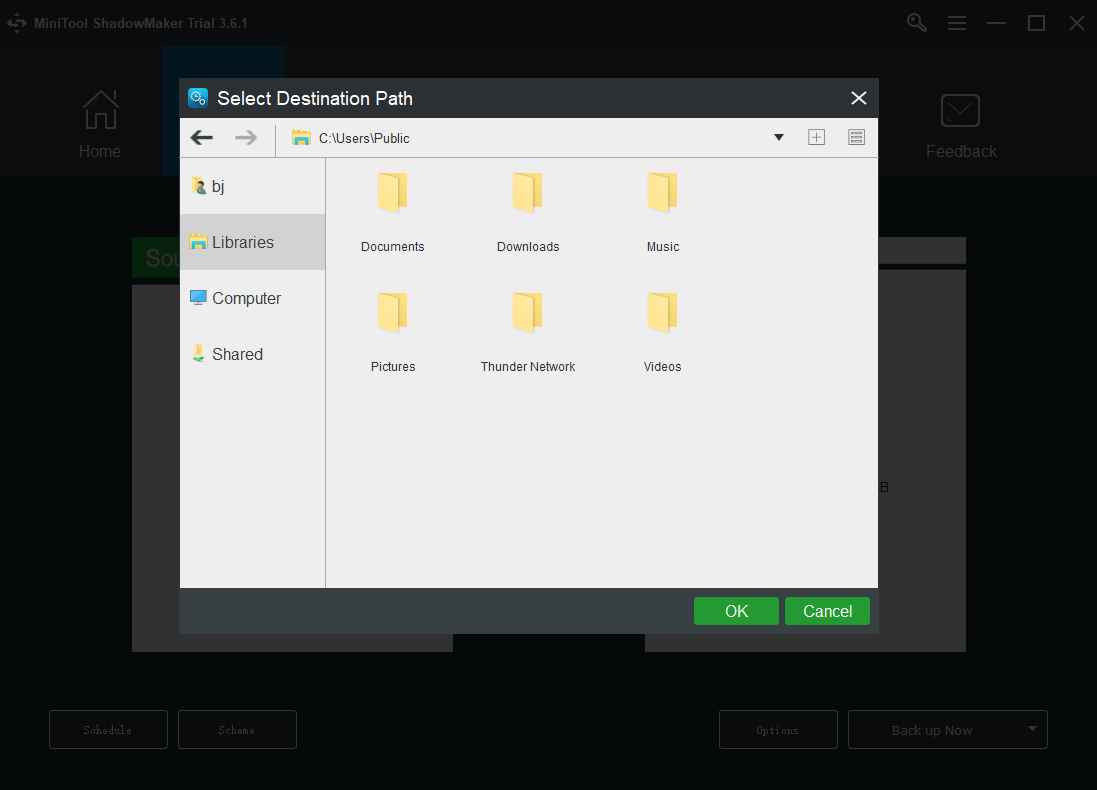
It is recommended to back up to your external hard drive.
Step 3: Click the Back up Now option to start the process immediately or the Back up Later option to delay the backup. The delayed backup task is on the Manage page.
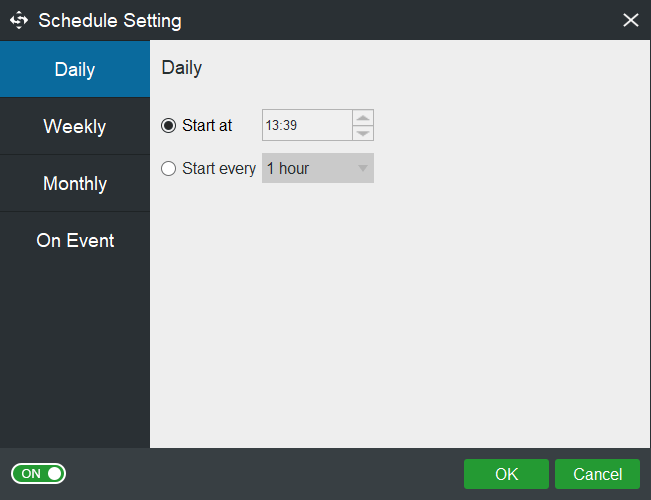
Apart from that, you can also enjoy other features to improve the backup experience, such as the Schedule feature and Scheme feature.
It is a good habit to back up at a scheduled time. If you often forget to do your backup task, MiniTool ShadowMaker can help you resolve this concern.
It has developed the Schedule option that can do your backup automatically as you want as long as you configure your backup schedule as once a day, a week, a month, or on an event.
Another feature is the scheme that allows you to design your backup scheme, including full, incremental, and differential backup.

At the same time, it also provides more options to choose from. You can carry on an encrypted backup or compress your backup to save some space, etc.
Part 2: Dual Boot Windows 10 and Windows Server
Preparations:
- Make sure you have enough hard drive space.
- Preparing separate drives will be the best, if you have not, two partitions on the same hard drive are OK. Two different drives can make the installation easier and if one crashes, the other one can be saved.
- Check if the main operating system is running in BIOS or Legacy mode but not UEFI.
- Create ISO image files or installation media for Windows 10 and the Windows server. You can download the ISO files on the Microsoft website and make a bootable USB drive with Rufus.
You will install Windows 10 as the main operating system and Windows Server as the second operating system.
Point 1: Create bootable USB drives
Step 1: Download the Windows 10 ISO file (if you have not installed any system) and Windows server ISO file on their official website.
Here, you can use two different external drives to save their ISO files.
Step 2: Download and install an ISO burning tool – Rufus from its official website.
Step 3: Open this program and connect your external drive to your computer.
Step 4: Choose the ISO file as your boot selection and set the partition scheme as GPT.
Step 5: Click START.

Point 2: Install the operating system
If you have no operating system installed or want to install a fresh multi-boot setup, you need to follow this point.
Step 1: Connect your installation media with Windows 10 to your PC.
Step 2: Open your PC and enter BIOS to set the installation media as your boot device. In this process, you can follow the instruction on the BIOS to modify the boot order.
If you have problems with this step, you can refer to this post: Top 4 Fixes for Boot Device Not Found Issue in Windows 10/8/7
Step 3: And then you will enter the Windows Setup. Choose your language, time and currency format, and Keyboard or input method to continue and click Install now.

Step 4: Choose I don’t have a product key and then click Next.
Step 5: Choose an edition of Windows from the list and then your installation type as Custom: Install Windows only (advanced).
Step 6: When you reach the disk selection screen, if you use the same drive for both OS, please create a partition 1 for your main system and leave your second one enough space in which you should create a second partition for the dual boot operating system.
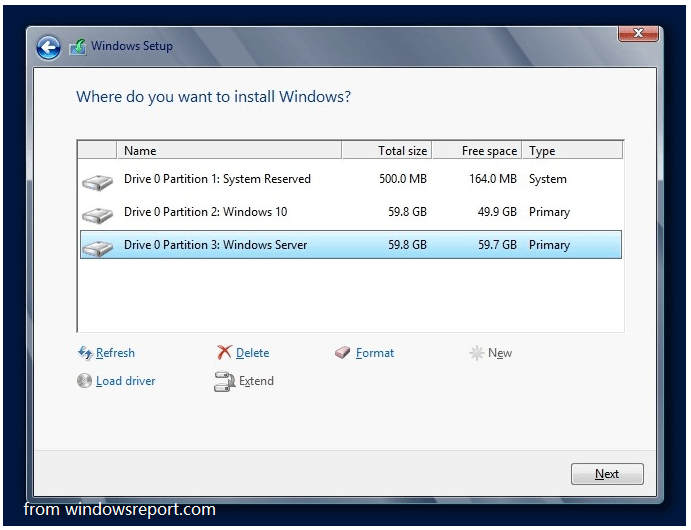
Step 7: Just select partition 1 to install your main Windows.
After finishing that, the installation will begin. Just wait for a minute, you need to follow the instruction on the screen to design some settings, such as PC name, region, pin, and something else.
Point 3: Narrow the main operating system partition
If you already have a single partition with the main operating system but no second drive or partition for the second operating system, you need to shrink the main operating system partition to leave enough space for a new one.
Step 1: Press R and Windows keys at the same time to open the Run dialogue.
Step 2: Input diskmgmt.msc to open Disk Management.

Step 3: Right-click on your OS partition and click Shrink Volume….

Step 4: Right-click on the new unallocated space and click New Simple Volume….

Step 5: Click Next in the next pop-up windows.
Step 6: In the Format Partition window, format it as NTFS and label it so you can recognize it easily when installing the second operating system. Then click Finish.

Point 4: Install the second operating system
Step 1: Connect your installation media driver with the Windows server to your PC.
Step 2: Enter BIOS and set this driver as your boot device.
Step 3: Then in the Windows Setup window, choose the partition you have labeled as the destination for your Windows server OS. Just follow the instructions and finish the installation.
Step 4: If you see the interface requires you to choose an operating system, you can choose a Windows server to finish its installation.
When you are done, you can choose which system you’d like to open every time the computer boots.
Some people find that the second OS is set by default. If you want to change the default system, do as follows:
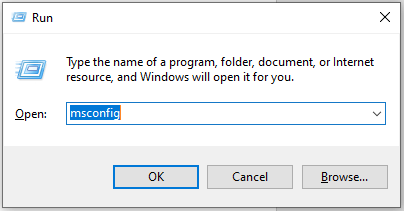
Step 1: Type msconfig in the Run dialogue by pressing the R and Windows keys together and then press Enter.
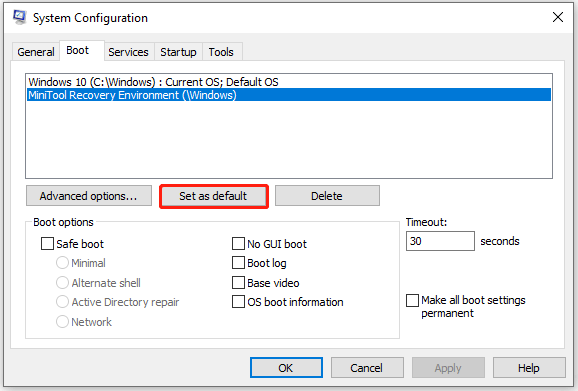
Step 2: In the System Configuration, switch to the Boot tab and select the operating system you want to set as default.
Step 3: Click the Set as default button. Click Apply and then OK.
After that, you have succeeded in creating dual boot Windows 10 and Windows server.
Is Dual-booting a Good Idea?
The dual boot can do much favor for you, but is it safe? Next, you will learn its advantages and risks separately.
Advantages:
1. Eliminates hardware redundancy
Users need to reduce the number of devices they have, saving a lot of money for users.
2. Provide greater software compatibility
The performance of different programs may differ when they are in different systems.
3. Perform better than a virtual machine
These two both can make users run two systems on one PC, so a lot of people will compare them. When running an operating system, the dual boot can make OS more accessible to hardware components, which means it will run faster than the virtual machine.
If you want to know more about the difference between the dual boot and virtual machine, please refer to this article: Dual Boot vs Virtual Machine: Which One Should You Choose?
Risks:
1. Accidental overwriting of your data or OS
This will lead to serious problems. In some cases, you may be able to retrieve part or all of an overwritten file. But it will be impossible to recover overwritten files because the data has been totally destroyed, as the storage space is reused.
2. Affected productivity
3. Locked partition
It may make part of your data inaccessible, precede to causing a booting issue. You need to manage your personal files well and be available.
4. Driver error
5. Windows update in trouble
Updating may rewrite your Master Boot Record (MBR), leading to some problems on your dual-booting computer; even a basic driver update can do so.
You need to make sure that the computer’s boot order is Windows by default and use Windows 10 recovery tools.
Further Reading:
If you worry about the uninstallation of the unwanted system or plan to change to another system, you can go on this reading and learn how to remove your dual boot menu.
Remove Dual Boot Menu
Step 1: Input msconfig in your Run dialogue box.
Step 2: Switch to the Boot tab and select the one you want to remove.
Step 3: Click Delete and then click Apply and OK.

Step 4: Restart your computer and you can check if the system has been deleted.
Bottom Line:
The dual boot has two sides and, indeed, to some extent makes a larger possibility to utilize the operating systems. In this process, you need to pay attention to its downsides. Anyhow, backup first can avoid some accidents happening and act as a lifeline to save your data.
If you have encountered any issues when using MiniTool ShadowMaker, you can leave a message in the following comment zone and we will reply as soon as possible. If you need any help when using MiniTool software, you may contact us via [email protected].
User Comments :