When your Lenovo laptop runs very slowly or encounters some system-related problems and fails to boot, you can choose to factory reset it. How to factory reset Lenovo laptop without password on Windows 7/8/10? This post from MiniTool tells you how to do that.
When you use a Lenovo laptop, you may encounter a corrupted operating system, computer virus, error messages or frequent system outages. Restoring your system to factory defaults is a great way to fix these problems. Then, let’s see how to factory reset Lenovo laptop without password on Windows 10/8/7.
What to Do Before Factory Reset Lenovo Laptop Without Password
Before starting this resetting process, make sure you have backed up all personal data to an external hard drive or USB flash drive. This process will erase everything on your computer, so it’s important not to lose important documents, pictures, and installed applications.
To back up your important data, it’s recommended to use MiniTool ShadowMaker. It’s a professional backup program, which is very easy to use and reliable for system backup, partition backup, disk backup, and the corresponding restoration in Windows 11/10/8/7.
You can download MiniTool ShadowMaker Trial Edition, install it on your Lenovo laptop and back up the system. Then in the event of system corruption, use the system backup to restore your Lenovo laptop to an earlier date.
Here, we will show you how to back up important data with MiniTool ShadowMaker.
MiniTool ShadowMaker TrialClick to Download100%Clean & Safe
Step 1: Install MiniTool ShadowMaker and click Keep Trial.
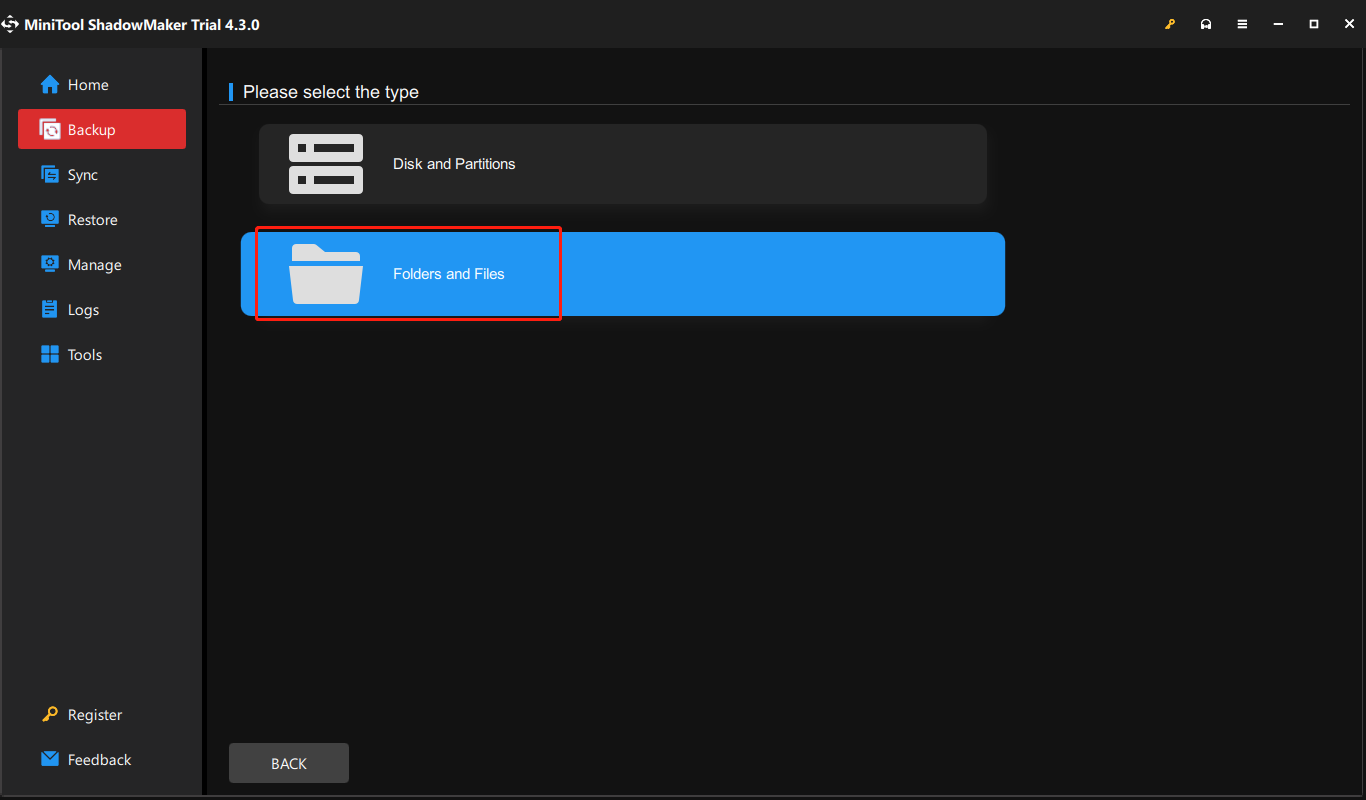
Step 2: On the Backup page, MiniTool ShadowMaker always selects the system partitions in the current OS by default. You need to choose Folders and Files and choose the files you want to back up.
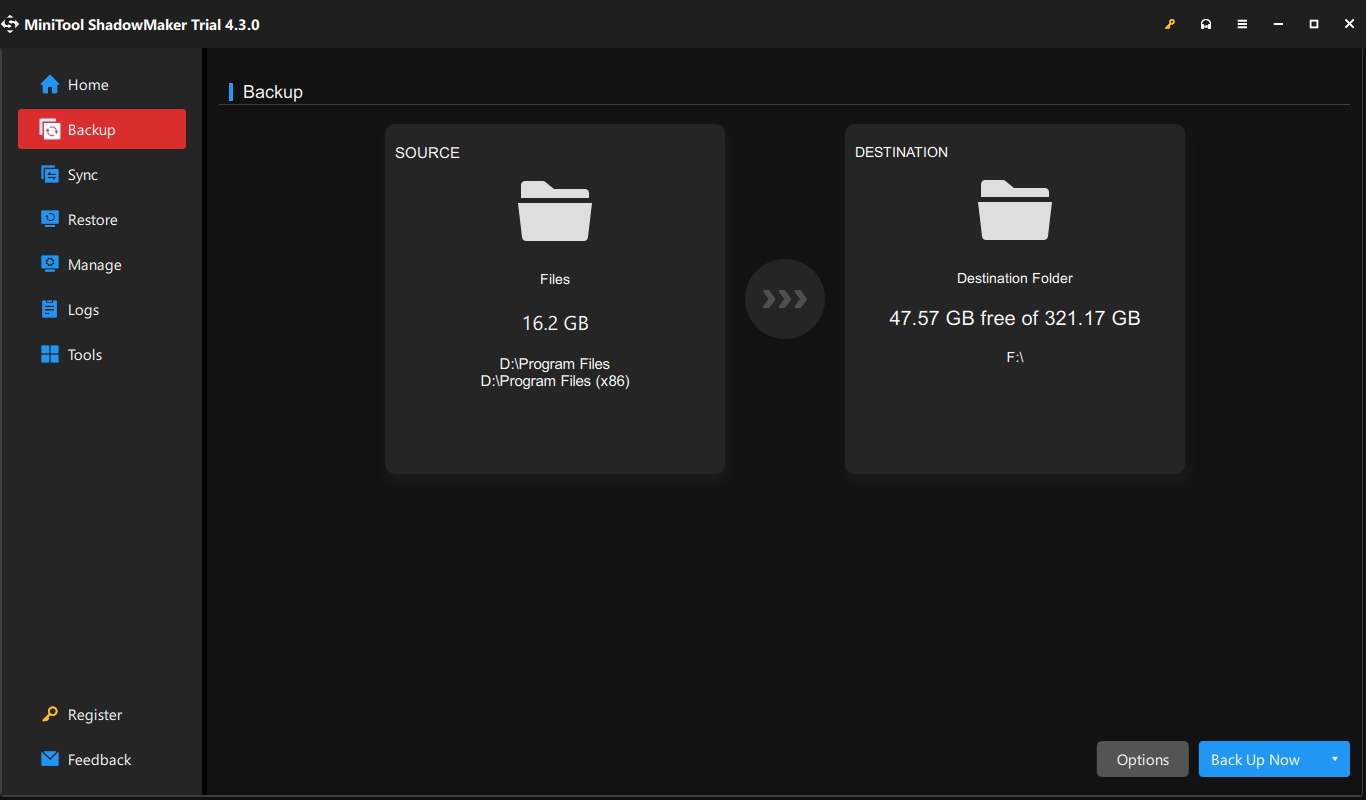
Step 3: Then, click DESTINATION to choose the storage location for the image. You had better choose an external hard drive that can be connected to your laptop via a USB cable.
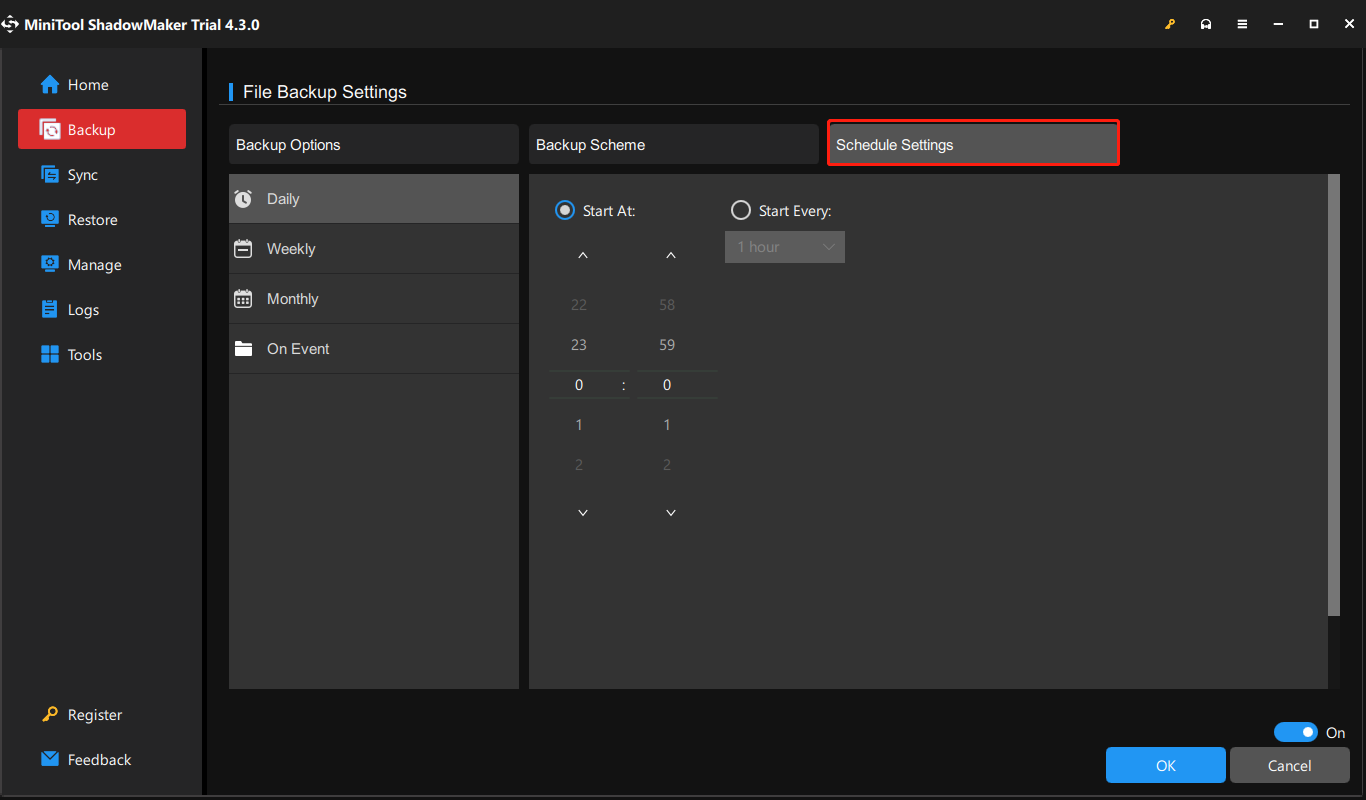
Step 4: From the Backup interface, you can see the Options button. Click it and click Schedule Settings. Then, choose one from Daily, Weekly, Monthly, and On Event.
Besides, this software offers you a Backup Scheme feature, helping create differential backups and incremental backups, as well as disk management when backing up.
Step 5: Please perform the backup image operation by clicking the Back Up Now button. Then you need to wait for a few minutes until the backup operation is completed.
After backing up all files, it is time to factory reset Lenovo laptop without password. And we will show you how to factory reset Lenovo laptop without password with a step-by-step guide.
How to Factory Reset Lenovo Laptop Without Password on Windows 10/8
Way 1: Via Lenovo OneKey Recovery
The Novo button comes with Lenovo Onekey recovery software. This allows you to enter Lenovo OneKey Recovery if your PC fails to boot properly. Here is how to do that:
Step 1: Power off your Lenovo laptop. If you can’t turn off it normally, you can take it out of the battery, and then connect it again.
Step 2: Connect the power source to your Lenovo laptop, and press the NOVO key for 5 seconds. This key is usually on the right/left side of the laptop or at the top of the keyboard near the power button.
Step 3: When the Novo Button Menu pops up, press the down arrow key to select the System Recovery option, and then press Enter to get into the recovery environment.
Step 4: On the OneKey Recovery mode, select Restore from initial backup, and then click Next.
Step 5: Click Start, and click Yes to begin the restoration process when the prompt message pops up.
Step 6: Wait for the system recovery process to complete, and then follow the on-screen instructions to configure your Lenovo laptop Windows settings.
Way 2: Via Boot Screen
If your Lenovo laptop can boot normally and enter the Windows password login interface, you can enter the advanced boot options after booting. Here are the steps on how to factory reset your Lenovo laptop windows 10 from the boot screen.
Step 1: On the Windows 10 login screen, click the Power button. Then, click the Restart option and press the Shift key at the same time.

Step 2: On the Choose an option page, then choose the Troubleshoot option.
Step 3: On the Troubleshoot page, click the Reset this PC option.
Step 4: On the Reset this PC page, there are two options – Keep my files and Remove everything. Here, you need to choose Remove everything since you don’t have your admin password. Otherwise, if you choose Keep my files, you still have to enter your Windows 10 admin password after resetting.
Step 5: Next, choose Cloud download or Local reinstall based on your needs.
Step 6: Then, you need to choose Just remove my files or Full clean the drive. If you want to sell or give away your Lenovo laptop, you had better select Fully clean the drive.
Step 7: Finally, click Reset. Your PC will immediately start resetting itself to factory settings. Just keep your Lenovo laptop on and wait for the reset to complete.
Step 8: Once the reset is complete, you need to follow the on-screen steps to re-set up your Lenovo laptop.
Way 3: Via DVD/USB Bootable Drive
Step 1: Create Microsoft’s media creation tool or Windows 10 iSO file on any working computer.
Step 2: Insert the Windows 10 USB drive to your Lenovo laptop. Start the PC and access its boot menu or BIOS menu to set the PC to boot from the USB.
Step 3: After the Lenovo laptop boots up and displays the Windows Setup screen, choose your language and keyboard, and then click Next.
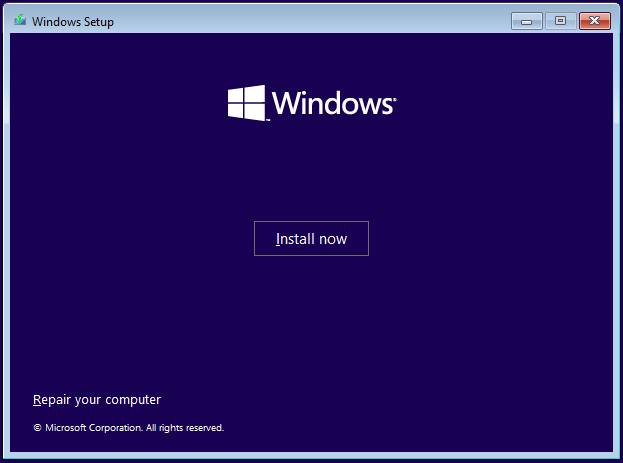
Step 4: On the next page, click Install Now.
Step 5: On the Activate Windows page, click I don’t have a product key.
Step 6: Choose your Windows edition and click Next.
Step 7: Accept the Microsoft software license, and then click Next.
Step 8: Choose which type of installation you want. Choosing the Upgrade option will keep your files including your admin password. You need to choose Custom: Install Windows only (advanced) since you don’t have your admin password.
Step 9: Choose the drive partition where you want to install Windows, and then click Next. Windows will wipe your installation drive and install a fresh copy of the Windows on your computer.
Step 10: Just follow the remaining instructions on the screen, and your Lenovo laptop will restore to a brand-new state, just like when it was factory set.
Way 4: Via Reset This PC in WinRE
Install/repair disks not only help you reinstall/repair your system, but also help you enter the Windows Recovery Environment. The following steps will show you how to use a setup/repair disc to reset your Lenovo laptop to factory settings without a password. Here are the steps:
Step 1: Insert your Windows installation CD/DVD or USB bootable drive to your computer, and start the computer.
Step 2: Enter the BIOS.
Step 3: Then press the right arrow key to select the Boot menu, press the up or down arrow key on the keyboard to choose the DVD or USB flash drive as the boot device, and press + on the keyboard to move the selected boot device on the top of the boot list. Then press Enter to boot the Windows 10/8 laptop.
Step 4: Click Repair your computer. Then, click Troubleshoot on the Choose an option screen.
Step 5: Click Reset this PC on the Troubleshoot screen. There will be two options to choose – Keep my files and Remove everything.
Step 6: Select your Windows system. Select the drive that you will refresh – Only the drive where Windows is install or All drives.
Step 7: There also are two options to choose on the following step – Just remove my files or Full clean the drive. Select one of them according to your need. At last, click the Reset button, this will begin the resetting process.
How to Factory Reset Lenovo Laptop Without Password on Windows 7
For Windows 7 users, you can easily factory reset Windows 7 Lenovo laptop without password with the following steps.
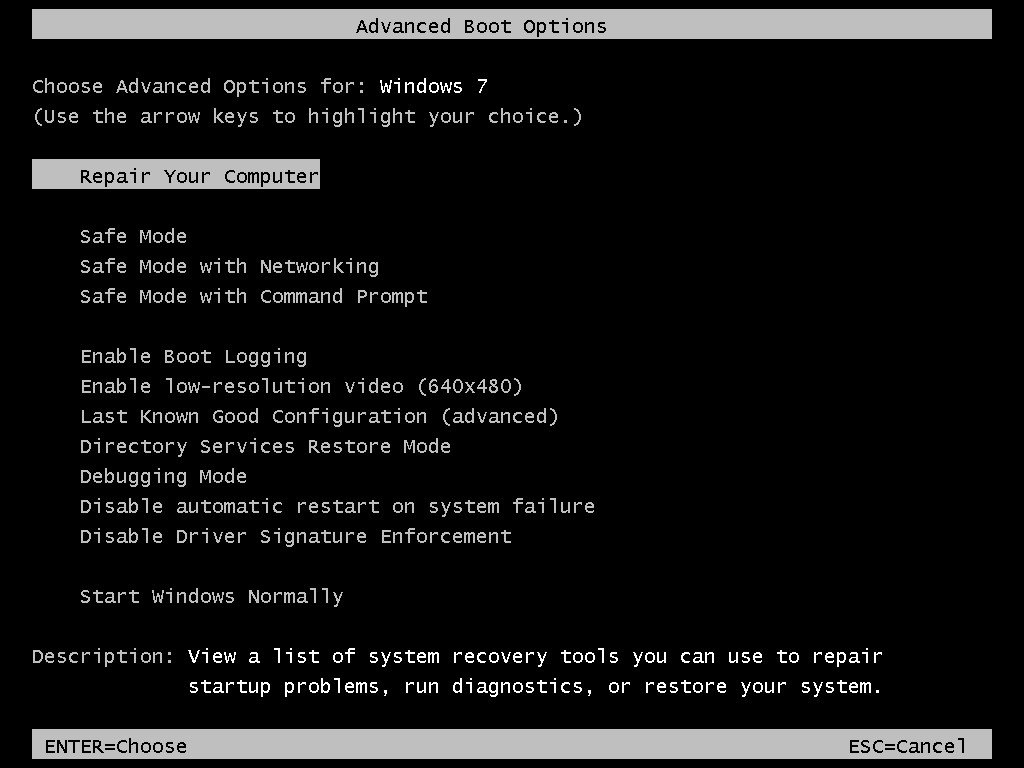
Step 1: Reboot your Lenovo laptop. When the logo comes out on the screen, repetitively press the F8 key until you enter the Advanced Boot Options menu.
Step 2: Select the Repair your Computer option and press Enter. Then the System Recovery Options screen comes up. Later, choose your keyboard’s layout, and click Next.
Step 3: The System Recovery Options window will pop up, click System Restore. Then, it will check the data in your Restore Partition and factory reset Lenovo laptop without password.
Bottom Line
In conclusion, this article has demonstrated reliable solutions to factory reset Lenovo laptop without password. If you need to do that, try these ways. And if you have any better solution to factory reset Lenovo laptop, you can share it in the comment zone. Or if you have any problem with MiniTool ShadowMaker, please contact us via the email [email protected] and we will reply to you as soon as possible.
User Comments :