Are you having trouble with your Surface Pro? Have tried some basic troubleshooting tips but still cannot fix your issue? Microsoft Surface factory reset is the last resort. Well then, how to reset Surface Pro in Windows 10/11? See this post and you can get 3 useful ways to do this work. Also, backing up your data using MiniTool Software before factory resetting is important.
Surface Pro is an ultra-light and versatile 2-in-1 laptop developed by Microsoft. When using a Surface Pro for some time, the machine may go wrong because of some reasons and fail to work. Then, you may choose to use Surface Diagnostic Toolkit to find and fix some problems in some aspects including Windows update, memory, storage, speakers, network connectivity, etc.
If your Microsoft Surface still has troubles, you can reset the machine to its factory defaults. This is a very effective solution. The following is about how to reset a Surface Pro for Windows repair.
Note: Back up Your Data Before Surface Pro Factory Reset
There is one thing you should notice – we are discussing a full reset. This means this behavior could erase all the personal files and restore all the programs and Windows operating system to the out-of-the-box state.
Thus, to make sure there is no data loss, it is essential to back up the important files you want to keep. Or else, you need to begin from scratch.
To create a backup for your Surface Pro, you can ask a professional and free backup software for help. Which one program is worth recommending? MiniTool ShadowMaker can be a good choice.
This backup software can be used on your Windows 11/10/8/7 PC including Surface Pro. With it, you are allowed to create a system image backup, back up your critical files & folders, sync files and folders to other locations, clone your disk to another drive, and more to keep the PC safe.
Besides, MiniTool ShadowMaker allows you to only back up the newly added or changed data at specified time points – that is, incremental or differential backup is also supported by this software. Moreover, you can back up your data automatically using this backup software.
Now, click the following button to download MiniTool ShadowMaker and then have a try to back up your necessary data before you reset Surface Pro.
MiniTool ShadowMaker TrialClick to Download100%Clean & Safe
Step 1: Double-click the MiniTool ShadowMaker icon you have installed on your PC to launch this backup software.
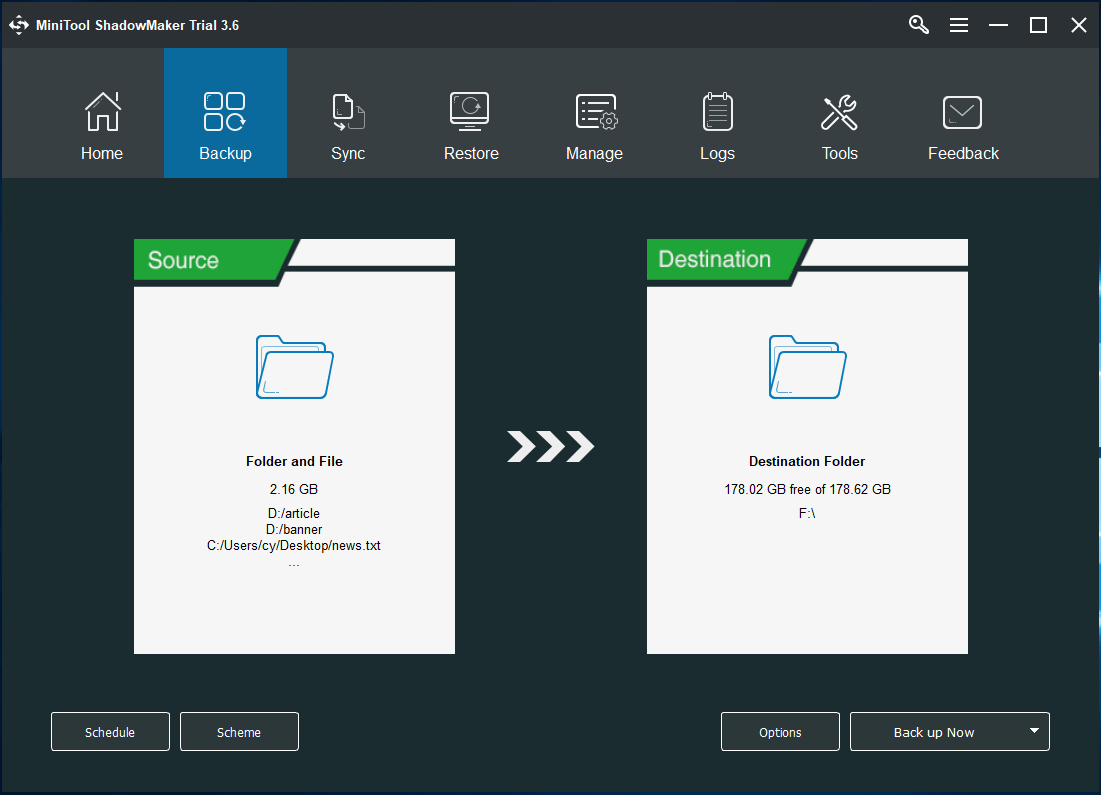
Step 2: Go to its Backup page and you can find this program has selected system-related partitions in the Source section. To back up data, go to choose items that you want to back up by clicking Source > Folders and Files.
Step 3: Choose a target path to store the backed-up files. Usually, an external hard drive or USB flash drive is recommended.
Step 4: Click the Back up Now button to execute the data backup immediately. After a while, the operation is done and you can go to have a check in Manage.
So far, your important files are backed up and now it is time to perform a Surface Pro factory reset. How to factory reset your Microsoft Surface in Windows 10 or 11? Follow these methods below to easily do this work and let’s go to see them.
3 Ways to Reset Surface Pro on Windows 11/10
Surface Pro Reset via Windows Settings
Microsoft offers you a simple way to perform Surface Pro factory reset in Windows 10 or 11 and it is using Windows Settings. This way is only applicable to Windows that can boot normally.
Windows 10
Step 1: Click the Start button and choose Settings to open the Settings app.
Step 2: Click Update & Security.
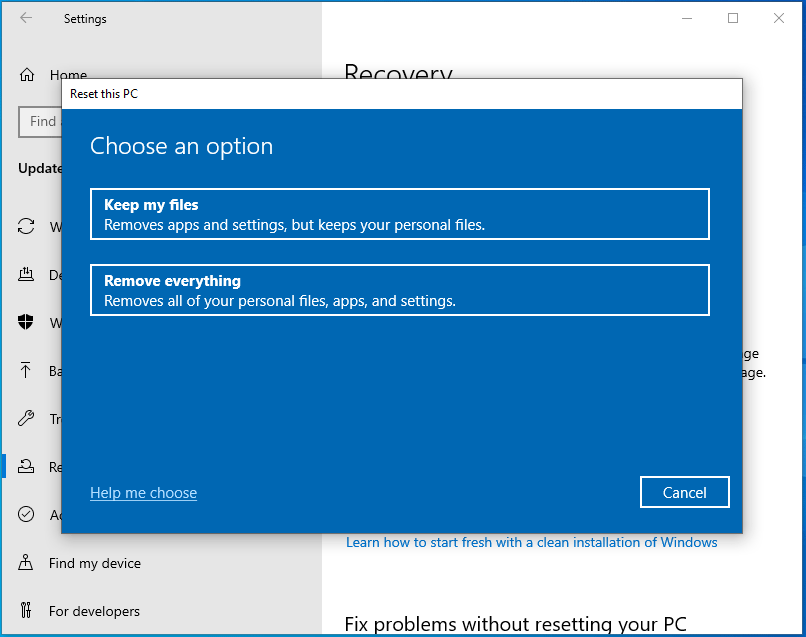
Step 3: Click the Recovery tab from the left side and then click the Get started button under the Reset this PC section.
Step 4: On the screen, you see a pop-up window that shows two options – Keep my files and Remove everything.
The first option can help you save all your account files and folders but you need to reinstall all software other than the pre-installed programs.
The second option can remove all of your personal files, apps, and settings. Just choose one option to reset your Surface Pro.
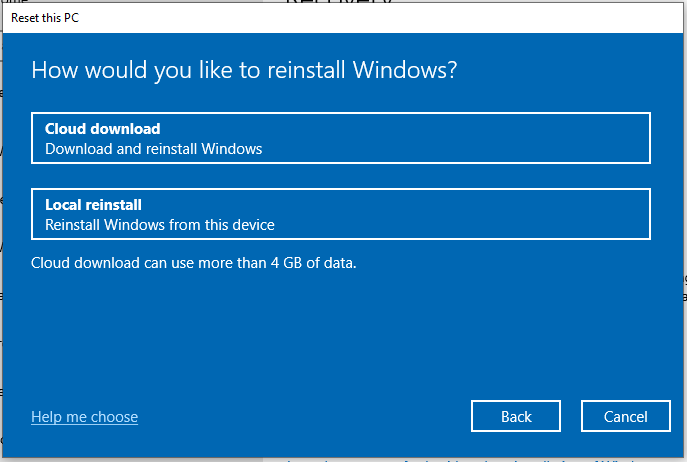
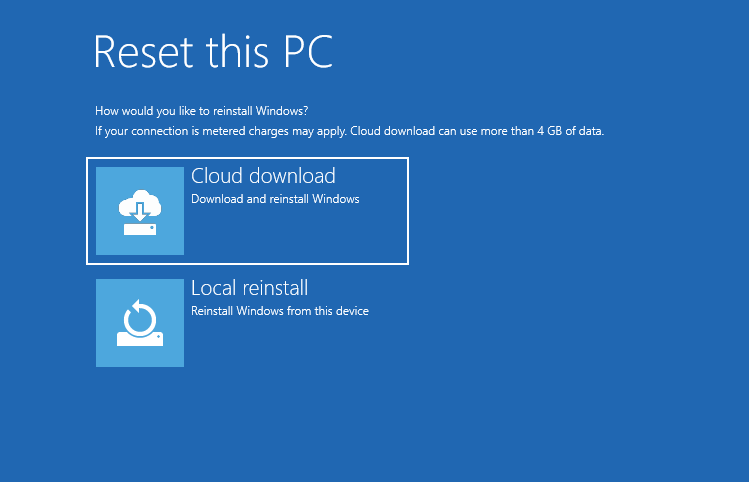
Step 5: You can see the following window. Which one should you choose? If you choose Cloud download, Windows will download everything it needs from Microsoft servers. Although your local copy is old, it will download the latest version. An Internet connection is required.
Local reinstall helps you to get the content required for the installation locally. If your Windows get corrupted, Windows cannot reinstall the system via this option. Just make your selection when you decide which one is right for you.
Step 6: Follow the on-screen instructions to finish the Microsoft Surface reset.
Windows 11
Windows 11 is a brand new operating system that brings a new user interface and Windows Settings are different from Windows 10. So, the steps to reset Surface Pro via Settings in Windows 11 differ from Windows 10. Let’s go to see the details.
Step 1: Press Win + I to get the Settings app. In this post – Windows 11 New Settings: How to Open it? | How to Use It, you can find some other ways.
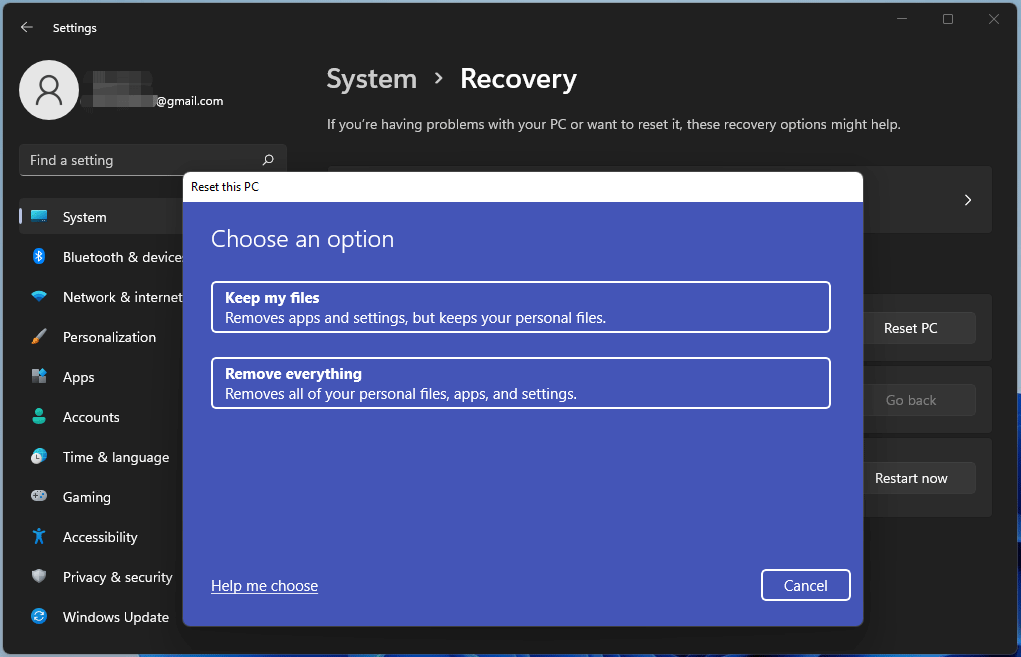
Step 2: In the System page, click Recovery and scroll down & click Recovery options.
Step 3: Click the Reset PC button under the Reset this PC section.
Step 4: You are asked to choose an option to reset your Surface Pro. To keep your files, choose the first option. To perform a full factory reset, Remove everything is recommended.
Step 5: Also, you need to decide how you want to reinstall Windows – Cloud download or Local reinstall. Then, finish the Surface Pro reset by following wizards on the screen.
Reset Surface Pro in Windows Recovery Environment (WinRE)
If your Surface Pro cannot boot properly to the desktop, how can you reset it to factory settings in Windows 11 or 10? The operation is very easy and let’s go to see what you should do.
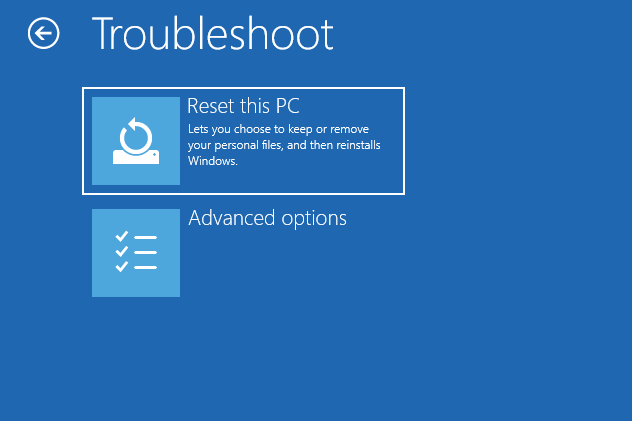
Step 1: Restart your Surface Pro when you see the Surface logo. Repeat this operation three times and it will go to Automatic Repair the fourth time you reboot. Then, go to Advanced options > Troubleshoot > Reset this PC. Or, you can reboot the system via a Windows repair drive or disc, click Repair your computer to enter WinRE, and then go to Troubleshoot > Reset this PC.
Step 2: In the pop-up window, choose Keep my files or Remove everything.
Step 3: Select Cloud download or Local reinstall to continue. Then, follow the on-screen prompts to start resetting a Surface Pro.
Use a USB Drive to Reset Surface Pro
In addition to the ways above to factory reset your Surface Pro, you can try to use a USB hard drive. How to reset a Surface Pro in Windows 10 or 11 via USB? Two options are for you.
Via Surface Recovery Image
When you fail to start your Surface, you can use a USB recovery drive to restore the machine to factory settings. But if you don’t have a USB drive, you can go to the Surface website and download recovery files.
Step 1: Go to download a recovery image for your surface.
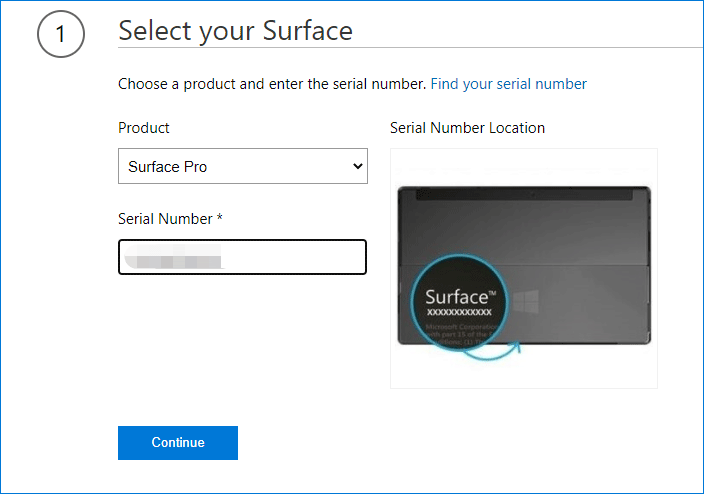
Step 2: Choose your Surface Pro and enter the serial number. The serial number can be found via the Surface app, on the original packaging, on the device, on a Surface accessory, or in Settings. To learn more information, refer to this website.
Step 3: Download the Surface recovery image. This image is delivered as a ZIP file and you had better download and store it to the local drive. Then, extract all the contents to your USB hard drive.
Step 4: Power off your Surface Pro and connect the USB drive to the machine. When pressing and holding the Volume down button, press the Power button. Then release Volume down when you see the Surface logo.
Step 5: Your Surface will enter into the Windows recovery environment. Just choose the language and keyboard layout.
Step 6: On the Choose an option screen, go to Troubleshoot > Reset this PC.
Step 7: Complete the factory reset process by following the on-screen instructions.
Via Created USS Recovery Drive
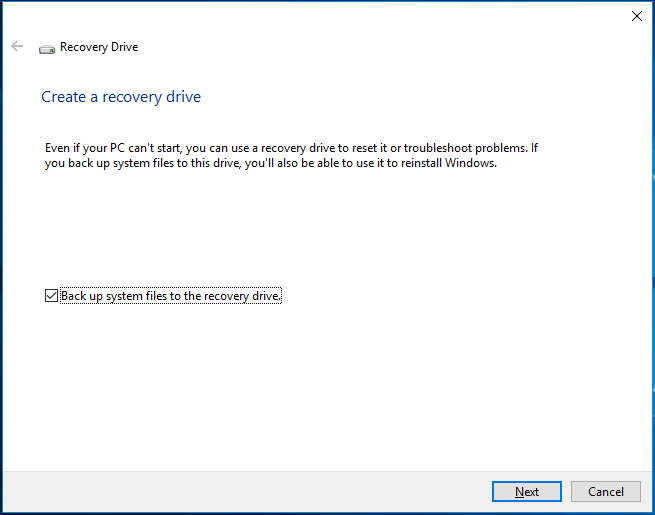
In addition, you can reset Surface Pro with a recovery drive. In Windows 10 or 11, Microsoft gives you a feature called Recovery Drive that can help you to create a recovery drive to reset your PC or troubleshoot problems. If you back up system files to this drive, you can use it to reinstall Windows.
You may have a doubt: my Surface Pro cannot boot properly and I don’t have a recovery drive, how to reset a Surface Pro using this drive? The answer is positive and you can still perform Microsoft Surface reset with a recovery drive.
Just create a recovery drive on a working PC. Type Recovery Drive and click the search result to get the following window. Then, click Next to continue. Choose your USB drive and click Create to begin the process. To know more, refer to this post – Guide – How to Create a Windows 10 Recovery USB for Another PC.
To factory reset your Surface, boot it from the recovery drive to the recovery environment and then navigate to Troubleshoot > Recover from a drive, select Just remove my files or Clean the drive fully based on your need and finish the resetting operation by following the wizards on the screen.
After Surface Pro Factory Reset
What you need to do next after Windows 10/11 loads the login screen depends on how you reset your Surface. If you keep your files, you should re-download all your apps and programs that don’t come with the Surface and then reinstall them.
If you remove everything, log back in with your local account or Microsoft account, install everything including all of your files. The Surface can run like a new one and you can resell or donate it if you don’t install something.
Wrapping Things up
That’s all the information about how to factory reset your Surface Pro. Just back up files before Microsoft Surface factory reset to avoid data loss in the resetting process. Then, follow the given ways to reset Surface Pro to fix your issue to let the machine run properly and normally.
If you have any other ways for PC factory reset or any ideas, let us know. You can leave a comment below or contact us via the support email – [email protected]. We will reply to you as soon as possible.
About The Author

Position: Columnist
Vera has been working at the MiniTool Team for over 10 years as a technical editor and content writer. She mainly focuses on disk and partition management, data recovery, Windows backup and restore, and PC troubleshooting. Through in-depth software testing and hands-on experience, she has helped users solve a wide range of computer problems and better protect their data on Windows devices.
User Comments :