Do you know Robocopy? This post has a detailed instruction of Robocopy and some practices for working with it. Meanwhile, you can learn how to transfer files over network in Windows 10/11 with it and a powerful alternative to Robocopy is mentioned. You can visit MiniTool to find more information.
What is Robocopy in Windows 10/11?
Robocopy is also called as Robust File Copy. It is a command-line directory or you can regard it as a file replication command tool in Windows. Robocopy replaces Xcopy in function with more options.
Starting with Windows NT 4.0, Robocopy serves as part of the Windows Resource Kit. In Windows Vista and Windows Server 2008, Robocopy was first introduced as a standard feature. With more than 80 switches, Robocopy is a powerful enough tool to transfer files.
Best Practices for Working with Robocopy
When you want to copy a few files, copy and paste may always be your choice. However, if you need to perform complex or large file copy operations, the process can take you a long time. Thus, if you want to transfer large files faster and more reliably, Robocopy is a great choice for you.
Although Robocopy is useful, it is a bit complex to use. Therefore, this section will explain which switch you are likely to use most often.
- Copying File Attributes: With /COPY switch, you can specify exactly which parts of the file to copy, which gives you a way to ensure that replicated data retains information.
- Subdirectories: If you need to copy a group of files, you may also need to copy subdirectories that may exist. /S switch copies only the subdirectories containing the data, ignoring any empty subdirectories. /E switch copies any subdirectories including empty subdirectories.
- Preventing Errors: Restartable Mode enabled by /Z switch allows you to resume the transfer from the point of failure, so you don’t need to restart the operation from the beginning.
If you are transferring user data without permission to get all the files of user, the files copy will fail, so you need Backup Mode enabled by /B switch to fix the issue.
- Performance: You can use /MT switch to reduce the amount of time required for the replication process to complete.
Transfer Files over the Network Fast with Robocopy in Windows 10/11
Robocopy in Windows 10/11 includes features that allow you to quickly copy files, but you need a wired connection to get the best experience. The time it takes to complete the transfer will depend on file size and network connection speed.
If you want to know how to use Robocopy in Windows to transfer files over the network quickly, here is the answer. You need to configure the file-sharing feature on the source device firstly, and then you can perform the transfer on the target device.

Move 1: Configuring File Sharing in Windows 10
In order to copy files between two computers, file sharing must be enabled on the source device. Only with file sharing enabled, Robocopy can access and copy files from the target device. To enable file sharing, follow the steps below:
- Open File Explorer on your source device and find the folder with files that you want to transfer.
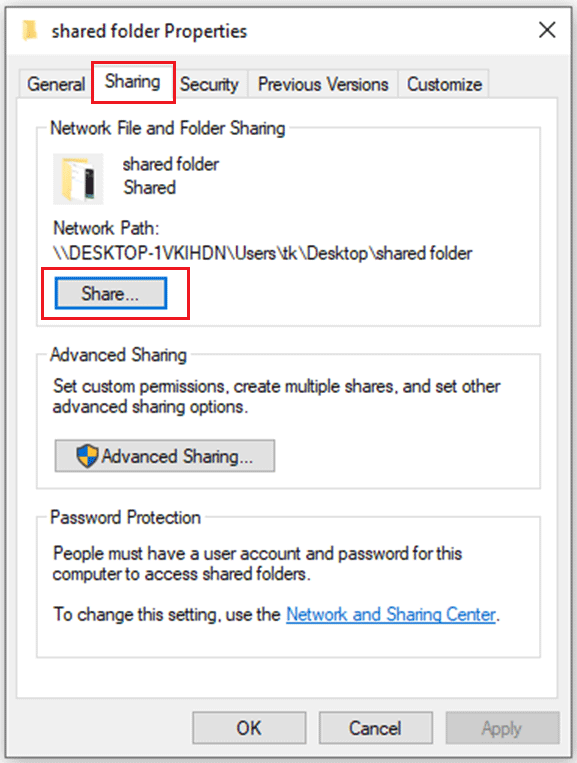
- Right-click the folder and choose Properties.
- Under the Sharing section, click Share… button.
- Choose Everyone group and then click Add.
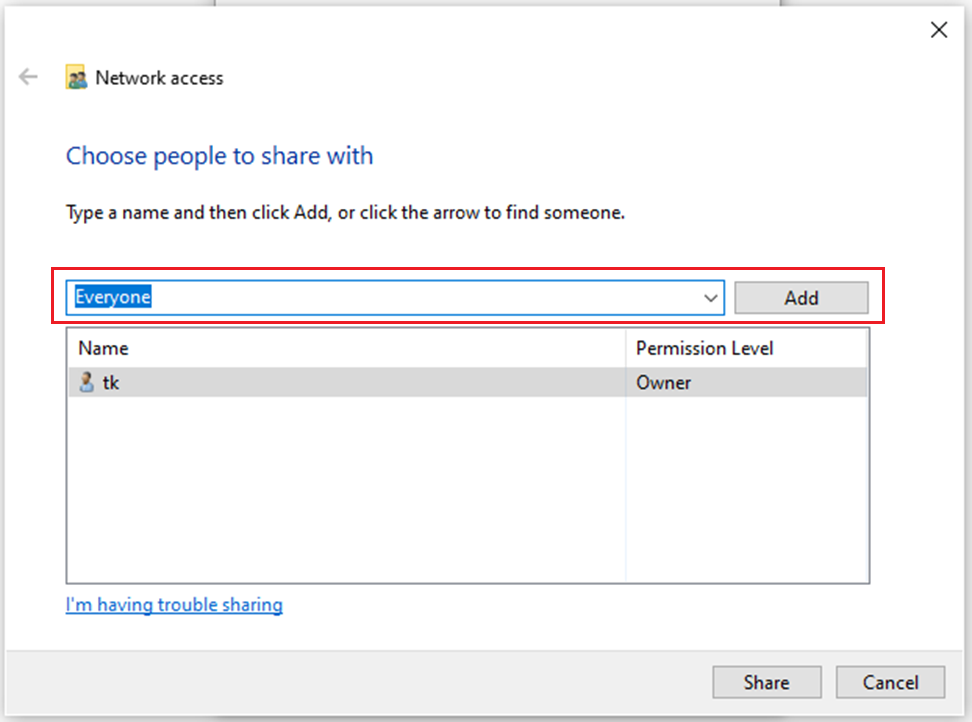
- Under Permission Level, select the type of sharing permission for the folder. Read is selected by default, and it allows you to view and open your files. Read/Write allows you view, open, modify and delete the content of your sharing folder.
- Click the Share button to continue.

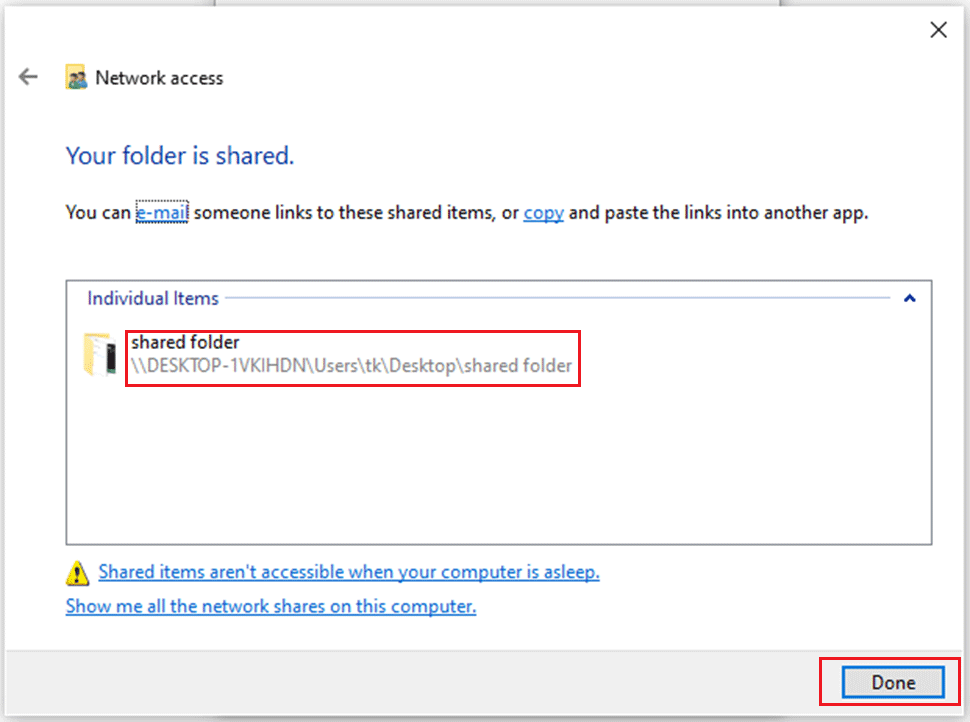
- Remember the network path of the shared folder that other users will need to access the content over the network. Then click Done.

Move 2: Copy Large Files Fast Using Robocopy in Windows 10/11
Since file sharing is enabled on the source device, now you can start to copy the files with Robocopy in Windows 10 in the target device. Follow the steps below to copy files fast with Robocopy.
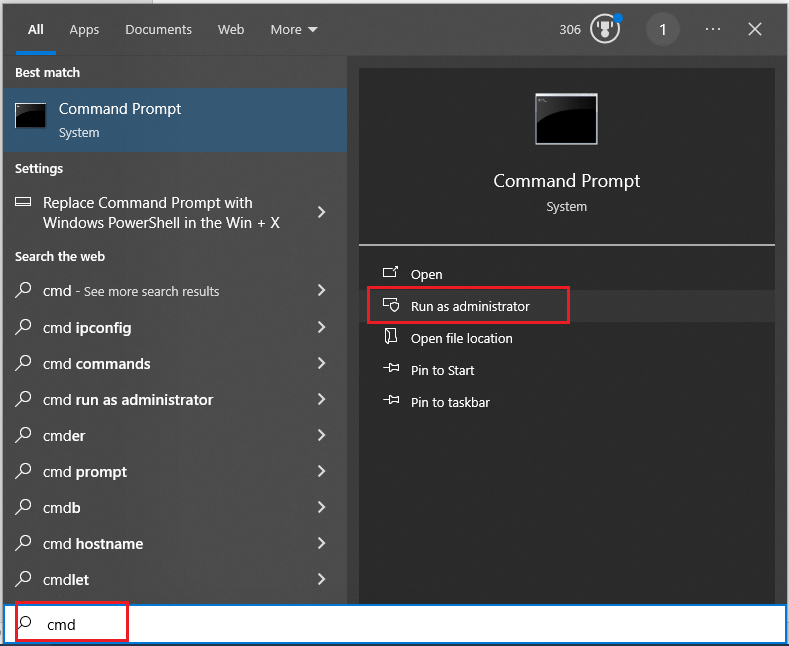
- Type cmd in the search box to locate Command Prompt and click Run as administrator.
- Type the command: Robocopy \\source-device-ip\path to share folder C:\destination-device\path to store folder /S /E /Z /ZB /R:5 /W:5 /TBD /NP /V /MT:16, and hit Enter.

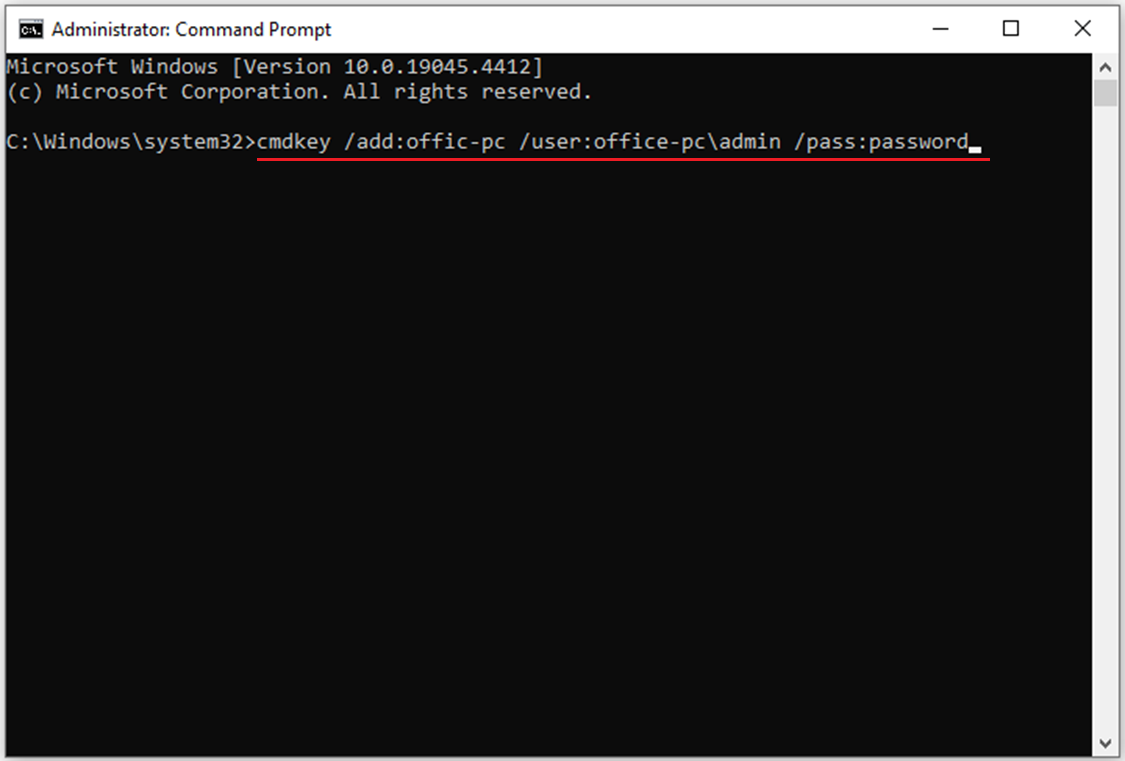
If you want to transfer files fast by using Robocopy in Windows 11, use these steps:
- Type the command: cmdkey/add:COMPUTER-OR-DOMAIN/user:COMPUTER-OR-DOMAIN\USERNAME/pass:PASSWORD, and hit Enter.
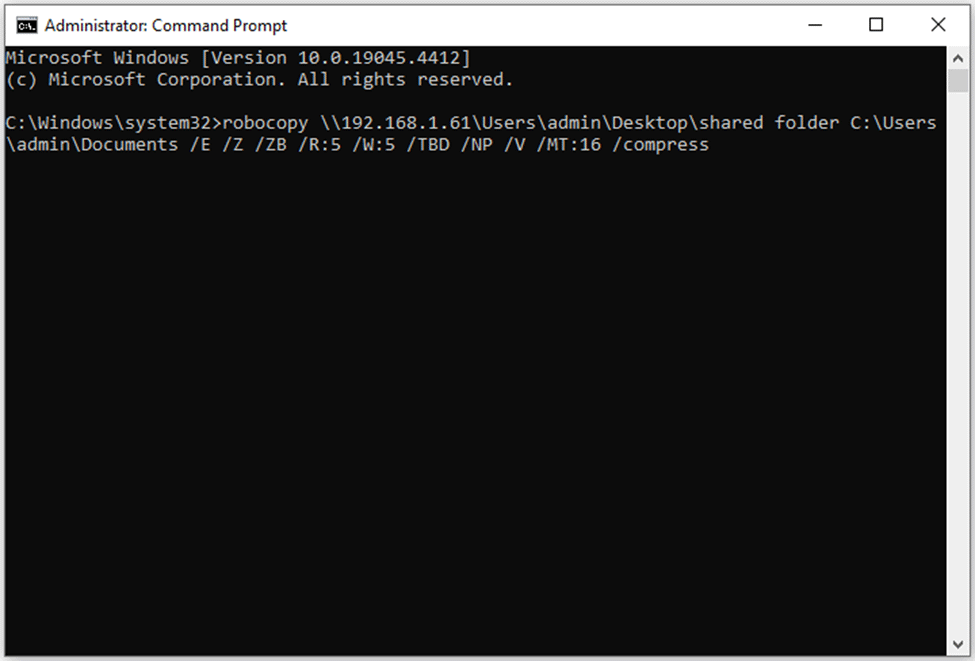
- Next, input the command: Robocopy \\source-device-ip\path to share folder C:\destination-device\path to store files /E /Z /ZB /R:5 /W:5 /TBD /NP /V /MT:16 /compress
Great Free Alternative to Robocopy in Windows 11/10 – MiniTool ShadowMaker
Although you can transfer files over the network with Robocopy in Windows 10/11, it is a little troublesome with these long and complex instructions. Besides, you have to be careful enough when you are using Robocopy because you can’t take a step back when you do something wrong. Sometimes, you may also not copy files with Robocopy.
Therefore, you need a more powerful free Robocopy alternative – MiniTool ShadowMaker. With its file backup function, you can easily and safely transfer files to a shared folder.
MiniTool ShadowMaker is a piece of backup tool, which enables you to backup system, files, folders, disks and partitions. And it is also a sync software that supports syncing files and folders. Both backing up and syncing can help you transfer files from computer to computer on the same network. What’s more, you can clone SSD to larger SSD in case that your old SSD is running out of space.
MiniTool ShadowMaker TrialClick to Download100%Clean & Safe
The following part will show you how to back up your PC to a shared folder with MiniTool ShadowMaker.
Step 1: Launch it and click Keep Trial to continue.
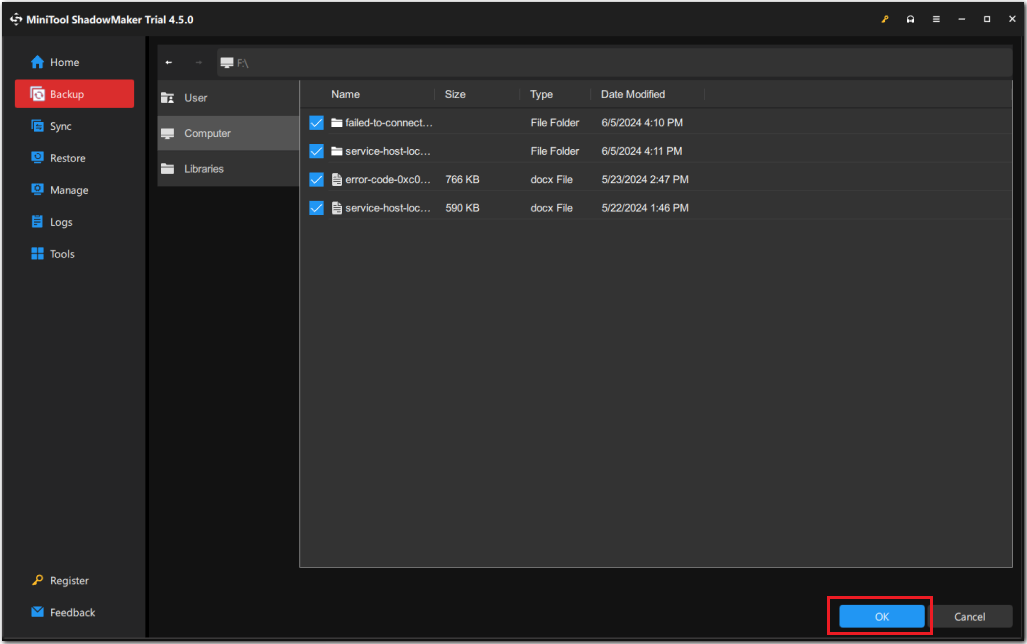
Step 2: Click the Backup tab, and choose the files you want to transfer in the SOURCE > Folders and Files section. Then click on OK.
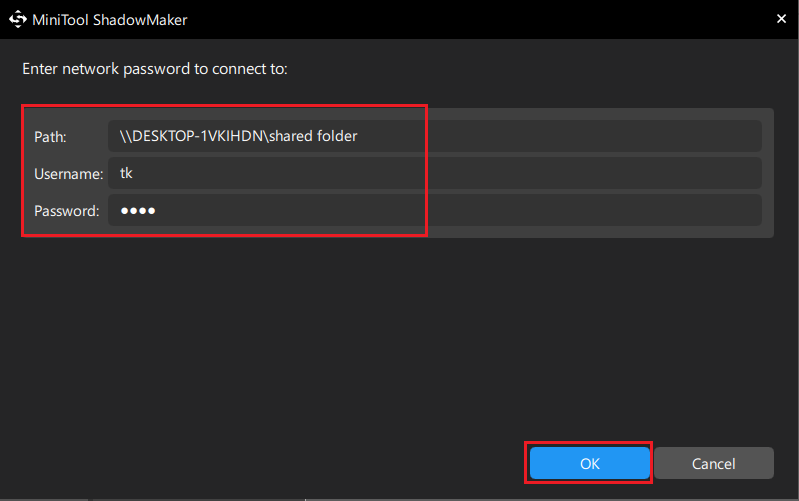
Step 3: Next, choose a target to save the files in the DESTINATION tab. To transfer files to a shared folder, hit Shared to select a shared folder created by another computer (in the same LAN) as the destination path. Click Add in left corner, and input the Path, Username and Password. Then click OK.
Step 4: Choose Back Up Now to perform the backup task immediately or Back Up Later to delay the task. You can start the delayed backup task on the Manage page.
After you finish the steps above, the source files are successfully backed up to the destination. You can find that transferring files with MiniTool ShadowMaker is much simpler.
In addition to Backup, you can also use the Sync function of MiniTool ShadowMaker to sync files to a shared folder. The following part will show you the steps briefly.
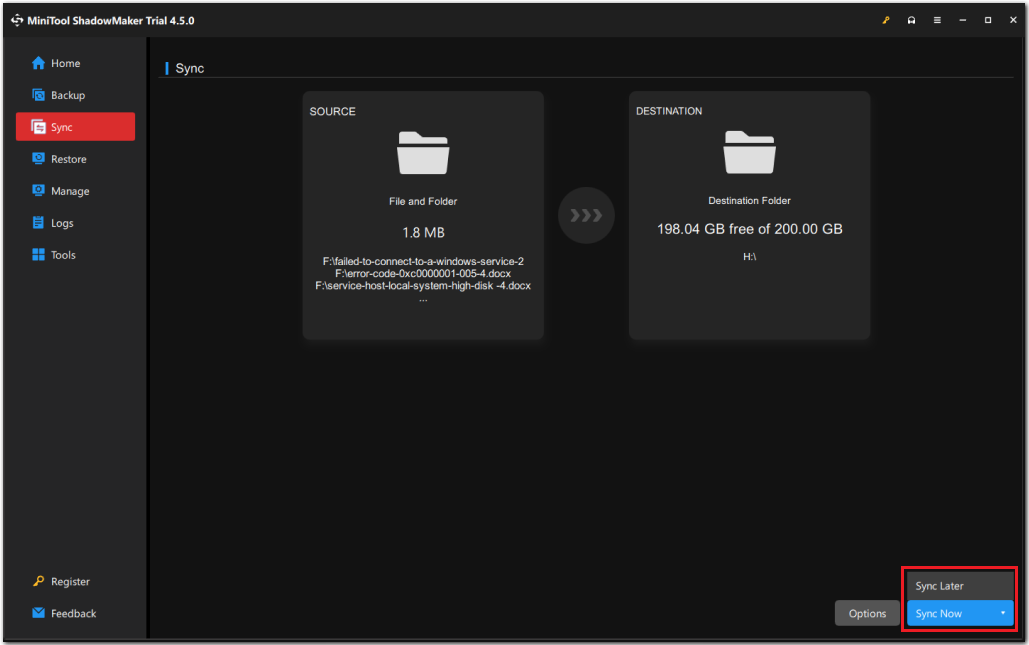
Step 1: Run MiniTool ShadowMaker and enter its main interface.
Step 2: Go to the Sync section to select the source files and destination path.
Step 3: Click Sync Now or Sync Later.
Further Reading: Robocopy VS MiniTool ShadowMaker
Easy Steps
As you can see from the above steps, transferring files with Robocopy is troublesome for you. You have to enable file sharing on the local network firstly with long instructions, and then you can transfer files.
However, you can transfer files easily with MiniTool ShadowMaker. Following the straightforward instructions, you just need to select transfer source and destination with a few mouse clicks. Then you can successfully transfer files to the target device.
In addition, during the process, you can stop the operation by simply clicking the Stop button when you are using MiniTool ShadowMaker. However, you can’t take a step back when you are using Robocopy, even if you make a mistake in the last step.
Advanced Settings
Although there are many switches you can use to tell Robocopy the way you want to copy files, it is a bit complex.
Now, MiniTool ShadowMaker provides you with some clear and easy function modules that you can do some advanced settings to make MiniTool ShadowMaker transfer files in the way you want.
The Schedule Settings function is user-friendly to help you make a backup on a regular basis. With this function, you can run automatic backup tasks daily, weekly, monthly or on event.
The Backup Scheme function of MiniTool ShadowMaker offers you 3 commonly-used types of backups: Full, Incremental and Differential. In order to help you manage disk space usage, it can delete the specified backup image file versions automatically.
In order to customize the current backup task, you can also set some advanced parameters for every task by clicking the Options button. For example, if you enable email notification, you will receive an email from MiniTool ShadowMaker when the backup operation is finished. It will inform you whether the task is failed or successful.
Other Advantages of MiniTool ShadowMaker
Manage is also a useful function of MiniTool ShadowMaker. With it, you can manage all backup tasks including backup image and file sync. Not only can you see the status of the backup task, but you can also choose several options to better arrange the backup task.
MiniTool ShadowMaker also offers you some useful tools to meet your different needs, such as the Media Builder feature, you can use it to create a bootable media to boot the unbootable computer.
Bottom Line
To sum up, this post shows you an overview of Robocopy and introduces the detailed steps on how to transfer files over network with Robocopy in Windows 10/11. In addition, a powerful alternative to Robocopy – MiniTool ShadowMaker is mentioned in this article, which is much easier to use.
If you have any problem in using MiniTool ShadowMaker, please don’t hesitate to contact us via [email protected] and we will reply to you as soon as possible.
Robocopy in Windows 10 FAQ
2. Robocopy is used to mirror or sync directories while Xcopy does nothing about that.
3. Xcopy is simpler and it has no monitoring support.
To know more differences between Robocopy and Xcopy, see this guide - Robocopy vs Xcopy: What Are the Differences Between Them.
User Comments :