
Shadow Copy Windows 10/11 can help you back up your data and protect it from loss. This guide explains what it is, how to enable it via system restore points & Task Manager, and how to use it. Additionally, we introduce a full backup solution, MiniTool ShadowMaker.
Key Takeaways
- Shadow Copy creates backup snapshots of files and volumes, even when they are in use.
- It helps restore deleted files via the Windows Previous Versions feature.
- You can enable Shadow Copy in Windows 11/10 via System Restore Points or Task Scheduler.
What Is a Shadow Copy
Shadow Copy is a built-in Windows technology that can create backup copies or snapshots of computer volumes/files on a local disk, external hard drive, or network drive, whether you are in use or not. It is implemented as a Windows service called the Volume Shadow Copy Service, also known as Volume Snapshots Service or VSS.
Shadow Copy requires the NTFS or ReFS file system to create and restore shadow copies. Any Windows component using this technology can create Shadow Copies on local or external volumes.
What Is Shadow Copy Used for in Windows 10/11
Shadow Copy is commonly used by System Restore, Backup and Restore, and File History. The main uses include:
- Restore previous versions of files: When a file is accidentally deleted or modified, previous snapshots can help recover the older version.
- Create restore points for a system restore: System Protection uses the Shadow Copy technology to create restore points, allowing you to restore the PC to a previous state.
- Open file backups: Shadow Copy allows third-party backup tools and Windows Backup to create file backups safely.
How to Enable Shadow Copy Windows 10/11
1. Enable Volume Shadow Copy Service Using System Restore Points
Setting restore points is an optional way to enable Shadow Copy in Windows 10/11. Here’s how to do it.
Step 1: Input Create a restore point into the search box of Windows and choose it.
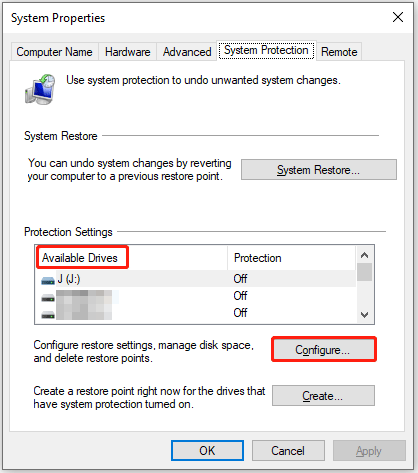
Step 2: Choose a drive from the Available Drives menu and then click on the Configure button.
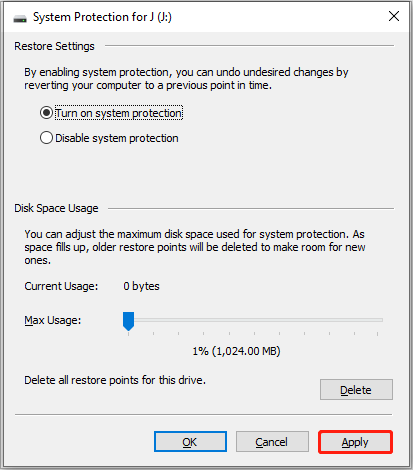
Step 3: Check the option for Turn on system protection, click the Apply button to enable the setting, and then click OK.
Step 4: Click the Create option to create a restore point to turn on the volume Shadow Copy service. Then you can type a description to help you identify the restore point in the pop-up window.
2. Automate Shadow Copy Using Task Scheduler
Utilizing Task Scheduler is a more accurate way to turn on Shadow Copy Windows 10/11. With it, you can set up a specific time to create a Shadow Copy.
Here’s how to enable Shadow Copy in Windows 10/11 using Task Scheduler.
Step 1: Locate the search bar, go ahead by typing Task Scheduler, and click on it to enter its interface.
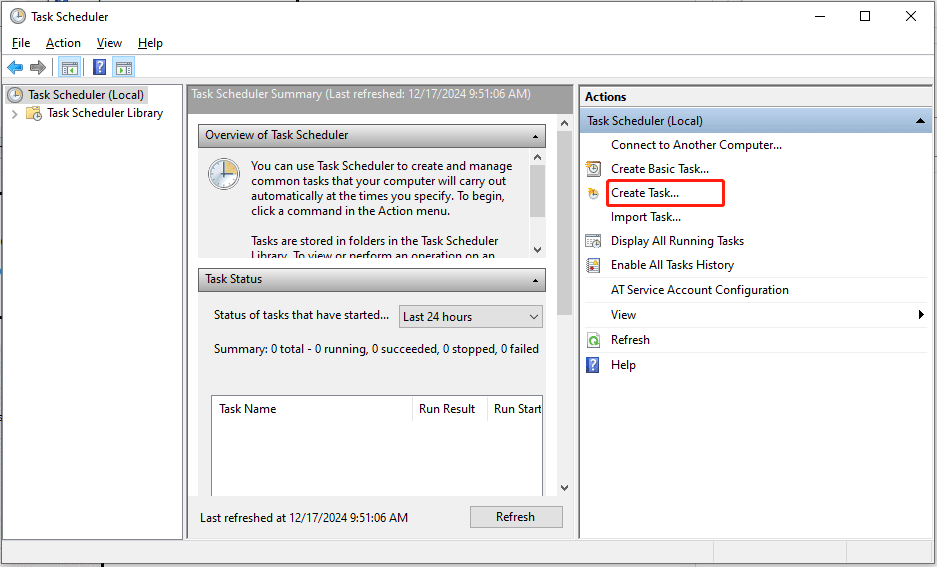
Step 2: Choose Create Task… from the right panel and name this task under the General section.
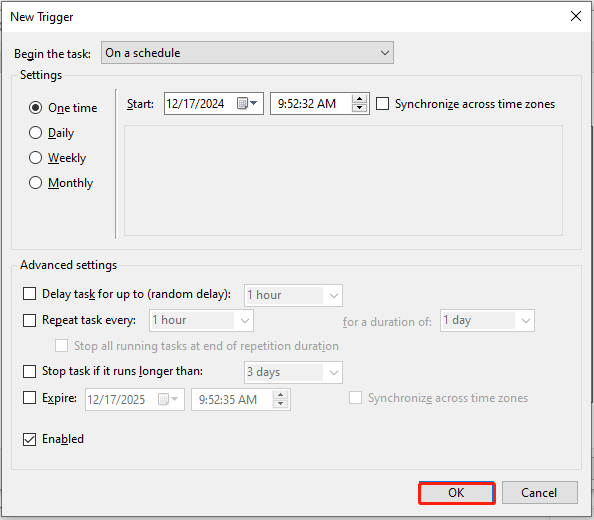
Step 3: Click Trigger and then click the New… button to create a new trigger. Now in the popup window, you can make settings as per your needs. When done, click OK to go on.
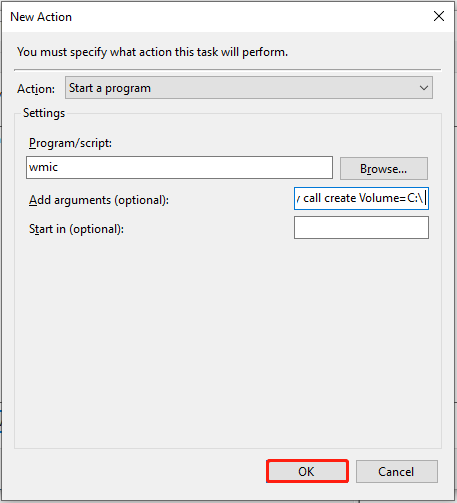
Step 4: Click the Actions button and choose New… to specify what actions this task will perform.
Step 5: Next type wmic under the Program/script: section and then input shadowcopy call create Volume=C:\ at the right side of the Add arguments (optional): section. Click OK to back to the Actions interface and then click OK to finish the settings.
How to Backup Files Using Windows Backup and Restore
After enabling Volume Shadow Copy, run the built-in tools such as Backup and Restore to backup files. But if you want to know more details about it, you can follow the steps below to check.
Step 1: Type Control Panel in the search box on Windows 10/11 and click it. View all the items by Category, choose the System and Security option, and click Backup and Restore (Window 7).
Step 2: Locate Set up backup and tap on it.
Step 3: Select where you want to have your backup saved and click Next.
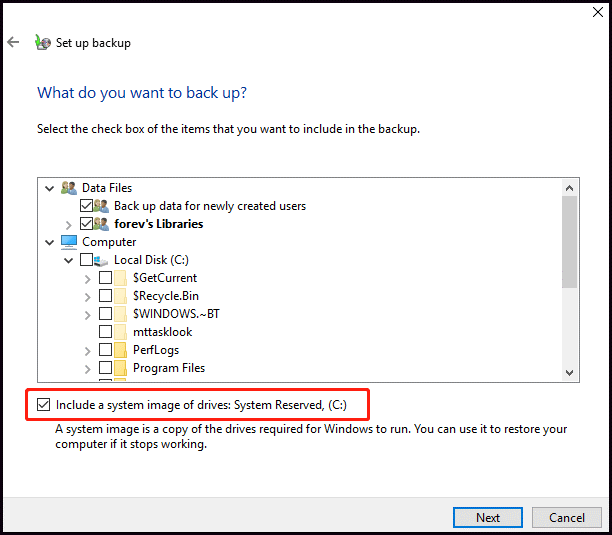
Step 4: Select Let Windows choose. Orcheck Let me choose tochoosethe items that you want to include in the backup. Check the checkbox – Include a system image of drives if necessary and click Next to continue.
Step 5: Review your backup settings and confirm the same. Finally, click Save settings and run backup.
How to Use Shadow Copies to Restore Previous Files
Under the condition of having shadow copies available on the drive, you can easily use the Previous Versions feature to restore deleted files and earlier specific copies from the snapshot of Shadow Copy. Take certain files that were saved on the Desktop as an example. Here’s how to restore shadow copies.
Step 1: Locate the Desktop folder in the File Explorer. Right-click it and choose Properties.
Step 2: Select the Previous Versions tab, click the right version you want to restore, and click the Restore option.
Full Backup Solution for Windows 10/11: MiniTool ShadowMaker
While Volume Shadow Copy helps restore previous versions of files and system changes, MiniTool ShadowMaker provides a more comprehensive backup solution for Windows 11/10.
It allows you to create system images, back up files, partitions, and disks, and schedule automatic backups to protect your data.
MiniTool ShadowMaker TrialClick to Download100%Clean & Safe
The table below provides a quick comparison of Windows Shadow Copy (VSS) and MiniTool ShadowMaker.
| Feature | Windows Shadow Copy | MiniTool ShadowMaker |
| Backup scope | Create file/system snapshots | Backs up systems, folders, files, disks, and partitions |
| Storage location | A local drive with limited space allocation | External hard drives, USB drives, NAS, and network locations |
| Backup scheduling | Requires System Protection settings or Task Scheduler for automation | Built-in backup schedules and schemes |
| Recovery options | Restores previous versions of files or rolls back system changes | Restore files, partitions, disks, or the entire system |
| Disaster recovery | Depends on Windows | Creates independent bootable USB/CD |
Take backing up Windows 10/11 system as an example.
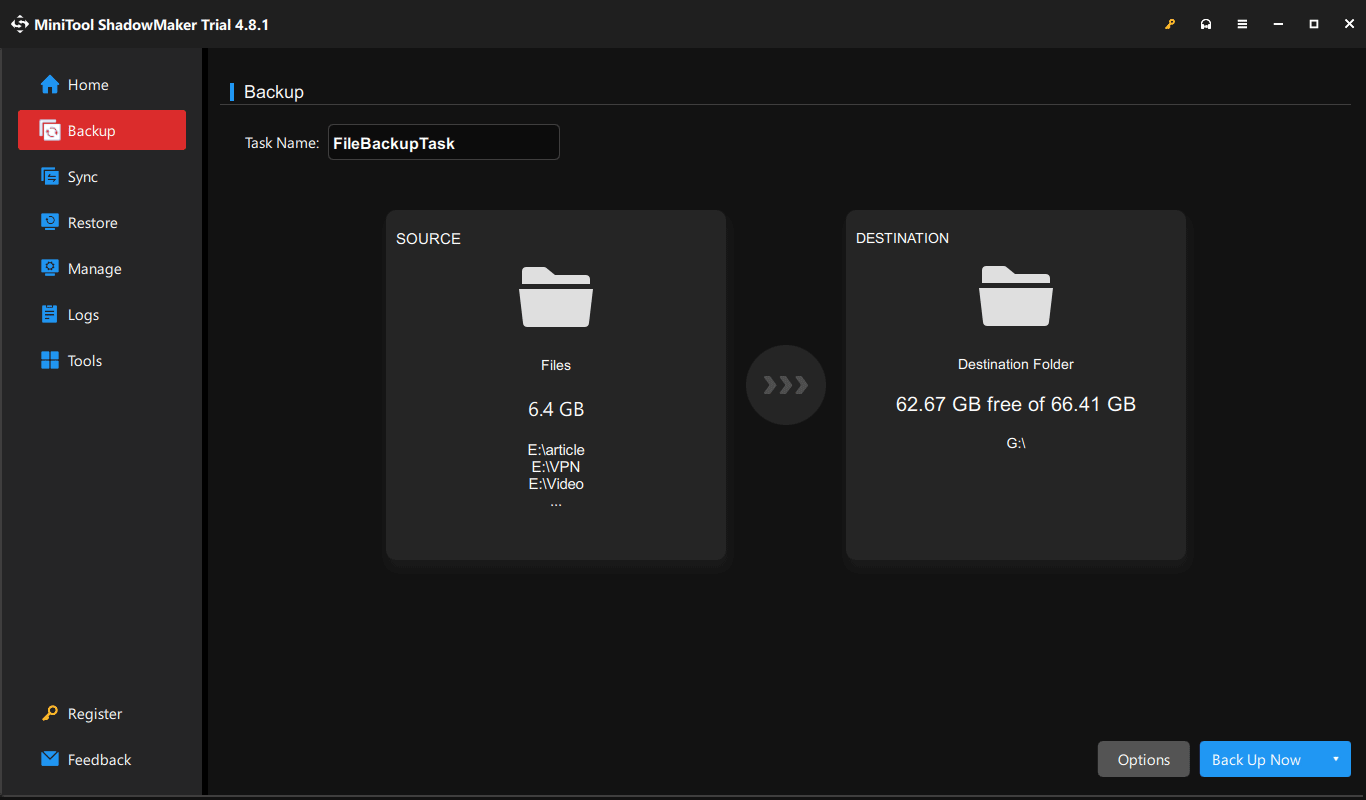
Step 1: Launch MiniTool Shadowmaker and choose the Backup section.
Step 2: Choose the SOURCE module. There are two source types you can select including Disk and Partition and Folders and Files. Select one you need to back up and click OK to continue.
Step 3: Click the DESTINATION module and choose the destination path where you want to save the image files. Click the OK button.
Step 4: Before backing up, you can go to Options > Backup options to customize some specific settings according to your needs.
1. Go to the Backup Scheme section to set up the backup type or manage disk space occupied by the backup image files.
2. Make a schedule to automatically back up the item in Schedule Settings.
Step 5: Click Back Up Now to perform the backup process immediately.
Bottom Line
In conclusion, this article does not just show you much introduction about what Shadow Copy Windows 10/11 is but also shares the methods on how to create a Shadow Copy in Windows 10/11. Meanwhile, it also introduces you to how to perform backups to keep your system and data safe with MiniTool ShadowMaker.
If you have any questions about MiniTool ShadowMaker, please contact us via the email [email protected].
Shadow Copy Windows 10/11 FAQ
About The Author

Position: Columnist
Vera has been working at the MiniTool Team for over 10 years as a technical editor and content writer. She mainly focuses on disk and partition management, data recovery, Windows backup and restore, and PC troubleshooting. Through in-depth software testing and hands-on experience, she has helped users solve a wide range of computer problems and better protect their data on Windows devices.
User Comments :