
An SSD shows unknown not initialized in Windows Disk Management, blocking you from accessing files. This guide walks you through several methods to restore the drive, including checking the SSD connection, updating drivers, and initializing it via MiniTool Partition Wizard.
Quick Answer
SSD unknown not initialized in Disk Management is usually caused by a corrupted partition table, driver problem, faulty connection, or hardware failure.
To fix this issue:
- Perform the SSD connection check
- Update the SSD driver
- Run CHKDSK
- Recover data and initialize the drive using MiniTool Partition Wizard
Why Won’t SSD Initialize
In Windows 11/10 Disk Management, your SSD may show Unknown, Not Initialized, and appear as Unallocated.
When attempting to initialize this drive, the following error may appear:
- Data error (cyclic redundancy check).
- Incorrect function.
- Access is denied.
- The request could not be performed because of an I/O device error.
- A device which does not exist was specified.
The unknown not initialized drive can occur for several reasons, including:
| Possible Cause | Recommended Fix |
| Corrupted partition table | Reinitialize the drive |
| Faulty SSD connection | Check cables and ports |
| Driver issue | Update the storage driver |
| Bad sectors or file system corruption | Run CHKDSK |
| Hardware failure | Check drive health |
How to Fix SSD Not Initialized in Disk Management
Method 1: Check the SSD Connection
If your SSD shows Disk 1 unknown and not initialized, and no disk space is displayed, the issue may be a loose or damaged connection.
Perform the check first.
Step 1: Shut down the computer.
Step 2: Disconnect the SSD.
Step 3: Try another SATA cable or a different port to reconnect the drive.
Step 4: Restart Windows 11/10 and check if the SSD is displayed in Disk Management correctly.
Method 2: Update the Device Driver
Outdated drivers can make your computer sluggish and even trigger some unexpected results. So, please make sure your hard drive is up to date and that can help fix security and compatibility problems, and errors.
Step 1: Right-click on the Start icon and choose Device Manager.
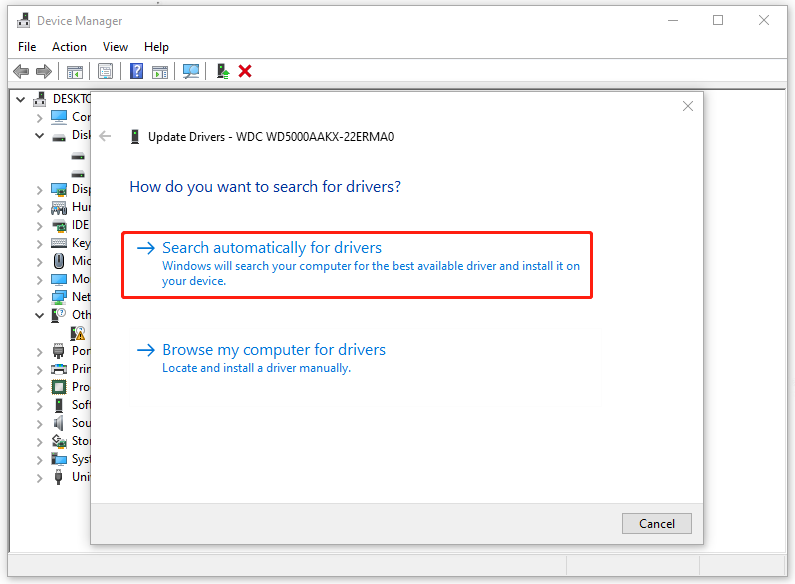
Step 2: Expand Disk drives and right-click on the problematic drive to choose Update driver.
Step 3: Click Search automatically for drivers to continue the move and please follow the next steps with the on-screen instructions.
![[Full Fixes] Windows 10/11 Won’t Install Drivers on PCs](https://images.minitool.com/minitool.com/images/uploads/2022/03/fix-windows-10-11-wont-install-drivers-thumbnail.png)
Method 3: Run CHKDSK
CHKDSK is a built-in Windows utility that helps scan the drive for file system errors and locate bad sectors.
Running it in Windows 11/10 can effectively restore the uninitialized SSD.
Step 1: Type cmd in the Search box and press Run as administrator.
Step 2: Type chkdsk E: /f /r and press Enter.
- /f: finds and fixes file system errors
- /r: includes the functionality of /f, locates bad sectors, then recovers readable information.
Method 4: Check SSD Health
If the SSD is still not initialized, check whether it is physically healthy before attempting initialization. In some cases, hardware issues such as bad sectors, firmware corruption, or controller failure can prevent a drive from initializing.
To perform an SSD health check, run a professional tool such as CrystalDiskInfo or Hard Disk Sentinel.
- If the SSD is healthy, initialize it using the method below.
- If the SSD shows signs of failure, recover important data and consider replacing it.
Method 5: Recover Data and Initialize/Replace the SSD
Based on the SSD health status, you may still be able to access data. Before performing any initialization or replacement, recovering your important files is the critical step.
#1. Recover Data from Uninitialized SSD
For an uninitialized SSD, the professional partition manager for Windows 11/10, MiniTool Partition Wizard, is a reliable choice. It offers the Partition Recovery feature to restore lost or deleted partitions, as well as Data Recovery to retrieve files from inaccessible drives.
- If the SSD shows unallocated, run Partition Recovery.
- If the SSD doesn’t show disk space, use Data Recovery.
Here we take Partition Recovery as an example.
Step 1: Download, install, and launch MiniTool Partition Wizard.
MiniTool Partition Wizard DemoClick to Download100%Clean & Safe
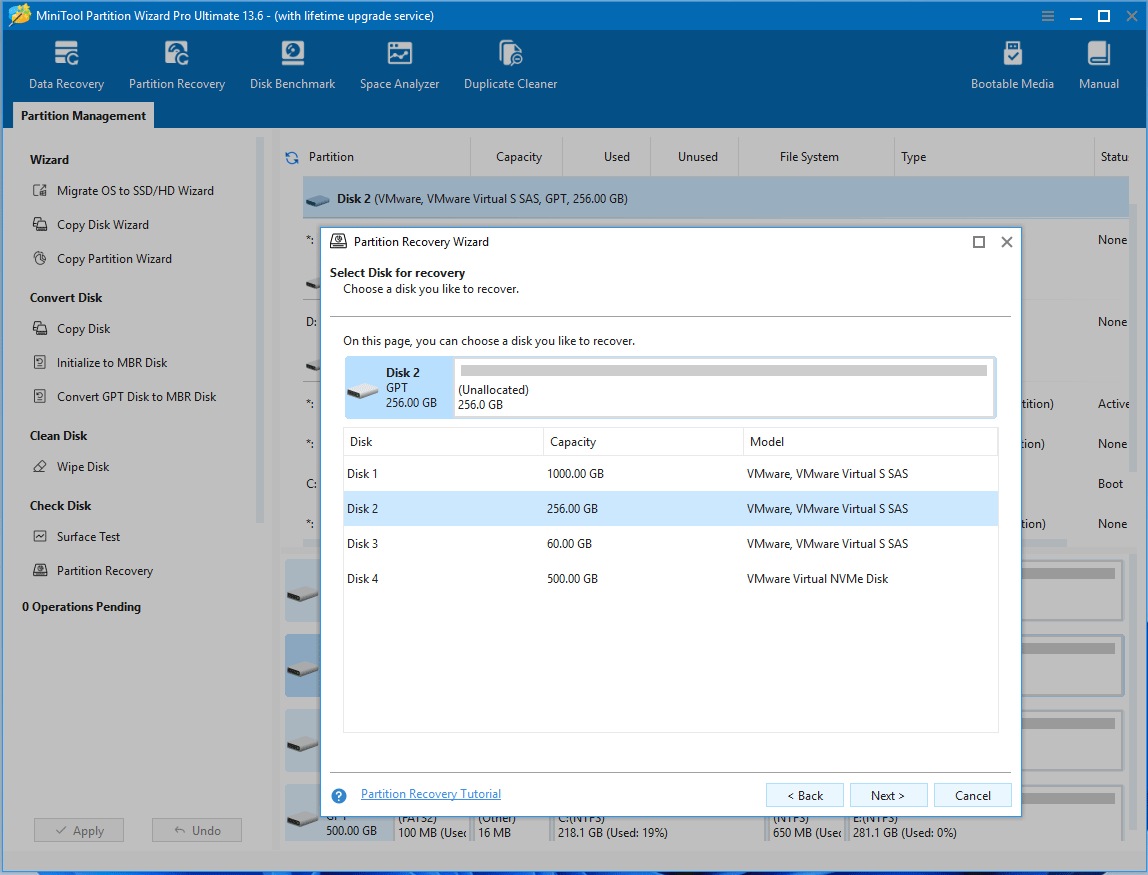
Step 2: Click Partition Recovery, select the SSD, and click Next.
Step 3: Choose the scanning range to proceed.
Step 4: Select Quick Scan or Full Scan.
Step 5: Choose all the found partitions and click Apply.
#2. Initialize the SSD (Optional)
In addition to partition recovery and data recovery, MiniTool Partition Wizard offers a feature to initialize your drive.
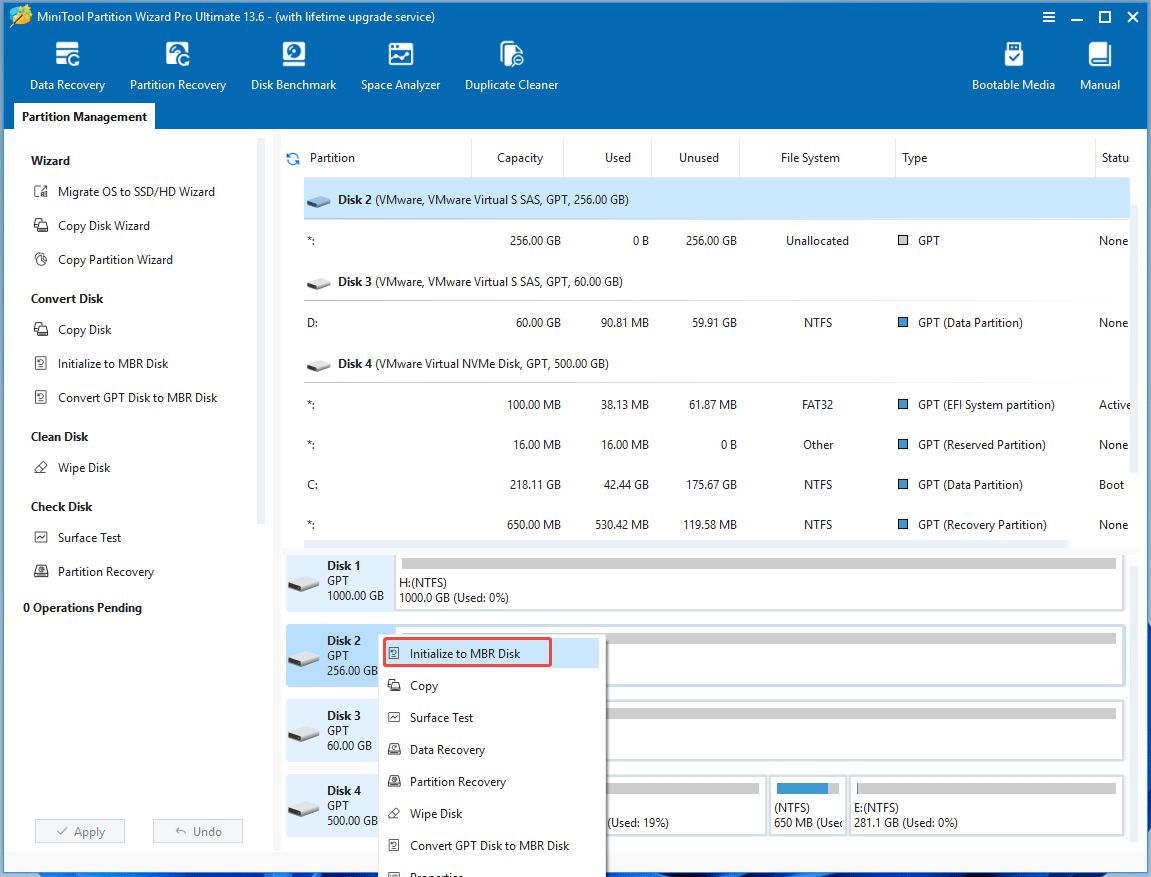
Step 1: In the main interface of MiniTool Partition Wizard, right-click on the SSD and select Initialize to MBR Disk or Initialize to GPT Disk.
Step 2: Click Apply.
GPT vs MBR: Which One to Choose
| Feature | GPT | MBR |
| Maximum disk capacity | Larger than 2TB | Up to 2TB |
| Number of partitions | 128 primary partitions | 4 primary partitions |
| UEFI support | Yes | No |
| Used for Windows 11 | Yes | No |
#3. Replace the SSD
If the drive is failing and you have successfully recovered your important data using the Data Recovery feature in MiniTool Partition Wizard, you can safely replace the faulty drive.
Conclusion
SSD unknown not initialized is a frustrating issue that can be fixed through 5 proven solutions. Follow the steps above to easily solve your issue. If the drive contains important files, recover them.
If you have any issues with MiniTool Partition Wizard, contact us at [email protected].
SSD Not Initialized FAQ
1. Initialize and format the SSD
2. Assign or change the drive letter
3. Change SATA mode from RAID to AHCI in BIOS
1. Slow performance
2. Frequent file corruption
3. System freezes and BSOD errors
4. Bad blocks
5. Drive read-only mode
6. Boot failures
About The Author

Position: Columnist
Vera has been working at the MiniTool Team for over 10 years as a technical editor and content writer. She mainly focuses on disk and partition management, data recovery, Windows backup and restore, and PC troubleshooting. Through in-depth software testing and hands-on experience, she has helped users solve a wide range of computer problems and better protect their data on Windows devices.
User Comments :