You may see the error “The application was unable to start correctly” followed by a code, such as 0xc0000142, 0xc0000022, or 0xc000007b. To fix it, follow this MiniTool guide to run that app as admin, reinstall the app, update Windows, run SFC, and try other methods.
About “The Application Was Unable to Start Correctly”
Understanding the Application Error
When running an application or game on your Windows computer, an error message may appear, as shown:
“The application was unable to start correctly (0xc000007b). Click OK to close the application.”
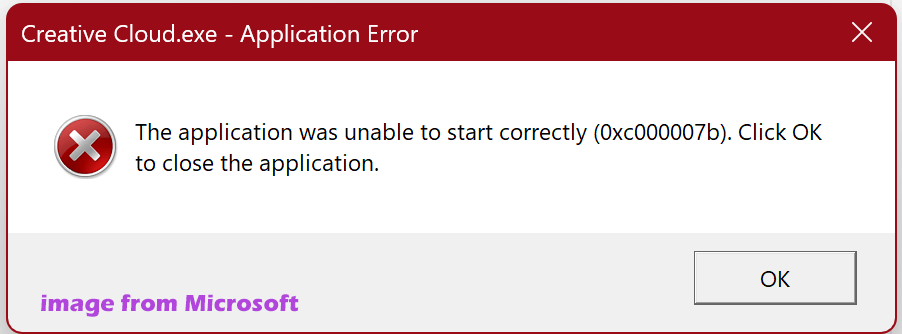
In addition to 0xc000007b, this application error is often accompanied by another error code, such as 0xc0000022, 0xc0000142, and 0xc00004ac.
This is a common issue, indicating that a problem is preventing the application from launching successfully. For example, the program is missing key files to run, has compatibility issues, or has become corrupted.
Causes of App Not Starting Correctly
Here are some common reasons why the application fails to start correctly.
- Corrupted or missing files: Essential files for the app may be damaged or missing, for example, components from the Microsoft Visual C++ Redistributable packages or DLLs (dynamic-link libraries).
- Incorrect permissions: The app may lack the necessary permissions to run, triggering 0xc0000142, 0xc0000022, 0xc000007b, or another code.
- Antivirus interference: Your security software may mistakenly prevent the app from running properly.
- Software conflicts: Other programs may interfere with the target application, leading to an application error.
- System issues: Corrupted system files, an outdated operating system, or failed updates can be possible causes.
- Registry errors: Incorrect settings in the Windows registry, like the LoadAppInit_DLLs key, can interfere with apps.
How to Fix “The Application Was Unable to Start Correctly 0xc000007b/0xc0000142/0xc0000022”
To fix the issue of app not running correctly, first try some basic steps, such as rebooting the PC, running the app as admin, or reinstalling the app.
If you still encounter the error, reinstall the Microsoft Visual C++ Redistributable packages, run SFC, disable security software, update Windows, and try other advanced solutions.
Basic Troubleshooting
First of all, we recommend performing some basic fixes.
#1. Reboot the PC
In some cases, a simple reboot can solve issues. When the application is unable to start correctly, try this method. To do that, click the Start button and choose Power > Restart.
Launch your app after a restart. If the issue persists, proceed with the following fixes.
#2. Check for Permission Settings
A common cause of 0xc0000022/0xc0000142/0xc000007b is that the system cannot access the files required to launch the app. Make sure your PC has the correct permission configuration first.
To check the permission settings:
Step 1: Right-click on the application that doesn’t start properly and choose Properties from the context menu.
Step 2: Navigate to the Security tab.
Step 3: Click the Edit button, select your user account or an administrator group, and tick Allow for Full control.
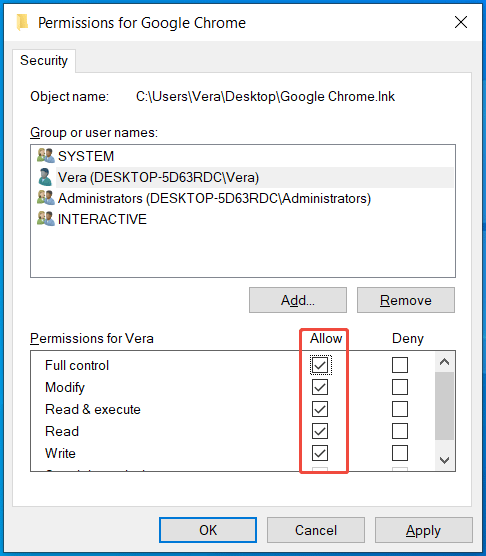
Step 4: Save the change by clicking Apply > OK.
Additionally, you should ensure your apps have admin privileges to function fully.
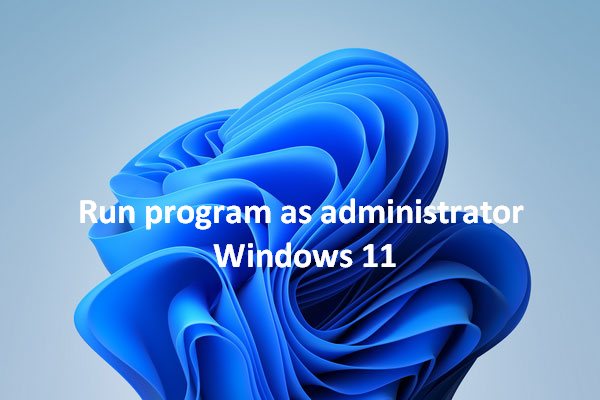
#3. Run an Application as Administrator
To launch an app, right-click that app and choose Run as administrator to give the necessary permissions.
If you want to always launch the app as an administrator, take these steps:
Step 1: Right-click on the app that has the “the application was unable to start correctly” error and choose Properties.
Step 2: Under the Compatibility tab, check Run this program as an administrator.

Step 3: Click Apply > OK to save the changes.
Then, run this app, and the application error should no longer appear.
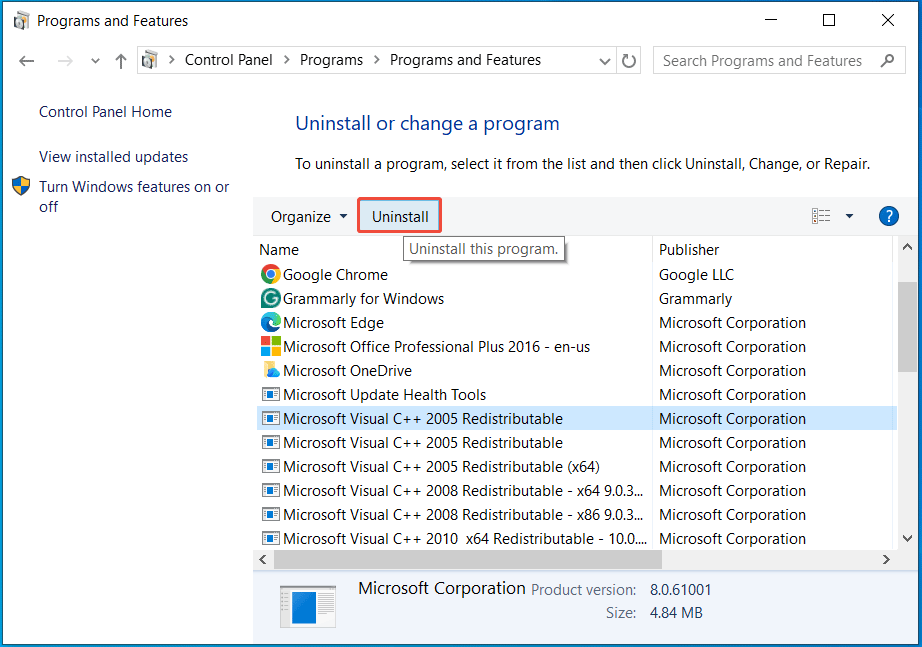
#4. Reinstall the Application
The core file of the program you want to run may get corrupted, preventing it from launching. It is recommended to completely uninstall that app and then reinstall it from a trusted source.
Step 1: Open Control Panel by typing control panel in the Search box and pressing Enter.
Step 2: Choose Category from the View by menu and click Uninstall a program from the Programs section.
Step 3: Select the problematic program from the app list and click the Uninstall option to uninstall it.
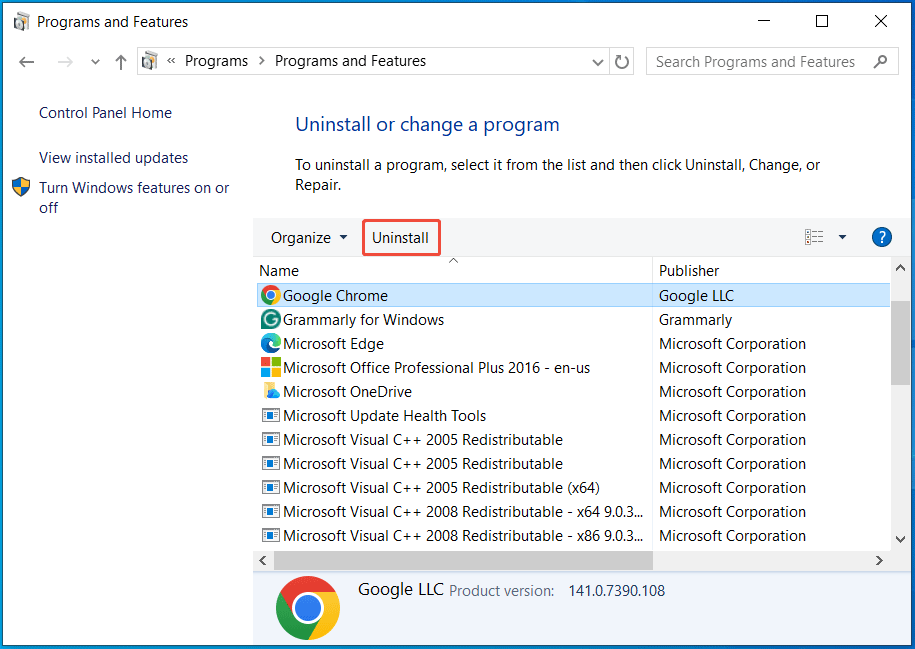
Step 4: Visit the official website of this program and download the latest installer.
Step 5: Run the downloaded file and follow the on-screen prompts to reinstall the app.
Run that application and check if the error disappears.
System and Component Checks
If you still experience “the application was unable to start correctly” after basic fixes, try some checks regarding the system and components.
Try the methods below to update Windows, reinstall/repair .NET Framework, and reinstall the Visual C++ Redistributable packages.
#1. Update Windows
One possible reason the app fails to launch is an outdated Windows version. Updating the system can resolve known system bugs and improve compatibility. Additionally, some features like .NET Framework and DirectX may be updated.

To update Windows:
Step 1: Go to Settings > Windows Update.
Step 2: Click Check for updates to begin checking for available updates.
Step 3: Sometimes, you need to click the Download & install button to download and install the updates. Then, restart the system to complete the updates.
Later, try running the app again.
#2. Repair or Reinstall .NET Framework
Sometimes, your app fails to start correctly due to issues with .NET Framework, which is a Windows-only software development framework for building and running applications.
To address the app error 0xc000007b, 0xc0000142, 0xc0000022, or another error code, repair or reinstall .NET Framework.
Repair .NET Framework
Step 1: Download the .NET Framework Repair Tool from Microsoft and double-click on the .exe file to run it.
Step 2: Accept the license terms, and this tool will detect issues with .NET Framework installations.
Step 3: Apply the recommended changes and click Finish.
Reinstall .NET Framework
Step 1: Access Control Panel by pressing Win + R, typing in control, and clicking OK.
Step 2: Select Category from the View by menu and choose Uninstall a program to open Programs and Features.
Step 3: Click Turn Windows features on or off to open Windows Features.
Step 4: Locate the specific .NET Framework versions, including .NET Framework 3.5 and 4.8, and uncheck the boxes for them.
Step 5: Click OK and restart the computer.
Step 6: Recheck .NET Framework 3.5 and 4.8 to reinstall them.

After restarting the system, run your application properly.

#3. Reinstall Microsoft Visual C++ Redistributable Packages
Microsoft Visual C++ Redistributable is a package of runtime components required to run applications developed using Visual Studio. Once files in the package are damaged or missing, many issues will occur, for example, “the application was unable to start correctly”.
You should uninstall and reinstall the Microsoft Visual C++ Redistributable packages.
Step 1: Open the Programs and Features window in Control Panel.
Step 2: Uninstall all the items with the name “Microsoft Visual C++”.
Step 3: Visit the Latest Microsoft Visual C++ Redistributable downloads page and download the proper versions.
Step 4: Run the .exe files you downloaded and finish the installation of the packages.
Then, reboot the computer and check if you can launch your app.
Advanced Solutions
Here are some other recommended solutions to resolve the application error 0xc000007b/0xc0000142/0xc0000022. Follow the instructions to run SFC, do a clean boot, disable antivirus software, edit the Windows registry, and replace .dll files.
#1. Run SFC and DISM
Damaged or missing Windows system files can cause errors such as “the application was unable to start correctly”.
To address this error, run the built-in tool, System File Checker (SFC). It can scan the integrity of all protected system files and replace incorrect, damaged, or changed versions with the correct ones.
Step 1: Open Command Prompt as an administrator by pressing Win + R, typing cmd, and pressing Ctrl + Shift + Enter.
Step 2: Type sfc /scannow and press Enter.
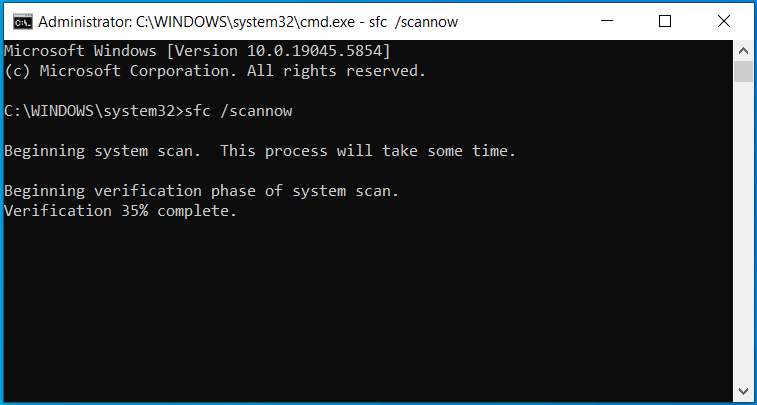
Step 3: Wait until the scan finishes.
Step 4: Run the command: DISM /Online /Cleanup-Image /RestoreHealth. DISM repairs the Windows image if SFC cannot fix all errors.
Then, restart the system and check if this helps you.
#2. Disable Antivirus Software
In some cases, antivirus software can interfere with the startup of certain apps, which may prevent apps from starting correctly. We recommend disabling it temporarily.
If your system is Windows 11 or Windows 10, disable Windows Security by following the guide on how to disable Microsoft Windows Defender.
If your PC uses a third-party antivirus program, you should also disable it. Usually, do this from the system tray.
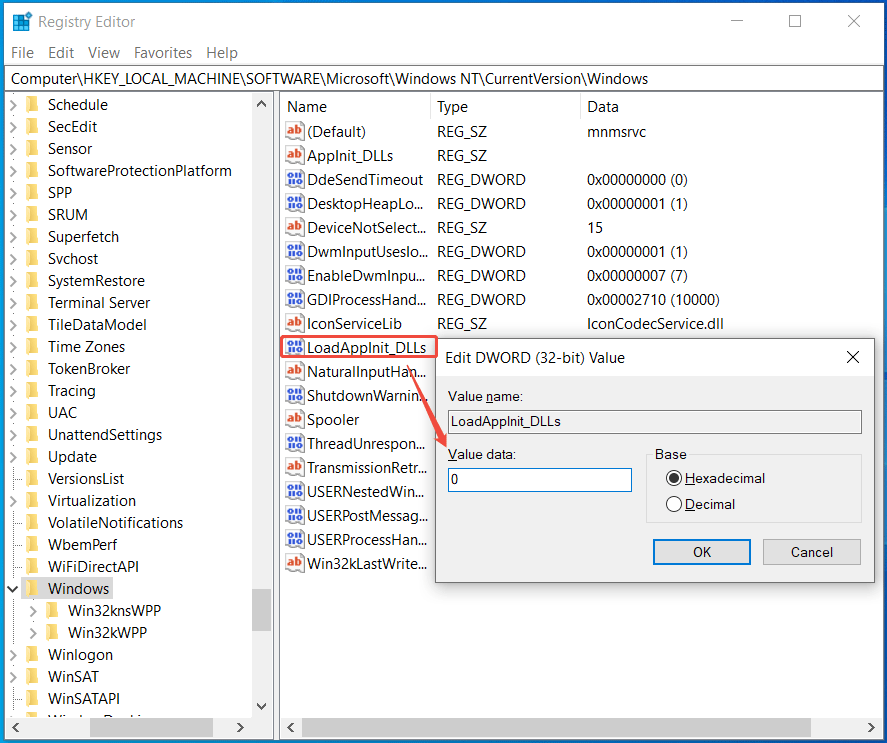
#3. Change the Value of the LoadAppinit_dlls Key
To fix the app that won’t start correctly, it is recommended to change the value of the LoadAppInit_DLLs Key.
Take these steps:
Step 1: Type regedit in Windows Search and press Enter to open Registry Editor.
Step 2: Copy and paste the following path to the address bar and press Enter.
HKEY_LOCAL_MACHINE\SOFTWARE\Microsoft\Windows NT\CurrentVersion\Windows
Step 3: Locate LoadAppInit_DLLs, double-click on this key, and set its Value data to 0.
Step 4: Click OK and restart the computer.
#4. Replace .dll Files
There is another solution from a Reddit user, which is replacing some .dll files. He offered a link from Steam to show how to do this task. This method has helped many users. If you still encounter the app error, give it a try.
#5. Perform a Clean Boot
A Windows clean boot helps determine whether a background program is interfering with the system. Try this if your app doesn’t start correctly.
Back up System After Troubleshooting
After resolving the issue of app not starting correctly, your computer is now stable, making it a good time to create a system backup. Once something goes wrong, restoring the PC to a previous state is simplified.
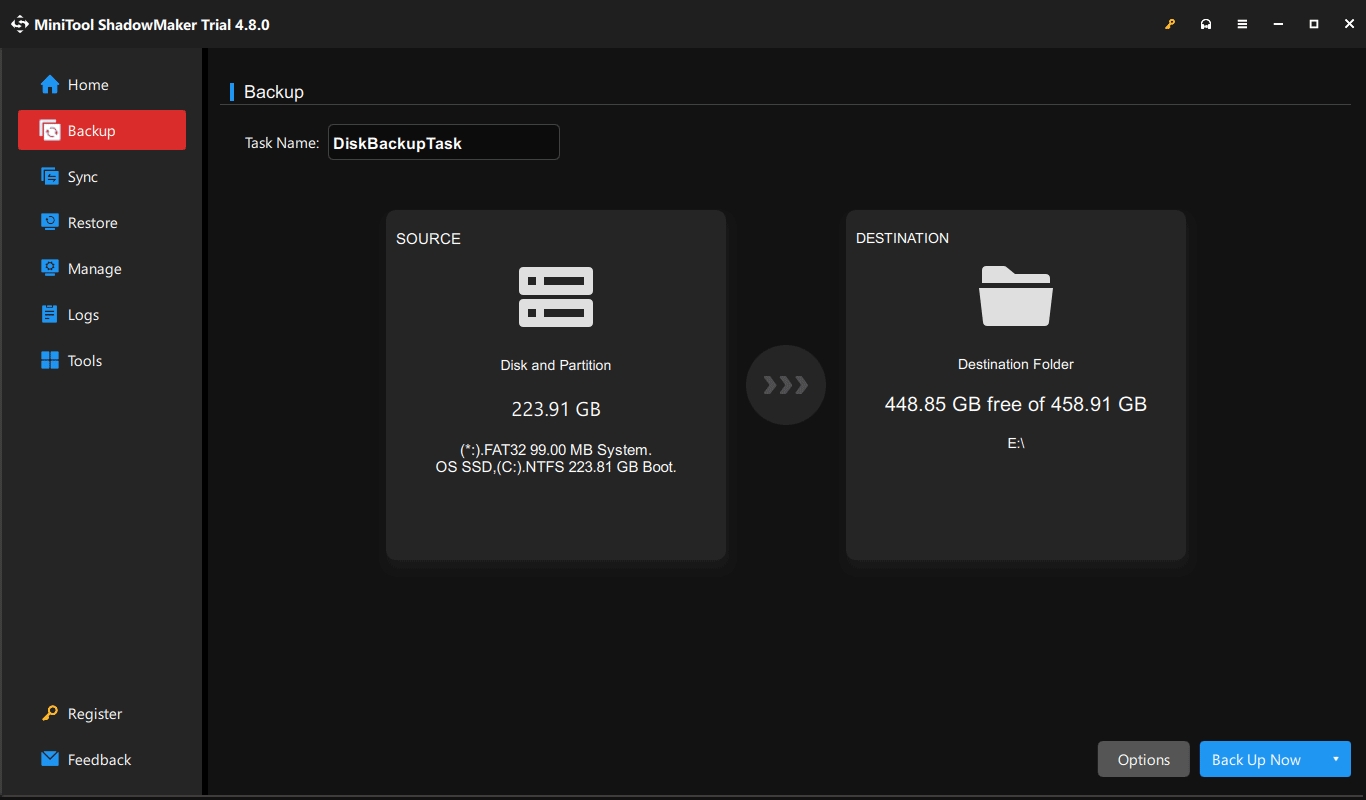
The free backup software, MiniTool ShadowMaker, provides essential data protection features, including disk/partition/system/folder/file backup & recovery.
Importantly, this program allows you to back up only the changed data via its incremental or differential backup scheme, saving storage space. It also supports automatically backing up important data.
MiniTool ShadowMaker TrialClick to Download100%Clean & Safe
Step 1: Connect a USB drive or external hard drive to your computer and launch MiniTool ShadowMaker.
Step 2: On the Backup page, the software selects system partitions as the backup source by default. Just go to DESTINATION and pick your USB drive or external drive as the target.
Step 3: Begin the system backup by clicking Back Up Now.
Conclusion
This article introduces various possible causes and effective solutions to “the application was unable to start correctly”.
By following the basic fixes, system checks, and advanced options, you may have addressed the error 0xc0000142, 0xc0000022, or 0xc000007b.
After that, back up your system or data regularly as a precaution. For the issues with MiniTool software, contact us at [email protected].
The Application Was Unable to Start Correctly FAQ
2. Close other tabs and applications
3. Check for malware
4. Disable extensions
5. Clear browsing data
6. Disable hardware acceleration
7. Disable antivirus and firewall
8. Reinstall Chrome
9. Run an SFC scan
2. Run SFC & DISM
3. Test RAM
4. Disable Data Execution Prevention (DEP)
5. Check for malware
6. Reinstall the problematic app
2. Repair the .NET Framework
3. Reset Windows Update components
4. Run SFC
5. Restart Windows Update services
6. Extend the Recovery Partition
About The Author

Position: Columnist
Vera has been working at the MiniTool Team for over 10 years as a technical editor and content writer. She mainly focuses on disk and partition management, data recovery, Windows backup and restore, and PC troubleshooting. Through in-depth software testing and hands-on experience, she has helped users solve a wide range of computer problems and better protect their data on Windows devices.
User Comments :