The USB drive read only issue blocks you from editing, deleting, or adding files on the drive. This guide explains its possible causes, and shows how to remove read only from a USB drive through 8 proven methods, from simple tips to advanced fixes.
Quick Answer
USB drive read only can be caused by write protection, file system errors, malware, or incorrect settings. In most cases, you can remove the read-only mode through these methods:
- Check the physical write protection switch
- Modify Windows Registry settings
- Remove write protection using Diskpart
- Adjust Group Policy settings
- Change USB Security Permissions
- Run CHKDSK
- Scan for viruses and malware
- Format the USB drive
Why is Your USB Drive Read Only?
A USB drive, also known as a USB stick, pen drive, thumb drive, or pen drive, is a portable data storage device that uses flash memory with an integrated Universal Serial Bus interface.
Sometimes, your USB flash drive becomes read-only and you cannot make any changes on the contents of the drive. Even if all the data is still there, you are not allowed to edit data, delete files, or save information on this drive.
The common causes include:
| Cause | Description | Severity |
| Write protection enabled | The system or drive is set to read-only mode. | Low |
| Physical lock switch | Some USB drives include a hardware lock toggle. | Low |
| File system corruption | NTFS or FAT32 file system errors may cause Windows to lock write access. | High |
| Virus or malware infection | Malicious programs may modify the registry to force read-only mode. | Medium |
| End-of-life flash memory | The USB drive is wearing out and failing permanently. | Very high |
The USB drive’s read-only mode can prevent others from modifying your data. However, in some cases, you may need to make changes to the drive. Below, we will explain how to make a read-only USB drive writable.
Can You Still Access a Read-Only USB Drive?
Yes. The read-only mode just means the USB drive is write-protected, indicating you cannot add, delete, or modify files on it.
You can still open the USB drive and read & copy files for data protection.
How to Protect Data Before Fixing Read Only USB Drive
Before applying any fix, it is recommended to back up your important files. A read-only USB drive sometimes indicates a drive failure. In addition, solutions such as formatting may result in data loss.
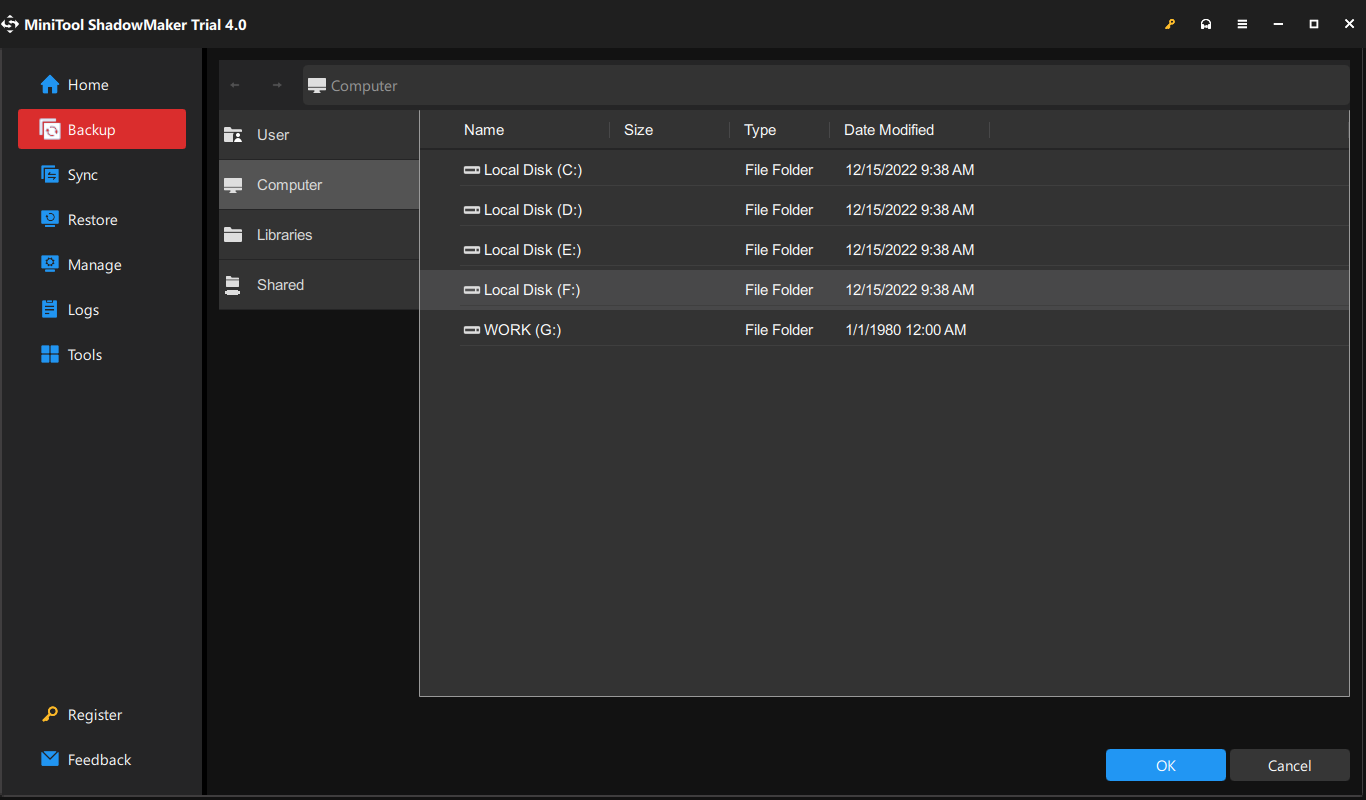
Professional backup software such as MiniTool ShadowMaker can create file, folder, disk, and system backups to keep your data safe. It also supports automatic backups, helping you protect data without manual effort.
Step 1. Download, install and launch the free trial of MiniTool ShadowMaker.
MiniTool ShadowMaker TrialClick to Download100%Clean & Safe
Step 2. Click on Keep Trial and then go to the Backup page.
Step 3. Go to SOURCE > Folders and Files and then you can choose the files that you need to back up. In DESTINATION, you can select a storage path for your backup image files.
Step 4. Click on Back Up Now to start the backup process at once or press Back Up Later to delay the task.
How to Change Your Read-Only USB Drive to Writable on Windows 10/11?
| Method | Difficulty | Best for | Data safety |
| Check the physical write protection switch. | Very easy | SD cards, USB adapters with a lock switch | High |
| Modify Windows Registry settings | Medium | Persistent system-level write protection | High |
| Remove write protection with Diskpart | Easy | Windows-level disk attribute issues | High |
| Edit Group Policy | Medium | PCs where USB write access is blocked by Group Policy restrictions | High |
| Change security permissions | Easy | Access/permission-related write restrictions | High |
| Run CHKDSK | Easy | Corrupted files system | Medium |
| Scan for viruses and malware | Easy | Malware-infected USB drives forcing read-only mode | Medium |
| Format the USB drive | Easy | Severe corruption or unusable USB | Low (data erased) |
Fix 1: Check the Physical Switch
Best for: USB drives or SD card adapters with a hardware lock switch accidentally enabled.
Some USB drives have a physical write protection switch on the side or button. If yours has this switch, you can try to turn it off.
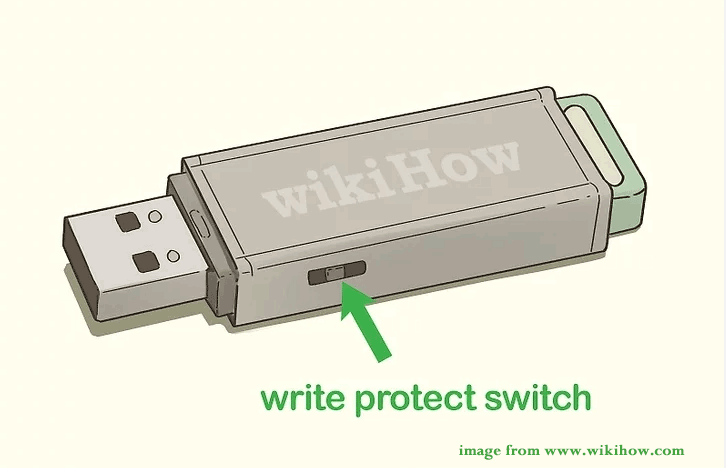
Step 1. Check if your USB drive has a lock switch. If there is one, slide the switch to the unlock side.
Step 2. Reconnect your USB drive to your computer and check if you can edit the data on it.
Fix 2: Change the Registry Key
Best for: Persistent write protection caused by system registry settings that change normal USB write permissions.
If you find no switch on the USB flash disk, you can unlock your device via Registry Editor. Here’s how to do it:
Step 1. Connect your read-only USB drive to the computer.
Step 2. Press Win + S to launch the search box.
Step 3. Type registry editor and then hit Enter.
Step 4. Navigate to the following path: HKEY_LOCAL_MACHINE\SYSTEM\CurrentControlSet\Control\StorageDevicePolicies
Step 5. Double-click on the write Protection key to change its value to 0 and hit OK to save the changes.
Some of you may find that the StorageDevicePolicies doesn’t exist in Step 4. Don’t worry! If so, follow the steps below:
Step 1. Right-click on the Control key > select New > hit Key > rename this new key as StorageDevicePolicies.
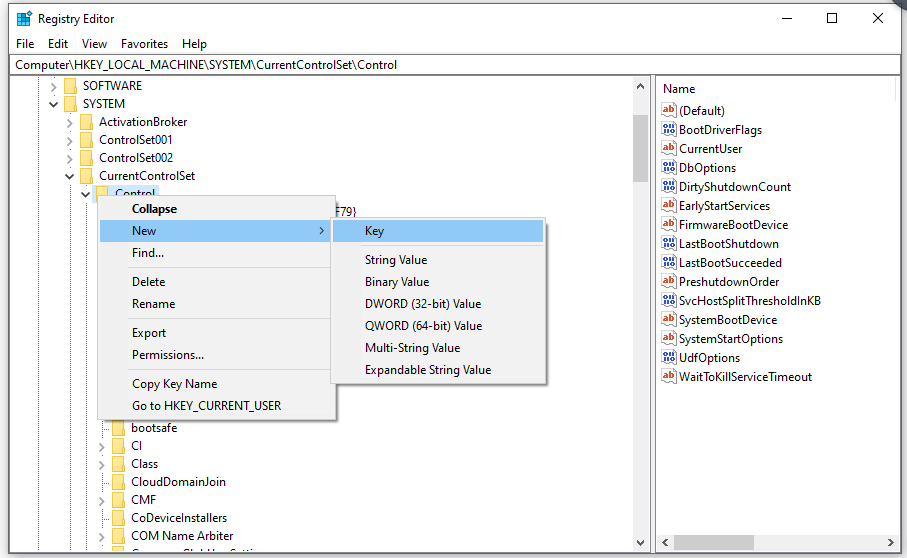
Step 2. Right-click on the StorageDevicePolicies > select New > hit DWORD (32-bit) Value > rename it as write Protection.
Step 3. Double-click on write Protection to change its value to 0.
Fix 3: Run DiskPart
Best for: Windows-level write protection where the USB drive is marked as read-only at the disk attribute level.
Another method to clear the read-only attribute on your USB drive is using the Windows DiskPart command. Follow the guidelines below:
Step 1. Press Win + R to open the Run dialog.
Step 2. Type diskpart and hit OK. If prompted by User Account Control, click on Yes to give permissions for your action.
Step 3. In the DiskPart command window, type list disk and hit Enter to show a list of all the disks on your computer. You can determine which one is your target USB flash drive according to the size of the disk. For example, we know that Disk 1 is our USB drive because its size is listed as 29 GB.
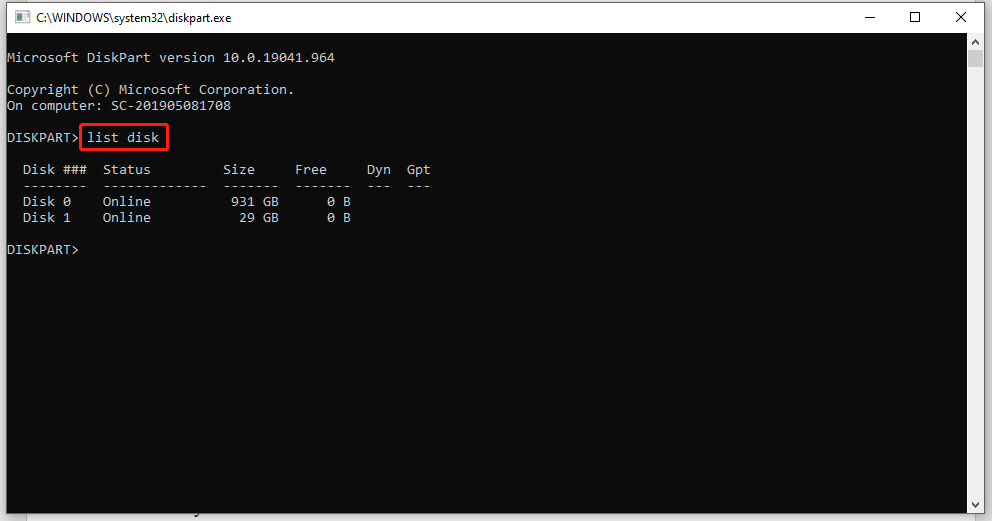
Step 4. Type select disk 1 and hit Enter. Remember to replace 1 with the disk number of your problematic drive.
Step 5. Type attributes disk clear readonly and hit Enter to disable the read-only mode on your USB drive.
Step 5. After the process is complete, quit this command window to check if the data on your target drive is able to modify.

Fix 4: Adjust Group Policy Settings
Best for: PCs where USB write access is restricted by policies.
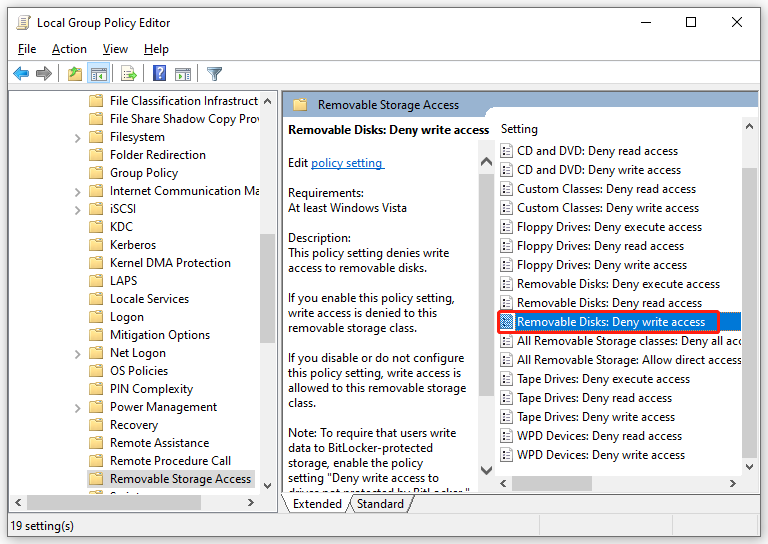
There is a possibility that the Removable Disks: Deny write access and Deny write access to removable drives not protected by BitLocker policy are enabled by mistake. In this case, it will deny write access to this removable storage class or all the removable data disks that are not BitLocker-protected will be mounted as read-only. Here’s how to modify these policy settings:
Step 1. Press Win + R to open the Run dialog.
Step 2. Type gpedit.msc and hit Enter to launch Local Group Policy Editor.
Step 3. Navigate to Computer Configuration > Administrative Templates > System > Removable Storage Access. In the right pane, double-click on Removable Disks: Deny write access, check Not Configured and save the change.
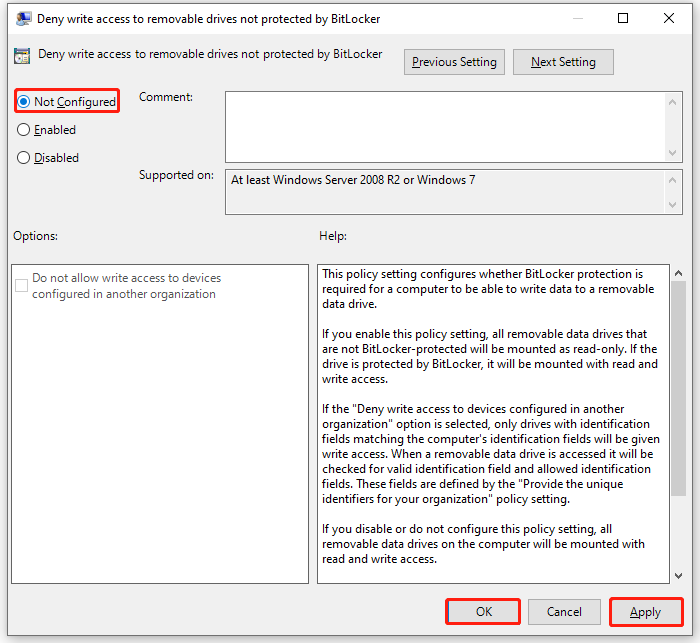
Step 4. After that, return to Local Group Policy Editor and head to: Computer Configuration > Administrative Templates > Windows Components > BitLocker Drive Encryption > Removable Data Drives. Then, double-click on Deny write access to removable drives not protected by BitLocker, set it to Not Configured and click on Apply & OK.
Fix 5: Change Security Permissions
Best for: USB write access blocked by incorrect Windows permission settings.
If you cannot clear the read-only attribute of your flash drive, the security permissions may need changing. Here’s how to do it:
Move 1: Check the File System of USB Drive
Step 1. Press Win + E to open File Explorer.
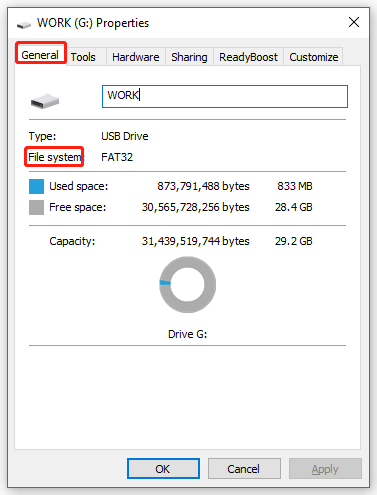
Step 2. Go to This PC and right-click on your USB flash drive under Devices and drives to choose Properties.
Step 3. In the General tab, check the File system entry to see how the flash drive is formatted.
Move 2: Change the Security Permissions
For FAT file system:
Step 1. In the Properties window, go to the Sharing tab.
Step 2. In Sharing, hit Advanced Sharing > tick Share this folder > hit Permissions.
Step 3. Hit Everyone if it is not selected. Under Permissions for Everyone, make sure the Change entry is allowed.

Step 4. Click on OK to save all the changes.
If your USB drive is still read only, repeat all the steps and tick the Allow box beside Full Control.
For NTFS file system:
Step 1. In the Properties window, go to the Security tab.
Step 2. Click on Everyone and Edit to change the permissions.
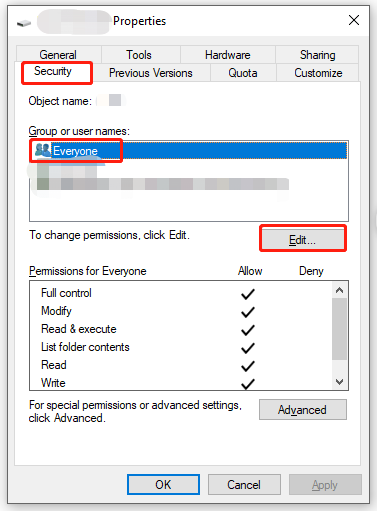
Step 3. In the Permissions window, hit Everyone. Under Permissions for Everyone, make sure the Modify entry is allowed.
Step 4. Hit OK to save all the security changes.
If you still cannot edit the data on the USB drive, repeat all the steps and make sure the Full Control entry is allowed under Permissions for Everyone.
Fix 6: Run CHKDSK
Best for: USB drives with file system corruption, bad sectors, or RAW errors causing read-only blocks.
It is likely that your USB drive becomes read only due to some disk errors. In this case, you can use the inbuilt Windows CHKDSK tool to fix these errors.
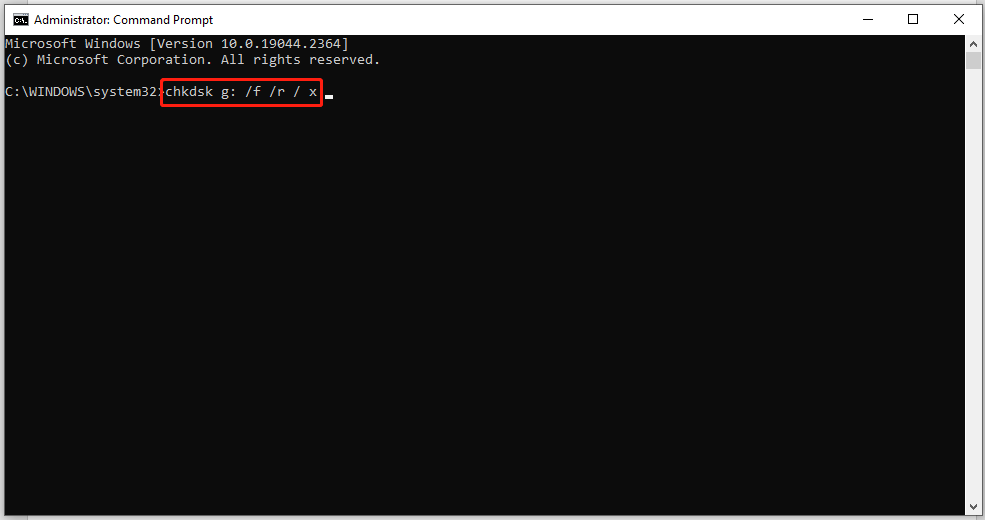
Step 1. Type cmd in the search bar to locate Command Prompt and right-click on it to choose Run as administrator.
Step 2. In the command window, type chkdsk g: /f /r / x and hit Enter to check and fix the error it finds. Don’t forget to replace g: with the drive letter of the read-only USB flash drive.
Fix 7: Scan for Viruses and Malware
Best for: USB drives affected by malware or viruses that modify permissions and trigger write protection.
If you download something from an unofficial website with your USB drive plugged into your computer, this device will easily be attacked by viruses or malware hence leading to USB drive read only. Then, you need to download some antivirus software to scan and kill the malware or virus at once.
Fix 8: Format the Target USB Drive
Best for: Severely corrupted or unstable USB drives when other fixes fail, and data loss is acceptable.
If none of the solutions above helps you out, chances are that the file system is corrupted. In this case, you can consider formatting your USB drive to make it writable or editable.
When it comes to formatting, it is suggested to try a free partition and disk management – MiniTool Partition Wizard. It has many powerful functions such as formatting partition, wiping disk, resizing partition, rebuilding MBR and more. Now, let’s check how to format a read-only USB drive with this tool:
MiniTool Partition Wizard FreeClick to Download100%Clean & Safe
Step 1. Download the drive and then follow the installing wizard to install this program.
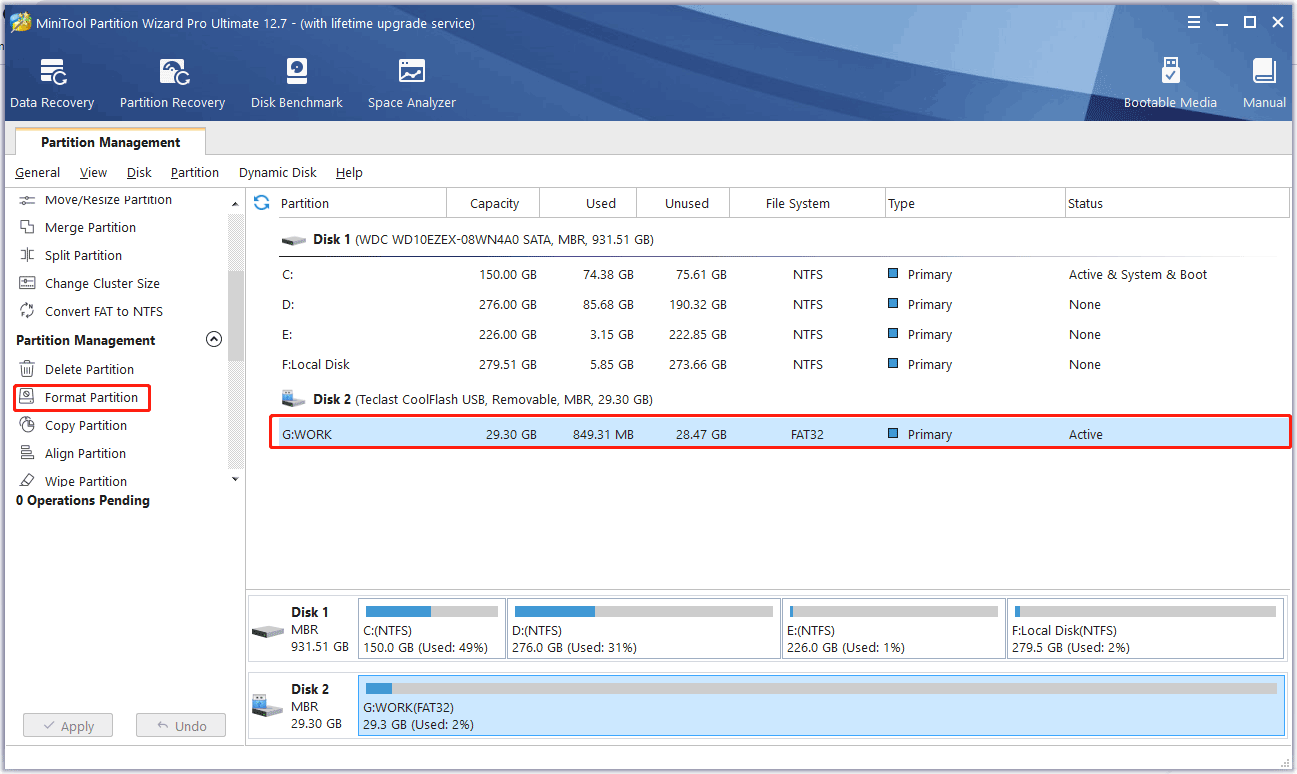
Step 2. Launch it and then select the partition that needs formatting.
Step 3. Scroll down in the left function panel to look for Format Partition and click on it.
Step 4. Set the partition label, file system and cluster size for the selected partition and hit OK.
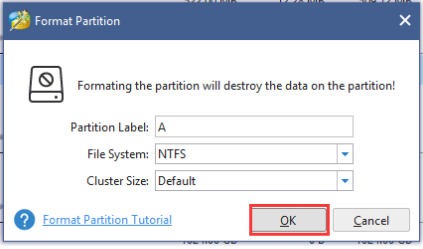
Step 5. Now, you can preview the formatted partition. If you are sure to apply the changes, click on Apply.
We Need Your Voice
In this post, we illustrate the causes and solutions for the USB drive read only issue for you. At the same time, we sincerely advise you to create a backup for your important files before fixing the issue to prevent data loss.
Do you have any queries about the solutions mentioned above or about our products? Show your ideas in the comment zone or contact us via [email protected]. We will reply to you as soon as possible.
USB Drive Read Only FAQ
1. Try a different USB port or computer.
2. Update or reinstall the USB driver
3. Run CHKDSK to fix file system errors
4. Assign a new drive letter
5. Format the USB flash drive
1. Toggle a physical write protection switch
2. Change file security permissions
3. Run the Diskpart command, attributes disk set readonly
About The Author

Position: Columnist
Vera has been working at the MiniTool Team for over 10 years as a technical editor and content writer. She mainly focuses on disk and partition management, data recovery, Windows backup and restore, and PC troubleshooting. Through in-depth software testing and hands-on experience, she has helped users solve a wide range of computer problems and better protect their data on Windows devices.
User Comments :