What Is Vssvc.exe?
What is vssvc.exe? Vssvc.exe is also called Volume Shadow Copy, Volume Snapshot Service or VSS. It is a service in Microsoft Windows that creates backup copies of computer files or volumes even when they are in use.
It requires Windows NTFS or ReFS file system to create and store shadow copies. Any Windows component that uses this technology can create shadow copies on local and external volumes, such as when creating scheduled Windows backups or automated system restore points.
Vssvc.exe has two functions:
- It works alongside other applications and does not interfere with them while creating backup images.
- It specifically provides APIs for third-party applications to help create images and rebuild volumes from the most recently stored images when needed.
![[7+ Ways] Fix VSS was Denied Access to the Root of Volume](https://images.minitool.com/minitool.com/images/uploads/2022/02/vss-was-denied-access-to-volume-root-thumbnail.png)
How Does VSS Create an Image?
VSS uses three different methods to generate images, and the whole process takes only a minute to complete:
Freeze – The hard drive being backed up goes into a read-only state for a period of time to ensure that nothing can be written on the drive until the backup process begins.
Snap – It then snaps the drive with the guidelines needed for future rebuilds of the image.
Unfreeze – The drive is no longer read-only and data can now be written to it. However, since according to VSS you can continue to use the hard drive while the backup is being generated, you can save the data until the drive is ready to be written to again.
How to Fix Vssvc.exe High Disk Usage
When the VSS service is stopped, shadow copies used for backups are lost and the backup process may crash. If this service is turned off, any VSS-based services will also stop working. So basically, stopping the service may interrupt the backup process, forcing some applications to stop working. Although the service doesn’t use too many system resources, you may meet the vssvc.exe high disk usage issue. Let’s see how to fix it.
Solution 1: Re-enable System Restore
First, you can try to re-enable System Restore to fix the vssvc.exe high CPU usage issue. Here is how to do that:
Step 1: Press the Windows + R keys together to open the Run box.
Step 2: Type systempropertiesprotection in the box and click OK to open the System Properties window.
Step 3: Under the System Protection tab, click the Configure… button.
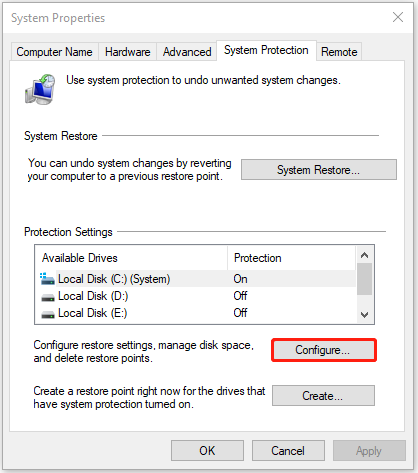
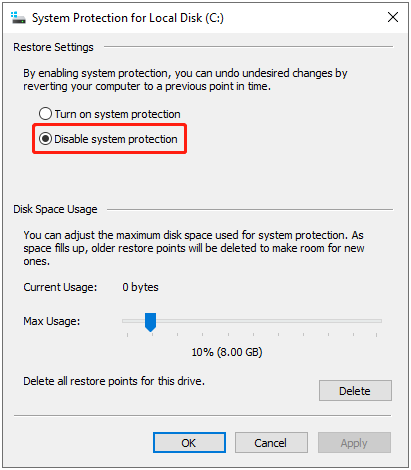
Step 4: Next, under the Restore Settings part, choose the Disable system protection option. Click Apply and then OK to save changes and exit.
Step 5: Now, restart your system and then repeat the process from step 1 to step 3. Now, under Restore Settings, select the Turn on system protection option. Click Apply and then OK to save the changes and exit.
Now, the system restore is enabled back again. Now, you can check if the vssvc.exe is consuming high CPU.
Solution 2: Restart the Volume Shadow Copy Service
The second method for you is to restart the Volume Shadow Copy service. Follow the steps below:
Step 1: Press the Windows + R keys together to open the Run box.
Step 2: Type services.msc in the box and press Enter to open the Service application.
Step 3: Find Volume Shadow Copy. Double-click it to open its Properties dialogue box.
Step 4: Under the General tab, go to the Service status section and click Stop. Now, click Start again. Click OK to save changes and exit. Alternatively you can also right-click the service and select Restart to start the service again.
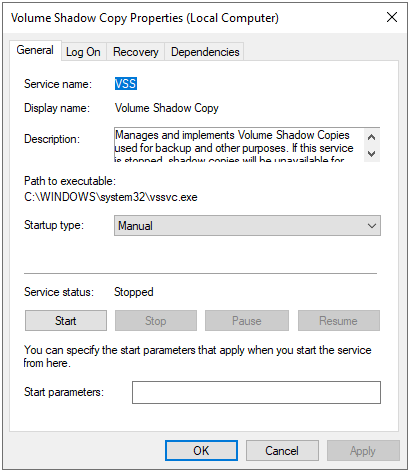
This should restart the VSS service and it should not consume much CPU and memory anymore.
Solution 3: End Volume Shadow Copy in Task Manager
When you notice that the PC is getting slower than usual and the CPU 100%, you can try the Task Manager to end the task. Here is how to do that.
Step 1: Search for Task Manager and open it.
Step 2: Click the CPU column header to sort the processes by CPU usage and check which processes cause your CPU becoming higher.
Step 3: Right-click Volume Shadow Copy and then you should click End task to finish this process.
Now, see if the CPU usage is still at 100% after you do the above operations. If not, this issue has been resolved. If the Vssvc.exe high disk usage issue persists, try the next solution.
Solution 4: Run System File Checker
If there are some corrupted or missing system files, you may also meet the “vssvc.exe high CPU” issue. Don’t worry, you can run Windows System File Checker (SFC), a built-in utility that enables you to scan and restore the problematic system files, to solve the problem.
Step 1: Click the Start menu. Then type cmd in the Search box. Right-click Command Prompt and choose Run as administrator.
Step 2: When you get into Command Prompt, input sfc /scannow and press Enter.
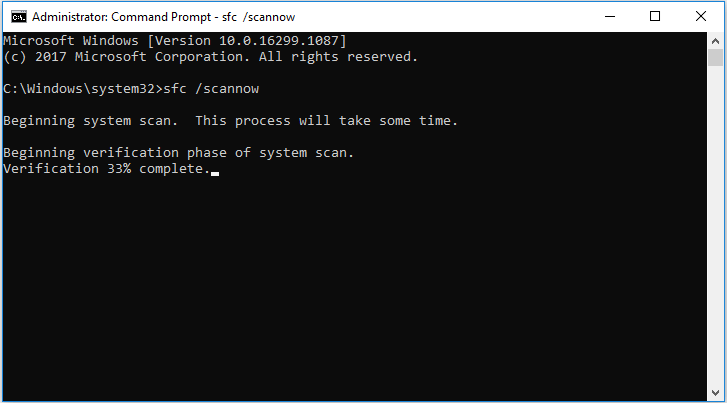
Step 3: Then Windows will scan for system file issues. You need to wait until the process is 100% completed.
Now exit Command Prompt and restart the computer.
Solution 5: Run Performance Troubleshooter in Command Prompt
You can also run Performance Troubleshooter in Command Prompt to get rid of the Volume Shadow Copy high disk usage issue. It can help you change settings to improve the speed and performance of your operating system.
Step 1: Type cmd in the Search box.
Step 2: Right-click Command Prompt and choose Run as administrator.
Step 3: Type msdt.exe /id PerformanceDiagnostic and press the Enter key.
Step 4: Click Next in the Performance window to continue. Wait for the troubleshooting process to finish.
Solution 6: Reset/Fresh Start Windows 10
If the above methods are not working. The last method for you is to reset or fresh start your Windows.
Reset This PC
In the past, it’s an inconvenient process to factory reset Windows. However, Microsoft has introduced an easier way to restore the current operating system to factory settings since Windows 8.
- Press Start button on the keyboard.
- Click on the Settings icon from the left side of Start menu.
- Scroll down to choose Update & Security.
- Choose Recovery from the left-hand panel.
- Find Reset this PC part from the right-hand panel.
- Click on the Get started button.
- Choose to Keep my files or Remove everything (take the latter as an example).
- Choose from Just remove my files and Remove files and clean the drive.
- Click on the Next button in the Warning window which says you won’t be able to undo the upgrade and go back to the previous version of Windows.
- Click on the Reset button in the Ready to reset this PC window.
- Click on the Continue button in the Choose an option window.
- Wait for the process to complete.
Fresh Start
- Repeat step one to step four of the above method.
- Find the More recovery options part.
- Click on the link text Learn how to start fresh with a clean installation of Windows.
- Choose Yes from the pop-up window to open Windows Defender Security Center.
- Click on the Get started button under Fresh start.
- Choose Yes from the pop-up User Account Control window.
- Click on the Next button to remove all apps and programs from your PC.

Use MiniTool ShadowMaker to Back Up Your Data
As the alternative to Windows built-in backup utility using Volume Shadow Copy Service, MiniTool ShadowMaker is worth recommending.
The free backup software is an all-in-one data protection and disaster recovery solution for PCs. It allows you to back up your systems, important files, folders, partitions, and even the whole disk. Once a disaster occurs, you are able to restore data with a copy of the backup.
MiniTool ShadowMaker also lets you create bootable media to restore your system to a normal state when your computer fails to boot. It’s easy to use MiniTool Media Builder and MiniTool PXE Boot Tool to maintain hard drives. And it is compatible with Windows 7/8/8.1/10 and Windows Servers.
You can download MiniTool ShadowMaker Trial to back up files and keep them safe. It can be used for free within 30 days or you can choose to purchase an advanced one.
MiniTool ShadowMaker TrialClick to Download100%Clean & Safe
Here is how to back up files:
Step 1: Decide a Backup Mode
- Launch MiniTool ShadowMaker.
- Continue to use the trial edition by pressing Keep Trial.
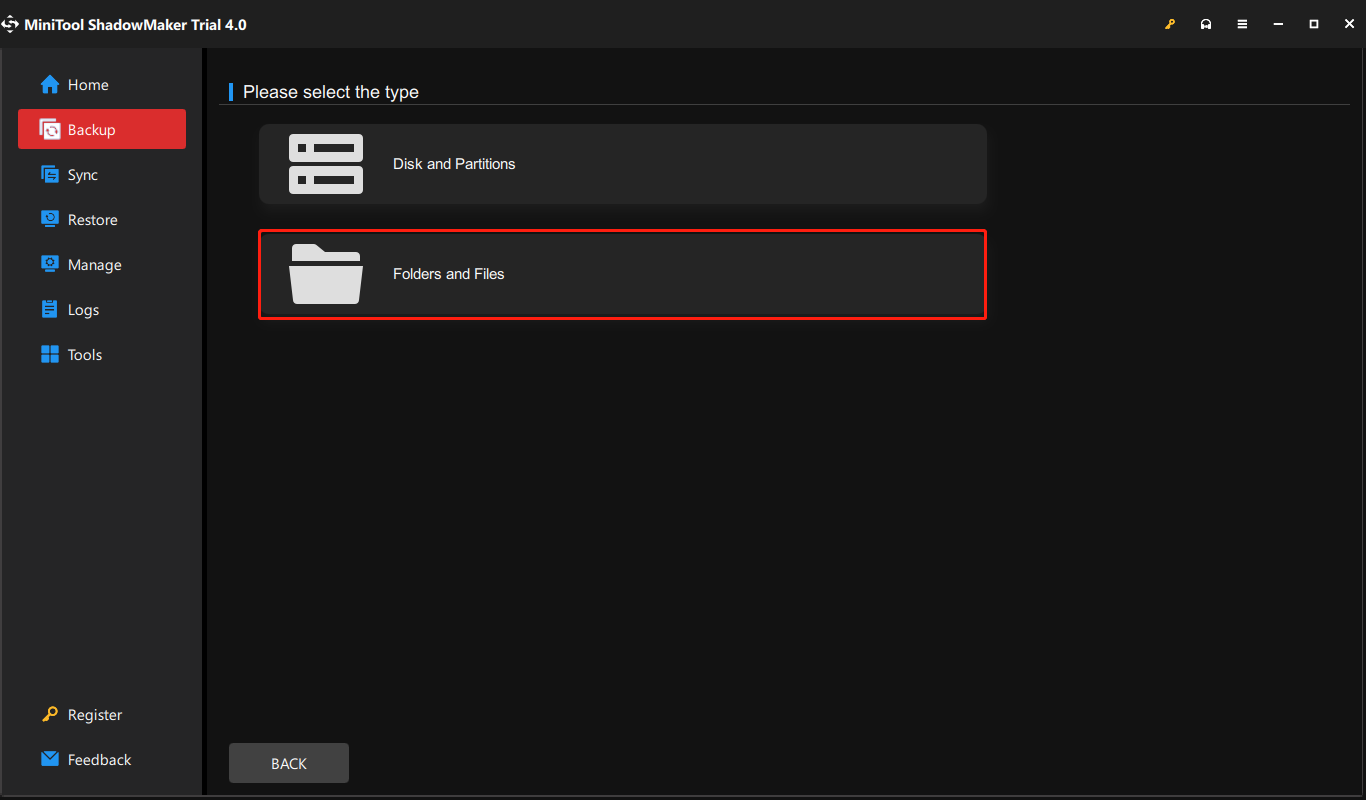
Step 2: Choose Backup Source
- Go to the Backup page.
- Choose Folders and Files to continue and choose the files you want to back up, then click OK.
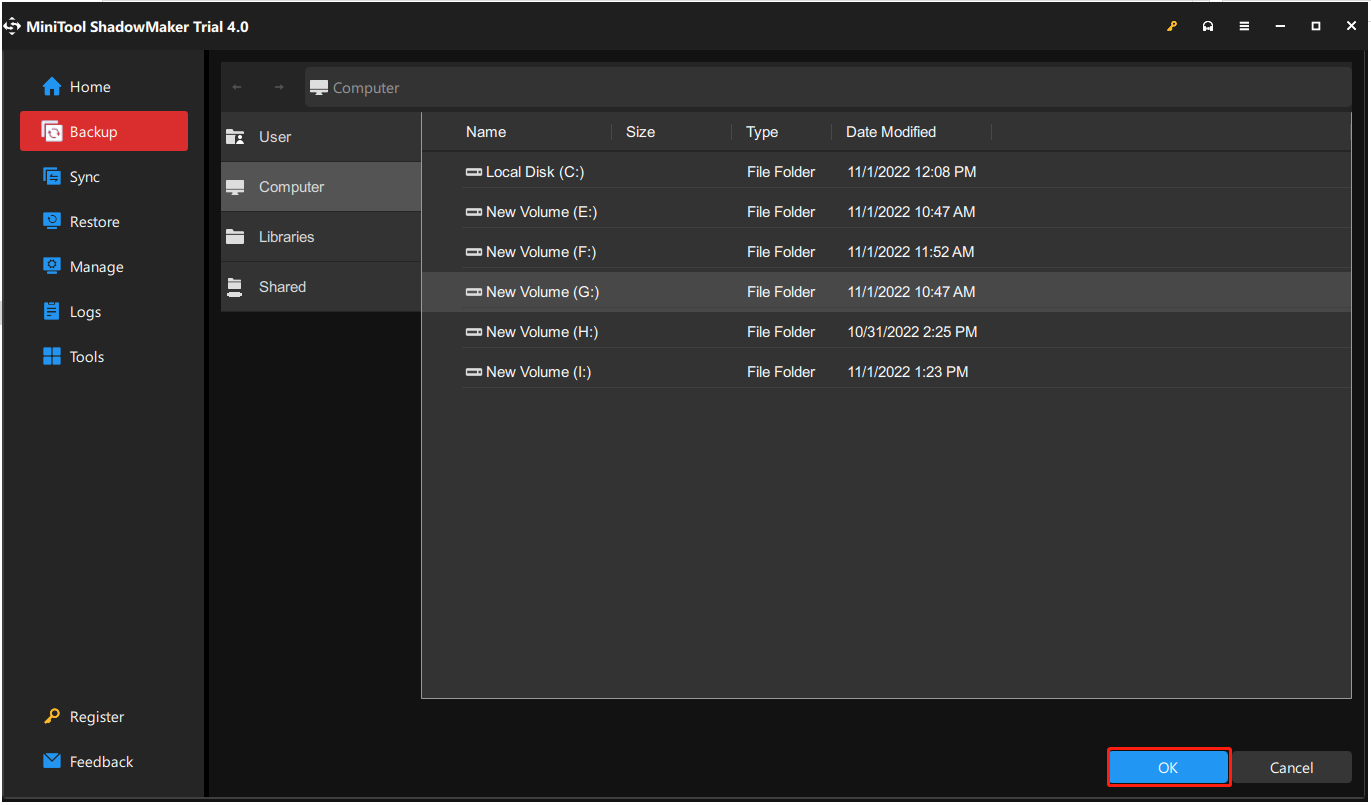
Step 3: Choose a Destination Path
Go to the following interface and choose one partition to store your files based on your needs and click OK.
Step 4: Start to Back Up
Go back to the following interface and click Back Up Now to start the process immediately.
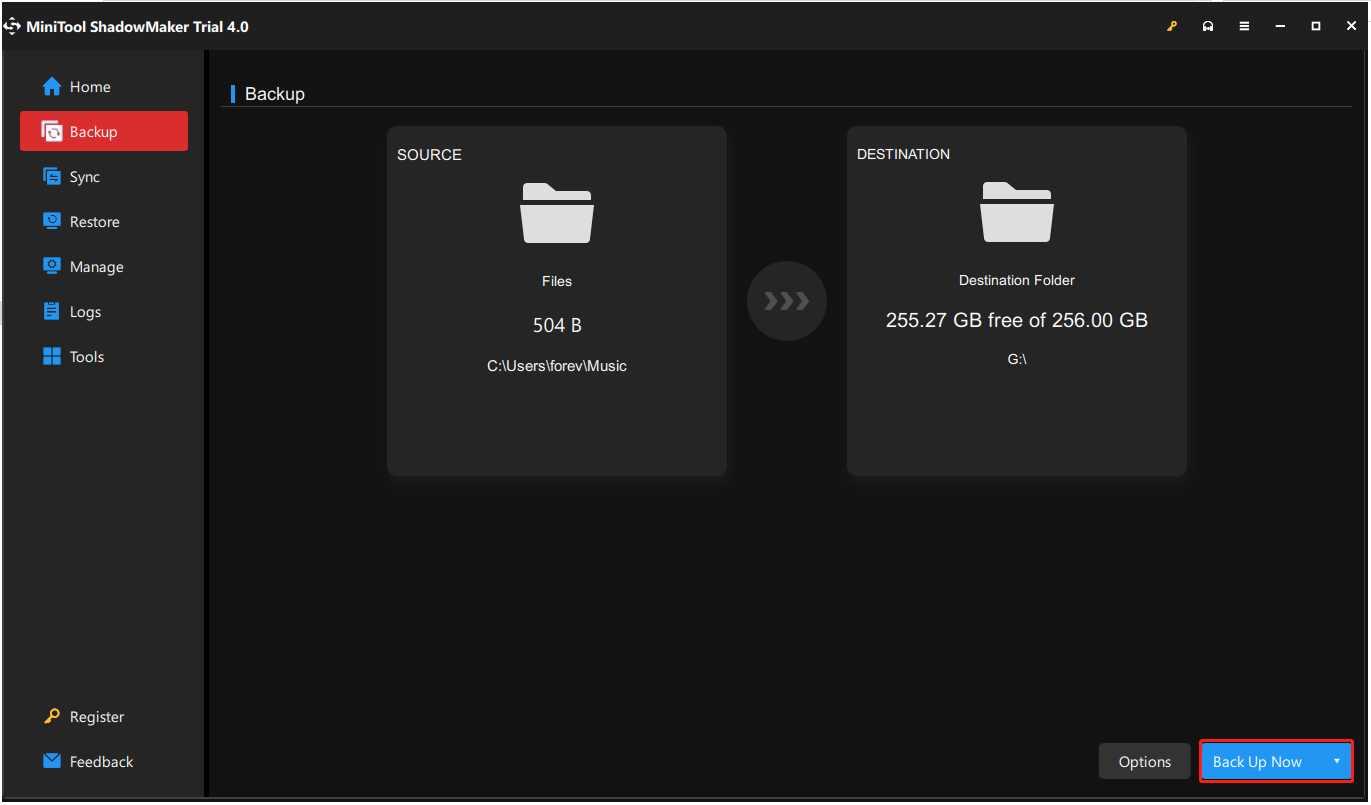
When the process is finished, you have successfully backed up files so as to have provided protection for the data.
Bottom Line
Although the exact reasons for vssvc.exe high disk usage are difficult to find, there is a list of solutions. In addition, there is a backup software – MiniTool ShadowMaker for you to back up files. If you have any questions or suggestions, please contact us via [email protected] or leave a comment.
vssvc.exe High Disk Usage FAQ
Windows uses the Volume Shadow Copy service to make a copy of the hard drive for restoration from System Restore. Sometimes this takes up too much space, especially with small hard drives, so you may need to reduce the disk space used by the shadow copy storage.
This should be between 15% and 20% of total drive capacity. For example, a hard drive of total capacity 99.9GB should have a VSS threshold setting of between 15GB and 20GB.
The command line associated with the script from Pastebin shows that it is instructing vssadmin.exe to delete volume shadow copies, a behavior that often occurs with ransomware infections.
User Comments :