Windows 10 won’t shut down? Researches indicate that abnormal Windows update, system files and even fast startup are the main causes. You may don’t know how to fix it. Fortunately, this article provides 8 solutions to fix Windows 10 won’t shut down. Read this post from MiniTool to get the solutions.
Why Windows 10/11 Won’t Shut Down
A computer won’t shut down is like a child who refuses to fall asleep. If you don’t take action now, the consumption of your computer hard drive and CPU is high.

What cause Windows 10/11 won’t shut down? Here are some reasons for this situation:
- Windows upgrade
- Fast startup
- Windows system files
- Unwanted running applications since startup
- The taskbar isn’t working
Then, I will introduce 8 useful solutions to fix Windows 10/11 won’t shut down completely in details.
How to Fix Windows 10/11 Won’t Shut Down
- Force Shut Down
- Disable Fast Startup
- Make Sure You Have the Latest Windows 10/11 Version
- Repair Windows System Files
- Use Command Prompt
- Control Applications Which Start Automatically
- Stop Windows Delivery Update Optimization
- Perform System Restore or System Image Recovery
How to Fix Windows 10/11 Won’t Shut Down?
Although it is a very frustrating and common problem, it is usually not difficult to solve. Before you start, check out if Windows 10/11 won’t shut down is caused by the update process.
Normally, a Windows update can take a few minutes or even hours. So, you are suggested to wait for 3 hours around when Windows update is the main cause for your issue.
If time is up and Windows 10/11 still hangs at shutting down, or your Windows 10/11 is not processing any update at all, try the following solutions.
Solution 1: Force Shut Down
Force shut down is the simplest and most feasible solution. Here’s how you can do this:
Step 1: Press and hold the power button until the computer is turned off.
Step 2: Remove all power (battery/power cord/unplug the power cord) for 5-10 minutes.
Step 3: Start your computer and try to shut it down normally.
Solution 2: Disable Fast Startup
Fast startup is a startup mode of Windows 10/11. A computer with Windows 10/11 fast startup runs 30% faster than a computer with Windows 7 normal boot, provided that they have the same hardware configuration.
In fact, the fast startup is a combination of Microsoft’s sleep mode and logout function. But sometimes it can interfere with the shutdown process, hence your Windows 10/11 won’t shut down completely. Here’s how to disable fast startup:
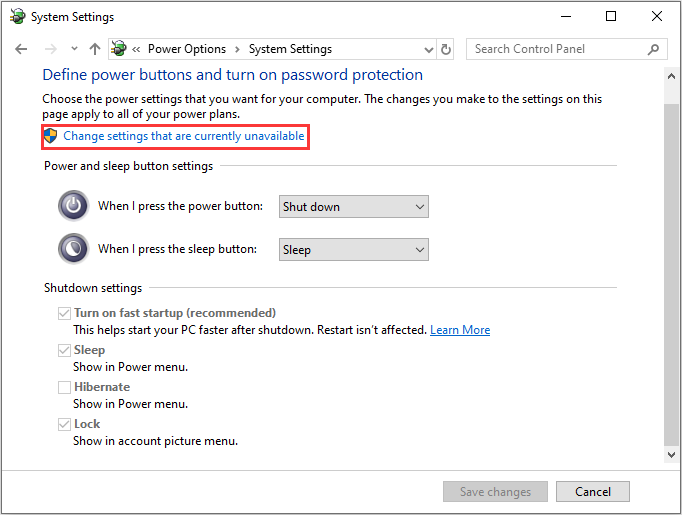
Step 1: Open “control panel” and search for “power options” and choose “Power Options”.
Step 2: From the left pane, choose “Choose what the power buttons do”.
Step 3: Choose “Change settings that are currently unavailable”.
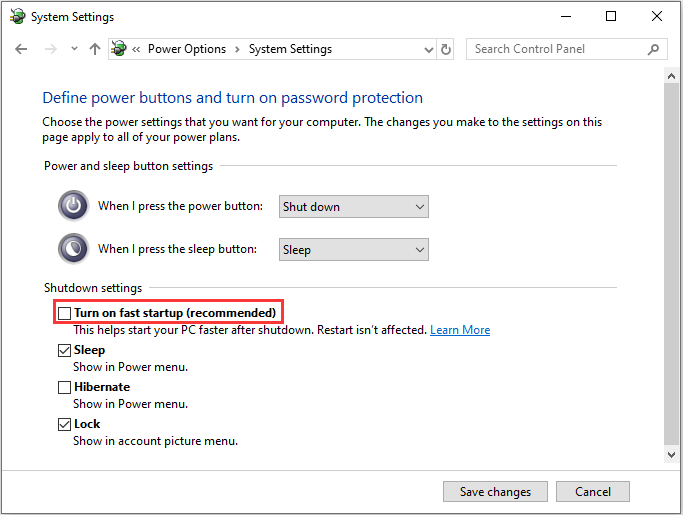
Step 4: Make sure the box before “Turn on fast startup” is unchecked, then click “Save changes” and close the window.
Solution 3: Make Sure You Have the Latest Windows 10/11 Version
It is always a good idea to have the latest version of Windows 10/11. Microsoft always uses it to send new updates and fixes to common problems, so we can always start troubleshooting by checking for updates.
To check if there are any updates you can do, please follow these steps:
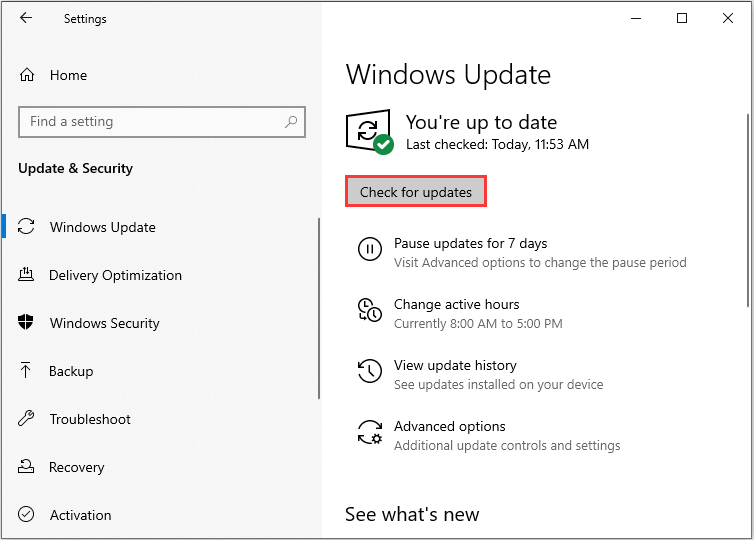
Step 1: Click “Settings” from your start menu and click “Updates & Security”.
Step 2: Choose “Windows Upgrade” from the left panel and click “Check for updates” button, and then your computer will check for, download and install any updates found.
If your update is getting stuck or not working, you can use the troubleshooter to fix Windows 10/11 won’t shut down after creators’ update. Here are the steps:
Step 1: On your keyboard, press the “Windows” key and “R” key at the same time, then input “control.exe /name Microsoft.Troubleshooting” into the box and click “OK”.
Step 2: Choose “Windows Update” and click “Run the troubleshooter”.
Step 3: Follow the on-screen instructions to fix the problems.
Step 4: Shut down your computer once again.
Now, you can see if the computer won’t shut down problem gets fixed by now.
Solution 4: Repair Windows System Files
After you updated your Windows, check if your computer shuts down. If the problem persists, continue to the next method: repair Windows system files. Sometimes, your Windows 11 won’t shut down because the Windows system files are corrupted. Here are the steps:
Step 1: On your keyboard, press the “Windows” key and “R” key at the same time, then input “cmd” and click “OK” to run as the administrator.
Step 2: Type the command “sfc /scannow” and then press “Enter”. Please make sure there is a space between “sfc” and “/scannow”.
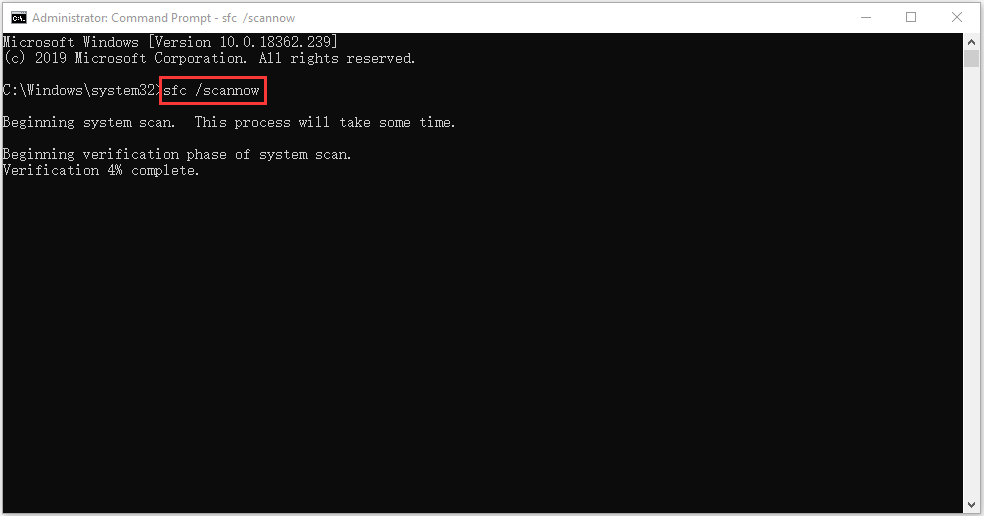
Wait patiently until the verification process 100% complete. Then reboot the computer to see whether Windows 11 won’t shut down loop still exists.
Solution 5: Try to Close the Computer Using Command Prompt
One of the best things about CMD (command prompt) is that you can directly request a forced shut down which stops any running applications. Here are the steps:
Step 1: In the start menu, please input “cmd” and choose “Run as administrator”.
Step 2: Type the following command: “shutdown /p” and then press “Enter”.
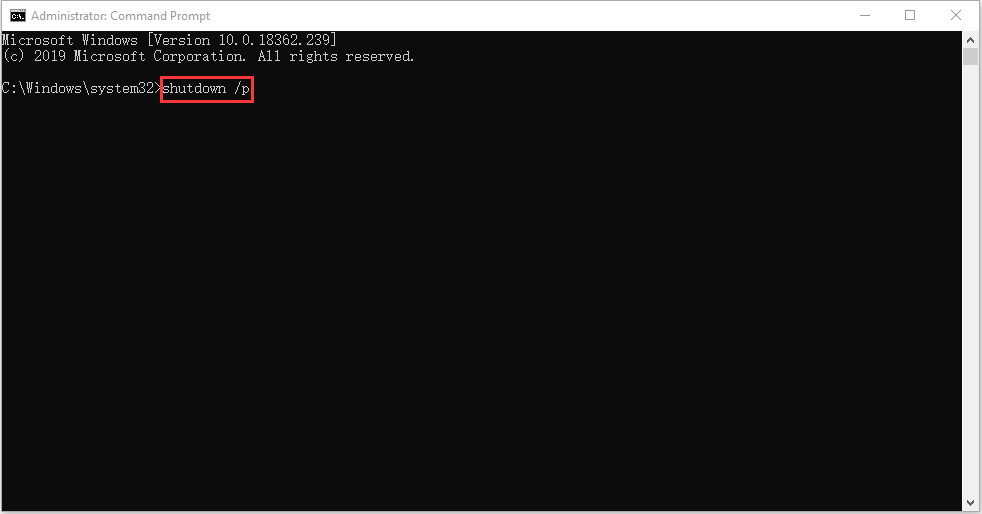
Your computer should now shut down immediately without installing or processing any updates.
Solution 6:Control Applications Which Start Automatically
Some applications and processes cannot be easily closed when you want to shut down your computer, this may be the cause of your shutdown problem. These applications are likely to run automatically in Windows Startup without your permission.
So here we can control them and disable every application that is not needed at startup. This will also increase your startup speed and shutdown speed. Here are the steps:
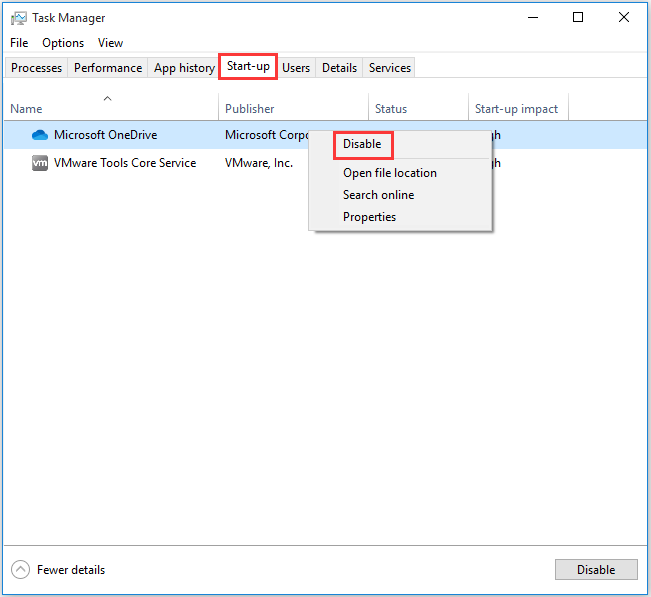
Step 1: Press “Ctrl”, “Shift” and “Esc” at the same time to launch the Task Manager and click “More details” to show more details.
Step 2: In the interface, please choose “Start-up” to open the Start-up tab.
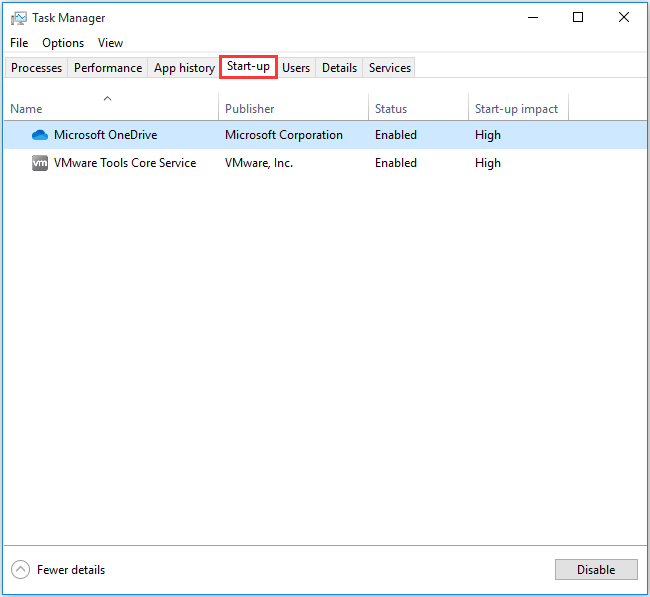
Step 3: Choose the application you need to control or disable and right-click it, then choose “Disable” to disable it.
Solution 7: Stop Windows Delivery Update Optimization
Windows 11/10 is always downloading updates, that’s why Microsoft came up with this service so that if there are several Windows 11/10 machines on the same network, computers can exchange the update files instead of downloading them on each computer.
So, if a computer on the network is getting any updates from yours, shut down won’t occur until the files transfer finishes. The good news is that you can turn off this feature, here’s how to do this:
Step 1: In the Start menu, please click “Setting” to open the setting interface.
Step 2: When you enter the main interface, please choose “Update &Security”.
Step 3: Now in the interface, click “Delivery Optimization” to continue.
Step 4: Turn off the Allow downloads from other PCs button to forbid downloads from other PCs.
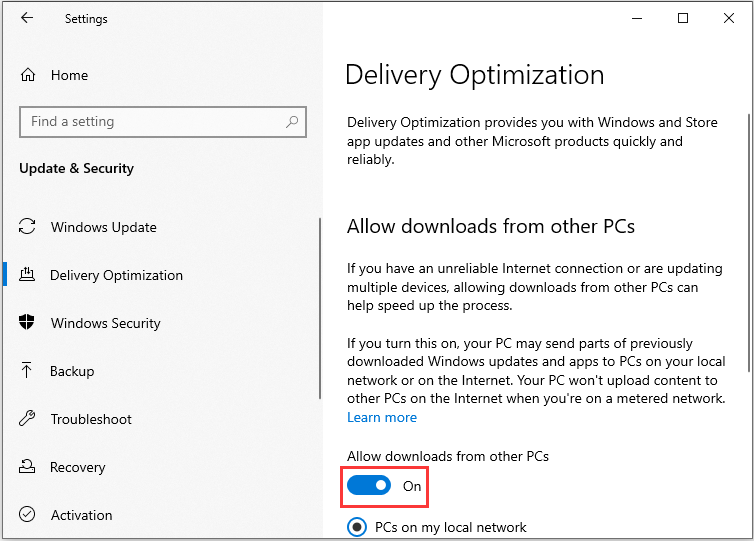
Now, you have done this operation successfully.
Solution 8: Perform System Restore or System Image Recovery
If you have created a system restore point or system image backup with Windows snap-in tools, you can try using the restore point or image file to restore your computer.
System Restore
Here are steps for system restore:
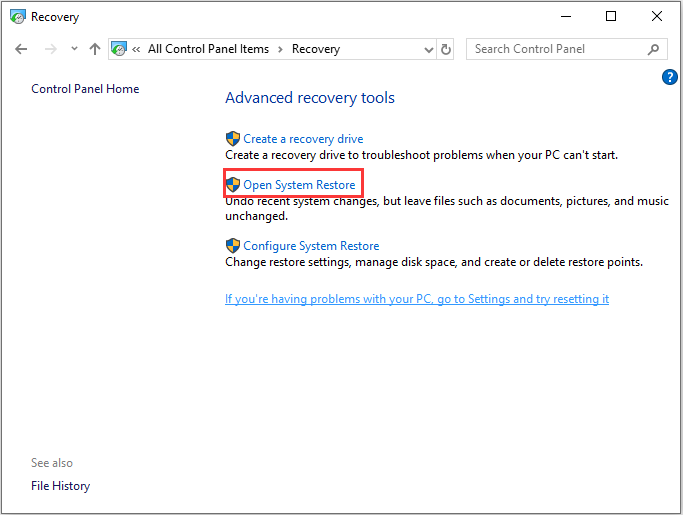
Step 1: In the start menu, search control panel to launch “Control Panel”.
Step 2: Type “recovery” and click “Recovery” to continue.
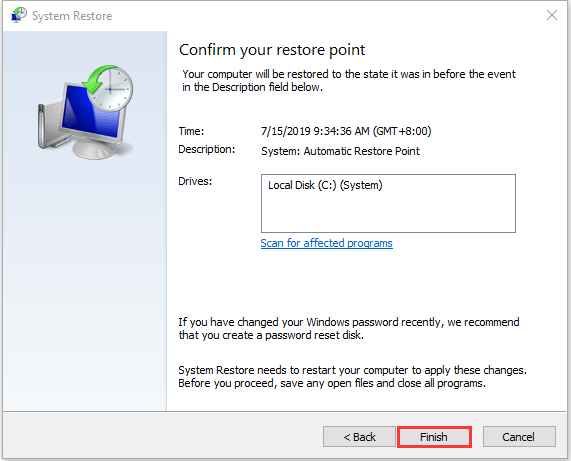
Step 3: In this interface, please choose “Open System Restore” to continue.
Step 4: In the Restore system files and settings interface, you can click “Next” to continue.
Step 5: Choose the time to restore your computer to the state it was in before the selected event and click “Next” to continue.

Step 6: You need to confirm the restore point and click “Finish”. After the system restore is finished, try to shut down your computer again.
When the system restore process is finished, you can reverse your computer to a previous state. And the system restore point can also help you to solve some system malfunctions or other problems.
System Image Recovery
If you do have a recent Windows 11 system backup, go back to the state when you were able to shut down your Windows 11. Here is how to perform system image recovery.
Step 1: In the “Start” menu, press “shift” and click “restart” at the same time to enter the WinRE.
Step 2: You should choose “Troubleshoot” in “Choose an option”, and then choose “Advanced options”.
Step 3: Choose “System Image Recovery” in “Advanced options” to get a new window.
Step 4: Choose the latest system image or an image backup that enables Windows 11 shut down. And then click “Next”.
Step 5: Follow the guidance to restore your PC. When a warning window for formatting pops up during the process, you need to click “Yes”.

Conclusion
It’s time to fix Windows 11/10 won’t shut down with these solutions. All of these solutions are easy and helpful, now you can choose a proper way to fix it. If you have any questions and suggestions, please contact us via [email protected] or leave a comment.
User Comments :