The “CHKDSK is not available for RAW drives” error appears when Windows cannot recognize a valid file system on the drive. If the data is important, recover your files first. If the drive is empty or the data is not needed, simply format it to restore usability. This MiniTool guide walks you through both processes.
Windows 11 Update KB5063878 corrupted my 8 TB Seagate drive (RAW, data loss). Symptoms:
Windows Explorer still shows folder names, but all files fail to open.
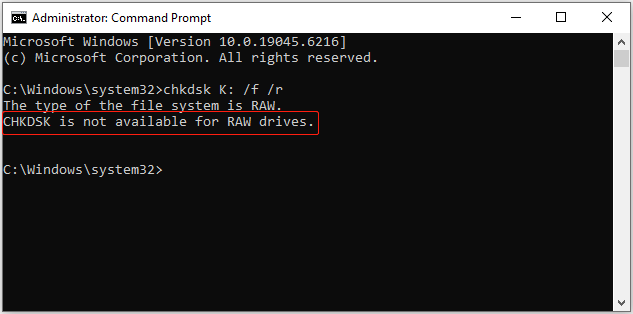
CHKDSK fails with: “The type of the file system is RAW. CHKDSK is not available for RAW drives.”
Windows Disk Management detects the disk but marks it as invalid.learn.microsoft.com
What does this error message mean? Keep reading to find out.
What Does “CHKDSK Is Not Available for RAW Drives” Mean
The error “CHKDSK is not available for RAW drives” means Windows cannot recognize the drive’s file system.
CHKDSK only works on valid file systems such as NTFS, FAT32, or exFAT. When a drive becomes RAW, Windows cannot interpret its disk structure, so CHKDSK cannot scan or repair it.
To be more specific, CHKDSK relies on file system metadata to repair logical errors. However, a RAW drive lacks readable metadata.
What Causes a Drive to Become RAW
A drive can become RAW due to several reasons, including:
- File system corruption due to improper ejection, sudden power loss, or system crash.
- File system missing because the drive has not been formatted.
- Malware or virus attacks that delete or corrupt file system information.
- Damaged partition table.
- Physical disk errors or bad sectors.
- An unsupported file system for the current operating system.
How to fix CHKDSK not available for RAW drive without losing data? The following section will guide you through the solutions.
Here is a quick video guide:
Case 1. You Need the Data: Recover Files From the RAW Drive
When a drive becomes RAW, repairing it usually requires formatting the partition to rebuild a valid file system.
However, formatting permanently removes all files on the drive, and the deleted data does not go to the Recycle Bin. If the RAW drive contains important files, you should recover your data first before attempting formatting.
MiniTool Power Data Recovery is a professional data recovery tool that works great for RAW drives. It supports 1 GB of free recovery.
MiniTool Power Data Recovery FreeClick to Download100%Clean & Safe
Recover Files From the RAW Drive (Based on My Real Testing Experience)
To verify how well MiniTool Power Data Recovery Free works on RAW drives, I used a 10 GB virtual hard disk and intentionally corrupted its file system.
Test Environment
- Operating System: Windows 10 22H2
- Storage Device: 10 GB virtual hard disk
- File System Before Corruption: NTFS
- Drive Usage: 4.6 GB occupied
- Test Data Types: Documents, images, and videos, with filenames prefixed by the test date 0424 to distinguish test files from existing data.
Recovery Steps
The recovery process required only three steps:
- Scan the RAW drive
- Preview the found files
- Save the needed files to another location
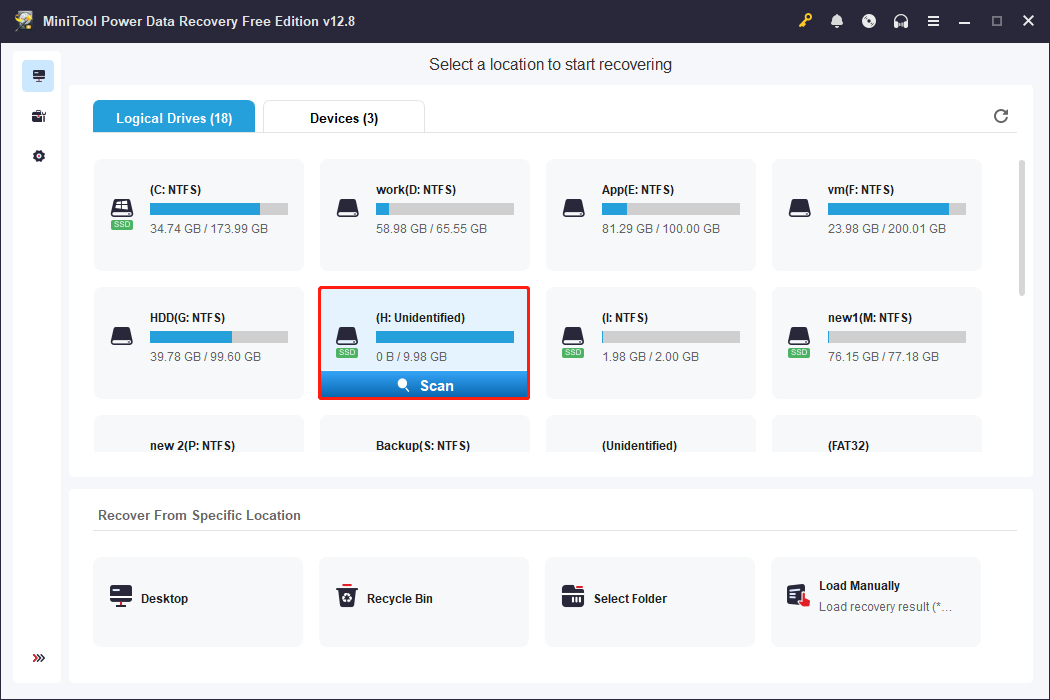
Step 1. Scan the Unidentified drive.
In my test, the RAW drive is detected correctly and labeled as Unidentified, which is typical for RAW partitions. Select it and click Scan.
- Scan duration: One and a half minutes
- Files found: 18647 files
- Scan mode: Quick and deep scan
Step 2. Find and preview the files.
After the scan completed, MiniTool displays all recoverable files under the Path and Type categories.
Since the scan returns several gigabytes of data, I use the Search feature to locate the test files by entering 0424, the filename prefix used during testing. All test files are successfully identified in the scan results.
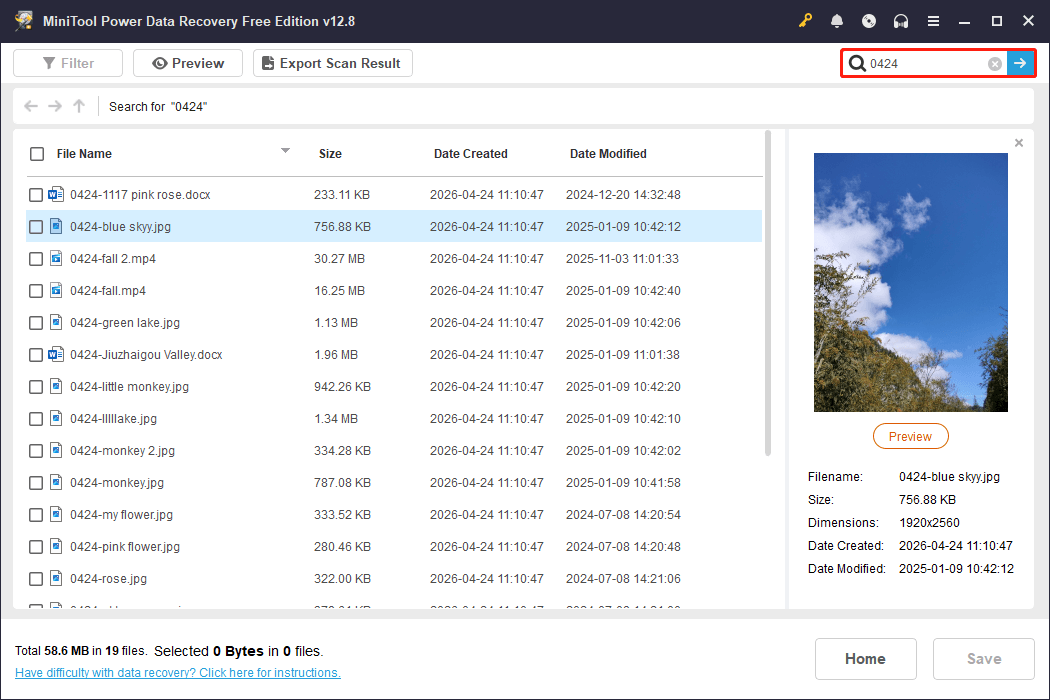
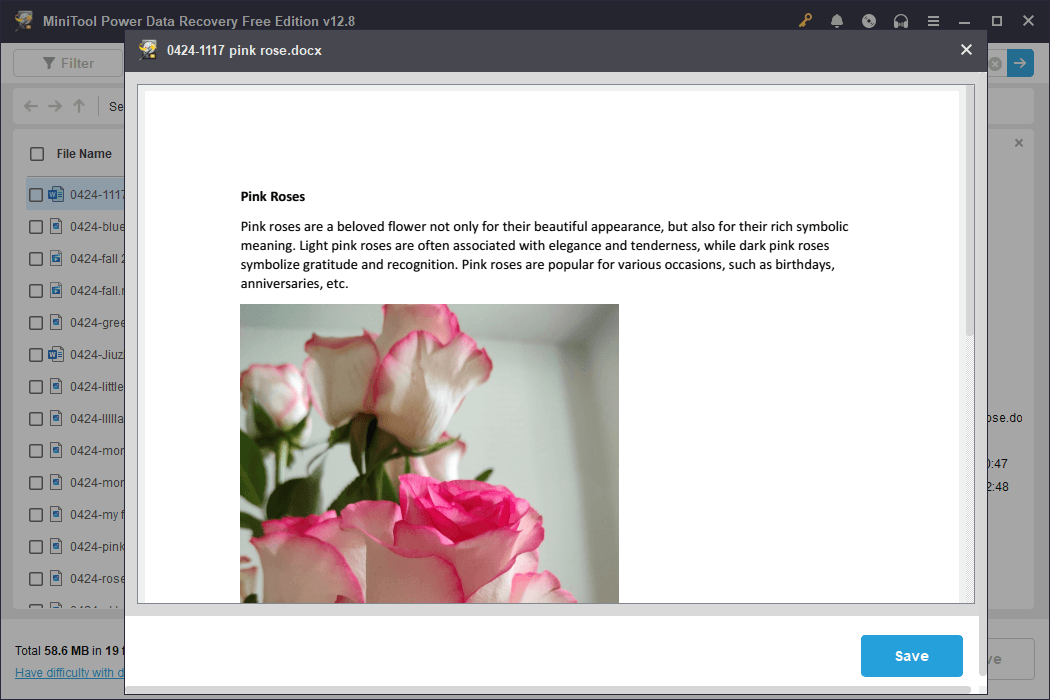
In addition, the Preview feature works well for all the tested images, documents, and videos.
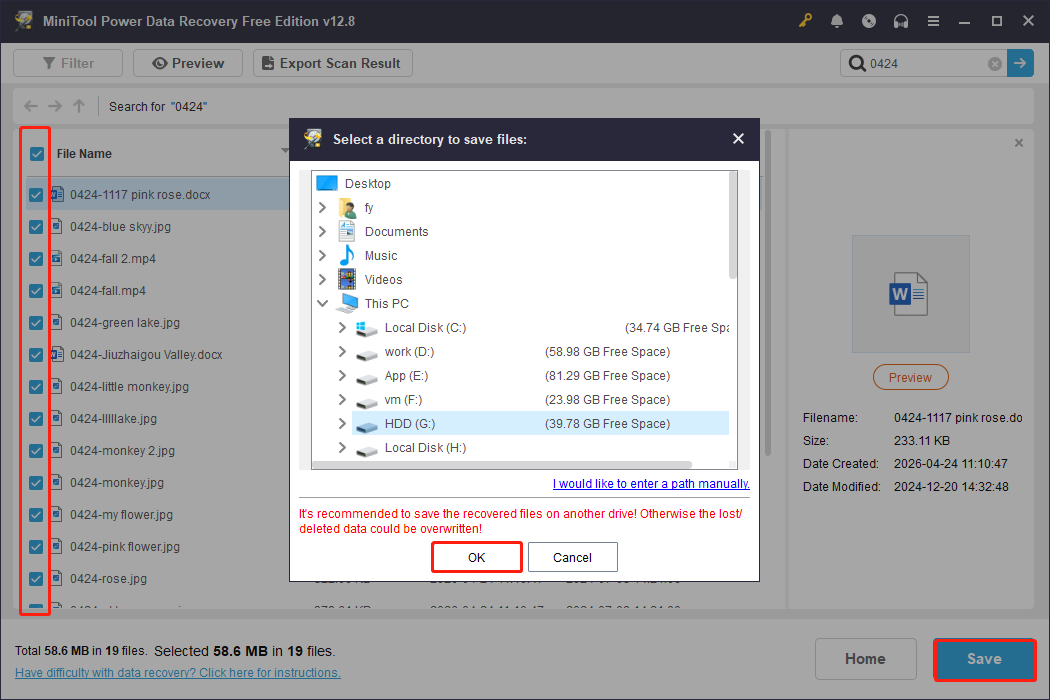
Step 3. Save required files.
Finally, select all the wanted files and click Save. Then I choose to store the recovered files to my internal hard disk and click OK.
The recovery process completes smoothly without errors.
Recovery Test Results
All test files with the 0424 prefix are successfully found and recovered. However, some older files had lost their original file names due to file system corruption, making them difficult to locate through search.
Case 2. You Do Not Need the Data: Format the RAW Drive
Format the RAW Drive to a Recognized File System
After recovering files from the RAW drive, the next step is to format it to a normal state. In the following parts, I will show you how to format a RAW drive with CMD, Disk Management, File Explorer, and MiniTool Partition Wizard.
Option 1. Use CMD
You can use the Command Prompt to format the RAW drive quickly, especially if you prefer using commands. Here is how to do that.
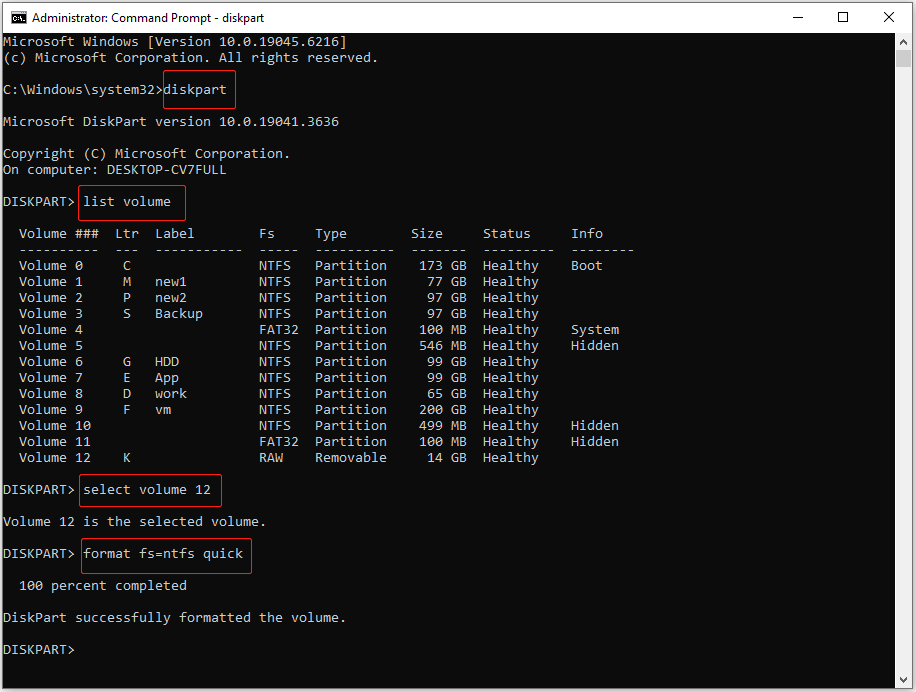
Step 1. Type cmd in the Windows search box. When the Command Prompt option appears, right-click it and choose Run as administrator.
Step 2. Type the following commands to run DiskPart and format the RAW drive. Remember to press Enter after each command.
- diskpart
- list volume
- select volume # (replace # with the actual volume number of the RAW drive)
- format fs=ntfs quick (you can replace ntfs with another preferred file system like fat32)
If you are not familiar with command lines, it is better to use the built-in graphical tools.
Option 2. Use Disk Management
Disk Management provides a graphical interface to perform disk-related operations. So, you can follow the steps below to format the RAW drive in Disk Management.
Step 1. Right-click the Start button and choose Disk Management.
Step 2. Find your RAW drive, right-click the partition, and choose Format.
Step 3. In the Format wizard, type a volume label and choose a file system. Tick the Perform a quick format option, and click OK.
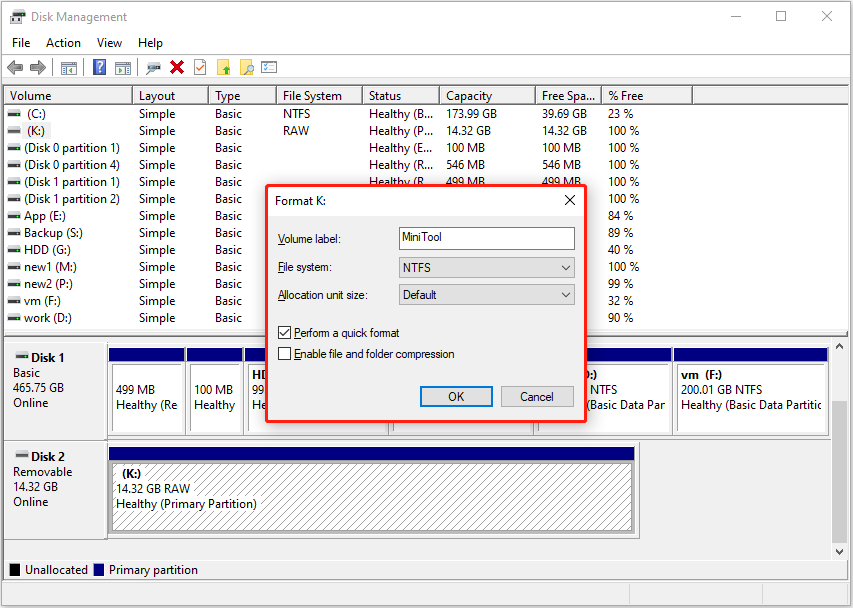
Step 4. Click OK again to confirm, and wait for the process to complete.
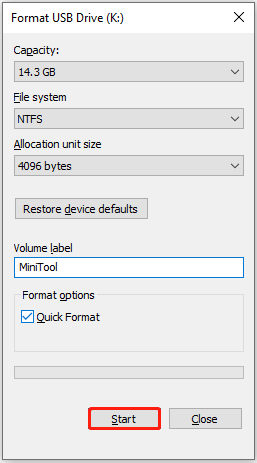
Option 3. Use File Explorer
For a RAW drive, when you try to open it in File Explorer, you will usually see the prompt “You need to format the disk before you can use it”. You can click Format disk to format the drive directly from this prompt.
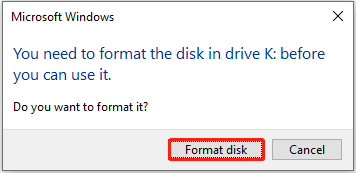
If no prompt appears, you can alternatively right-click the drive and select Format.
In the pop-up window, set up the file system and volume label. Keep Quick Format ticked, and click Start.
If you have difficulty fixing the RAW drive with CMD, Disk Management, or File Explorer, MiniTool Partition Wizard can help.
Option 4. Use MiniTool Partition Wizard
MiniTool Partition Wizard is a professional partition manager designed for Windows users. It can help you format partitions to NTFS, FAT32, exFAT, and several other file systems.
You can use MiniTool Partition Wizard to format a RAW drive for free. Here are the detailed steps.
Step 1. Download, install, and launch MiniTool Partition Wizard.
MiniTool Partition Wizard FreeClick to Download100%Clean & Safe
Step 2. Find and select the RAW partition, and then click Format Partition from the left sidebar.
Step 3. Next, type a partition label, select a file system, and click OK.
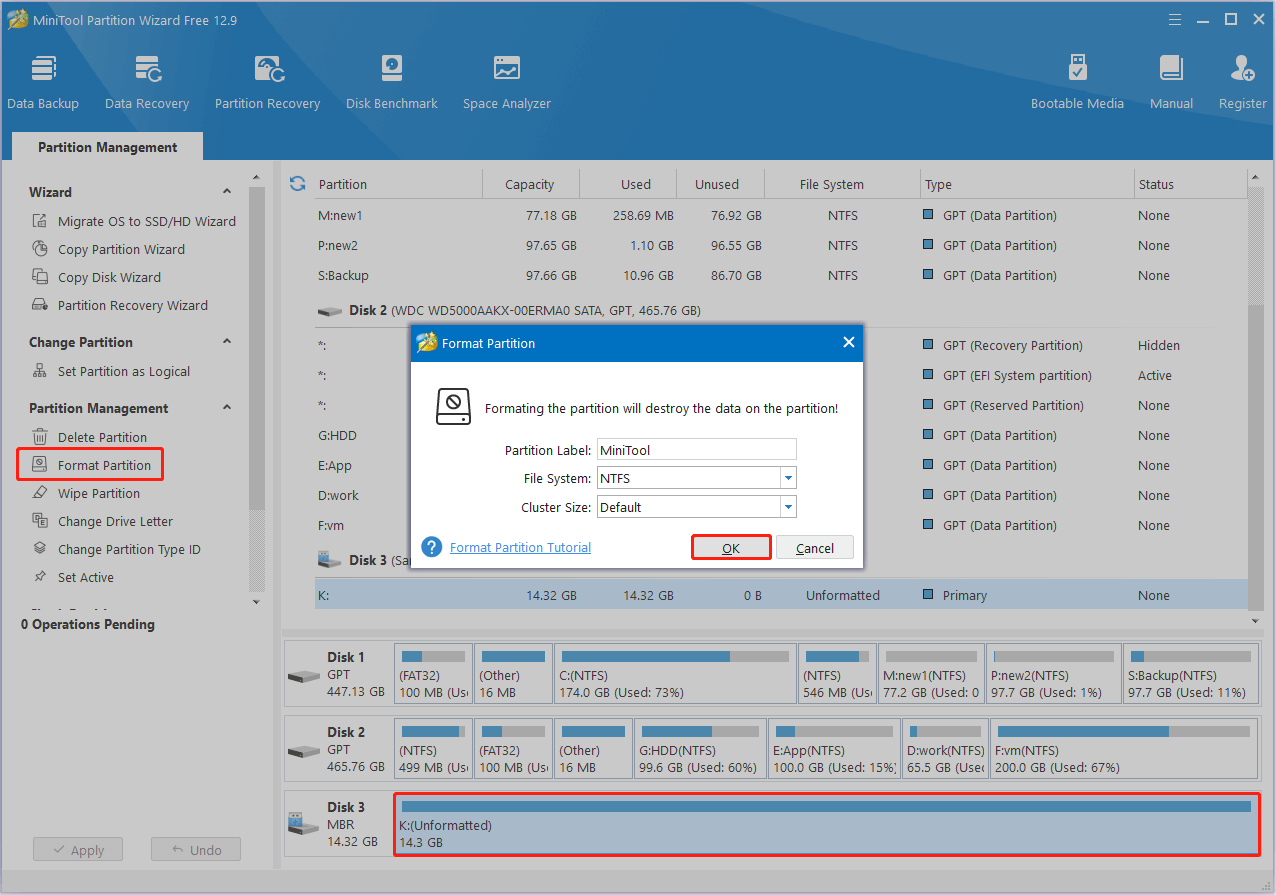
Step 4. Review the format effect. If it is satisfied, click the Apply button in the lower left corner to confirm.
Once your drive has been formatted, you can run CHKDSK or use other tools to monitor its health without encountering the “CHKDSK is not available for RAW drives” error on Windows 10/11.
How to Prevent a Drive From Becoming RAW
To avoid suffering from the RAW issue again in the future, it is important to take some preventive measures. Here are a few useful tips for your reference.
Tip 1. Safely Use Your Disk
Many disk problems start from improper handling. Pay attention to these tips to avoid it:
- Always eject your USB drive or external drives properly using the Safely Remove Hardware option.
- Avoid unplugging the drive during file transfer or shutting down your computer while the drive is in use.
- Keep Windows Defender or other antivirus software turned on. This prevents your disks and files from virus infection.
- Avoid plugging and unplugging the drive frequently.
- Store the drive in a stable and clean environment to reduce hardware failures.
Tip 2. Monitor Disk Health Regularly
Regularly checking disk health status can help find and repair file system issues early. You can run the built-in error-checking tool or a reliable third-party tool periodically to detect and repair errors.
To run the error-checking tool:
Open File Explorer, right-click your disk, and choose Properties.
Next, go to the Tools tab and click Check under Error checking.
Tip 3. Back Up Important Files
Sometimes, even if you handle your drives carefully, they can still fail. Therefore, it is important to always protect your files.
To keep your data safe, you can back up important files to multiple locations, either manually or using data backup software.
If you are looking for a Windows backup tool, MiniTool ShadowMaker is recommended. It brings easy data backup, system backup, and disk/partition backup automatically. Get the Trial Edition to use it for free for 30 days.
MiniTool ShadowMaker TrialClick to Download100%Clean & Safe
- Launch the backup software and click Keep Trial to proceed.
- Go to the Backup tab.
- Click SOURCE to select the files, folders, partitions, or disks you want to back up. Then click DESTINATION to select a location for the backup file.
- Click Back Up Now to start the backup process.
Bottom Line
When the “CHKDSK is not available for RAW drives” error appears, it means the file system is severely damaged, and CHKDSK does not support RAW drives at all. Formatting the drive is the only way to fix it.
If you want to keep your files, use MiniTool Power Data Recovery to scan the drive and save the files first. Then, format the drive by using DiskPart, Disk Management, or other tools.
If you have any questions when using MiniTool’s products, do not hesitate to contact the support team at [email protected]. We’re always ready for help.
CHKDSK Is Not Available for RAW Drives FAQ
Second, format the card: Open Disk Management, right-click the drive, and choose Format. Next, set up the volume label and file system, and then click OK.
First, run Command Prompt as an administrator.
Second, type chkdsk drive letter: /f /r and press Enter (replace the drive letter with the actual letter of your corrupted SD card).
Third, wait for the system to scan the SD card, detect file system errors, and repair them automatically.
If you want to keep your files, you can use MiniTool Power Data Recovery or other similar tools to rescue your files to another location. Then, format the drive.
If there are important files on the drive, use data recovery software like MiniTool Power Data Recovery to recover files first. Then format the drive by using CMD or Disk Management.
1. Run Command Prompt as an administrator.
2. Execute the following commands:
diskpart
list disk
select disk 2 (Replace 2 with the actual disk number. Be careful to select the correct disk)
clean
create partition primary
format fs=ntfs quick
assign
About The Author

Position: Columnist
Shirley holds a bachelor’s degree in English and has been an editor at the MiniTool Team for many years. She specializes in IT-related content, with a focus on data recovery, file backup, disk management, and other technical topics. She is committed to delivering clear, accurate, and practical solutions to help users resolve common computer issues.
User Comments :