Issue: Files in Windows 10/11 Quick Access Missing
Quick access is a convenient feature for daily office work and multitasking. However, sometimes you may encounter frustrating problems, such as:
- Folders or files in Windows 10 Quick access missing
- The entire Quick access tab not showing up
These problems not only disrupt workflows but may also lead to the loss of important files. Now, take a look at the detailed introduction to Quick access.
What Is File Explorer Quick Access
Quick access is a feature in Windows File Explorer that displays frequently used folders and recently used files in the left navigation pane.
It allows you to quickly open frequently used locations without having to navigate through disk directories. This is an upgraded version of the old “Favorites”.
Here are some features of Quick access:
- Shows frequently used folders: Automatically counts your most frequently opened folders and lists them on the left.
- Shows recently used files: Allows you to quickly return to files you just edited or viewed.
- Supports pinning: Allows you to manually pin frequently used folders to Quick access, creating shortcuts.
How to Pin/Unpin a Folder to Quick Access
As mentioned before, Quick access supports the pinning feature. The following section shows you how to pin and unpin a folder to it.
Pin a folder to Quick access:
Step 1: Press Win + E to open File Explorer.
Step 2: Select and right-click the target folder, then choose Pin to Quick access.
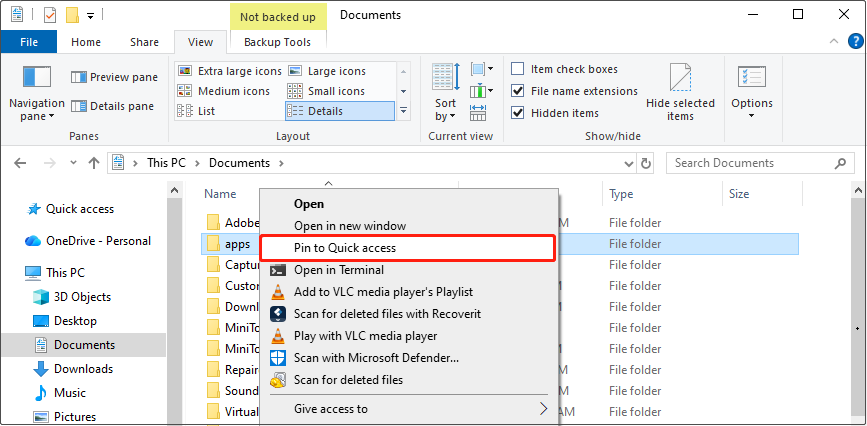
Navigate to the Quick access tab, and the folder is pinned here.
Unpin a folder to Quick access:
Step 1: In the Quick access section, find the target folder.
Step 2: Right-click it and select Unpin from Quick access.
The folder has disappeared from the Quick access tab.

Why Is the Files in Windows 10 Quick Access Missing
If Quick access is missing, either completely or with only the pinned items disappeared, it is usually due to settings changes or caching issues.
Understanding these causes can help you quickly restore the functionality and avoid repeated problems.
1. The File Explorer became unstable.
Occasionally, malfunctions in File Explorer can cause Quick access to fail to load. This can usually be resolved by restarting File Explorer.
2. Cache or configuration files get corrupted.
If cache files are corrupted or missing, File Explorer cannot load the content correctly. It results in the Quick access bar disappearing.
3. The folder path is invalid.
When your pinned folder is deleted, moved, or its path changes, Quick access cannot find the corresponding location. This causes pinned items to disappear.
4. Etc.
Overall, “Quick access missing” does not necessarily mean that files are actually lost. Therefore, restoring the Quick access tab should be the first step.
See Also: How to Fix Windows File Explorer Slow?
Step 1: Fix Files in Windows 10 Quick Access Missing
The following methods to fix Windows Quick access are widely recommended on forums. Try them one by one.
Method 1: Disable the Show Recommended Section Option
The “Show Recommended Section” option is a setting in Windows 11 File Explorer. It displays the “Recommended” section on the Home page.
If this option is turned on, the Recommendations section replaces Quick access, making Quick access missing on Windows 11. Therefore, to show Quick access, turn off this option.
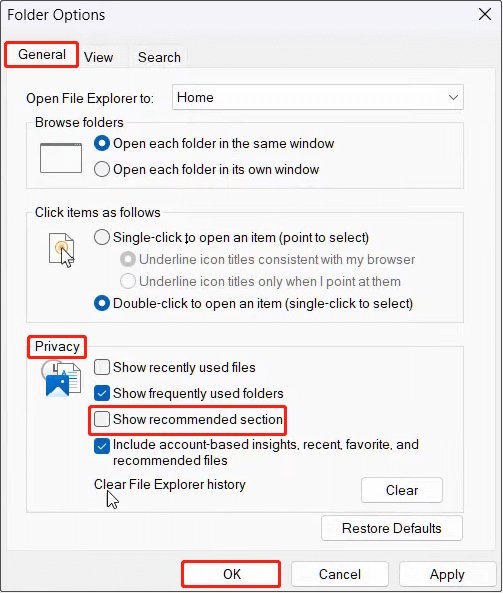
Step 1: Access the Folder Options page
Press Win + E to open File Explorer. Click the See more icon in the toolbar and select Options.
Step 2: Disable Show recommended section
In the General tab, uncheck the Show recommended section option under the Privacy section. Then, click OK to apply the change.
If this method doesn’t work, continue with the next one.
Method 2: Clear Quick Access Cache Files Manually
As mentioned in the causes section, Quick access relies on cached files. If the caches are corrupted or the data is inconsistent, folders may disappear, be duplicated, or fail to load.
Manually clearing the cache forces the system to regenerate these files, thus restoring normal display. Here is how to do it.
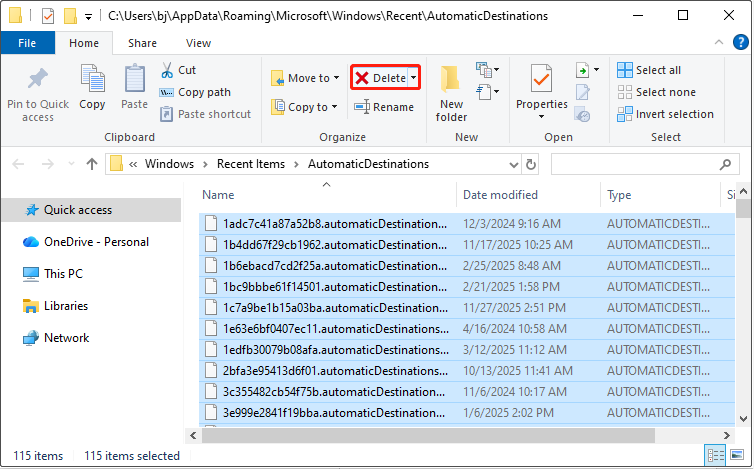
Step 1: Open the caches folder
Press Win + R to open the Run dialog. Type the following path and press Enter.
%AppData%\\Microsoft\\Windows\\Recent\\AutomaticDestinations
Step 2: Delete the cache
Select all cached files for Quick access in this folder and click Delete.
If this issue is unrelated to caches, proceed with the next solution.
Method 3: Repin Folders to Quick Access
When the recent files in Quick access are missing, repining them to the tab is a feasible method.
Step 1: Press Win + E to open File Explorer.
Step 2: Type the following path in the address bar and press Enter to access all the recent files.
shell:::{22877a6d-37a1-461a-91b0-dbda5aaebc99}
Step 3: Click the Pin to Quick access button in the upper-left corner.
Then, the Recent folders tab will display on the left pane. If this method fails, try resetting folder defaults.
Method 4: Reset Folder Defaults
Changes or corruption in folder view or personalization settings may cause Quick access to malfunction.
Resetting the folder default settings clears abnormal configurations, restoring the system’s standard view environment. This will allow the Quick access feature to reload and display correctly.
Here are three options to help you reset folder defaults.
Option 1: Reset Quick access with File Explorer
Step 1: Press Win + E to open File Explorer.
Step 2: Go to the View tab and click Options.
Step 3: Switch to the View tab and click Reset Folders.
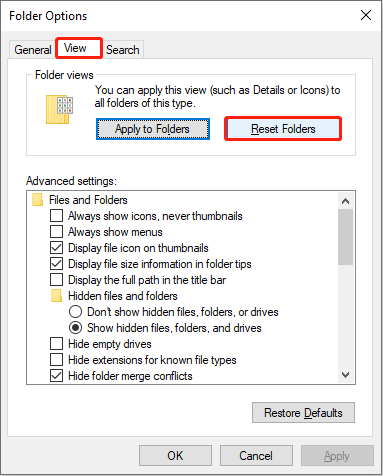
Step 4: In the prompt window, click Yes to confirm the change.
Option 2: Reset Quick access in Command Prompt
Step 1: Type Command Prompt in the Windows search bar, right-click the best match, and choose Run as administrator.
Step 2: When prompted by UAC, click Yes to continue.
Step 3: Type the following command and press Enter to reset the folder’s default.
del /F /Q%APPDATA%\Microsoft\Windows\Resent\AutomaticDestinations\*
When the process ends, open File Explorer to check if the Quick access tab shows.
Option 3: Reset Quick access via Windows Registry
Step 1: Open the Run dialog, type regedit, and click OK to open Registry Editor.
Step 2: Navigate the following path:
Computer\HKEY_CURRENT_USER\SOFTWARE\Microsoft\Windows\CurrentVersion\Explorer\Ribbon
Step 3: Right-click the Qatltems entry and click Delete, then click Yes to confirm the change.
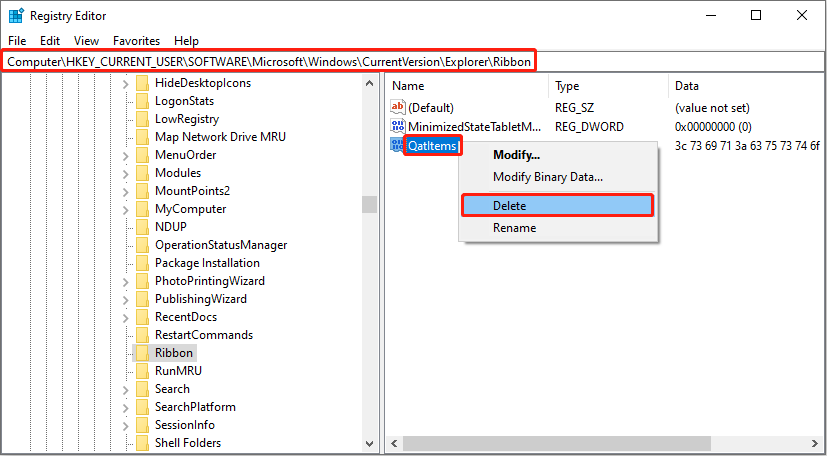
The Qatltems sub-registry will be created the next time File Explorer is opened.
If your files do not appear in Quick access after using the methods above, try searching for them using Windows Search. If they still do not show up, the files may have been lost.
Additionally, if you have restored Quick access shortcuts but encounter errors when opening them, the original files may have been deleted.
In such cases, use data recovery software to recover your lost files.
Step 2: Recover Missing Files in Quick Access
MiniTool Power Data Recovery is a professional and powerful data recovery software. It can be used to recover the lost files in Quick access. Here are some of its features.
- Multi-scenario recovery: This tool can recover data lost due to accidental deletion, disk formatting, system crashes, virus attacks, disk failures, etc.
- Extensive file type support: It supports the recovery of almost all file types, including documents, pictures, videos, audio, etc.
- Strong compatibility: This software supports hard drive recovery, USB flash drive recovery, SD card recovery, etc. And it is fully compatible with Windows 11/10/8/8.1.
- Easy-of-use: The interface is intuitive and simple, making it easy to use even for beginners.
The free edition of this software gives you 1 GB of free recovery quota. Download and install MiniTool Power Data Recovery Free to get started.
MiniTool Power Data Recovery FreeClick to Download100%Clean & Safe
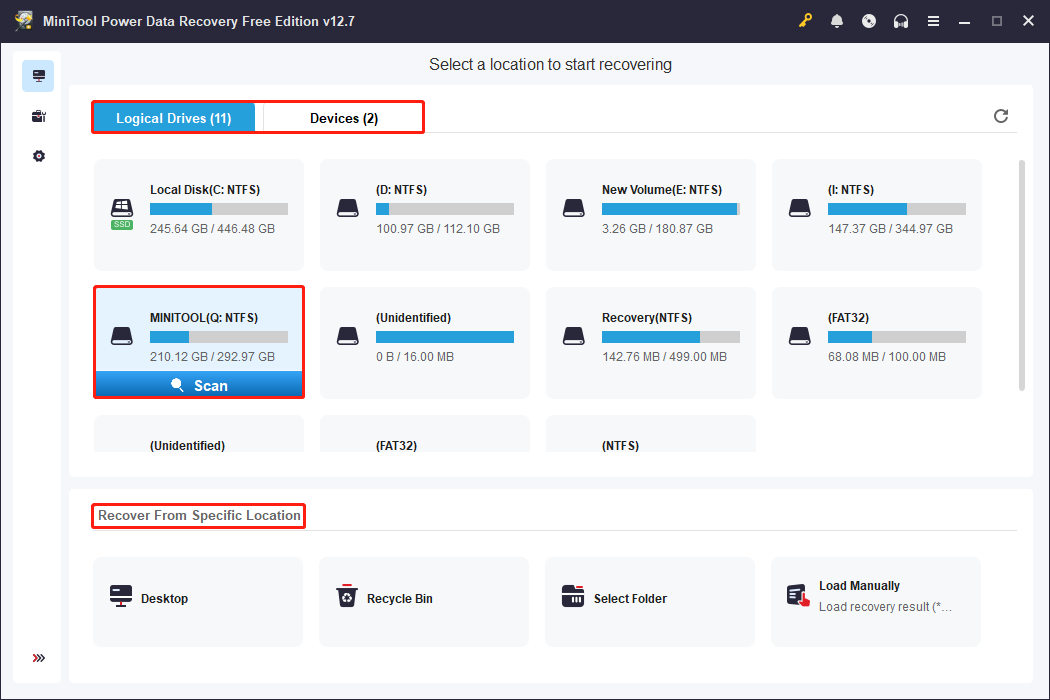
Step 1: Launch the software and scan the location
Open MiniTool Power Data Recovery. In the main interface, select the area where your lost files should exist.
- Logical Drives: It lists all the partitions, including existing partitions, deleted partitions, and unallocated space.
- Devices: It displays all the disks connected to your computer.
- Recover From Specific Location: It allows you to scan and recover from the Desktop, the Recycle Bin, or a specific folder.
When you find the target scan location, move your cursor to it and click Scan. The scan process will start.
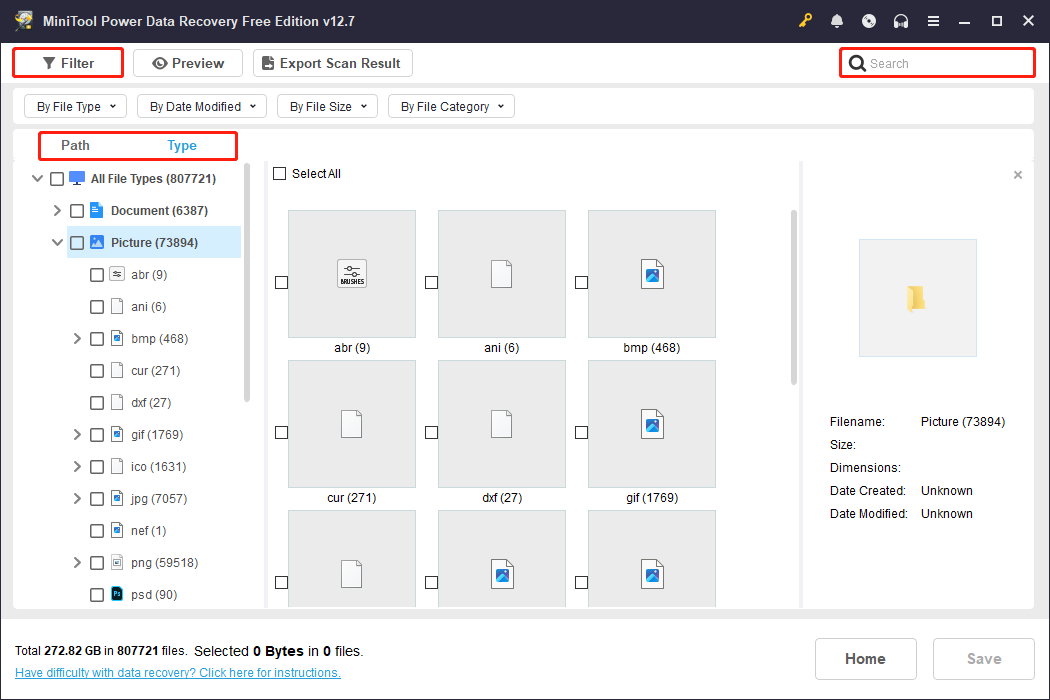
Step 2: Locate the required files using Path, Type, Filter, and Search
When the scan process ends, use Path, Type, Filter, and Search to locate the needed files.
- Path: Displays found files according to their original storage path.
- Type: Categorizes scan results by file type (e.g., documents, pictures, videos).
- Filter: Further narrows down the file scope by file type, modification date, file size, and file category.
- Search: Supports entering the full or partial filename to directly find the specific file.
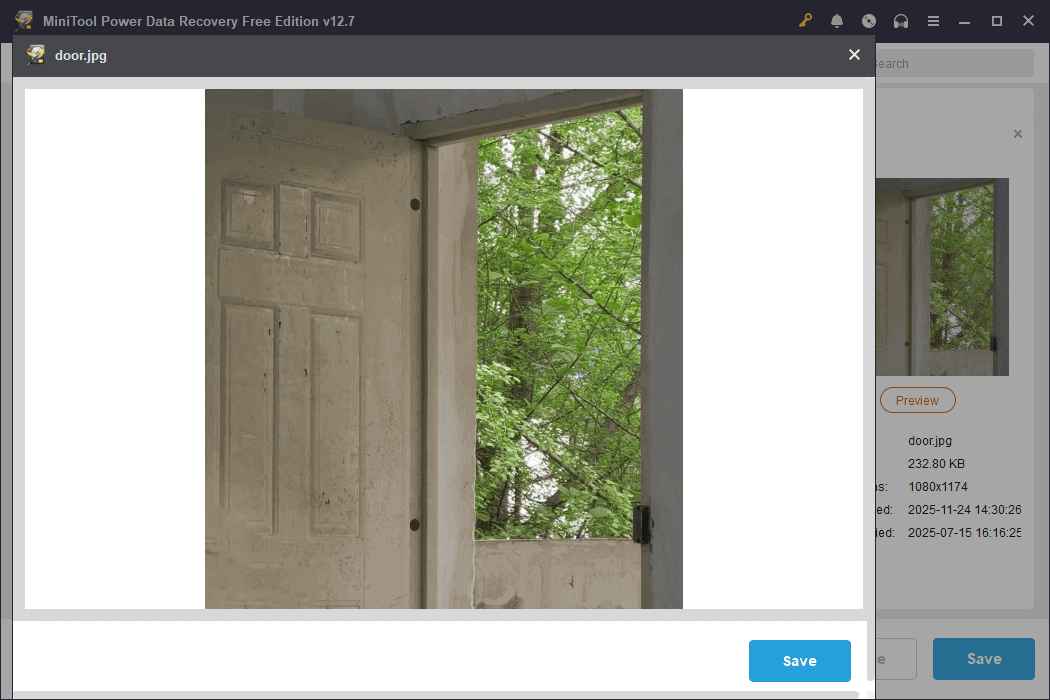
Step 3: Preview the file to ensure it is correct
The Preview feature allows you to preview file content before recovery. It supports common formats such as pictures, audio, and videos. This confirms whether it is the file you need and whether it is complete.
Double-click the file you want to view, and then the window will pop up.
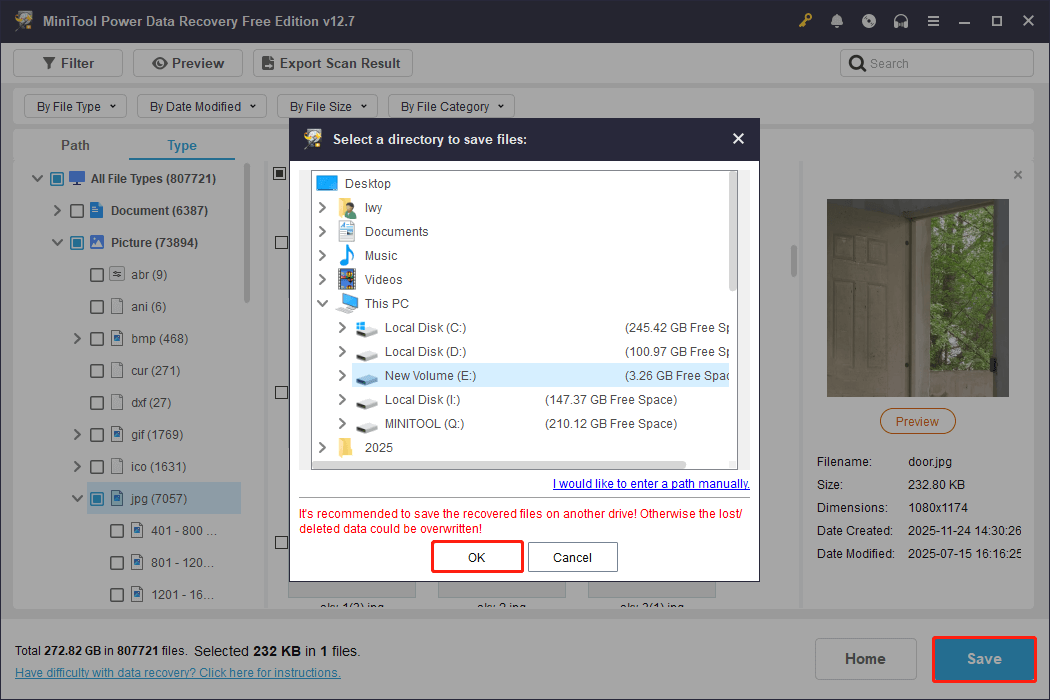
Step 4: Recover the wanted files to a new location
Check all the files you want and click Save. In the pop-up window, choose a new and safe place for the recovered files. Finally, click OK to start recovery.
When the Recovery Completed window shows, check your recovered Quick access files.
Now that your files have been recovered, to prevent them from being lost again, refer to the following methods to back them up.
Step 3: Back up Your Quick Access
Here is how to back up Quick access destinations and Quick access files.
Solution 1: Back up Quick Access Destinations
On Windows, Quick access destinations save shortcuts to your frequently used folders and recent access history.
Backing up their destinations allows you to quickly restore frequently used paths in the event of system corruption or migration.
Step 1: Open the Quick access folder
Press Win + R to open the Run dialog, type the following path, and press Enter.
%AppData%\\Microsoft\\Windows\\Recent\\AutomaticDestinations
Step 2: Back up the file
In the AutomaticDestinations folder, find the file named f01b4d95cf55d32a.automaticDestinations-ms. Copy this file to an external hard drive, USB drive, or a separate folder.
Step 3: Restore the backup (on another computer or after a reset)
Navigate to the AutomaticDestinations folder on the target computer using the same method as Step 1. Copy the backup file you saved in Step 2 and paste it into the AutomaticDestinations folder on the target computer.
If a dialog box appears asking to replace the file, confirm by clicking Replace the file in the destination.
Solution 2: Back up Quick Access Files
The previous method explained how to back up commonly used file destinations. However, it does not back up the actual file contents, but only their locations.
If the original files are deleted or lost, restoring the destinations won’t allow you to access the files. To ensure file security, backing up the files themselves is the safest approach.
MiniTool ShadowMaker can back up not only files in Quick access, but also other important files on your local hard disks. Download it to back up files for free for 30 days.
MiniTool ShadowMaker TrialClick to Download100%Clean & Safe
Wrapping Things Up
To fix the problem of files in Windows 10 Quick access missing, try disabling Show Recommended Section, clearing cache files, repining folders, or resetting folder defaults.
If your files still do not appear after repairing the Quick access, use MiniTool Power Data Recovery to recover lost files.
Should you have any inquiries regarding the MiniTool products, contact us through [email protected].
About The Author

Position: Columnist
Chelsea graduated from university with a major in English. She has a strong interest in English writing. It is this passion for writing that led her to become an English editor. Her articles mainly focus on data recovery and other computer industry news. As an energetic and outgoing girl, Chelsea enjoys listening to music, singing, riding bikes, and eating in her spare time.
User Comments :