Part 1: Get to Know Windows Inaccessible Boot Device
At the beginning, get a full understanding of the boot device, the “Inaccessible Boot Device” error, and the possible causes of this error.
Boot Device Overview
A boot device is a hardware device used by a computer to load the operating system when the computer is powered on. It contains the bootloader and files required for system startup.
Common boot devices include hard disk drives (HDDs/SSDs), optical disc drives, and USB flash drives.
When the computer is powered on, the BIOS/UEFI checks these devices in the configured boot order and loads the operating system from the first available boot device.
If the boot device is inaccessible or misconfigured, the system will fail to boot and may display an “Inaccessible Boot Device” error.
An Introduction to Inaccessible Boot Device Error
This “Inaccessible Boot Device” error occurs when the Windows kernel fails to read or access the boot device during the loading process.
- Error number: 0x0000007B.
- Symptom: Windows shows a blue screen (BSOD) with the message INACCESSIBLE_BOOT_DEVICE.
Learn about its factors to find the corresponding solution.
Causes of the Inaccessible Boot Device Stop Error
Many causes can lead to this blue screen error. Here are some common ones.
- Hard drive connection issues: Loose or damaged data or power cables prevent the system from reading the disk.
- Hard drive failure: Bad sectors or damage to the hard drive render the boot sector inaccessible.
- BIOS/UEFI setting changes: Disk mode switching causes driver incompatibility.
- Damaged or missing drivers: An abnormal storage controller driver prevents the system from communicating with the hard drive.
- Boot Configuration Database loss: A missing BCD file will prevent Windows from accessing the boot disk during startup.
- Corrupted boot files or partition tables: Corruption in the boot sector or partition table prevents the system from locating operating system files.
When this boot error occurs, the system may be stuck on the blue screen and fail to load Windows. Several methods can resolve the issue, but data loss may occur during the repair process.
Therefore, if you have valuable files, recover them from the crashed computer before attempting any repairs. If not, you can skip to Part 3 for repair procedures.
Part 2: Save Your Data from an Inaccessible Boot Device
This section teaches you how to recover important data from your crashed computer.
MiniTool Power Data Recovery is a reliable and powerful data recovery tool for recovering data from a non-booting PC.
This software offers a Bootable edition that allows you to create a bootable USB drive or CD/DVD disc. This allows data recovery even if the system fails to boot to the desktop.
Besides this, this tool can recover almost all kinds of files, such as documents, pictures, videos, audios, and more. In addition, it is compatible with Windows 11/10/8.1/8.
MiniTool uses read-only mode during the recovery process and will not damage the existing data. Now, follow the steps to recover files.
Phase 1: Create a Bootable Disk on a Working PC
To recover data when the system fails to boot normally, you should first create a bootable disk. This provides an independent boot environment.
Step 1:Download and install MiniTool Power Data Recovery Bootable on a working computer.
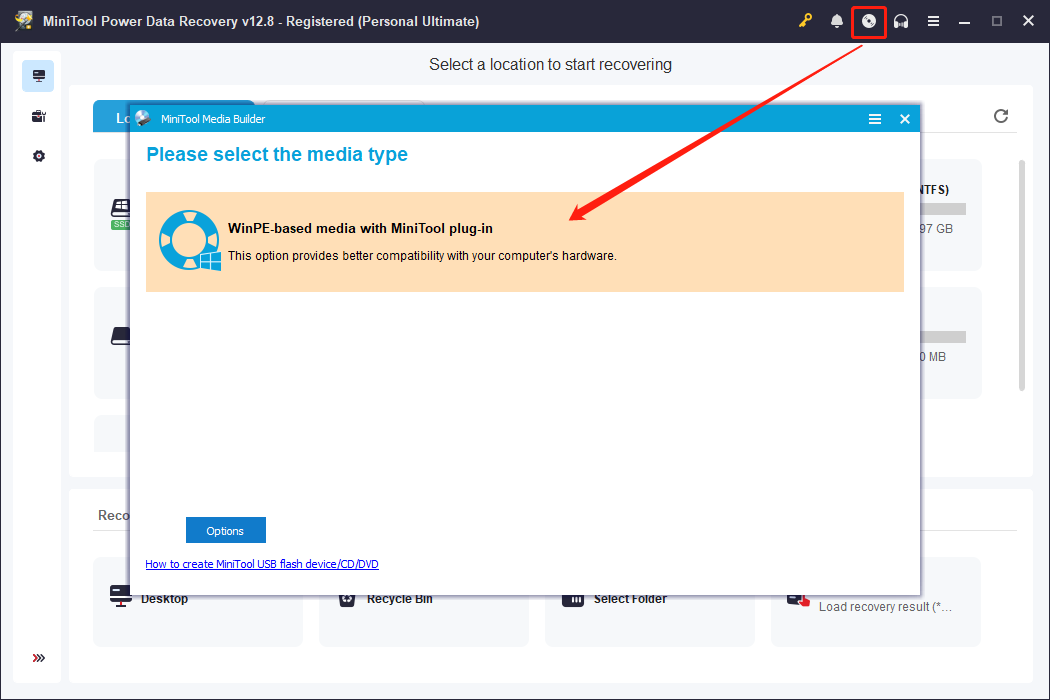
Step 2: Open the software and click the Bootable Media icon in the upper right corner.
Step 3: Insert an empty USB or CD/DVD and select the WinPE-based media with MiniTool plug-in option.
Step 4: Then, follow the prompts to create a bootable disk.
Phase 2: Recover Data from Your Non-booting PC
After the disk is created, proceed with the data recovery process.
Step 1: Insert the prepared bootable disk into the computer that cannot boot.
Step 2: Press the BIOS/UEFI entry key during startup (commonly F2, F12, Delete, or Esc).
Step 3: In the Boot section, set the USB disk as the first boot device.
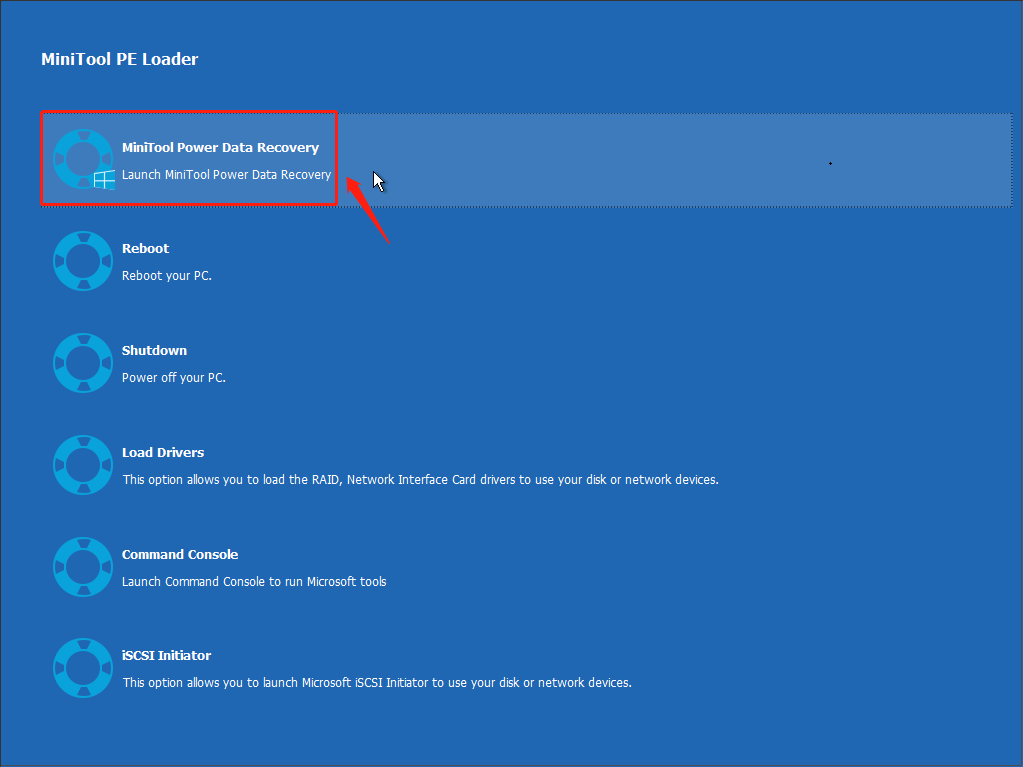
Step 4: Press F10 to save the settings and exit the BIOS. The computer will load from the bootable disk and enter the WinPE environment.
Step 5: Select MiniTool Power Data Recovery to launch the data recovery software.
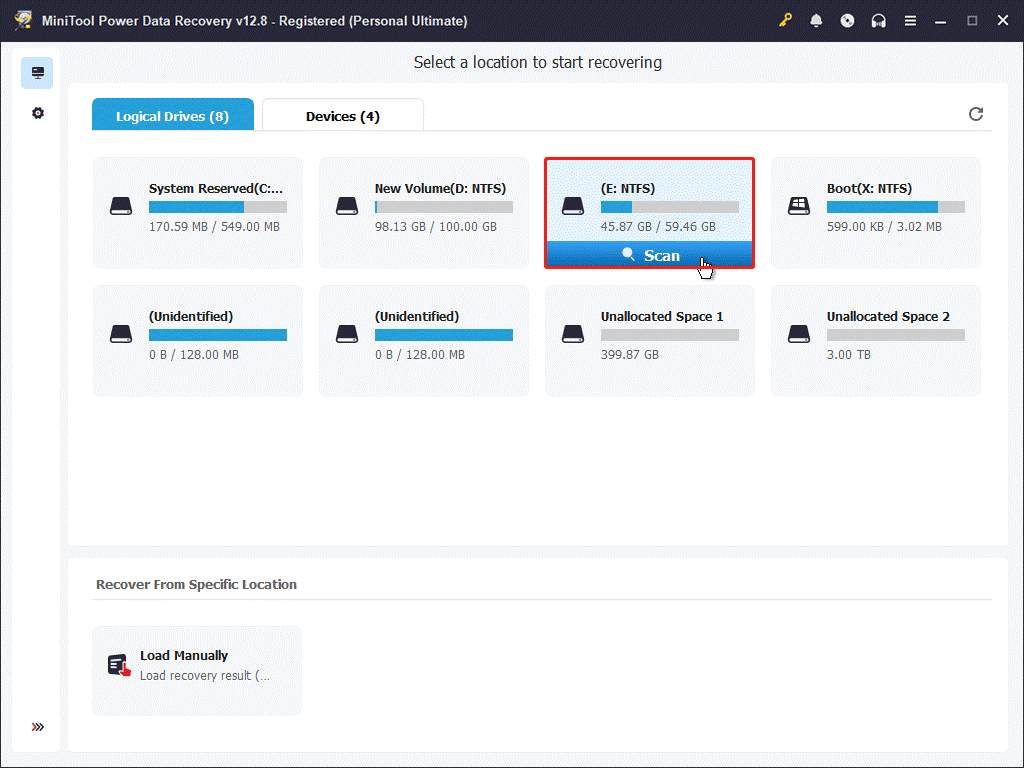
Step 6: In the main interface, find the scan location, select it, and click Scan:
- Logical Drives: It lists all the partitions, including existing partitions, lost partitions, and unallocated space.
- Devices: It displays all the disks connected to your computer.
Step 7: Wait for the scan process to complete. When it ends, use Path, Type, Filter, and Search to find the target files.
- Path: The scan results are listed according to the file structure.
- Type: The found files are categorized based on their types, such as document, picture, audio, video, and more.
- Filter: The files can be filtered by file type, modification date, file size, and file category at once.
- Search: The specific file can be located by searching for a full or partial filename.
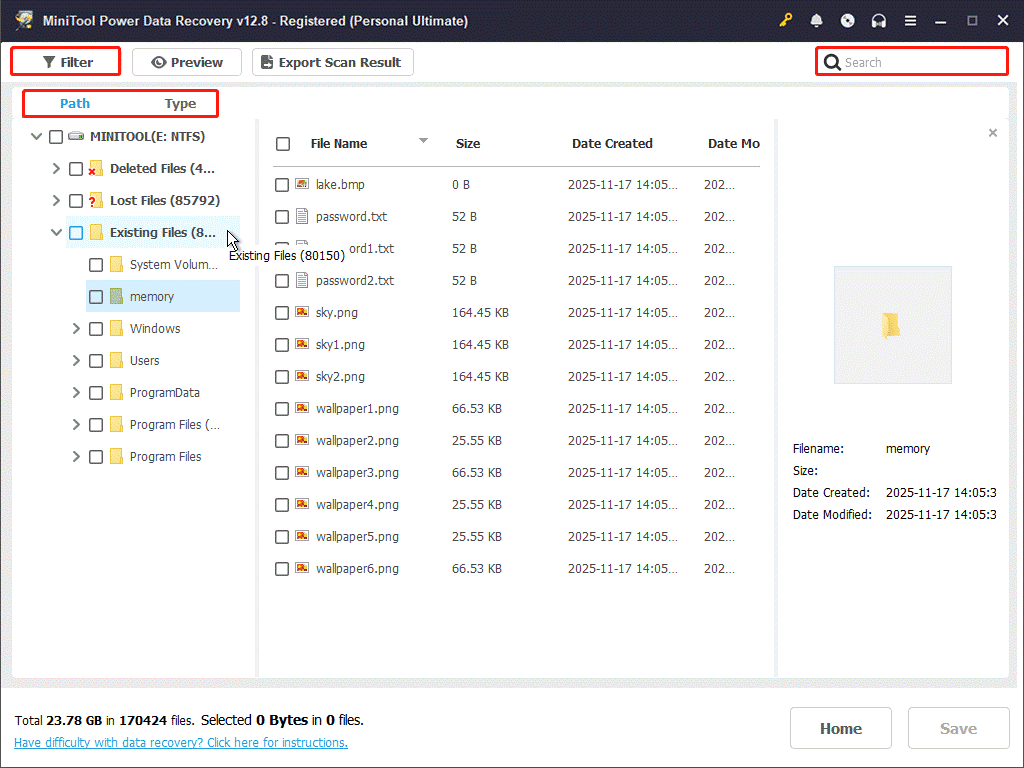
Step 8: After finding the files, double-click them to preview.
Step 9: When the files are confirmed, check them and click the Save button.
Step 10: In the new window, choose a safe path and click OK to start recovery.
When the Recovery Completed window shows, navigate to the specified location to check your files.
Once the important data is safe, the next step is to repair your crashed computer.
Part 3: Fix Inaccessible Boot Device on Windows 11/10
This section provides methods to fix Inaccessible Boot Device error, including running Startup Repair, checking the BCD, enabling AHCI mode, and more.
Method 1: Verify Boot Disk Connection and Accessibility
A missing boot disk can prevent Windows from loading the necessary system files, leading to this boot error. Checking if the disk is recognized by your PC can help troubleshoot.
Step 1: Press and hold the Power button for about 10 seconds to shut down the computer.
Step 2: Press the Power button again to start the computer.
Step 3: Immediately after starting, press and hold the Power button again for about 10 seconds to shut down the device.
Step 4: Repeat steps 1-3 to enter WinRE (Windows Recovery Environment).
Step 5: Select Troubleshoot > Advanced options > Command Prompt.
Step 6: Type the following commands, and press Enter after each:
- diskpart
- list disk
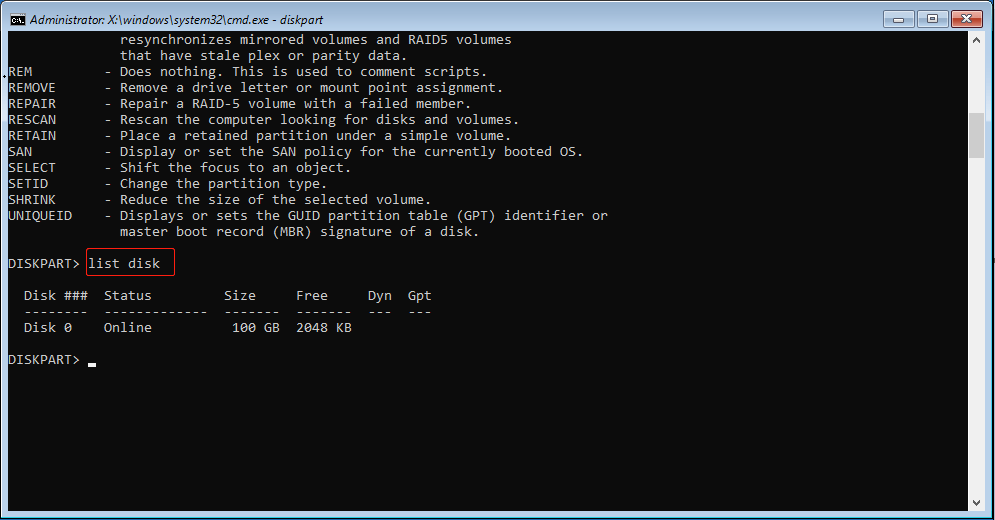
Check if your boot disk is listed here.
Case 1: If the disk is not displayed, try the following:
- Confirm the hardware connection
- Check if the BIOS/UEFI recognizes the drive
After that, check if the computer runs normally.
Case 2: If the disk shows, proceed with the next method.
Method 2: Troubleshoot in Safe Mode
Safe Mode boots the system with minimal drivers and services, avoiding storage controller driver conflicts or misconfigurations. This can help troubleshoot and fix software issues that cause the boot problem.
Step 1: Follow the steps in method 1 to enter WinRE.
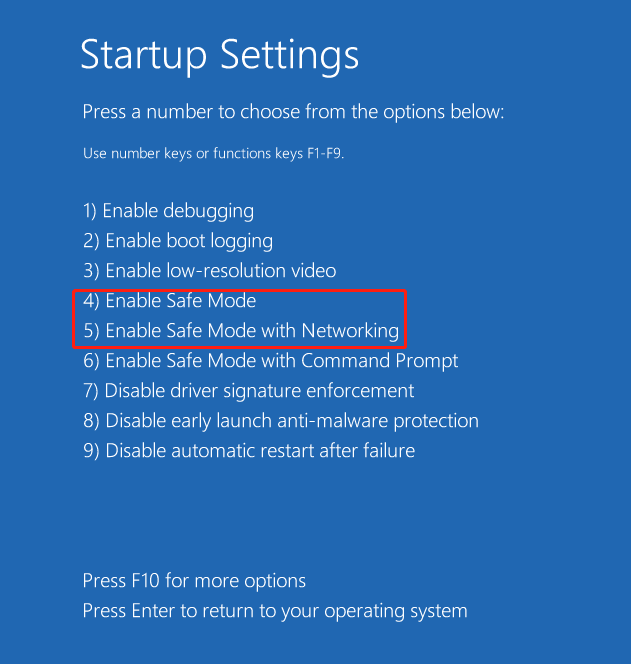
Step 2: Select Troubleshoot > Advanced options > Startup Settings > Restart.
Step 3: Finally, press F4 or F5 to enter Safe Mode.
When entering Safe Mode, try the basic operations below:
- Perform a System Restore
- Uninstall recent updates
- Update/Reinstall drivers
- …
If the Safe Mode cannot be accessed, try the following approaches.
Method 3: Run Startup Repair from the Windows Boot Menu
The Startup Repair automatically detects and repairs common startup-related problems, such as corrupted boot files or configuration errors.
It helps the system re-establish a normal boot process, thereby resolving this issue.
Step 1: Enter WinRE and select Troubleshoot > Advanced options.
Step 2: Select Startup Repair. The system will automatically scan and attempt to repair startup-related problems.
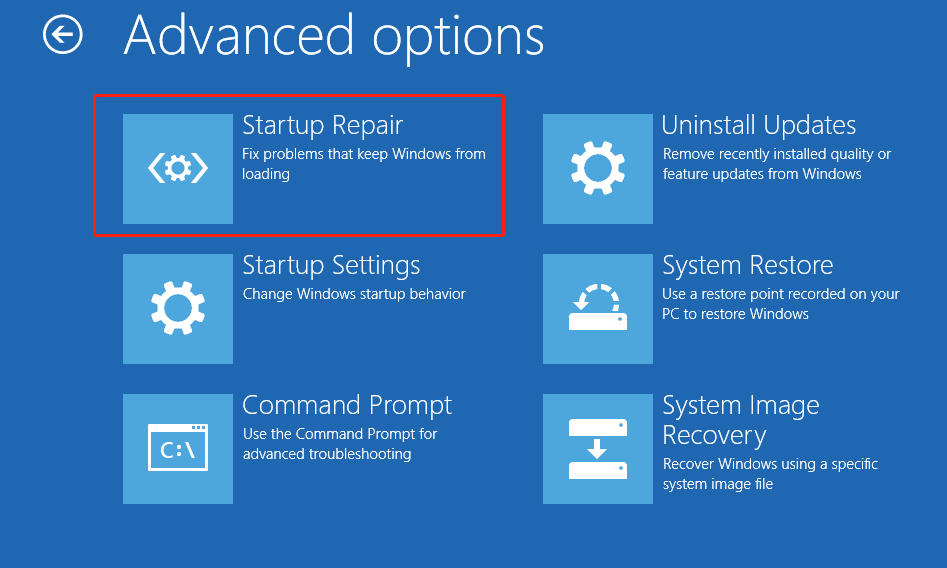
The repair process may take some time. When it completes, the system will indicate whether the repair was successful. If it is successful, the computer will automatically restart and boot into Windows.
If Startup Repair does not resolve the issue, try other methods.
Method 4: Check Boot Configuration Database Integrity
The boot error can be caused by a corrupted or missing boot configuration. Therefore, checking the Boot Configuration Database (BCD) integrity is essential.
Step 1: In the Advanced options page, select the Command Prompt module.
Step 2: Type bcdedit /enum all and press Enter to view the current BCD configuration.
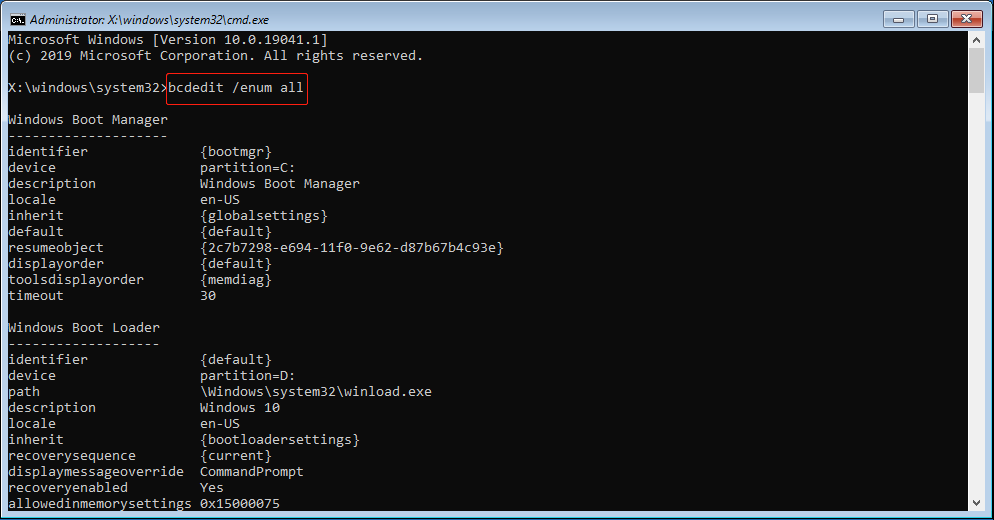
This will list all boot entries, helping to identify any errors or missing entries.
If you need to repair or rebuild the BCD, run the Bootrec command. It can repair damaged or lost boot records and configurations, and rebuild the MBR (Master Boot Record), BCD, or boot sector. This helps resolve boot errors.
Step 1: Type bootrec /fixmbr and press Enter to repair the MBR.
Step 2: Type bootrec /fixboot and press Enter to repair the boot sector.
Step 3: Type bootrec /rebuildbcd and press Enter. This command will scan the Windows installation on the disk and add any missing entries to the BCD.
After completing the commands, type exit and press Enter to exit Command Prompt. Then, click Continue to check if the computer boots normally.
If this is ineffective, attempt the following method.
Method 5: Run DISM and SFC
Corrupted or missing system files can prevent the computer from starting properly. Running DISM and SFC helps repair or replace these files to restore normal boot functionality.
Step 1: In the Advanced options page, click the Command Prompt module.
Step 2: Type DISM /Online /Cleanup-Image /RestoreHealth in the window and press Enter.
Step 3: Continue typing SFC /scannow and press Enter.
Wait for the process to end, then check if the computer can boot to Windows.
If this fails, move on to the next.
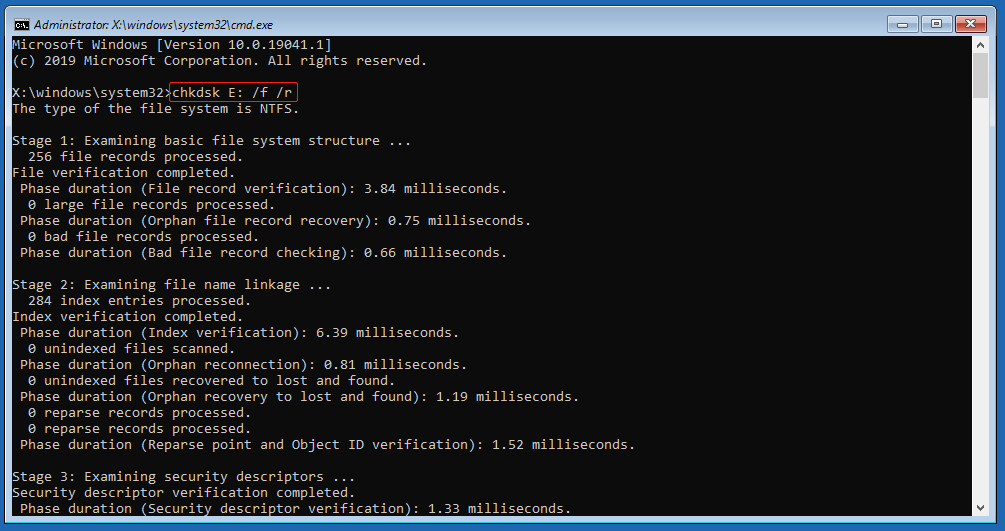
Method 6: Execute the CHKDSK Command
Executing CHKDSK allows the system to identify and repair disk file system errors. This helps restore normal boot functionality.
Step 1: Open Command Prompt in WinRE. In the prompt window, type notepad and press Enter.
Step 2: In the Notepad interface, click File > Open in the upper left corner.
Step 3: In the pop-up window, go to This PC. Locate the system drive by looking for system folders such as Program Files or Windows, and note its drive letter.
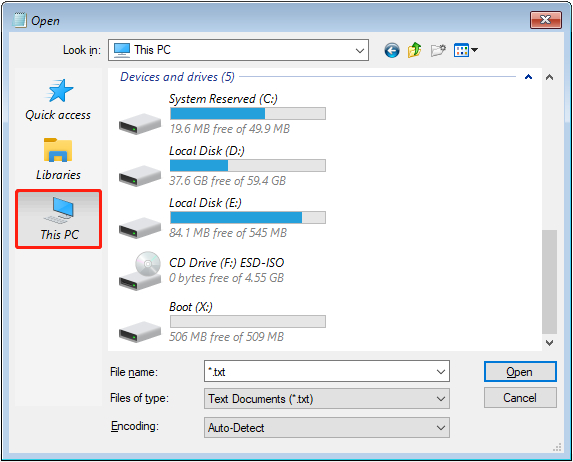
Step 4: Type chkdsk E: /f /r and press Enter to scan and repair file system errors. The letter E should be replaced by the drive letter you just checked.
Method 7: Enable AHCI Mode in the BIOS
Storage controller driver conflicts may cause the system to fail to recognize and boot the disk.
Enabling AHCI mode in the BIOS can improve hard drive compatibility and system performance, resolving this issue.
Step 1: Restart your computer and press the designated shortcut key during startup (F2, F12, Delete, or Esc) to access BIOS.
Step 2: In the BIOS menu, switch to Advanced or Integrated Peripherals, and find SATA Configuration or a similar option.
Step 3: Change the SATA mode from IDE or RAID to AHCI.
Step 4: Press F10 to save the changes and restart the system.
How to check whether AHCI is enabled?
Step 1: Right-click the Windows button and choose Device Manager.
Step 2: Expand the IDE ATA/ATAPI controllers array.
If the listed device shows Standard SATA AHCI Controller or any driver name containing AHCI (such as Intel, AMD, or other manufacturer-specific SATA AHCI controllers), this indicates that AHCI mode has been successfully enabled.
Part 4: Conclude
In summary, facing the “Inaccessible Boot Device” error, to avoid data loss, use MiniTool Power Data Recovery to restore your important data first.
Then, start with basic checks in Safe Mode. If that fails, try performing Startup Repair, checking and rebuilding BCD, running SFC or CHKDSK, and enabling AHCI to fix the error.
If you have any confusion about the MiniTool product, send an email to [email protected].
About The Author

Position: Columnist
Chelsea graduated from university with a major in English. She has a strong interest in English writing. It is this passion for writing that led her to become an English editor. Her articles mainly focus on data recovery and other computer industry news. As an energetic and outgoing girl, Chelsea enjoys listening to music, singing, riding bikes, and eating in her spare time.
User Comments :