Issue: Hard Drive Only Shows Half Capacity
During daily use of hard drives, you may encounter various disk issues. One of the most confusing situations is when the hard drive only shows half capacity.
This not only affects the normal utilization of storage space but may also indicate other disk errors. To help you solve this problem, this article provides a full guide.
Recover Data Before Fixing the Hard Drive Showing Half Capacity
Before addressing the abnormal hard drive capacity display, it is recommended to recover your files first.
This is because abnormal capacity often stems from corrupted partition tables, firmware failures, or bad sectors, all of which indicate an unstable file system.
Attempting to repair directly could result in file loss due to write operations during the repair process. Therefore, data recovery is essential.
MiniTool Power Data Recovery is ideal for recovering data from a hard disk showing half of its capacity, primarily for the following reasons:
- Powerful deep scan: This tool supports scanning of multiple file systems (e.g., NTFS, FAT, exFAT) to retrieve files lost due to partition loss, formatting, or capacity recognition errors.
- Broad compatibility: MiniTool works with all drive types (HDDs, SSDs, removable drives). It is capable of restoring almost all file types, such as documents, pictures, videos, audios, and more.
- Read-only operation: It operates in a read-only mode, ensuring no data is written to the original drive and preventing secondary damage to lost and existing files.
This free file recovery software gives you a 1 GB free recovery quota. Click the following button to download and install it to do a hard drive recovery.
MiniTool Power Data Recovery FreeClick to Download100%Clean & Safe
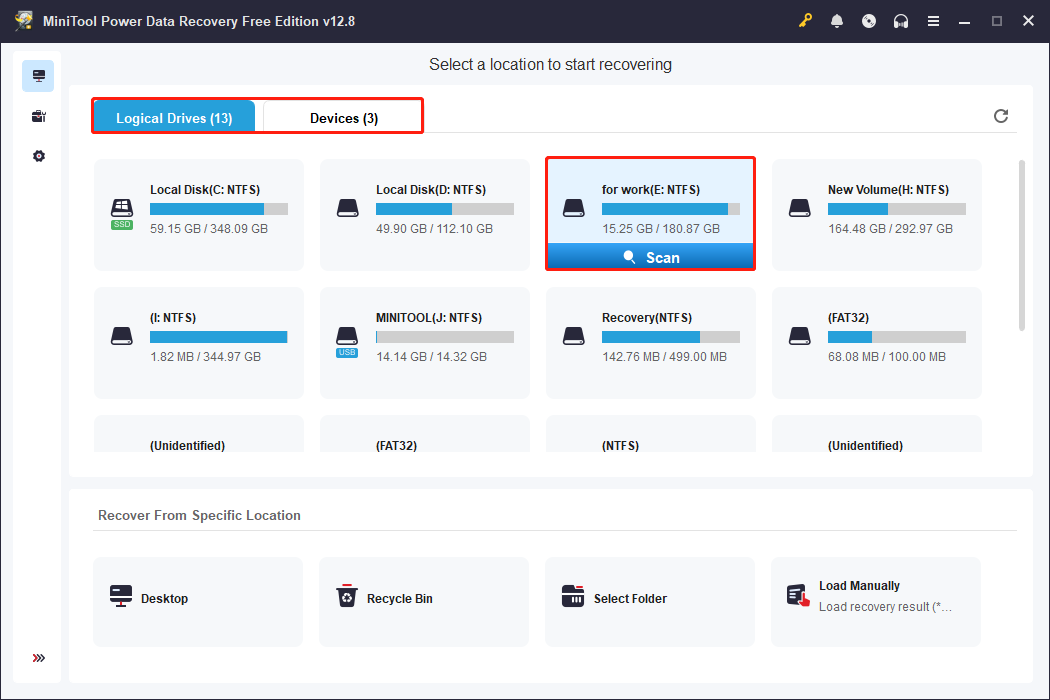
Step 1: Open the software and scan the drive
Launch MiniTool Power Data Recovery. You can find the hard disk under Logical Drives and Devices.
- Logical Drives: It lists all the partitions, including existing partitions, lost partitions, and unallocated space.
- Devices: It displays all the internal and external disks that are connected to the computer.
Select the target partition or disk and click Scan to start the scan process.
Step 2: Find the required files and preview them
The scanning process will take some time. Wait patiently for it to complete to get the most complete results. When it ends, use Path, Type, Filter, and Search to locate the target files.
- Path: Allows you to manually browse the folder tree and locate the directory from which you want to recover data.
- Type: Allows you to expand file types such as documents, pictures, videos, and audio files to quickly find a specific type of file.
- Filter: Allows you to filter out irrelevant results and narrow your search based on criteria like file type, modification date, file size, and file category.
- Search: Allows you to directly locate specific files by entering filenames or keywords.
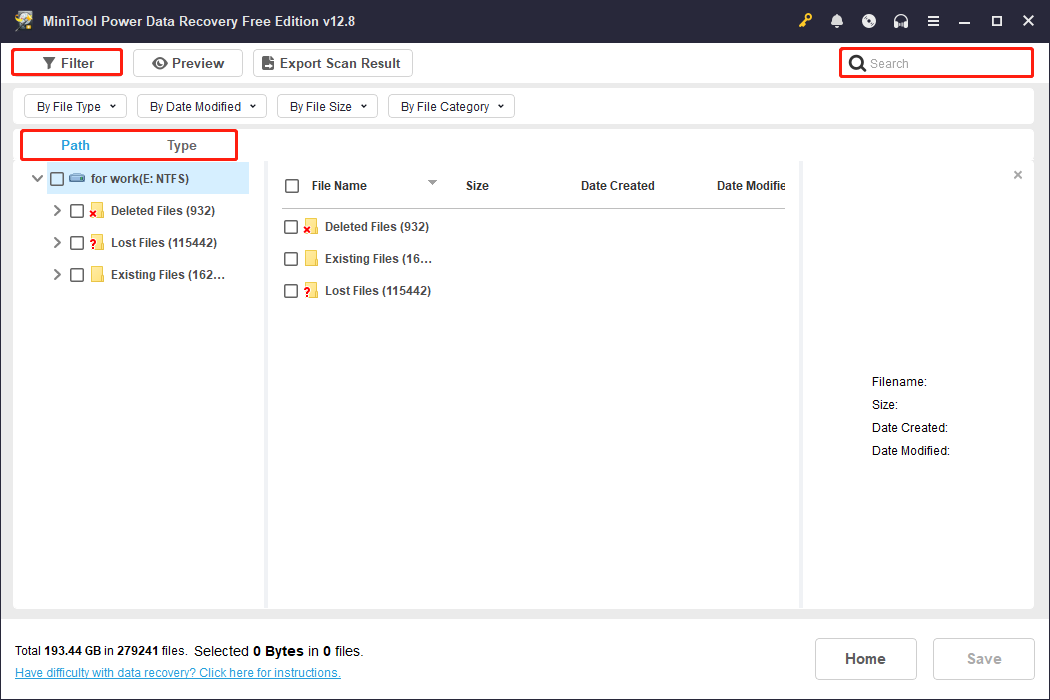
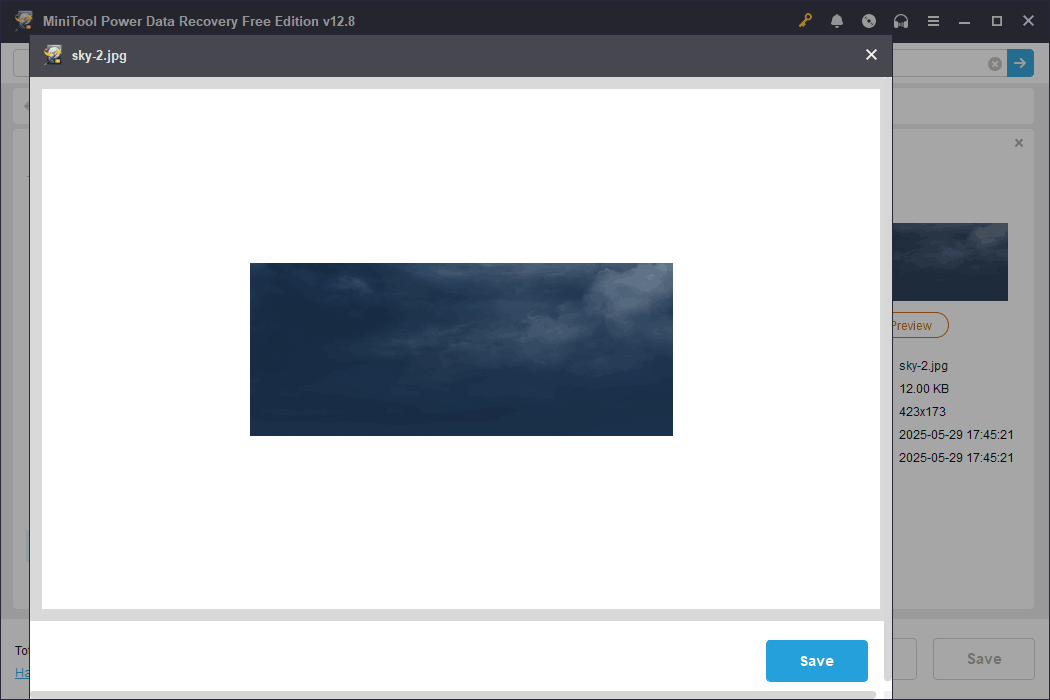
After finding the files, it is best to check their contentsbefore recovery to verify file integrity and accuracy.Double-click the files you want to view, and the preview window will pop up.
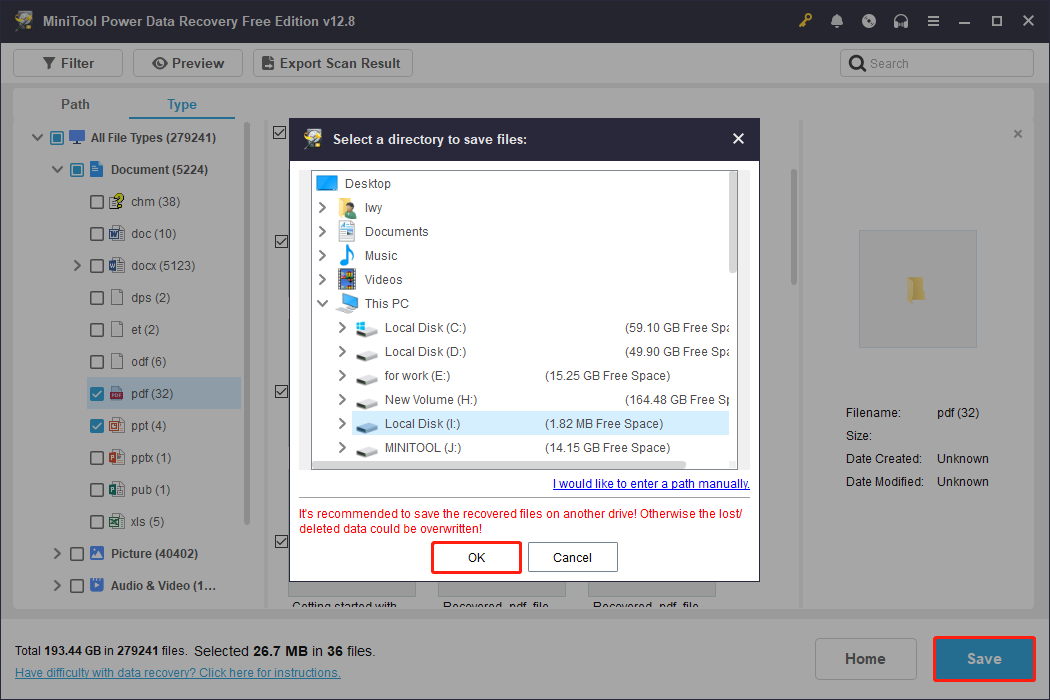
Step 3: Recover files to a safe destination
Select the required files and click the Save button. Choose a path and click OK. Wait for the Recovery Completed window to appear, then click the View Recovered button to check them.
When the files are safe, the next step is to get your hard drive back to normal.
How to Fix That Hard Drive Only Shows Half Capacity
This section explains how to fix if your hard drive only shows half capacity. Try them one by one until your drive capacity shows normally.
Method 1: Check if It Is a Fake Drive
Some inferior or counterfeit hard drives use firmware deception techniques to falsely report a larger storage capacity than the actual usable space.
When you repartition the disk or write data, you may encounter problems such as abnormal capacity reporting, write failures, or inaccessible partitions.
Therefore, when encountering such problems, checking the authenticity of the hard drive is an essential step.
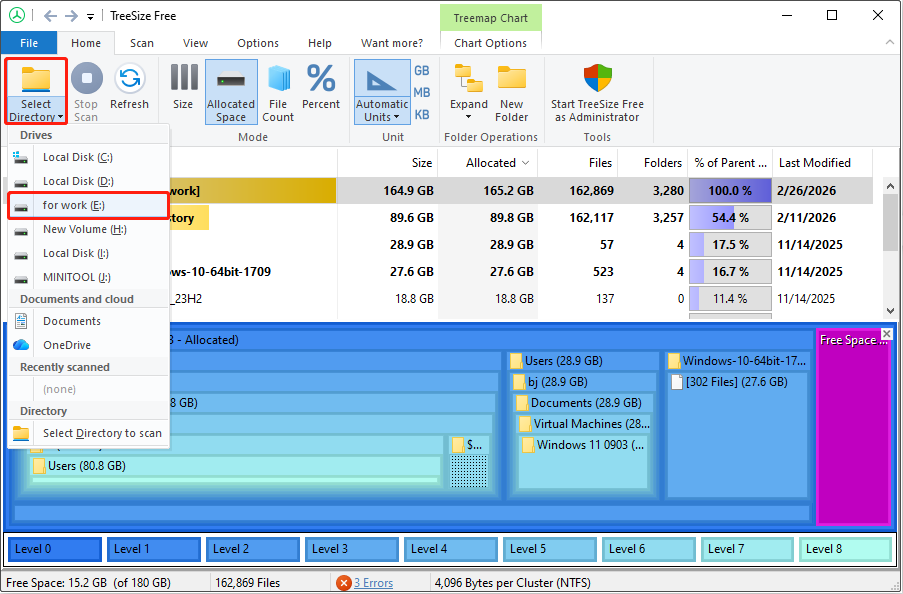
Method 2: Check Disk Space Usage Using TreeSize
When the problem of Windows only showing half capacity of the disk occurs, use TreeSize to check the disk space usage.
It can reveal whether hidden files, system backups, or abnormal usage are causing the insufficient space.
This helps distinguish between file usage issues and partition/hard drive structure errors, allowing for more targeted troubleshooting.
Step 1: Download and install TreeSize from the official website, then open it.
Step 2: Click Select Directory and choose the problematic hard drive. The hard drive space usage will be displayed.
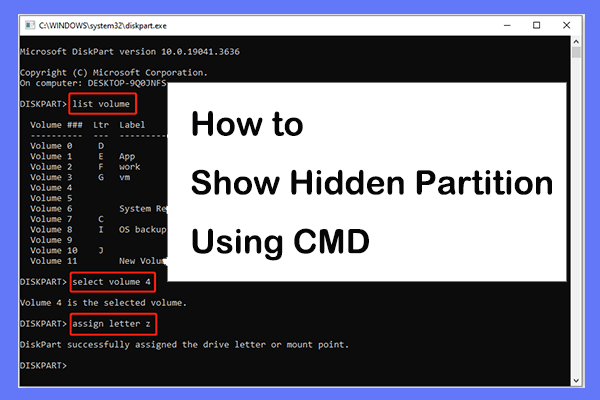
Method 3: Check for Hidden Partitions
It is necessary to check for hidden partitions when a hard drive shows the wrong capacity. That’s because hidden partitions may occupy a large amount of unshown space.
Step 1: Press Win + R, type gpedit.msc, and press Enter.
Step 2: Expand User Configuration > Administrative Templates > Windows Components > File Explorer.
Step 3: Double-click Hide these specified drives.
Step 4: Select the Not Configured option and click OK.
Method 4: Run CHKDSK
The file system errors, bad sectors, and partition table issues may cause the system to display only part of the drive’s total capacity. CHKDSK can scan and attempt to fix these errors.
Step 1: Type cmd in the Windows search box, right-click Command Prompt, and choose Run as administrator.
Step 2: When prompted by the UAC window, click Yes to continue.
Step 3: Type chkdsk E: /f /r in the window and press Enter. (Replace E with the actual drive letter of your drive.)
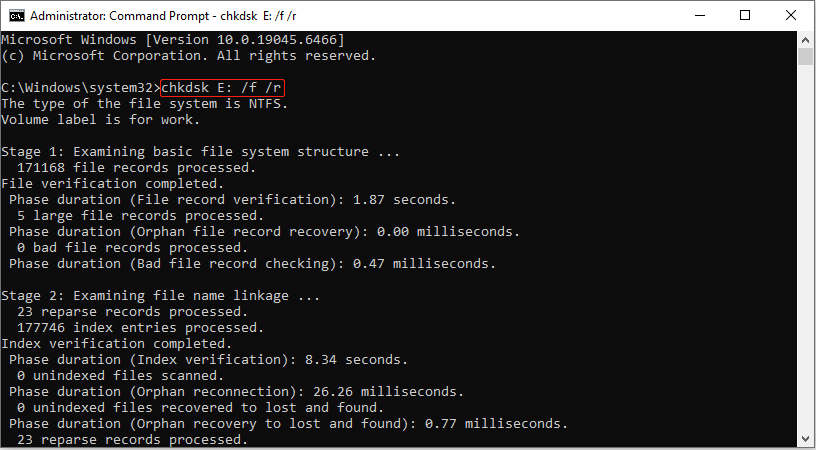
Wait for the process to end, and then check if the drive capacity is displayed correctly.
Method 5: Convert MBR to GPT
The MBR partition format may also cause this disk capacity issue. That’s because MBR has a 2 TB capacity limit; it cannot recognize or use space beyond 2 TB.
Converting to the GPT partition format removes this restriction, allowing the system to detect and use the full storage capacity of the hard drive.
Here are two options to convert MBR to GPT.
Option 1: Use the DiskPart tool
DiskPart is a built-in Windows utility that allows you to convert a disk’ partition style from MBR to GPT without installing any third-party software.
Step 1: Open Command Prompt with administrative privileges.
Step 2: Type diskpart and press Enter to launch the tool.
Step 3: Type the commands below one by one and press Enter after each:
- list disk
- select disk # (The # should be replaced with the number of the problematic hard drive)
- clean
- convert gpt
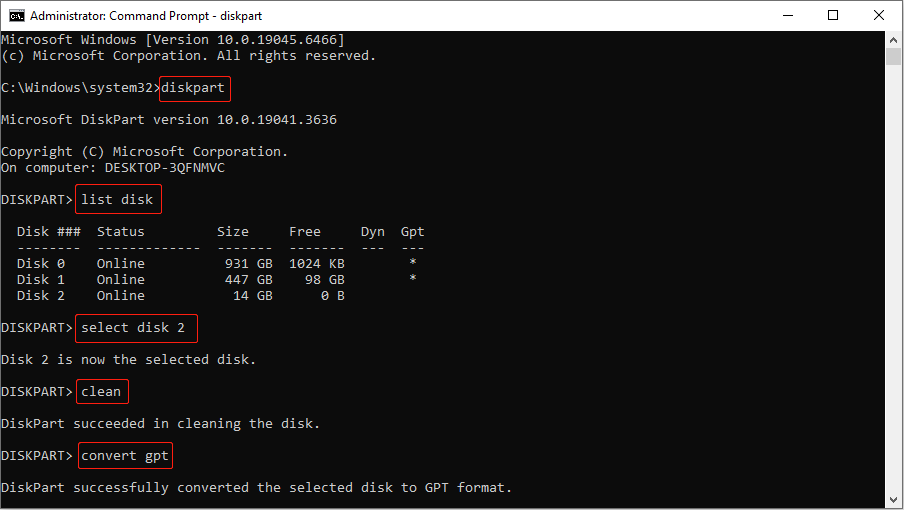
Step 4: Type exit and press Enter to close DiskPart.
Option 2: Use MiniTool Partition Wizard
MiniTool Partition Wizard supports converting MBR to GPT directly without deleting data. This tool is easy to operate with an intuitive graphical interface and is safer than DiskPart.
Step 1: Download and install the software on your computer.
MiniTool Partition Wizard FreeClick to Download100%Clean & Safe
Step 2: Open this software, and then click the section showing the disk partition table format to select the entire disk.
Step 3: Click Convert MBR Disk to GPT Disk under Convert Disk.

Step 4: Finally, click Apply to make the change take effect.
Method 6: Repartition the Disk or Create a New Partition
If a large amount of disk space is unallocated and cannot be recognized by the system, the hard drive will only show a smaller capacity.
In this case, try repartitioning the drive or creating a new partition on the unallocated space. This can reconfigure the entire partition structure of the drive and reclaim all the missing or unused space.
Here is how to repartition the disk:
Step 1: Open Disk Management, then find the hard drive that only shows half capacity.
Step 2: Right-click each existing partition on the drive and select Delete Volume until all space becomes Unallocated.
Step 3: Right-click the large Unallocated space, then choose New Simple Volume.
Step 4: Then, keep the default maximum partition size, assign a drive letter, choose a file system, and set a volume label.
Here is how to create a new partition:
Step 1: Open Disk Management, right-click the Unallocated space, and select New Simple Volume.
Step 2: Follow the wizard to set the partition size, assign a drive letter, and format the volume with NTFS.
Method 7: Clean up the Hard Drive to Its Full Capacity
If all methods fail, try cleaning up your hard drive. It deletes the partition formatting and data on the disk, restoring the hard drive to a blank state.
Follow the steps below to clean the hard drive with DiskPart:
Step 1: Run Command Prompt as an administrator.
Step 2: Type diskpart and press Enter.
Step 3: Then, type the following commands one by one and press Enter after each:
- list disk
- select disk # (replace # with the actual number of your disk)
- clean
This command removes all partition and volume formatting instantly. When the process ends, recreate partitions on the unallocated space.
Now the full disk capacity should be available. Continue reading to learn about the causes of this problem and the protection tips.
Common Causes for Hard Drive Only Shows Half Capacity
When a hard drive only shows half capacity, it is usually caused by one of these issues:
- MBR partition limit. The MBR partition table only supports a total partition size of up to 2 TB and cannot utilize any space exceeding that limit.
- Improper partitioning. Incorrect partition configuration during disk initialization or system installation can cause some space to become unallocated.
- Impact of disk image cloning. Cloning a hard drive from a smaller-capacity hard drive typically preserves the original hard drive’s partition size. And the newly added space cannot be used automatically.
- Binary vs. decimal capacity calculation difference. Hard drive manufacturers label capacity using the decimal standard (1 GB = 1000 MB), while Windows systems calculate in binary (1 GB = 1024 MB). As a result, a nominal 500 GB drive typically only shows around 465 GB in the system.
How to Protect Your Hard Drive in the Future
This section tells you how to protect the hard drive from showing only half its capacity again.
- Use the GPT partition table instead of MBR for hard drives larger than 2 TB.
- Back up data before partitioning, formatting, or converting the partition table.
- Do not arbitrarily delete system reserved partitions, EFI partitions, or recovery partitions.
- Avoid sudden power loss or forced shutdowns while reading from or writing to the hard drive.
- Regularly use disk checking tools to scan and repair file system errors.
- Plan partitions uniformly for a single hard drive and do not leave a large amount of unallocated space.
To Sum Up
This article mainly discusses the common problem that a hard drive only shows half capacity.
- First, it introduces how to recover data from the drive to ensure data security.
- Then, it proposes methods such as repairing disk errors, converting MBR to GPT, repartitioning the disk, or creating a new partition to fix this issue.
- Finally, it analyzes the main causes and provides some practical preventive measures.
If you have any questions about MiniTool products, contact us at [email protected].
About The Author

Position: Columnist
Chelsea graduated from university with a major in English. She has a strong interest in English writing. It is this passion for writing that led her to become an English editor. Her articles mainly focus on data recovery and other computer industry news. As an energetic and outgoing girl, Chelsea enjoys listening to music, singing, riding bikes, and eating in her spare time.
User Comments :