USB Ports Are Blocked by Your IT Administrator
Why Did Your IT Administrator Block or Disable USB Ports?
It is a normal operation to transfer files between a computer and a USB flash drive, memory card, SD card, or pen drive via a USB port. You can also transfer your files from your Android phone or tablet, iPhone or iPad to your PC using a USB port.
However, the USB ports can be blocked by your company’s IT administrator due to the following reasons:
- Security Concerns: USB ports can be used to transfer viruses and malware to the system. To prevent this, administrators may block the USB ports to ensure the security of the system.
- Data Theft: USB ports can also be used to transfer sensitive data from the computer. To prevent data theft, administrators may block the USB ports of the device.
- Productivity: In some organizations, employees may use USB devices for non-work-related activities, which can decrease productivity. To prevent this, administrators may block USB ports.
- Compliance: In some industries, there may be compliance regulations that require USB ports to be blocked to protect sensitive data.
How to Check If USB Ports Are Blocked or Disabled?
There are two ways you can use to check whether USB ports are blocked or disabled by administrators: use Device Manager or use Local Group Policy Editor.
Way 1: Use Device Manager
Step 1: Press Windows + X to open the WinX menu, then select Device Manager to open it.
Step 2: In the Device Manager window, expand the Universal Serial Bus controllers section.
Step 3: Look for any exclamation marks or question marks or other strange marks next to the USB controllers. If you see any, it means that the USB ports are disabled or blocked.
Way 2: Use Local Group Policy Editor
Step 1: Press Windows + R to open the Run dialog box.
Step 2: Type gpedit.msc into the Run dialog and press Enter.
Step 3: In the Local Group Policy Editor, navigate to Computer Configuration > Administrative Templates > System > Removable Storage Access.
Step 4: Check if any of the policies are enabled that block USB storage devices.
How to Enable USB Ports that Are Blocked by Administrators?
Is it possible to enable USB ports disabled by the IT administrator? Of course, yes. You can do this job by using Device Manager, Registry Editor, or Local Group Policy Editor. You can use a third-party tool to do this job.
In this part, we will introduce these methods one by one. These methods work on Windows 10 and Windows 11.
How to Unblock USB Ports Using Device Manager?
Step 1: Press Windows + X to open the WinX menu. Then, select Device Manager to open it.
Step 2: In the Device Manager window, find the Universal Serial Bus controllers option and click it to expand it.
Step 3: Right-click on the USB controller and select Enable device from the context menu. You can repeat this step to unblock all USB ports.
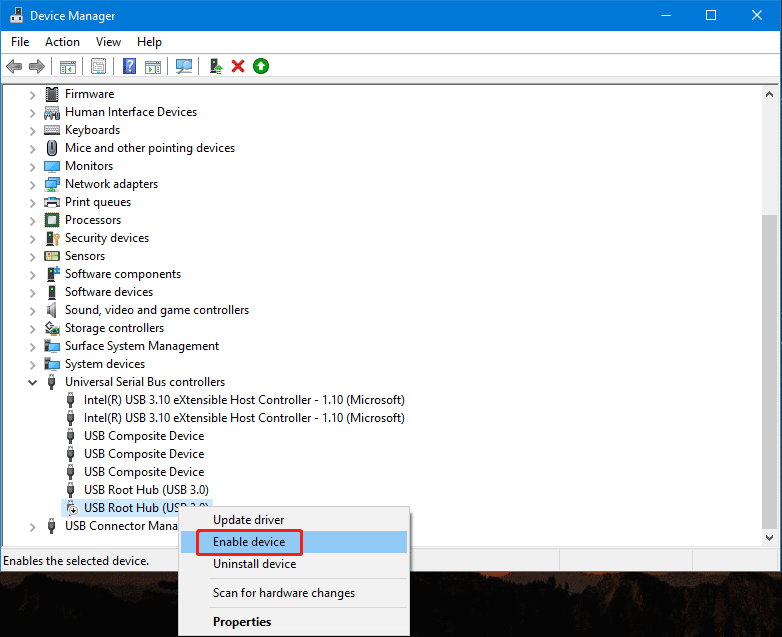
Step 4: Close Device Manager and restart your Windows computer.
How to Unblock USB Ports Using Registry Editor?
Device Manager is not the only tool that can help you enable your USB ports. You can also use Registry Editor to do the same job. Here are the steps you can use:
Step 1: Click the search icon in the taskbar, then use it to search for Registry Editor.
Step 2: Click Registry Editor from the search result to open it.
Step 3: Go to the following path:
Computer\HKEY_LOCAL_MACHINE\SYSTEM\CurrentControlSet\Services\USBSTOR
You can directly copy and paste this path to the address bar in Registry Editor and press Enter to access this path.
Step 4: Double-click the Start DWORD on the right panel to open that value.
Step 5: Change to value data to 3.
Step 6: Click the OK button to save the change.
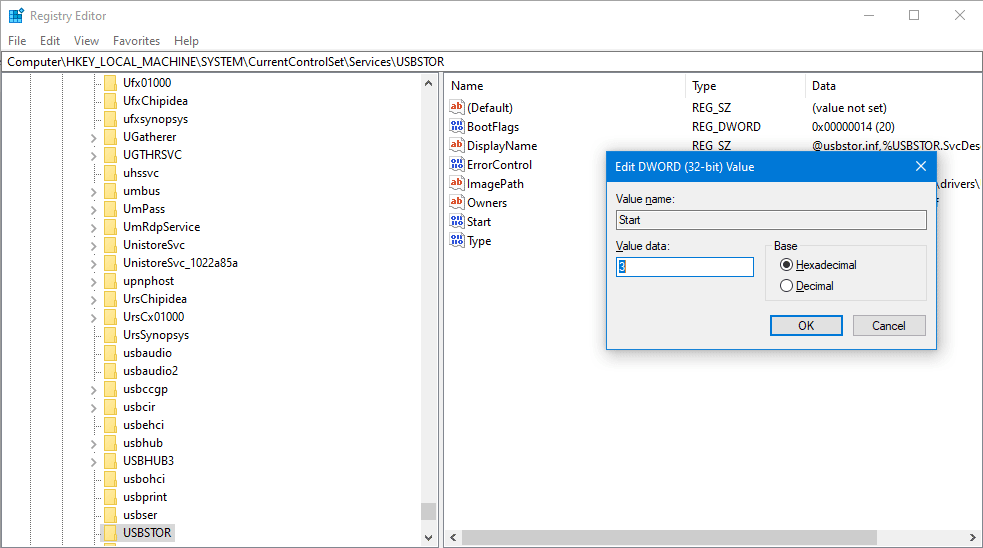
Step 7: Close Registry Editor and restart your PC.
How to Unblock USB Ports Using Local Group Policy Editor?
By default, Local Group Policy Editor is not available on Windows 10 and Windows 11 Home Editions. But you can manually enable it. See how to enable Local Group Policy Editor on Windows Home Editions.
If you are running Windows 10/11 Pro or a more advanced edition, you can also unblock USB ports using Local Group Policy Editor. Here we go:
Step 1: Press Windows + R to open the Run dialog box.
Step 2: Type gpedit.msc into the Run dialog and press Enter. Then, you can see the Local Group Policy Editor window.
Step 3: Go to Computer Configuration > Administrative Templates.
Step 4: Double-click on System on the right panel to continue.
Step 5: Select Removable Storage Access on the next page.
Step 6: Double-click the All Removable Storage classes: Deny all access policy setting.
Step 7: Select Not Configured or Disabled if that setting is enabled.
Step 8: Click OK to save the change.
Step 9: Double-click the Removable Disks: Deny read access policy setting.
Step 10: Select Not Configured or Disabled if that setting is enabled.
Step 11: Click OK to save the change.
Step 12: Double-click the Removable Disks: Deny write access policy setting.
Step 13: Select Not Configured or Disabled if that setting is enabled.
Step 14: Click OK to save the change.
Step 15: Close Local Group Policy Editor.
Step 16: Restart your PC.
How to Unblock USB Ports Using a Third-Party Tool?
You can also use a third-party USB unblocker to enable USB ports that are blocked. Here are some choices for you:
- Windows USB Blocker
- SysTools USB Blocker
- USB Flash Block/Unblock for PC
- Pen Drive Unlocker
How to enable USB ports that are blocked by administrators? You can find 4 ways in this part. You can select one way accordingly.
How to Recover Lost or Deleted Files on USB Removable Drives?
A USB drive is usually used as a data storage device to save or transfer some of your important files. However, you may delete or lose some of these files unexpectedly. Then, how to get your missing data back from a USB drive?
You can use professional data recovery software. MiniTool Power Data Recovery is a good choice for you.
This free file recovery tool is designed and developed by MiniTool Software. You can use it to recover files like images, videos, music files, movies, Office documents, ISO files, and more from data storage devices like internal hard drives, external hard drives, memory cards, USB flash drives, SD cards, and more.
- Here are the data types this software can recover: Supported File Types to Recover.
- Here are the supported storage media: Supported Storage Media.
This software can recover data on all versions of Windows, including Windows 11, Windows 10, Windows 8.1, and Windows 7.
With the free edition of this software, you can scan the drive you want to recover data from and recover up to 1 GB of files without paying any cent. So, if you are not sure whether this software can find your needed files and recover them, you can first try the free edition.
MiniTool Power Data Recovery FreeClick to Download100%Clean & Safe
No matter which data recovery software you are using, the tool can only recover lost or deleted files that haven’t been overwritten by new data. To prevent your files from being overwritten and becoming unrecoverable, you should not install the software onto the drive where the missing files were saved.
It is very easy to recover your files from a USB drive on a Windows computer using this software. You can use these steps:
Step 1: Download and install MiniTool Software on your Windows PC.
Step 2: Open the software to enter its main interface. This software will show all drives it can detect under the Logical Drives section on the software interface. Then, you need to hover over the target drive and click the Scan button to scan that drive. If you are not sure which drive is the target one, you can switch to the Devices sections and select the entire disk to scan.
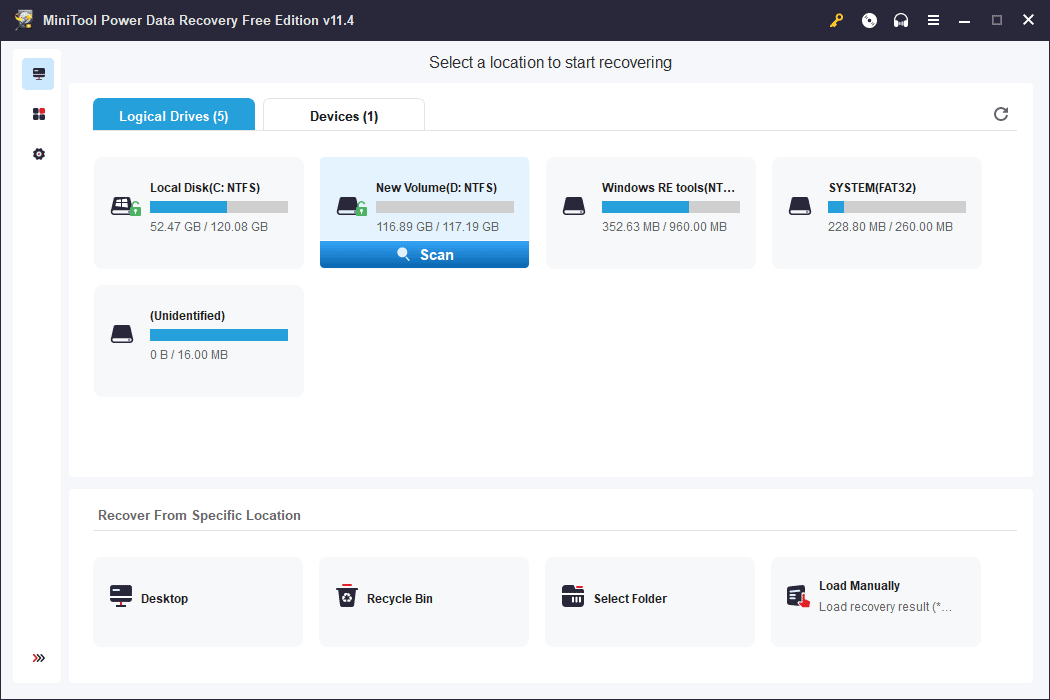
Step 3: The scanning process will last for some minutes, depending on the size of the drive and the data in it. To get the best data recovery effect, you should wait until the whole process end. Then, you can see the scan results that are listed in 3 categories: Deleted Files, Lost Files, and Existing Files. You can open each path to find your missing files. On the other hand, you can also click the Type tab to make MiniTool Power Data Recovery show the scanned files by type. Then, you can quickly find files by type.
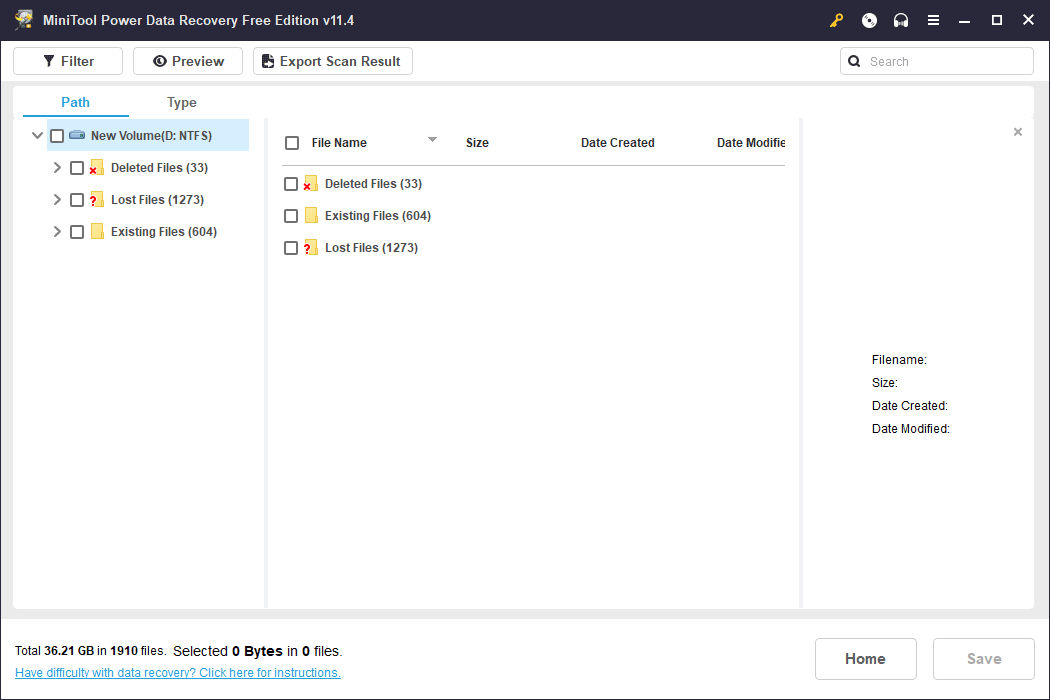
Step 4: This software allows you to preview up to 70 types of files. This can help you check if the files you select are your needed files.
If it is the first time for you to use the free edition of this software, you need to download the previewer package in advance. You can select one file and press the Preview button, then this software will begin to download the package.
Step 5: Check the files you want to recover, then click the Save button and select a suitable folder to save your selected files. To prevent overwriting data, the destination folder you select should not be the original location of the lost files.
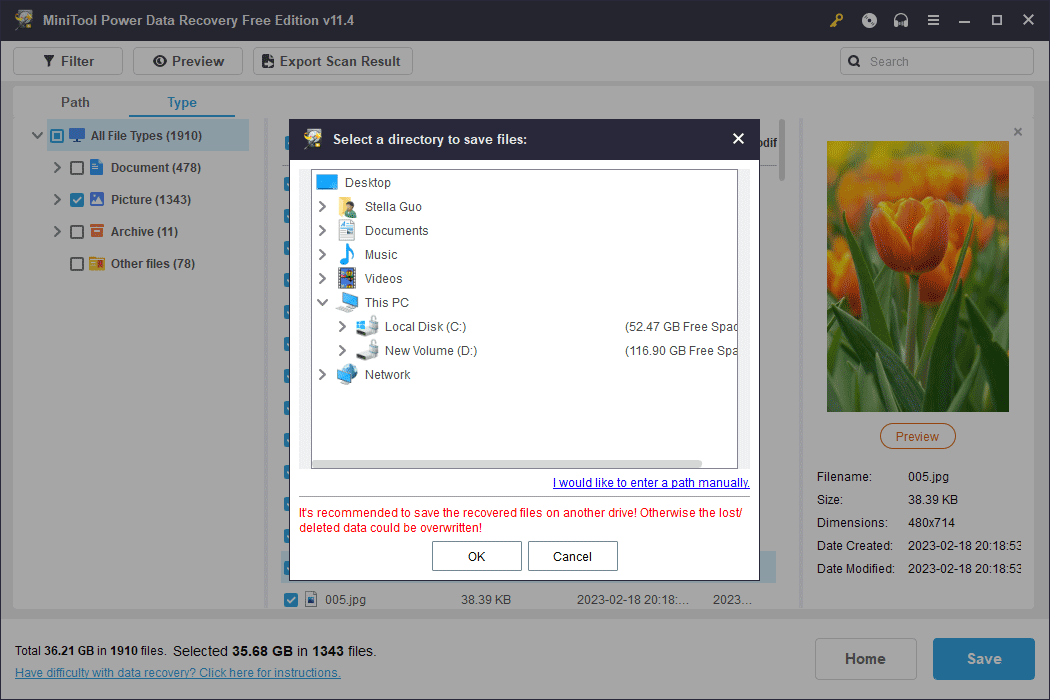
If the total size of the files you select exceeds 1 GB, you will not be allowed to recover them due to the limit in the free edition. But you can upgrade the free edition to a full edition. After that, you can recover your files without worrying about the limitation. You can go to the MiniTool Store to select a suitable edition as per your situation.
How to Block USB Ports on Windows?
If you want to block USB ports on your Windows computer, you can refer to this blog: How to Disable USB Ports on a Windows PC/Laptop?
How to Transfer Files if USB Ports Are Blocked?
Blocked USB ports can stop you from transferring files between a PC and a USB drive. Unblocking USB ports is one way to break the limit. You can also use another method to transfer files if USB ports are unavailable. For example, you can sync files using a cloud service. You can sync your files using Google Drive or Dropbox.
After you import your files to Google Drive or Dropbox, you can view or download these files on any computer as long as you log in to the same account. You can see that you can transfer files without a USB port.
Wrapping Things up
Are your USB ports blocked by your IT administrator? How to enable USB ports that are blocked by administrators? You can find four different ways in this blog. There should be one suitable method for you. Should you have other suggestions or other related issues that need to be solved, you can contact us via [email protected].
User Comments :