In certain situations, photos on SD card show on the camera but not on the PC. This is a common issue, as illustrated in the following example:
“Pictures are showing up on my camera, but not when I insert the SD card into the computer. I made sure the SD card was in there, and we got to taking photos, many photos. When I put my SD card into the PC, nothing shows up... literally nothing. Does anyone know what to do?”reddit.com
Fortunately, in most cases, the photos are not really lost but invisible in Windows due to various technical problems.
This guide will discuss why the “SD card photos not showing up in Windows” issue occurs and provide 7 effective methods to fix it.
Part 1. Why Are Photos on SD Card Not Showing on the Computer
The “SD card photos not showing” issue may occur for various reasons. For instance, your photos may be stored on the camera’s internal memory.
Sometimes, the SD card might not be properly connected to the computer, which could prevent you from viewing its pictures.
Here are some common reasons for photos on the SD card not showing on the PC:
- Virus infection.
- Write-protected SD card.
- Hidden photos.
- Loose connection.
- Drive letter conflict.
- File system errors.
- Outdated or corrupted drivers.
- Hardware issues (card reader/port).
- Accidental deletion.
- Formatting of the SD card.
After learning the possible causes, read on to get the solutions to make your computer read the SD card’s photos again.
Part 2. How to Fix SD Card Photos Not Showing on the Computer
Before proceeding with any complex solutions, try some simple steps:
- Reinsert the SD card.
- Restart the device.
- Use another card reader.
If they don’t work for you, we sum up 7 available solutions to make SD card pictures show up in Windows as follows. Try them one by one.
Fix 1. Remove the SD Card Write-Protection
While SD card write protection usually prevents files from being edited, in rare cases, it may also affect how your computer reads the card.
If the card is locked, your system may fail to read its contents properly, making your photos appear missing.
SD card write protection is primarily of two types:
- Physical write protection is a hardware lock on the SD card itself or its adapter.
- Software-based protection is set through the device’s operating system or file system.
First, check the write-protection of your SD card, disable it, and then open the SD card photos on the PC.
#1. For Physical Write Protection
Locate the write protection switch on the side of your SD card, and then slide it to the Unlock position.
Reinsert it into your PC to access the photos.
#2. For Software-based Protection
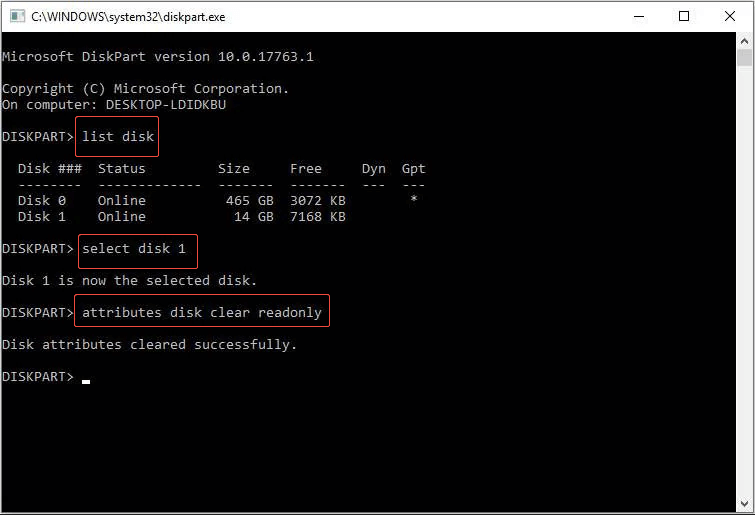
Step 1. Press Win + R to open the Run dialog box, type diskpart, and press Enter.
Step 2. The diskpart interface will open, and you will have to type the following commands. Be sure to press Enter after each command.
- list disk
- select disk x (Replace “x” with the drive number of the SD card.)
- attributes disk clear readonly
If the problem that SD card photos don’t show in Windows is not due to the write protection, continue to the next solution.
Fix 2. Unhide Photos in the SD Card
Sometimes, your photos on the SD card may be hidden in Windows, making them invisible. In this case, you need to adjust the File Explorer settings.
Here’s how to do it:
Step 1. Press Win + E to open the File Explorer.
Step 2. Go to the View tab in the top toolbar, and check the box of Hidden items.
Open the SD card’s folder to see if the photos appear.
Fix 3. Run the Attrib Command
If the files are hidden due to disk corruption or virus infections, changing the hidden file settings may not help. In this case, try using the Attrib command to restore their visibility.
Here’s the breakdown on how to run the Attrib command to unhide files:
Step 1. Run the Command Prompt as administrator.
Step 2. In the pop-up window, type diskpart and press Enter.
Step 3. Type attrib -h -r -s /s /d drive letter:\*.* (Replace “drive letter” with your SD card drive letter) and press Enter.
Once the scan completes, try accessing the photos on your computer.
Fix 4. Change the SD Card Drive Letter
If your SD card does not appear in File Explorer at all, you won’t be able to view any of its contents, including your photos.
In this case, the problem is not that the photos are missing, but that the SD card itself is not being recognized properly.
One possible reason is a drive letter conflict. To fix this, follow the steps below to change a drive letter:
Step 1. Connect the SD card to your PC using a card reader.
Step 2. Press Win + X to open the Power User menu and choose Disk Management.
Step 3. Right-click on the volume for which you want to alter the drive letter, and select Change Drive Letter and Paths.
Step 4. In the pop-up window, click Change. Then assign a different drive letter to the SD card.
Step 5. Click OK to complete the settings.
Now, reopen the File Explorer to check whether you can see the card and photos on it.
Fix 5. Use the CHKDSK Command
As mentioned above, the file system errors may trigger the “photos on SD card not showing on the computer” issue.
To scan and repair logical file system errors of the SD card, a built-in Windows utility – CHKDSK, can be helpful.
Steps to run the CHKDSK command:
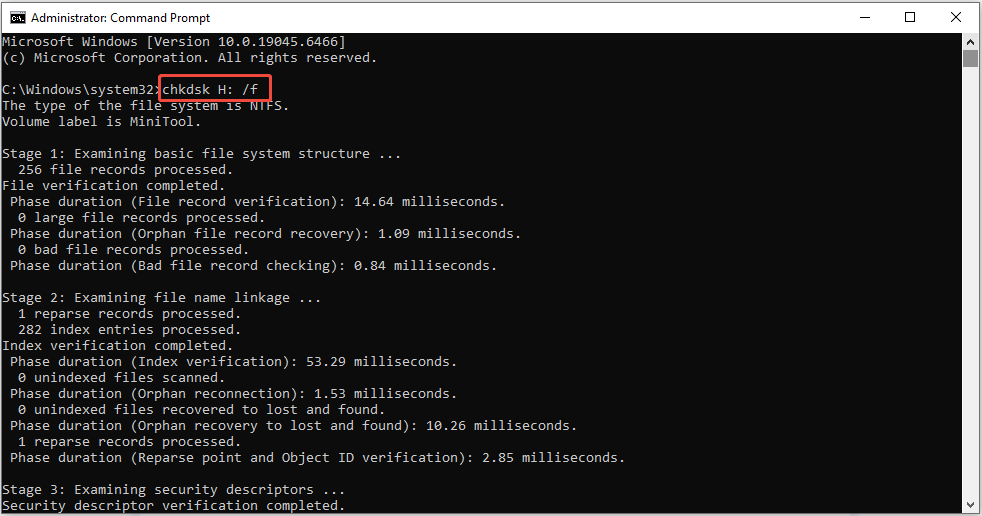
Step 1. Press Win + S to open the Windows search bar, type cmd, and then right-click Command Prompt to select Run as administrator.
Step 2. In the command line window, type chkdsk [drive letter]: /f and press Enter (Replace the “[drive letter]” with your SD card letter).
For example, if the SD card’s drive letter is H, you need to type chkdsk H: /f.
If this method fails, proceed with the next one.
Fix 6. Update/Reinstall the SD Card Driver
When the disk driver becomes corrupted or outdated, your PC may fail to recognize the SD card and access its data properly, even if it is securely connected.
In such a situation, consider updating or reinstalling the driver:
Step 1. Press Win + X and then select Device Manager.
Step 2. Expand the Disk drives category.
Step 3. Right-click on your SD card and select Update driver.
Step 4. Select Search automatically for drivers.
If updating the driver does not resolve the issue, right-click on the device and choose Uninstall device. Restart your computer, and Windows will try to reinstall the driver automatically.
If you have tried all the methods mentioned above but still cannot view your photos on the SD card, consider formatting it.
Fix 7. Format the SD Card
As a final measure, formatting the SD card can fix file system corruption to resolve the “SD card photos not showing up on the computer” problem.
Here are two solutions to format an SD card:
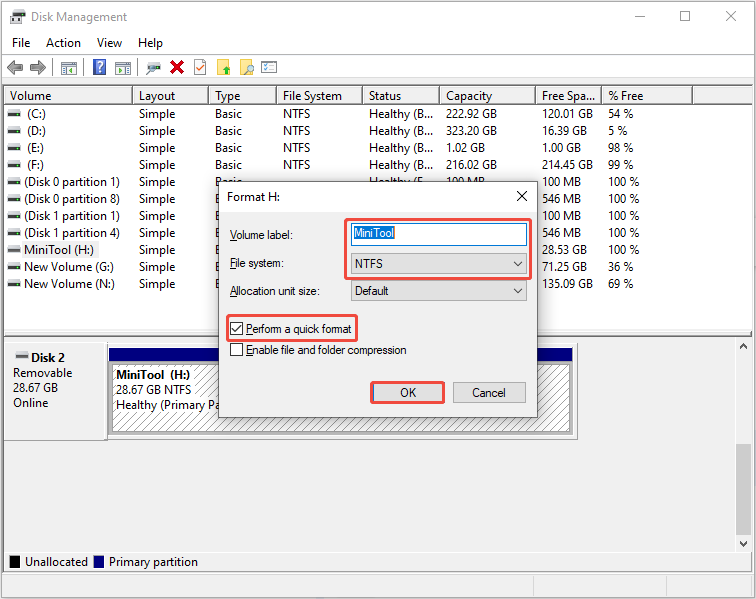
Option 1. Disk Management
Step 1. Press Win + X and choose Disk Management from the WinX menu.
Step 2. Locate the SD card in the disk list, right-click on it, and select Format.
Step 3. Type the volume label and select an appropriate file system for the SD card. Check the Perform a quick format option, and then click OK to confirm your changes.
Option 2. MiniTool Partition Wizard
MiniTool Partition Wizard is considered the best tool for formatting SD cards, as it offers multiple file systems, such as NTFS, FAT32, FAT, exFAT, Ext2/3/4, etc.
Furthermore, its intuitive interfaces and straightforward step-by-step wizards help you easily navigate through all the procedures.
MiniTool Partition Wizard FreeClick to Download100%Clean & Safe
Follow the steps to format your SD card using MiniTool Partition Wizard:
Step 1. Connect the SD card to your computer using a card reader and open MiniTool Partition Wizard. Select the SD card’s partition and click Format Partition in the left action panel.
Step 2. In the pop-up interface, choose the file system, partition label, and cluster size. Once you’ve made these selections, click OK to return to the main interface.
Step 3. Click Apply to complete the SD card formatting process.

Part 3. How to Recover Lost Photos From the SD Card on PC
If none of the above methods work and you cannot export the photos from the camera, it is possible the files are no longer accessible through normal methods. In this case, try using data recovery software to scan the SD card and detect the files.
Even if the card has been formatted, data recovery tools can help retrieve your pictures.
To recover lost SD card photos in Windows, MiniTool Power Data Recovery is the most recommended tool.
Here is an overview of its main features and advantages:
- Recover files from SD cards, USB drives, hard disks, SSDs, and other storage media.
- Supports various file types, such as pictures, videos, documents, archives, and more.
- Effective for situations involving accidental deletions, disk formatting, file system issues, etc.
- Allows previewing different file types, including photos, before recovery.
- Allows for the recovery of up to 1 GB of files at no cost.
- Features a user-friendly and straightforward interface.
Now, download this free data recovery software and follow the instructions below to scan your SD card, preview the photos, and recover files.
MiniTool Power Data Recovery FreeClick to Download100%Clean & Safe
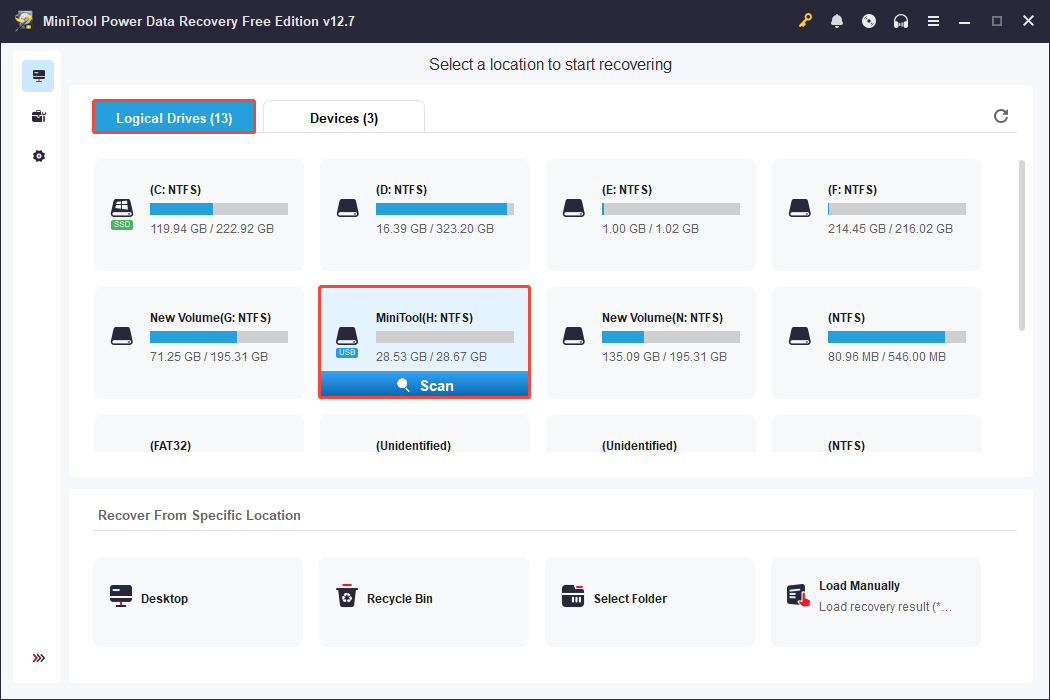
Step 1. Scan Your SD Card
Connect your SD card to your PC and run MiniTool Power Data Recovery to enter the main interface.
Here, you will see all partitions of connected disks on your computer under the Logical Drives tab.
Move your cursor to the target SD card (marked with a USB icon) and click Scan.
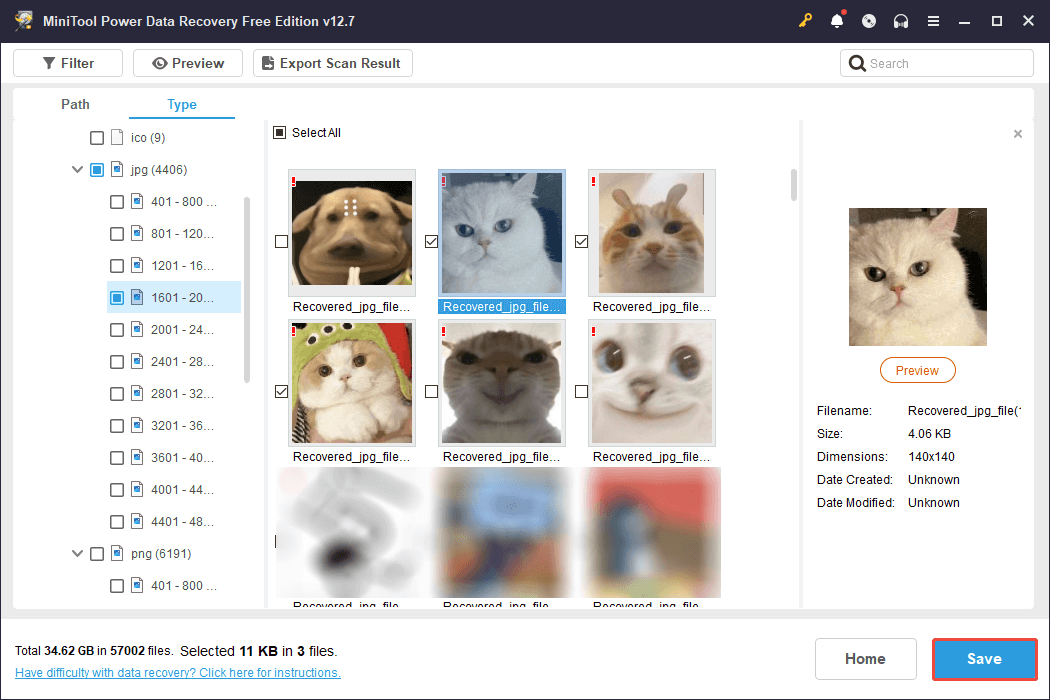
Step 2. Find and Preview Photos
After the scan finishes, navigate to the Type tab and expand the Picture section. All detected photos will be categorized by their format.
Look for the desired format and select the photos you wish to recover.
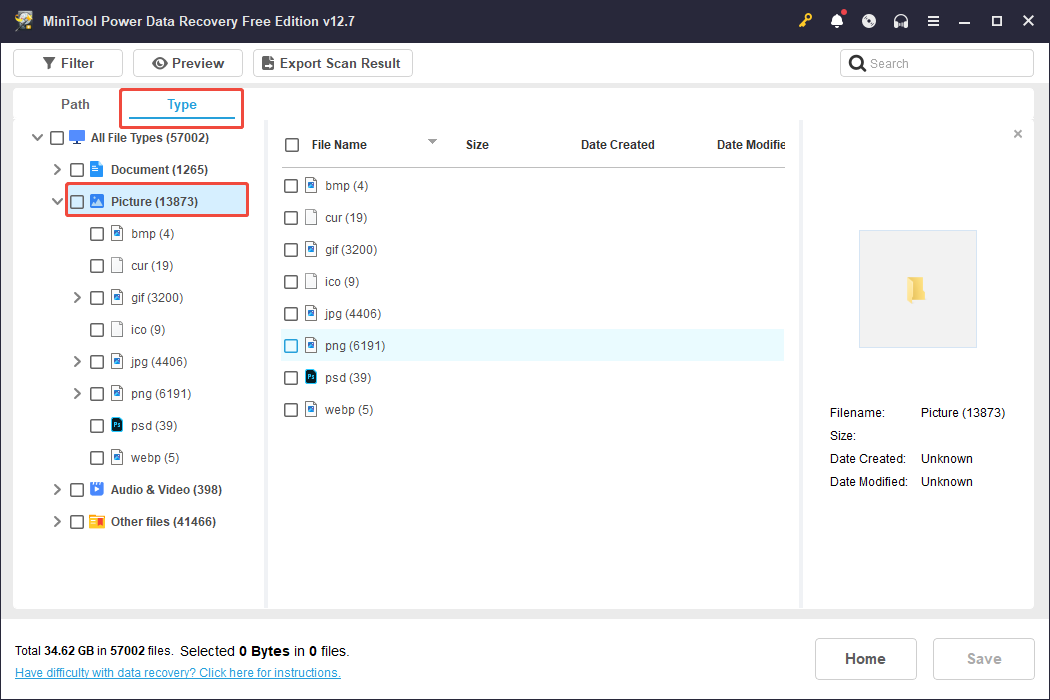
If you remember the file name, type the full name or a keyword into the search bar located at the top-right corner, and press Enter to find it quickly.
This tool also allows you to view files before recovering them. Double-click on a photo to open the preview window and ensure it’s the right one.
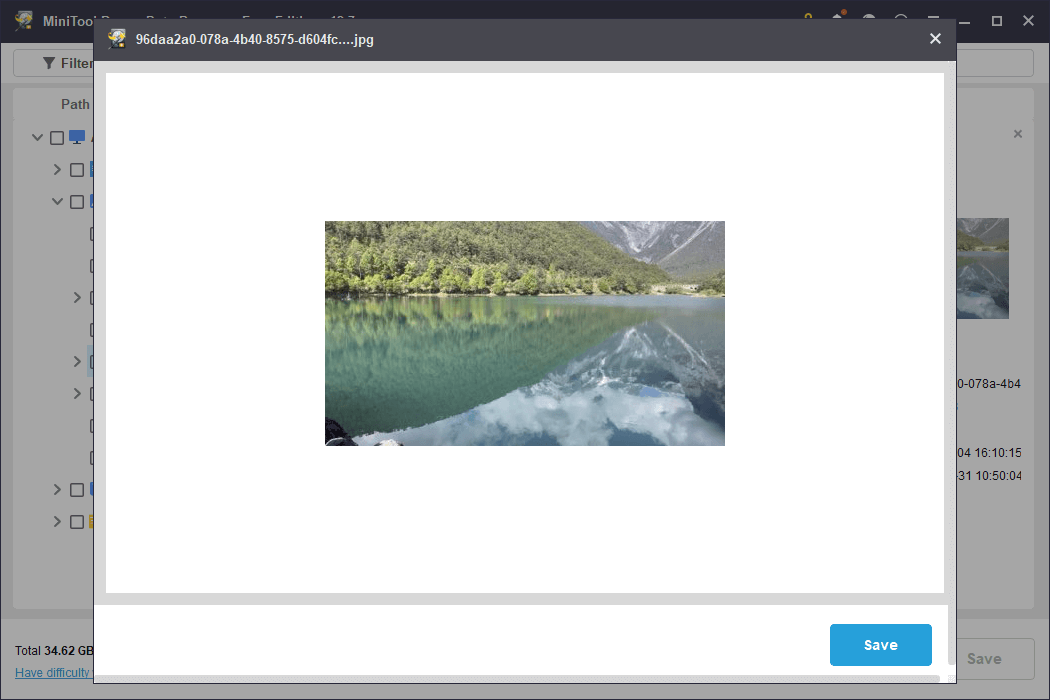
Step 3. Save Desired Photos
In the preview window, click Save to restore the current picture.
Alternatively, preview several photos, select each one you wish to recover, then click Save and choose a different location to save them all.
As previously mentioned, the free version of this Windows data recovery tool allows for the recovery of up to 1 GB of data at no charge.
If you run out of this capacity, you will need to upgrade to the Professional edition of the software to recover remaining files.
Once the recovery process is completed, you can access the save location and view the recovered photos.
Bottom Line
To sum up, this post explores some basic checks and seven effective solutions to fix the “photos on SD card not showing on the computer” problem in Windows.
If you format the SD card or the photos on the SD card are lost, we also provide a professional data recovery tool to help you get them back.
If you need any help or have any questions when using MiniTool software, please send an email to the support team at [email protected].
About The Author

Position: Columnist
Sandy became an English editor after graduation. She is devoted to finding effective solutions for diverse IT problems and provides articles on data recovery, data backup, and computer partitions and drives. In her spare time, she likes listening to music and playing games.
User Comments :