Storage Spaces helps you protect data from hard drive failure and prolong the storage time when you add drives to your computer. You can use Storage Spaces to group two or more drives in a storage pool. When the storage space is not enough, just add more drives to the storage pool. However, some people encounter failed Storage Spaces and their files are inaccessible. How to recover data from failed Storage Spaces comes to the prior thing.
I'm going a bit insane trying to fix this issue with my file server it's a Plex server with some files built on Windows 10 using parity. I had 6 drives and 1 failed, storage spaces would not let me remove the drive, and I would get a lack of resiliency error, so I added another drive... Same error... so I added another... Now I'm broke and still can't access my data. I physically removed the dead drive as it seemed to be causing Windows to take 30+ minutes to boot. I don't know what to do, but really need a few of the files back, my wife stored her school stuff on there. – otakunorthtenforums.com
![[Review] How to Create Windows 11 Storage Spaces/Storage Pool?](https://images.minitool.com/minitool.com/images/uploads/2021/09/windows-11-storage-spaces-thumbnail.png)
Failed Storage Spaces: Typical Error Messages
Storage Spaces is a widely used tool to save files. But you may get various error messages when working with it. To fix the failed Storage Spaces error, you should know exactly what the error is. Therefore, I list the common Storage Spaces errors in the following content.
Storage Space Errors
In general, you may see the following error messages when encountering failed Storage Spaces.
Error 1: Inaccessible; reconnect drives.
This is a common error that many people have seen in Storage Spaces. Though it can be caused by many reasons, the most possible one is the changes in storage pool configuration. This error is caused by either adding a new drive or reconnecting any of the drives in the pool.
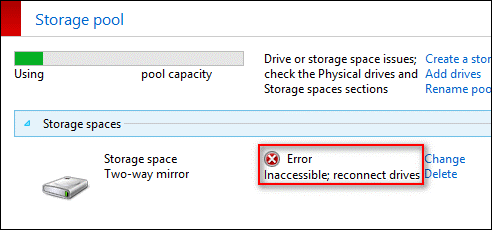
Please note: there are 3 typical cases in which the drive becomes inaccessible.
- The disk becomes RAW suddenly.
- The volume doesn’t contain a recognized file system.
- The request failed due to a fatal device hardware error.
Error 2: No capacity; add * drives (* stands for the number of drives that are needed).
This is an error that you can see only on Storage Spaces provided with thin provisioning. It occurs when there is no more disk space available. The No capacity; add * drives error can be fixed easily by adding the required number of drives.
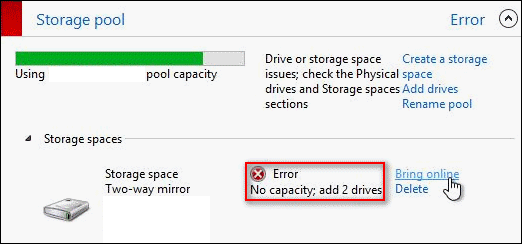
Please note: you may also see the warning message – Low capacity; add * drives (* also represents the number of drives that is required) – when the disk space left is not sufficient.
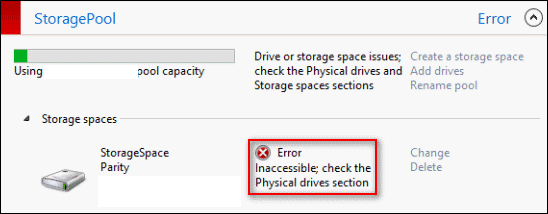
Error 3: Inaccessible; check the Physical drives section.
Some people reported that they came across this error after installing new Windows Updates. When they came back to the system after the update, they found the Storage Pool was dead and they got the Inaccessible; check the Physical drives section error message.
Error 4: Reduced resiliency; check the Physical drives section.
If one or more drives that are included in the redundant spaces (mirror or parity) lose connection, you will receive this error. If more than one drive fails, you’ll receive a Degraded; check drive health error message. You can fix the problem by reconnecting the drives or adding the required number of drives to replace the failed ones.
Storage Pool Errors
These are the common error messages indicating problems have been found on the virtual disks included in the Storage Pool. Yet, if there’s something wrong with the Storage Pool itself, you may see the following errors:
- Inaccessible; check the Physical drives section (all the drives may appear to be Okay in the Physical drives section, indicating that the system can’t identify the problematic drive).
- Drive issues; check the Physical Drives section for Warnings or Errors (you’ll see this error when the drive fails totally or the connection is lost permanently).
- Drive or storage space issues; check the Physical drives and Storage spaces sections (this could appear in both the Storage Pool section and Storage Spaces section after you removed a drive from the pool and then brought it back).
How to Recover Data from Failed Storage Spaces
When encountering disk errors, you are highly advised to recover files before taking action to resolve the problem because files may get lost in the fixing process.
How to rescue files on Storage Space? One of the most effective and safest ways is to seek help from professional data recovery software, such as MiniTool Power Data Recovery. This free file recovery software is capable of restoring files under different situations, including formatted SD cards, crashed hard drives, unrecognized drives, and so on.
Then, follow the next guide to recover files from Storage Spaces.
Recover Files from Storage Spaces without Any Delay
Firstly, download MiniTool Power Data Recovery and install this software with the instructions. After successfully installing, you can double-click on the software to launch it.
MiniTool Power Data Recovery FreeClick to Download100%Clean & Safe
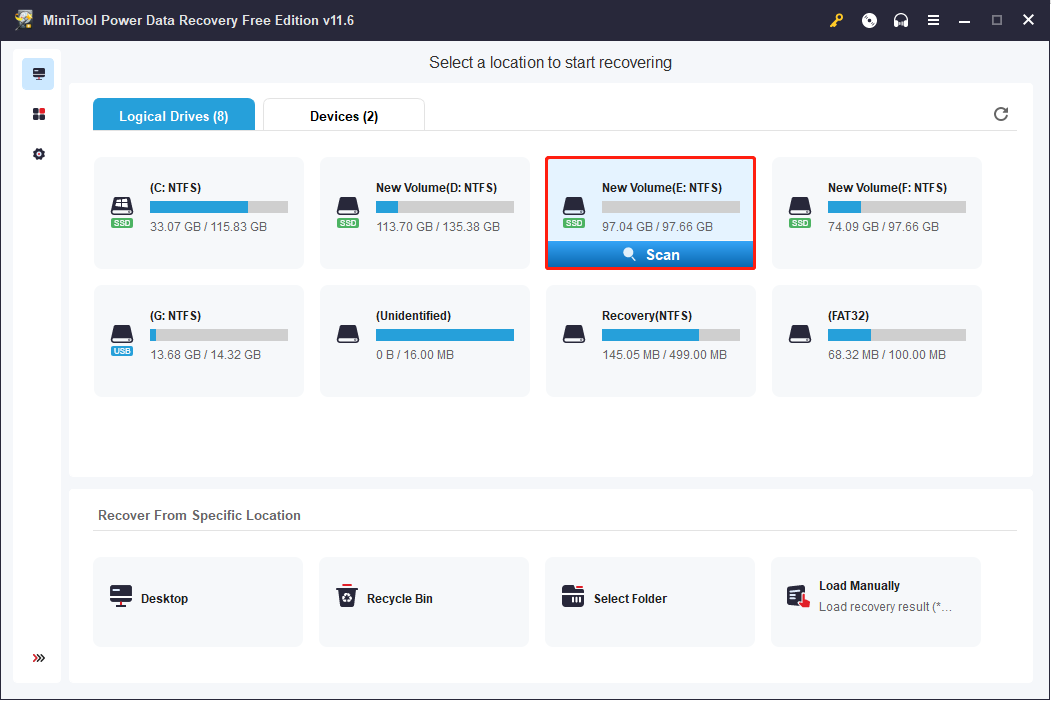
Secondly, you will enter the main interface and find all the drives mounted to the computer, including the connected external drives. You need to choose one drive that is failed and contains needed files, then click on the Scan button.
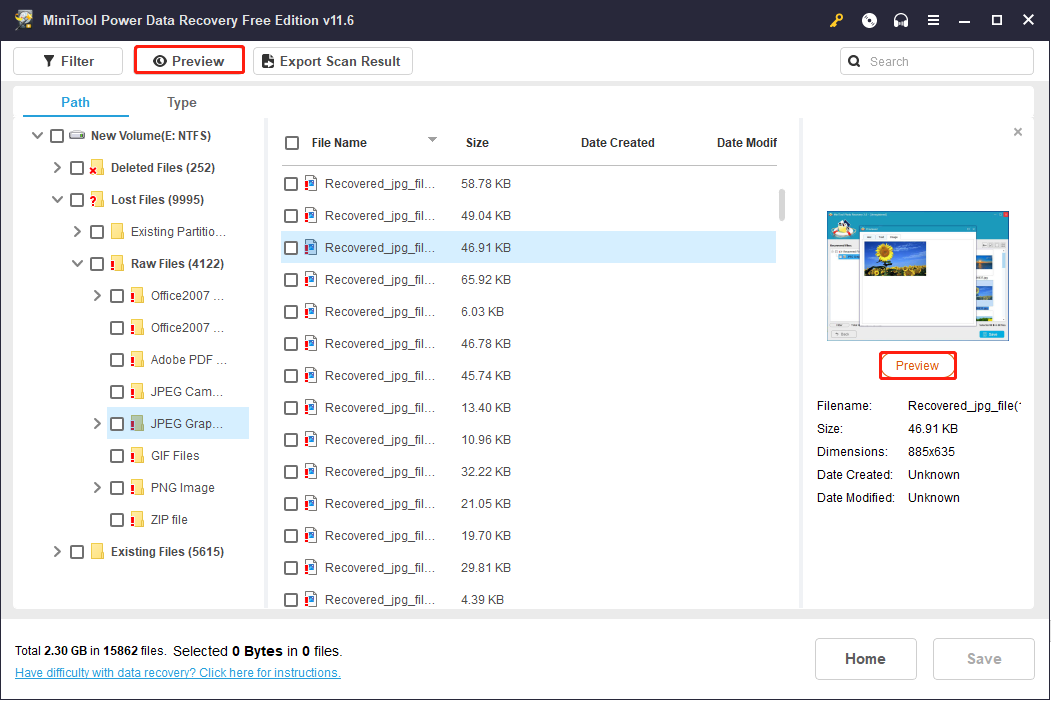
Thirdly, the software will start the scan process, which will take a few minutes. When the process is finished, the found files will be listed in three folders: Deleted Files, Lost Files, and Existing Files. You can expand different folders to find files. But this will be a time-consuming process if there are thousands of files.
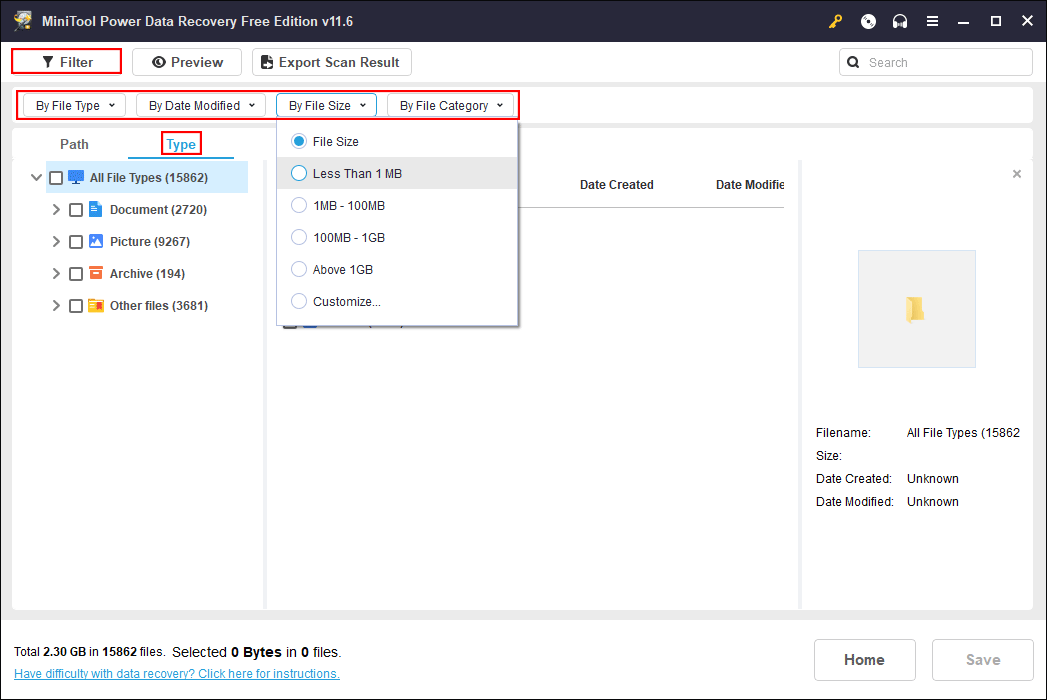
You can find files more quickly by changing to the Type category list, which lists files according to their types. Besides, you can also click on the Filter button to narrow down the file list by setting filter criteria, such as file size, file type, file category, and file modified date.
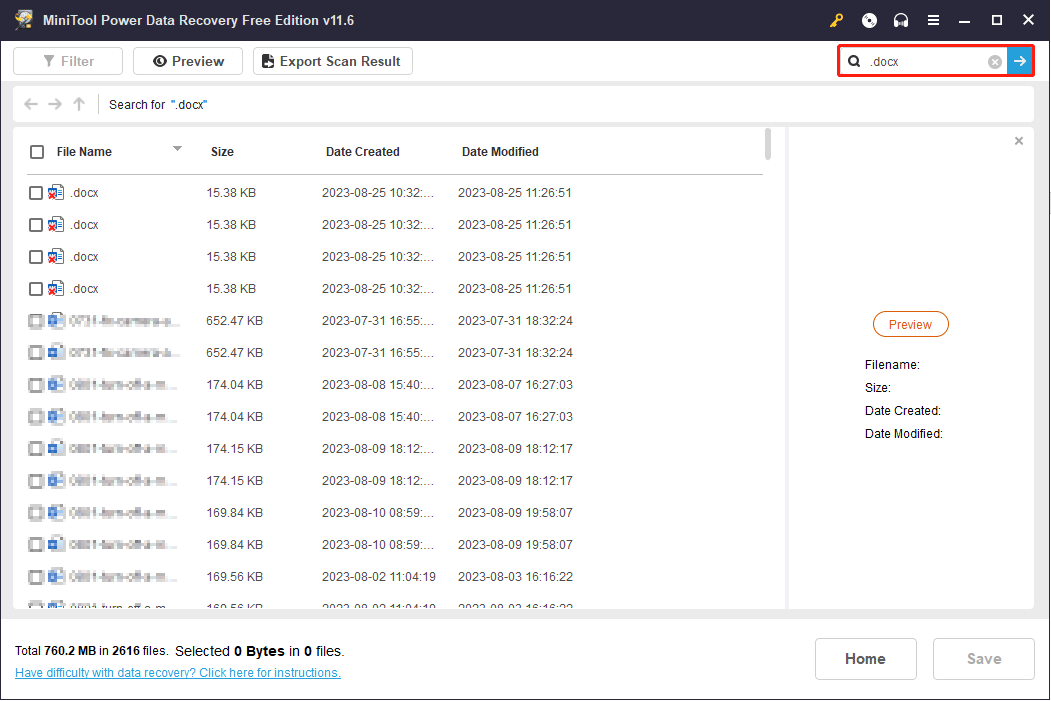
If you want to locate a specific file, the Search function helps a lot. You can type its full or part of the name, then the software will filter matched results and show you on the result page.
Previewing chosen files ensures your data recovery accuracy. You can preview documents, photos, videos, and audio files by clicking the Preview button on the top toolbar or on the right pane after selecting the target file.
Fourthly, tick the files you need and click on the Save button to select one storage path. Do not save files to the original path to prevent data overwriting.
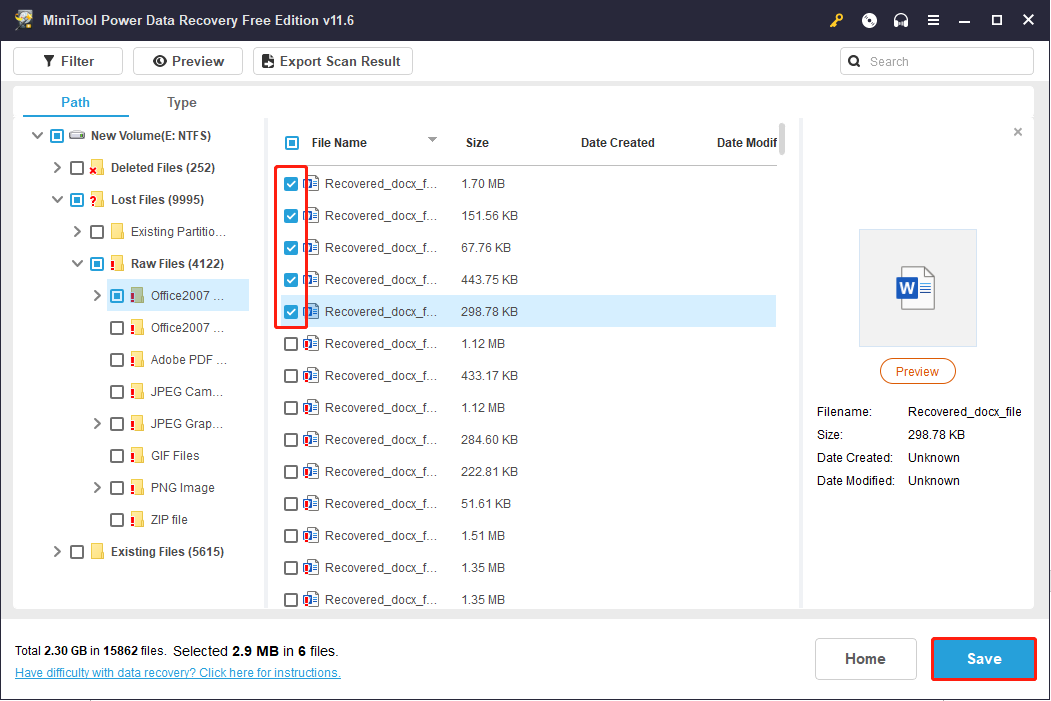
When the data recovery process is over, you can check files in the chosen destination. Then, you can read the following content to resolve the Storage Spaces errors.
![[Solved] Can’t Add Drives to Storage Pool Error 0x00000032](https://images.minitool.com/minitool.com/images/uploads/2021/05/0x00000032-thumbnail.png)
How to Repair Storage Spaces in Windows 10
When you find Storage Spaces unresponsive or have other problems, you must want to recover Storage Spaces Windows 10. In this part, I’ll show you the common steps to repair failed Storage Spaces.
Step 1: Back Up Data
In order to prevent unexpected data loss, you’d better back up files on the Storage Spaces. A reliable free data backup software is a good choice, such as MiniTool ShadowMaker. This software supports backing up files, folders, partitions, and disks. You can use it to make three types of backups: full, differential, and incremental backup. You can use the MiniTool ShadowMaker trial edition to back up files for 30 days for free.
MiniTool ShadowMaker TrialClick to Download100%Clean & Safe
Step 2: Identify the Problematic Disk
In general, Storage Spaces and Windows will help you to identify the disk that has failed. Yet, there are some cases in which the disks are mounted and users are not able to see the identifying information. At this time, you should do the following things:
- Restart the computer.
- Look at the computer firmware.
- Shut down the computer and trace cables around to locate the suspect disk.
- Unplug the suspect disk and check the list.
- Plug power in and see what happens.
- Change a SATA cable to see whether the disk can be found by firmware.
Then, you should make sure the disks are OK or not. You can run CHKDSK /f /r to check the disk errors.
Step 3: Remove the Problematic Drive
If the problem persists after you check the connection, you can remove this disk from the Storage Spaces pool.
- Press Win + S and type Control Panel into the search box.
- Hit Enter to open the window.
- Shift to System and Security > Storage Space.
- Click on Change settings, then click on the Change button in the Storage Space section.
- Select the problematic disk and click on the Prepare for removal option under the Physical drives section.
- Click on Prepare for removal again to confirm.
The drive will show as preparing for removal until all the data stored on it is erased.
Step 4: Create a New Drive and Add It to the Storage Pool
After you remove the problematic drive, you can replace it with a new drive, then add it to the storage pool again.
- Press Win + I to open Windows Settings.
- Select System > Storage, then scroll down to find and click on the Manage Storage Space option on the right pane.
- Click Create a new pool and storage space to add the drive to the storage pool.

Now, hope you enjoy the Windows 10 Storage Spaces improvements.
You can learn more information about how to create/resize/delete Storage Space from this article.
Final Words
Like other separate hard disks, the disks in Storage Spaces may also fail due to a lot of factors. When encountering a failed disk in Storage Space, the first thing you should consider is data recovery. You can safely recover data from failed Storage Spaces with MiniTool Power Data Recovery.
MiniTool Power Data Recovery FreeClick to Download100%Clean & Safe
After this, try to repair the Storage Space with the guidance in this post. Feel free to tell us your problem by email via [email protected].
User Comments :