Data loss can be caused by many reasons and Windows update is one of them. But you have to update Windows systems in some cases. If your files disappeared, how to recover lost files after Windows update? This is what MiniTool is going to answer for you in this post.
Part 1: Files Gone after Windows Update
A Windows update is a pretty exciting thing, but things will turn totally different if you fail to find some needed files after the update. Some users wish that they had never finished the update due to this reason. To get rid of such a dilemma, you can try to recover lost files after Windows update.
There are several methods for you, but considering the operability and data recovery effectiveness, you are highly suggested to use a third-party data recovery software.
In the following part, I’d like to introduce you to four methods. You can try them to restore your files.
Part 2: How to Recover Lost Data After Windows Update
Some of you might experience this situation when that Windows update deletes files. Can you recover files deleted by Windows? The answer is positive. There are four solutions to help you recover missing files after upgrading your Windows system.
Solution 1: Recover Files with MiniTool Power Data Recovery
When you find files gone after Windows update, don’t be frustrated. You can recover lost/deleted files easily with a professional data recovery tool, such as MiniTool Power Data Recovery. This free file recovery software is specifically designed to retrieve various types of files from internal and external hard drives, SD cards, USB flash drives, memory cards, and other types of data storage devices.
MiniTool Power Data Recovery provides you with several editions to fulfill different requirements of users. You can try the free edition first to make a deep scan and restore up to 1GB of files, then go to this page to obtain a suitable edition if needed.
MiniTool Power Data Recovery FreeClick to Download100%Clean & Safe
If you have downloaded and installed MiniTool Power Data Recovery properly, please follow the next steps to recover files.
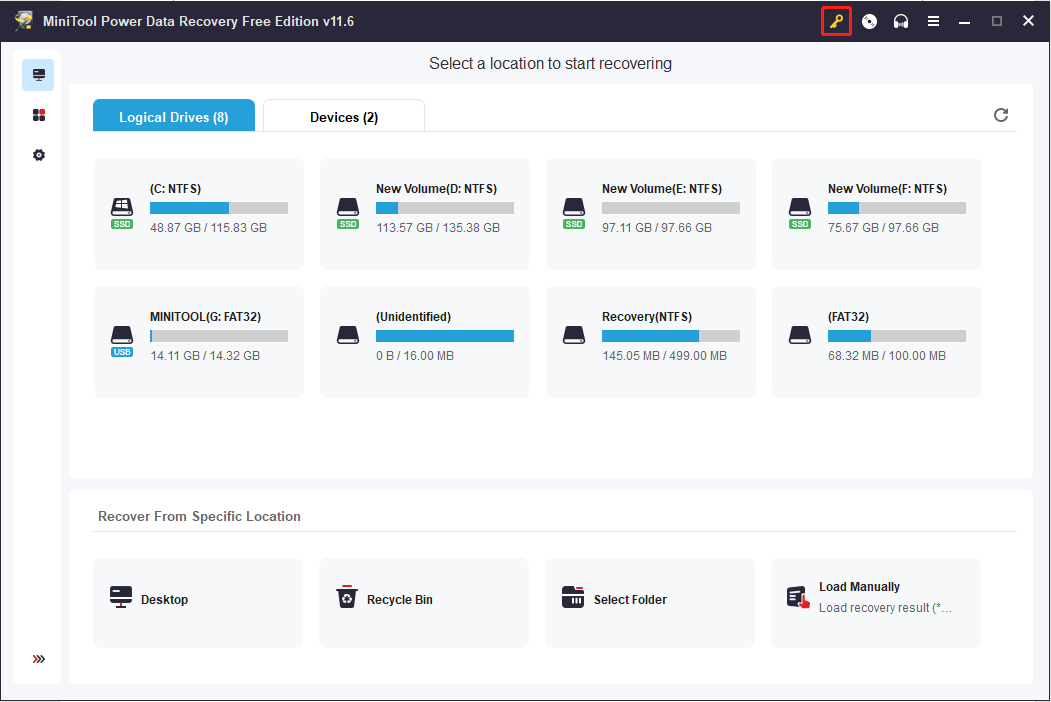
Step 1: Launch the software to enter the This PC interface. You have two choices to scan your files:
- Logical Drives: This section displays all the partitions on your computer. You can choose one partition where the lost files previously stored to scan.
- Devices: This section shows you all the connected devices. You can select one device to scan the entire disk. Obviously, this choice will take a longer time to scan.

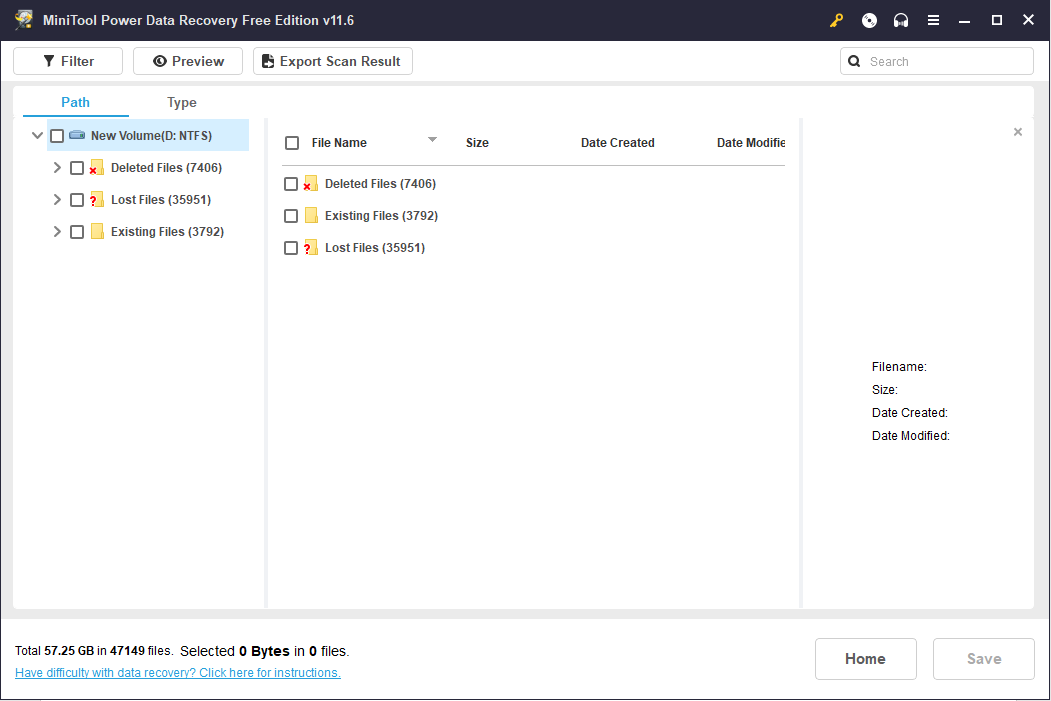
Step 2: Please wait patiently until the scan process is completed. The result page will list the found files in different folders, generally Deleted Files, Lost Files, and Existing Files. You can find your files by expanding different folders.
You can also turn to the Type category list to find files according to their types.
Step 3: Add checkmarks in front of the files you need, then click on the Save button to restore files. When you select the storage path, please do not save files to the original path, otherwise, the data will probably be overwritten and become unrecoverable.
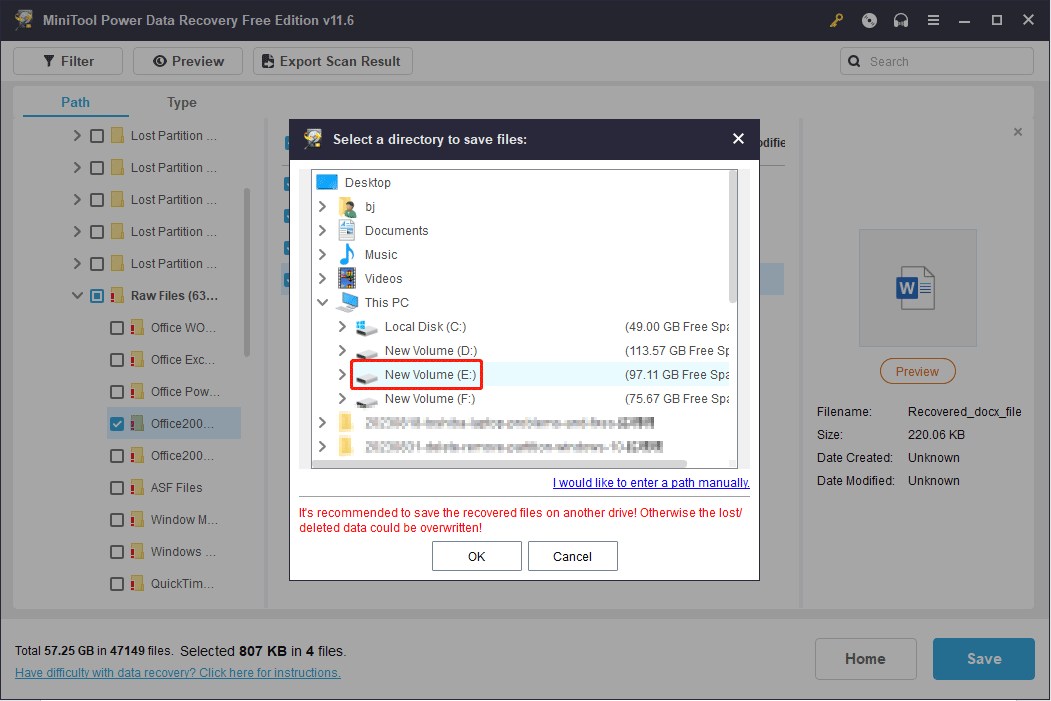
When the data recovery process is completed, you can go to the chosen destination to check the recovered files.
Solution 2: Recover Files from Backup
If you have backed up files by using the Backup and Restore utility of your computer before the files are lost, you can get files back after Windows updates with the following steps.
Step 1: Press Win + S and type Control Panel into the search box.
Step 2: Hit Enter to open the Control Panel window.
Step 3: Choose System and Security > Backup and Restore (Windows 7).
Step 4: Opt the Select another backup to restore files from choice.
Step 5: In the following window, choose a backup and click on the Next button.
Step 6: Search for the files by clicking on the Browse for files or Browse for folders options.
Step 7: Select your needed files and click on the Restore button.
Solution 3: Sign Out the Temporary Profile
Occasionally, you might sign in with a temporary profile after updating the Windows system. To make your files available, you can go to check and sign out the temporary profile.
Step 1: Press Win + I to open Windows Settings.
Step 2: Click on Account, then switch to the Sync your settings tab.
Step 3: If you are using a temporary profile, you can find a message: You are logged on a temporary profile. Roaming options are currently unavailable.
In this case, you should restart the computer and log on to your account to find your files.
Solution 4: Enable a Windows Administrator Account
If you have created a new Microsoft account after upgrading the Windows system, some of your files might become inaccessible because of insufficient permissions. You can enable the Windows Administrator account to access all the files on your computer.
Step 1: Press Win + S and type Computer Management into the search box.
Step 2: Hit Enter to open the window.
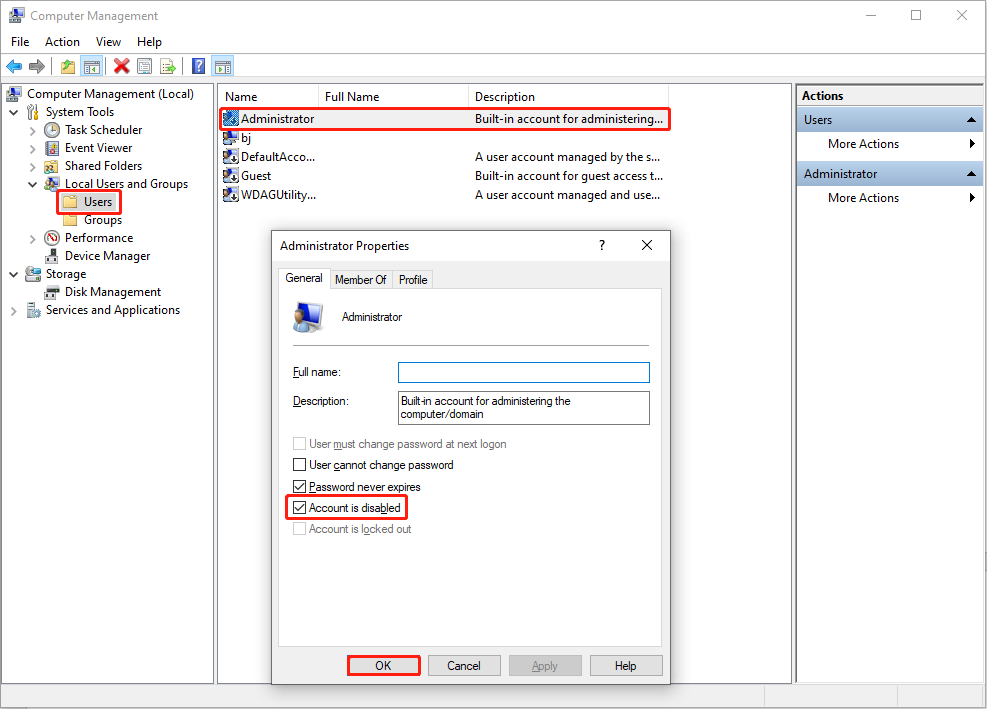
Step 3: Select Local Users and Groups > Users on the left pane.
Step 4: Right-click on the Administrator option on the right pane and choose Properties from the content menu.
Step 5: Uncheck the Account is disabled option in this window, then click OK to save the change.
Now, you can access all the files on your computer. It’s time for you to check whether the lost files appear.
Part 3: About Windows Update You May Not Know
If you have enabled automatic Windows updates, there will be a notification on your computer when a new update is out. You can choose to get the new update or not. If you disable the automatic update, you can also choose to turn it on to get the new update manually.
Right now, I’m feeling like telling you how to enable/disable automatic updates and how to deal with Windows update not working problems.
How to Enable/Disable Automatic Update Function
In a Windows system, the automatic update function is enabled by default. The biggest advantage of enabling this function is that it helps to gain and use the latest patch whenever it’s out. But frankly speaking, this function is not so practical due to the two reasons:
- The update may cause a system error.
- The unstable update will affect the stability and speed of the system.
How to Turn on/off Automatic Updates
Step 1: Press Win + R to open the Run window.
Step 2: Type gpedit.msc into the text box and hit Enter to open the window.
Step 3: Navigate to Computer Configuration > Administrative Templates > Windows Components > Windows Update > Configure Automatic Updates.
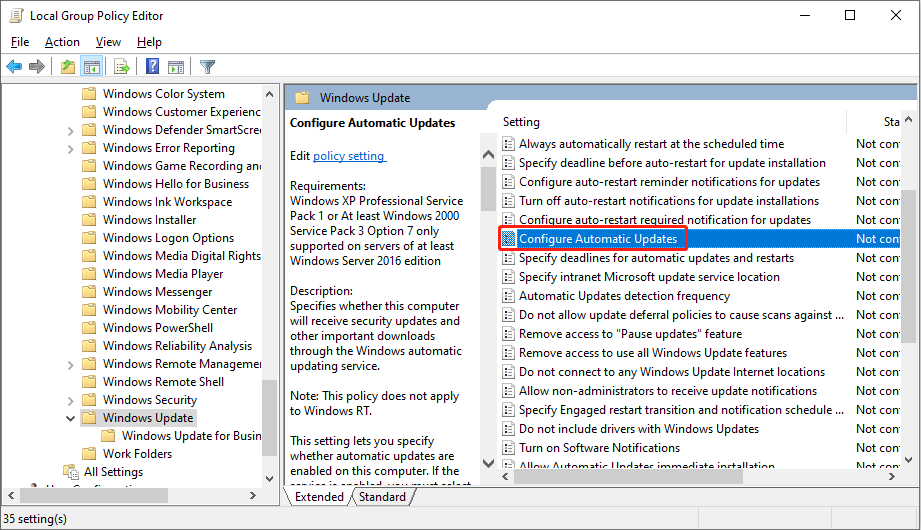
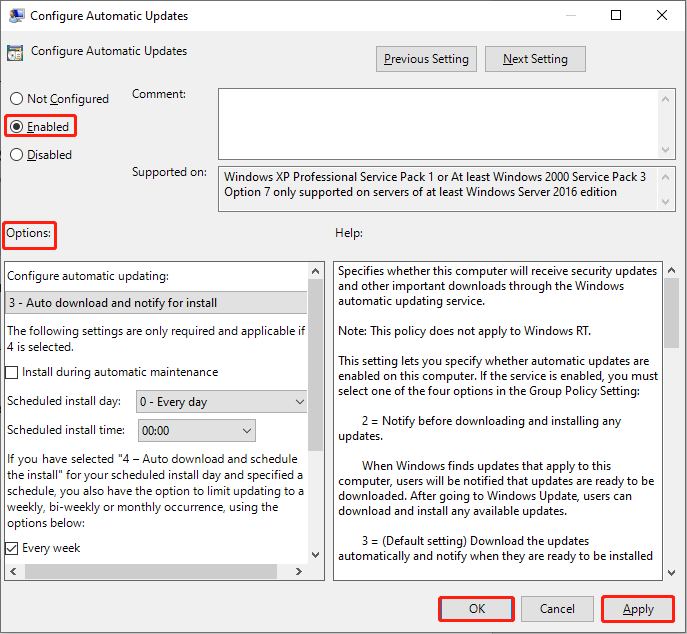
Step 4: Double-click on the Configure Automatic Updates policy.
Step 5: You can turn on/off automatic updates based on your needs.
If you choose Enabled, you need to configure more settings under the Options section according to your requirements;
If you choose Disabled, you should update your Windows system manually through Windows Settings.
How to Deal with Windows Update Not Working Problem
Sometimes, when you prepare to check and install the update, you may unluckily be stuck on Checking for updates. This problem can be caused by several reasons, but, fortunately, there are piles of methods to help you resolve the problem as well.
You can read this post to obtain detailed information about how to fix Windows not updating:
How to Recover Data When Windows Update Stuck
The statistics show that Windows update stuck is a common problem that bothers lots of users. Though the error messages are not the same, the result could be only one: Windows stuck on a screen, stopping you from entering the system or accessing the hard drive.
How to rescue your data from the computer? In this case, you need to seek help from the professional data recovery software, MiniTool Power Data Recovery. MiniTool Power Data Recovery contains a snap-in WinPE Bootable Media Builder that can be used to create a bootable disk. Then, you can use this created bootable media to boot up the computer and restore files from it.
Part 1: Create a Bootable Disk
Step 1: Download and install MiniTool Power Data Recovery on another well-performing computer.
MiniTool Power Data Recovery FreeClick to Download100%Clean & Safe
Step 2: Connect a USB drive (the size should be between 4GB to 64GB), then launch the software.
Step 3: Click on the key icon on the top right toolbar.
Step 4: You can choose one edition that contains a snap-in WinPE Bootable Builder. For more specific information about different editions, you can click on the Visit Online Store button in the top right corner.
Step 5: After choosing a suitable edition, you can register with the key license by clicking on the key icon.
Step 6: Click on the disc icon to create the bootable media with the on-screen instructions.
Step 7: When the file preparation process is completed, you should click on the Finish button and remove the connected USB drive, then plug the drive into the problematic computer.
Step 8: Start the computer, press and hold the F2 key to enter the BIOS menu, and adjust the boot order to make your computer boot from the created bootable media.
Afterward, wait for the computer to enter the main interface of MiniTool Power Data Recovery. You can now start to recover your files.
For more specific information about how to recover data with the created bootable disc, you can read this passage: How to Recover Data When PC Won’t Boot (Works 100%).
Part 4: Bottom Line
Many problems may happen during Windows updates, such as getting stuck in the update process or data lost after Windows updates. Don’t be panic in this case. You need to recover lost files after Windows update immediately with MiniTool Power Data Recovery.
MiniTool Power Data Recovery FreeClick to Download100%Clean & Safe
Any problems with MiniTool software are welcome to share them with us via [email protected].
User Comments :