Learn how to recover PDF files on Windows/Mac in this MiniTool guide. Firstly, recover deleted PDFs from the Recycle Bin/Trash, a backup, or by using data recovery software. Secondly, restore unsaved PDFs using Adobe AutoSave. Finally, fix corrupted PDFs by restoring an old version, using First-Aid, or converting them to another format.
PDF files are one of the most commonly used document formats due to their stability and compatibility. Whether they’re contracts, reports, papers, e-books, or invoices, PDFs play an indispensable role.
However, problems such as accidental deletion, virus attacks, or system crashes can cause PDF file loss or corruption. Fortunately, PDF file recovery is not impossible. This article will systematically explain how to repair and recover deleted/unsaved/corrupted PDFs on Windows and macOS.
Before recovering files, understanding the cause of file loss helps you choose the appropriate recovery method.
- Accidental deletion: This most commonly occurs when a user accidentally deletes a file.
- Hard drive formatting or corruption: This occurs when disk failure or misuse leads to file loss.
- Virus or malware attacks: This damages the file structure or directly deletes files.
- System crashes or software errors: For example, an Adobe Acrobat crash can cause file loss or corruption.
- Transfer interruptions: This occurs when a file is not completely moved or copied, resulting in file loss or corruption.
Now, let me show you how to recover PDF files in different situations on Windows and macOS.
How to Recover Deleted PDF Files on Windows/Mac
Need a fast guide? Watch this short video:
If the PDF files are lost by accident or for other reasons, there are many ways to retrieve deleted PDFs. Try them one by one.
Way 1: Check the Recycle Bin/Trash
When the files are deleted, they are usually moved to the Recycle Bin or Trash instead of immediately being erased from the disk. Therefore, when your PDF files are deleted, you can check the Recycle Bin or Trash first.
1. Deleting using Shift + Delete
2. Deleting the PDF from a USB drive or external hard drive
If you are not in the above two situations, then start to recover deleted PDF files from the Recycle Bin/Trash.
Restore from the Recycle Bin
Recycle Bin is a special folder on Windows. It is used to temporarily store your deleted files. Now, use it to recover PDF files.
Step 1: Open the Recycle Bin.
Step 2: Scroll down the list to find the target PDF files.
Step 3: After finding, select and right-click them, and choose Restore.
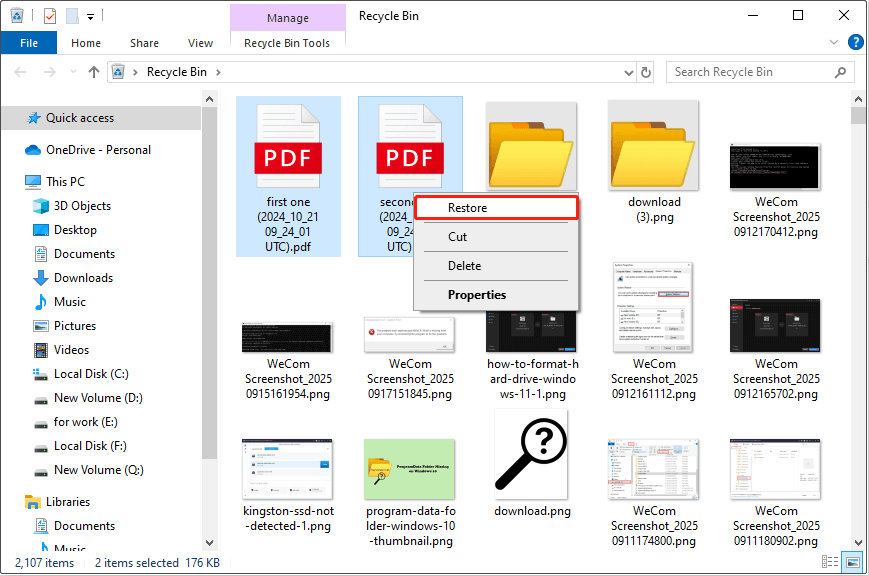
The files will be restored to their original location. Go and check them.
Put back from the Trash
Trash is the “Trash” function in macOS. Here is how to put back the PDF files from it.
Step 1: Open the Trash.
Step 2: Find and right-click the wanted PDF files.
Step 3: Select Put Back from the pop-up menu.
The recovered files are automatically returned to their original locations.
If this way is not suitable for you, continue with the next method.
Way 2: Restore from a Backup
When you can’t find the deleted PDF files in the Recycle Bin or Trash, try to restore them from the backup. Both Windows and Mac have built-in backup tools that can help you recover files, as long as you have previously enabled them and configured the backup location correctly.
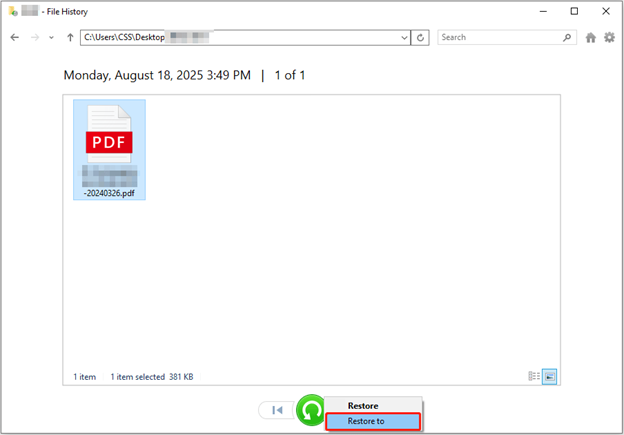
How to restore using Windows File History:
File History is an automatic backup feature built into Windows. It protects your personal files from accidental deletion. Now, recover PDF files with it.
Step 1: Open File History
Type Restore your files with File History in the Windows search bar and press Enter.
Step 2: Browse the backup
A window will appear showing your backup folders. Navigate to the original location of your PDF files. Use the arrow keys to browse through the backups at different points in time until you find the PDF files you want.
Step 3: Restore the PDF files
After selecting the target file, click the green Restore button at the bottom of the window, and the file will be restored to its original location. Or right-click the green button, select Restore to, choose a new location, and click Select Folder to start the restore.
How to retrieve using macOS Time Machine:
Time Machine is a built-in automatic backup tool for Mac. If you have it enabled, you can restore important PDF files to their original locations.
Step 1: Start Time Machine
Click the Time Machine icon and select Enter Time Machine or Browse Time Machine Backups.
Step 2: Browse your backup timeline
Go to the folder containing the file you want to restore. Use the timeline or arrows on the right side of the screen to go back to a point in time when the file was not deleted.
Step 3: Find and restore the PDF files
Once you have found the PDF files you want, press the Space bar to preview them and confirm that they’re correct. Then, click the Restore button to restore them to their original location.
Haven’t backed up your files before? Don’t worry, you still have a chance to recover PDF files. Keep reading.
Way 3: Use MiniTool Power Data Recovery on Windows
MiniTool Power Data Recovery is powerful data recovery software. It can recover almost all file types, including PDF files. Therefore, it is recommended that you use it to recover deleted files. Here are some specific advantages:
- Supports various data loss scenarios. Whether it’s accidental deletion, emptying the Recycle Bin, a virus attack, disk corruption, or a system crash, it effectively recovers PDF files.
- Compatible with various storage devices. This MiniTool tool can recover data from hard drives, external hard drives, USB drives, SD cards, and other devices.
- Easy to use. The interface is simple and the operation instructions are straightforward, requiring no technical expertise.
- Provides free recovery capacity. The free edition can recover up to 1 GB of data, making it suitable for average users with small file recovery tasks.
Now, download and install this free file recovery software to recover PDF files on Windows.
MiniTool Power Data Recovery FreeClick to Download100%Clean & Safe
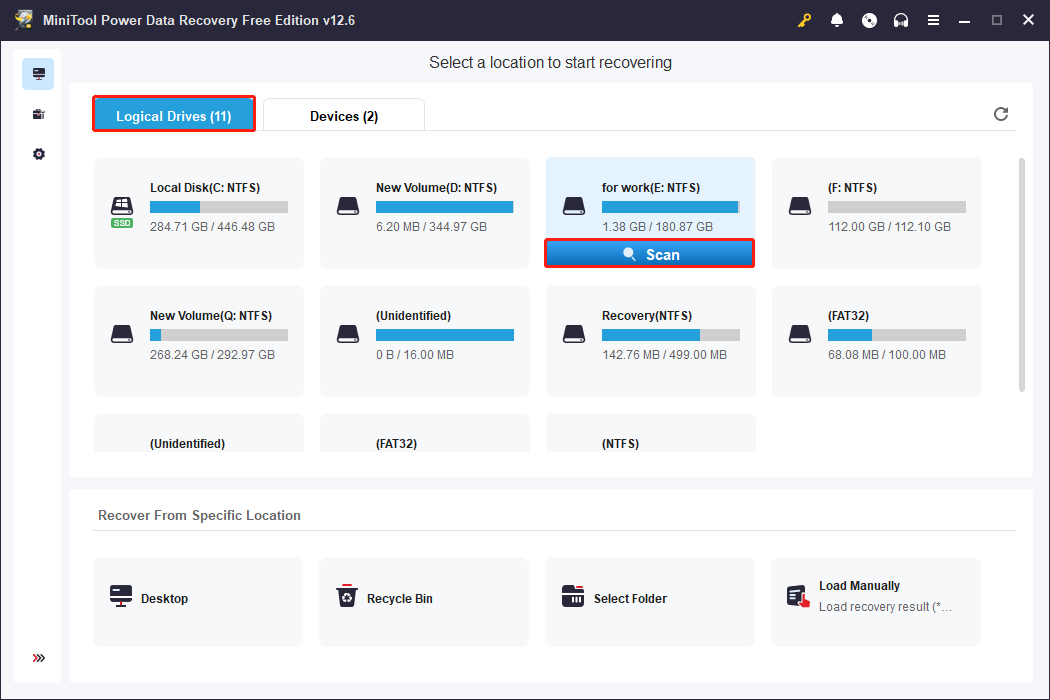
Step 1: Launch the program and scan the target location
Launch MiniTool Power Data Recovery. After accessing the main interface, select the partition where your PDF files were stored and click Scan under Logical Drives. The program will begin a deep scan for all the data.
Step 2: Find the PDF files using Type or Search
Wait patiently for the scan to complete. Once complete, you can begin searching for your target PDF files. The Type function allows you to filter files by file type. Switch to the Type tab, expand All File Types > Document > pdf.
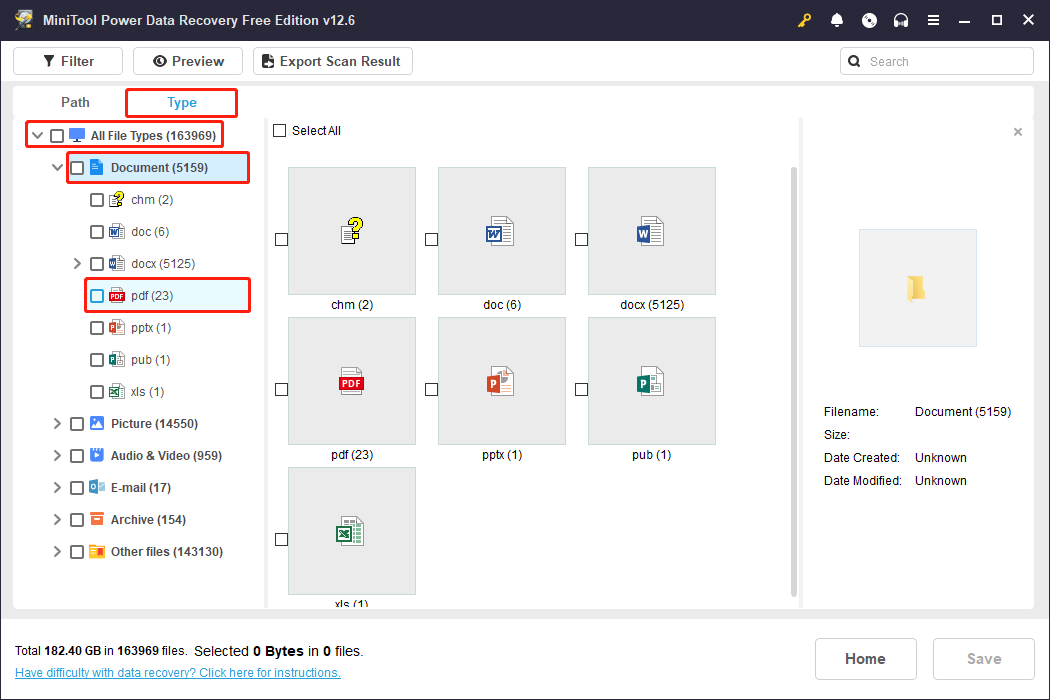
Or, use the Search feature. Just enter pdf or the file name to quickly locate the file.

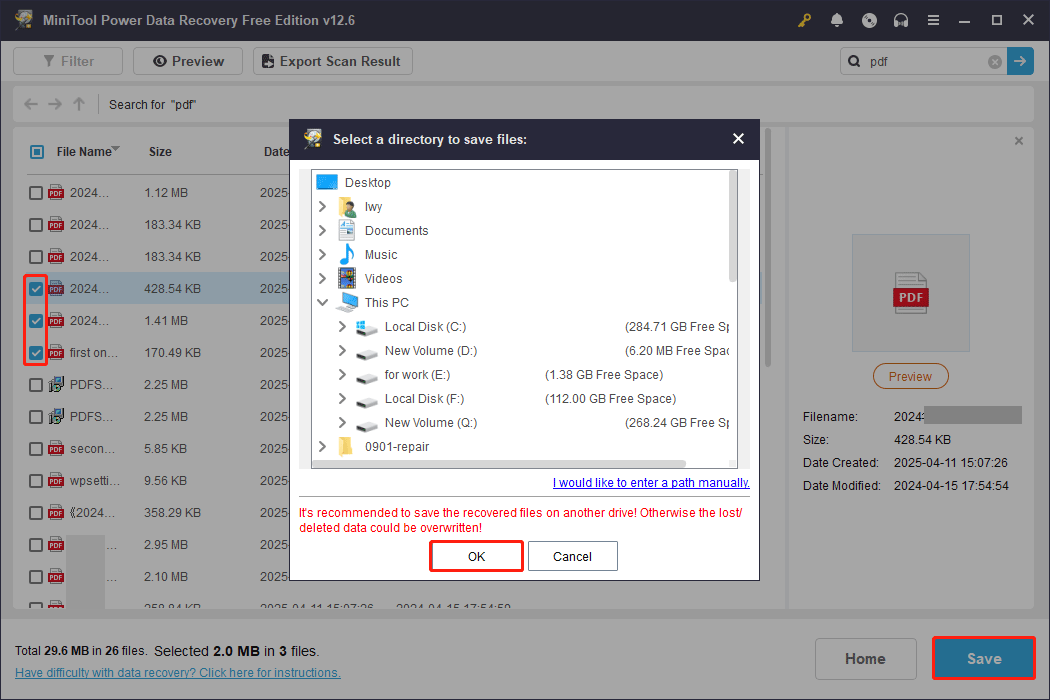
Step 3: Click Save and select a recovery location
Check the boxes next to the files you want to recover and click Save. Be careful not to save to the original location where the files were lost to avoid overwriting the data. Once you’ve selected a location, click OK to begin recovery.
After the recovery is complete, you will see a new window, which shows the remaining free recovery capacity. If you use it up, remember to upgrade to a full edition.

Way 4: Utilize Stellar Data Recovery for Mac
Stellar Data Recovery for Mac offers professional data recovery capabilities, designed specifically for macOS users. It handles a variety of complex file loss scenarios, including accidental deletion, formatting, and disk corruption.
This tool is compatible with APFS, HFS, HFS+, exFAT, NTFS, and other file systems, covering virtually all Mac storage formats. Its graphical interface makes it easy to use. Download and install it to start a recovery.
Data Recovery for MacClick to Download100%Clean & Safe
Step 1: Open the software and scan the location
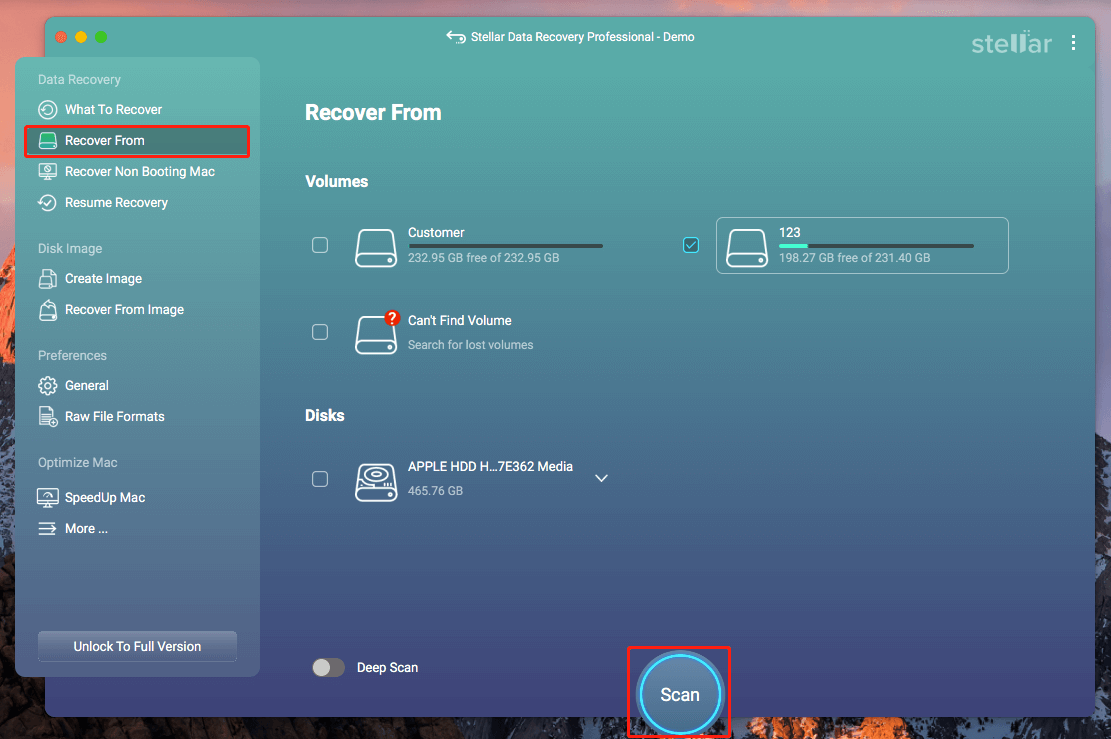
Launch Stellar Data Recovery for Mac. In the What to Recover section, tick the box for Documents and click Next. In the Recover From section, select the volume or disk where your PDF files were stored, and click Scan.
Step 2: Find the target PDF files and recover them
When the scan process ends, browse and locate the PDF files from the file list. After finding, check them and click the Recover button.
What if your PDFs are lost before they are saved? The following part can help you get them back.
How to Restore Unsaved PDF Files on Windows/Mac
If you accidentally close a PDF file while editing it, or if your system crashes or experiences a power outage, your file may be lost without being saved.
However, unsaved PDF files aren’t always completely gone. Whether you’re using macOS or Windows, the system or software often leaves behind temporary files, auto-saved copies, or cached records. With Adobe’s AutoSave feature, you can still recover unsaved PDF files.
Method 1: Use Adobe AutoSave on Windows
On Windows, Adobe AutoSave is an automatic save feature. It periodically saves temporary copies of documents (such as PDFs) while you edit them. That can prevent data loss due to program crashes or unexpected shutdowns.
Here is how to use it to recover unsaved files on Windows.
Step 1: Press Win + E to open the File Explorer.
Step 2: Go to the C drive, and click Users > username > AppData > Roaming > Adobe > Acrobat > 1X.0 > AutoSave.
Step 3: Browse and locate the temporary PDF files and save them.
Method 2: Use Adobe Acrobat on Mac
The AutoSave feature in Adobe also performs well on macOS. The AutoSave feature in Adobe also performs well on macOS. Here you can see how to use it to recover unsaved PDFs on Mac.
Step 1: Make sure Finder is open. On the Mac menu bar, select Go > Go to Folder.
Step 2: Type the following address in the box and click Go.
/Library/Application Support/Adobe/Acrobat/AutoSave/
Step 3: Navigate to this directory and search for temporary files.
Step 4: If the contents are complete, hit File > Save to recover them to a safe location.

How to Fix Corrupted PDF Files on Windows/Mac
The last case is to recover corrupted PDF files. Check the ways below.
Fix 1: Restore an Older Version
Restoring the damaged PDF file to an older version can help you get the good file back. This can be done with the Windows or macOS built-in backup feature, as long as you have enabled the relevant settings.
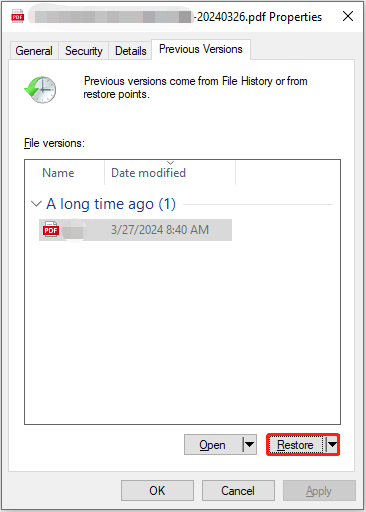
Step 1: Right-click the corrupted PDF file and choose Restore previous versions.
Step 2: In the Previous Versions tab, wait for the file versions to load. Once completed, select the version before corruption and click Restore. The file will go back to the original destination.
Or, you can click Restore to, choose a new location, and hit Select Folder. The file will go to the specified place.
Fix 2: Try First-Aid on Mac
First Aid on macOS can indirectly resolve file corruption issues by repairing file system errors on the disk. Although First Aid cannot directly repair PDF content, it may be helpful if disk errors cause the corruption.
Step 1: Go to Finder > Applications > Utilities > Disk Utility to open it.
Step 2: Select the drive or volume on the left, and then click the First Aid button in the toolbar at the top of the window.

Step 3: In the pop-up window, click Run. Wait for the scan and repair process to complete. If errors are found, the system will attempt to repair them automatically.
After the repair is complete, try opening the PDF file again. If the repair is successful, the damaged PDF file may be readable again. If not, try the following method.
Fix 3: Convert the File to Another Format
When a PDF file is damaged and cannot be opened normally, converting it to another format is also an effective way. Here, you can try MiniTool PDF Editor to convert your PDFs.
Final Words
When you need to recover deleted PDFs, check the Recycle Bin/Trash, restore from a backup, or use MiniTool Power Data Recovery and Stellar Data Recovery for Mac.
If your PDFs are lost before they are saved, try Adobe AutoSave to restore them. What if your PDFs are corrupted? Restore an old version, utilize First-Aid, or convert them to another format. Hope you can recover PDF files successfully.
For any MiniTool product-related concerns or questions, our team, [email protected], is available to assist you.
About The Author

Position: Columnist
Chelsea graduated from university with a major in English. She has a strong interest in English writing. It is this passion for writing that led her to become an English editor. Her articles mainly focus on data recovery and other computer industry news. As an energetic and outgoing girl, Chelsea enjoys listening to music, singing, riding bikes, and eating in her spare time.
User Comments :