When you open File Explorer, you will find many folders displayed on the left side, such as Libraries, This PC, OneDrive, and so on. What’s more, you can also find several folders shown above the drive when you open This PC. Many Windows users want to remove folders from This PC on Windows 11. But how to do it? MiniTool gives you answers in the following content.
About This PC on Windows 11
This PC is actually My Computer. Microsoft changed the name of this unit from “My Computer” to “Computer” and finally named it “This PC”.
This PC is an important part of the File Explorer (previously known as Windows Explorer) and it is used frequently by users. In general, you can find 2 categories in This PC on Windows 11:
- Folders: contains Desktop, Documents, Downloads, Music, Pictures, Videos, etc.
- Devices and drives: all your local drives and external devices connected to the PC will be displayed here.
How to Find This PC on Windows 11?
You can open File Explorer (previously named Windows Explorer) on Windows 11 and then select This PC easily in the left pane.
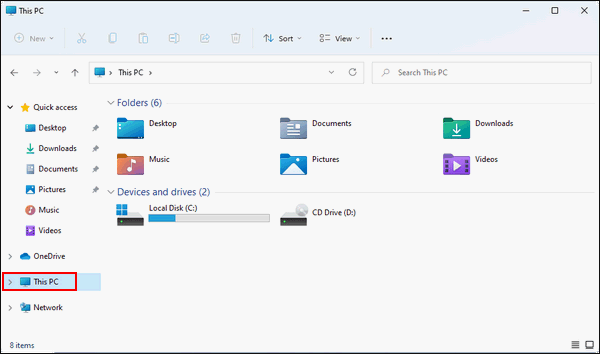
Here are some common ways to open File Explorer:
- Press Windows + E (the easiest and most direct way).
- Click on the File Explorer icon on the taskbar if there’s one.
- Right-click on the Start button (or press Windows + X), then select File Explorer.
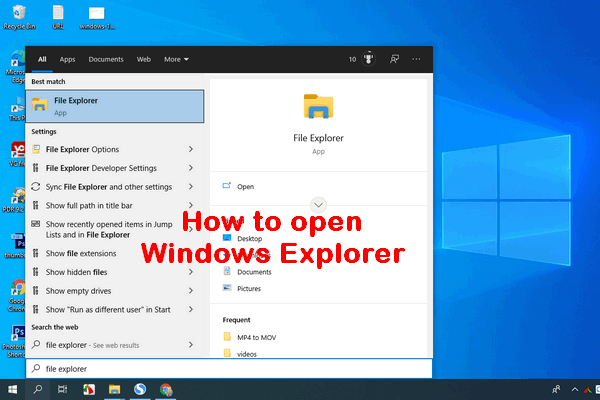
- Press Windows + S > type File Explorer > press Enter.
- Press Windows + R to open the Run dialog box > Type explorer in it > press Enter.
- Open from other File Explorer shortcuts.
Rename This PC Back to My Computer
If you prefer the previous name “My Computer” over the new name “This PC”, you can rename it by following this guide.
- Open File Explorer on Windows 11.
- Locate This PC in the left sidebar.
- Right-click on This PC and select Rename.
- Type My Computer and press Enter.
How to Remove Folders from This PC Windows 11
It’s easy to remove folders on the Desktop, Quick access, different drives, and so on. But you will find that folders like Documents, Downloads, Music, Pictures, and Videos in This PC can’t be removed in the same way. If you want to remove folders from This PC on Windows 11, please follow this guide.
Method 1: Remove Folders in This PC by Modifying Registry Values
Step 1: Press Win + R to open the Run window.
Step 2: Type regedit and hit Enter to open Registry Editor.
Step 3: Navigate to HKEY_LOCAL_MACHINE > SOFTWARE > Microsoft > Windows > CurrentVersion > Explorer > FolderDescriptions.
Step 4: Find the corresponding folder you want to remove and expand it.
This PC folders and the corresponding {GUID} keys.
- Desktop: {B4BFCC3A-DB2C-424C-B029-7FE99A87C641}
- Documents: {f42ee2d3-909f-4907-8871-4c22fc0bf756}
- Downloads: {7d83ee9b-2244-4e70-b1f5-5393042af1e4}
- Music: {a0c69a99-21c8-4671-8703-7934162fcf1d}
- Pictures: {0ddd015d-b06c-45d5-8c4c-f59713854639}
- Videos: {35286a68-3c57-41a1-bbb1-0eae73d76c95}
Step 5: Click the PropertyBag folder.
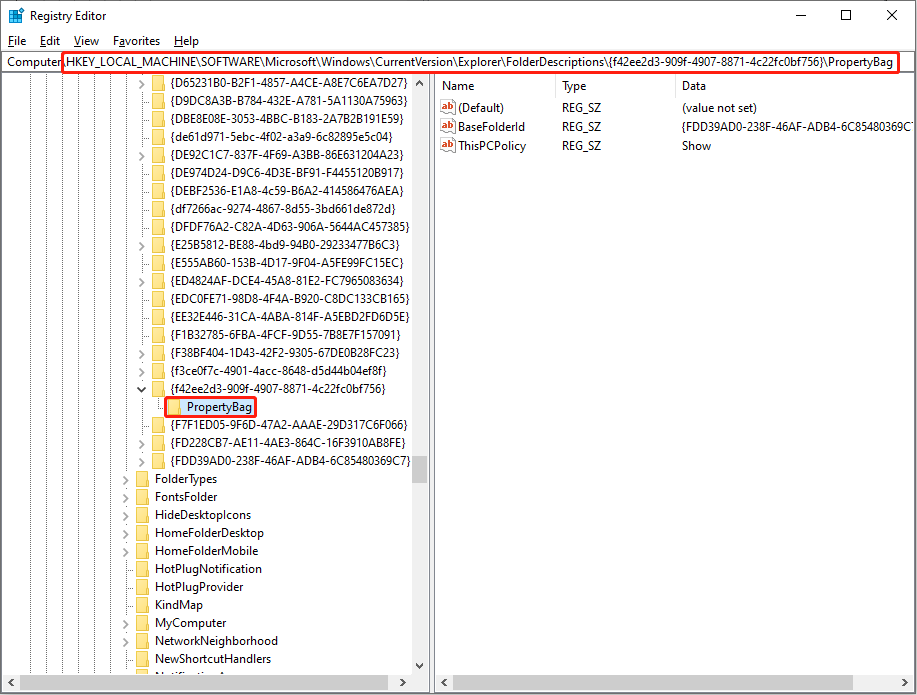
Step 6: Right-click on the ThisPCPolicy value in the right panel and select Modify.
Step 7: Change the Value data from Show to Hide.
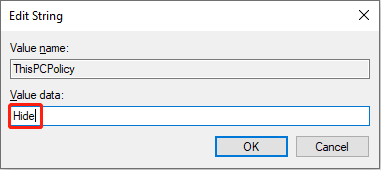
Step 8: Click OK to save the change.
If you can’t find the ThisPCPolicy value in the corresponding folder, follow these steps:
- Right-click on the blank section in the right panel.
- Select New > String Value from the context menu.
- Name the new value as ThisPCPolicy and change its Value data to Hide.
- Click OK to confirm the change.
You can also set the Value data to Show in the corresponding value to make the folder appear in This PC again.
There are many third-party Tweakers designed to help you add or remove folders from This PC on Windows 11 according to your actual needs.
Method 2: Remove This PC Folders by Deleting {GUID} Keys
You still have another choice in terms of removing folders from This PC – delete the corresponding {GUID} key or keys from Registry Editor.
Step 1: Press Win + R to open the Run window.
Step 2: Type regedit and hit Enter to open Registry Editor.
Step 3: Navigate to HKEY_LOCAL_MACHINE > SOFTWARE > Microsoft > Windows > CurrentVersion > Explorer > FolderDescriptions.
Step 4: Find the target {GUID} key.
Step 5: Right-click on it and select Delete.
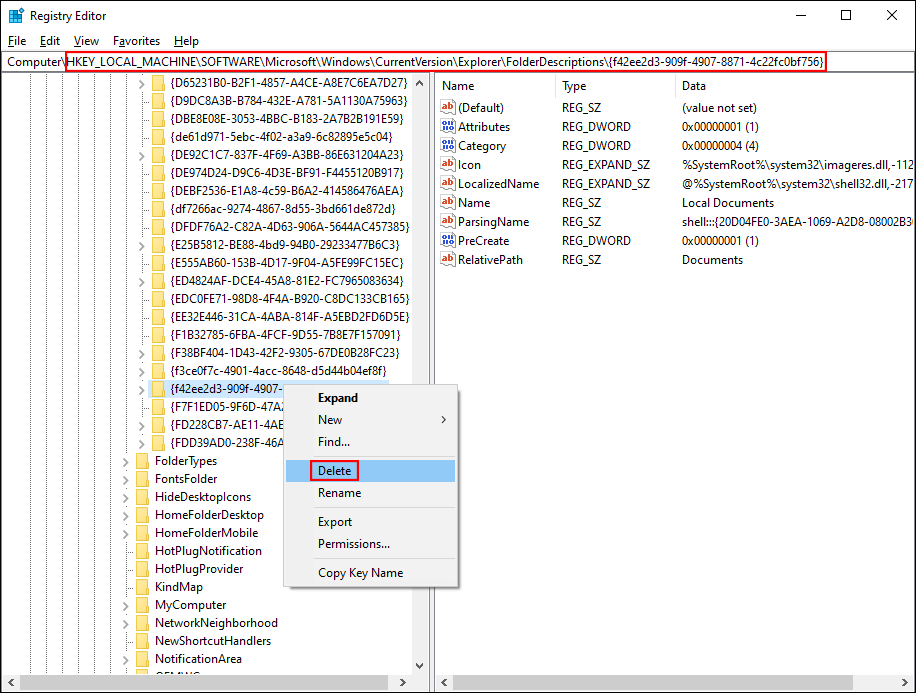
Step 6: Click Yes to confirm.
Step 7: Repeat step 5 to delete the other folders you want to remove.
If you want to restore folders in This PC, you need to create new {GUID} keys and name them with the previous names.
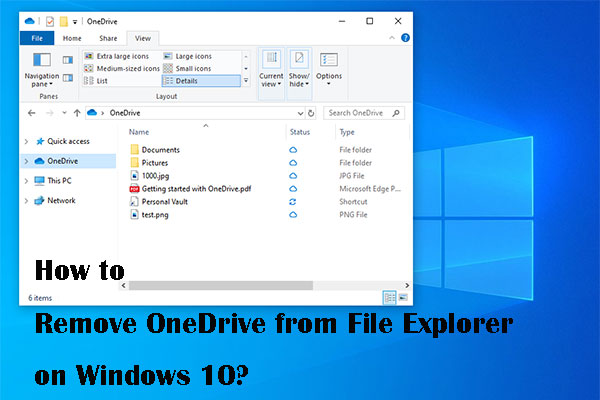
How to Remove OneDrive from File Explorer
Some Windows users want to remove the OneDrive folder from File Explorer to free up their computer space. Here are two methods for you.
Method 1: Uninstall Microsoft OneDrive
Step 1: Press Win + I to open Settings.
Step 2: Select Apps and click Apps & features.
Step 3: Find Microsoft OneDrive.
Step 4: Click on the three vertical dots and select Uninstall.
Step 5: Click Uninstall to confirm.
Method 2: Remove OneDrive via Registry Editor
Step 1: Press Win + S and type Registry Editor in the search box.
Step 2: Click Open on the right panel.
Step 3: Go to HKEY_CLASSES_ROOT > CLSID > {018D5C66-4533-4307-9B53-224DE2ED1FE6}.
Step 4: Double-click on the System.IsPinnnedToNameSpaceTree value.
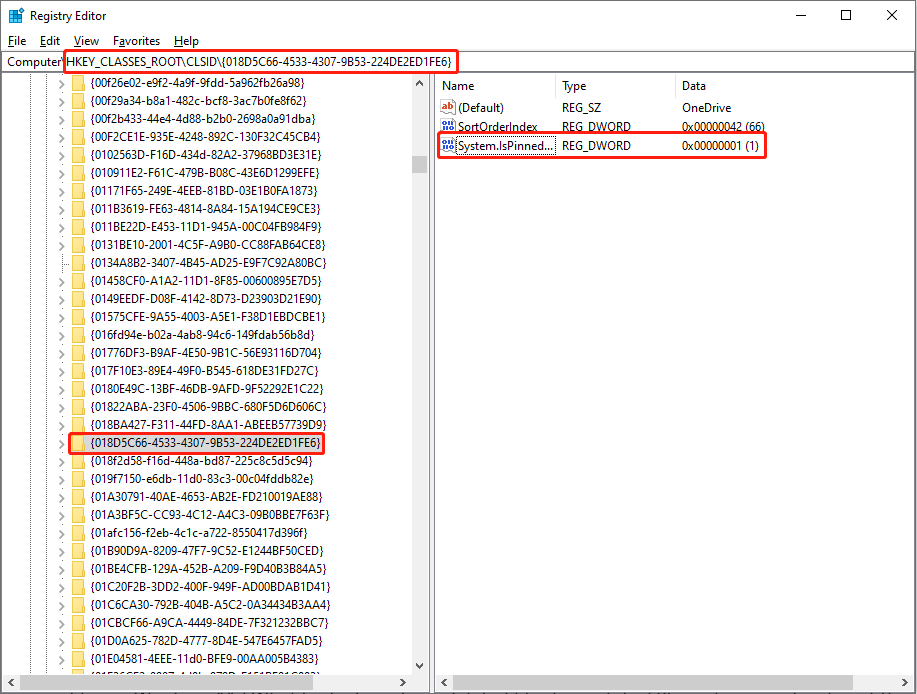
Step 5: Change the Value data to 0 and click OK.
Tips for Removing Folders from Start Menu & Hiding Libraries
How to Remove Folder from Windows 11 Start Menu
Step 1: Press Win + I to open the Settings window.
Step 2: Select Personalization and switch to the Start section.
Step 3: Click Folders on the right panel and turn Off the folders you want to remove.
Additionally, if you want to add folders to the Start menu, you can read this passage to know how to make it: How To Add Or Remove Folders On Windows 11 Start Menu
How to Remove Libraries on Windows 11 in File Explorer
Libraries collect several files or folders and present them in a simple and coherent view. You can find it in the right panel of File Explorer. If you want to hide libraries, you can follow these steps.
Step 1: Press Win + E to open File Explorer.
Step 2: Click on the three dots icon in the top taskbar menu.
Step 3: Select Options from the drop-down menu.
Step 4: Shift to the View tab in the popup window.
Step 5: Scroll down to find the Navigation pane in the Advanced settings section.
Step 6: Uncheck Show libraries and click Apply.
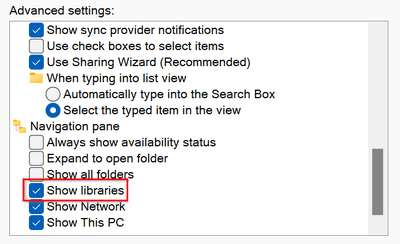
Step 7: Click OK to close the window.
You can also uncheck Network and This PC options to remove them from File Explorer.
How to show or hide the Libraries folder on Windows 11 in File Explorer more easily?
- Open File Explorer.
- Right-click on the blank area in the left pane.
- Click Show libraries to check or uncheck this option.
Remove Folders & Files on Windows 11
Sometimes, you may want to delete useless files to free up your computer. How to delete files on Windows 11? What to do if you have deleted files by mistake? Please keep reading to get the answers.
How to Remove Your Folders & Files Windows 11
The folders and files deleted using these methods will be sent to your Recycle Bin (you can go to Empty Recycle Bin if you like).
Method 1: Use the Toolbar Delete Icon
- Open File Explorer.
- Select This PC in the left pane.
- Navigate to the files or folders you don’t need.
- Select all the folders and files.
- Click on the delete icon in the toolbar at the top.
Method 2: Use the Context Menu
- Go to File Explorer -> This PC.
- Access the drive that contains your folders and files.
- Select the folders or files you want to remove.
- Right-click on any of the selected items.
- Click on the delete icon at the top navigation bar of the context menu.
Method 3: Press Delete on the Keyboard
- Also, you need to navigate to the files and folders you want to remove.
- Select them all and they’ll be highlighted.
- Press the Delete button on your keyboard.
Method 4: Drag and Drop
- Navigate to the files and folders.
- Select them all.
- Drag the items and drop them into the Recycle Bin.
What if you can’t remove folders from This PC? Please use the following ways to force delete them.
How to force delete files or folders on Windows 11:
- Find and select the files & folders and then press Shift + Delete on your keyboard (they will be deleted permanently, instead of being sent to Recycle Bin).
- Open Command Prompt and then execute the corresponding commands.
- Boot to Windows 11 Safe Mode and then try to delete the files/folders again.
How to Recover Deleted Folders/Files
What to do if you deleted files or folders mistakenly? You can recover them from Recycle Bin if you haven’t cleared Recycle Bin. Then, how about the folders you permanently deleted? At this time, you need to choose a professional data recovery tool to rescue your files.
MiniTool Power Data Recovery is a good choice. This free data recovery software is compatible with all Windows systems and provides a safe data recovery environment. Besides, you can use it to recover files from external hard drives, memory cards, USB drives, and other data storage devices. Apart from this, MiniTool Power Data Recovery works great in restoring lost data in different situations, such as crashed operating system, damaged hard drive, RAW partition, etc.
You can also use this software to retrieve deleted photos, videos, archives, emails, and so on. With the free edition, you can check where the wanted files are and recover up to 1GB of files.
Then, you can use MiniTool Power Data Recovery to get the deleted/lost files back with the following guide.
Step 1: Download and install MiniTool Power Data Recovery by clicking the button.
MiniTool Power Data Recovery FreeClick to Download100%Clean & Safe
Step 2: Launch the software. If you want to recover files from an external hard drive or other external storage devices, you need to connect them to your computer first.
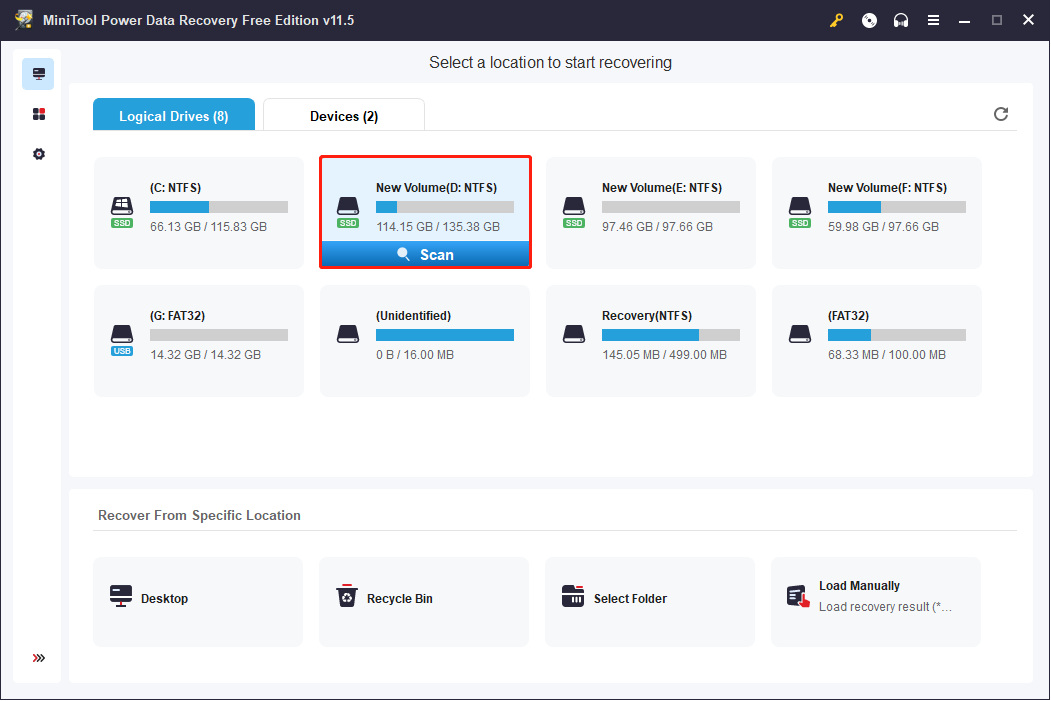
Step 3: Select the partition which contains the lost or deleted files and click Scan. If you know the specific location of the wanted files, you can choose to scan from the Desktop, Recycle Bin, or a specific folder. If you don’t know where the files , please switch to the Devices section to scan the whole drive.
Step 4: Wait for the scan process to finish. You may find millions of files on the scan result page. This will increase the difficulty for you to find the wanted files. Thus, you can make use of Filter, Type, and Search functions to reduce needless files and locate required files quickly.
Besides, when you look through the scan results, you can click the Preview button to check whether the file is what you want.
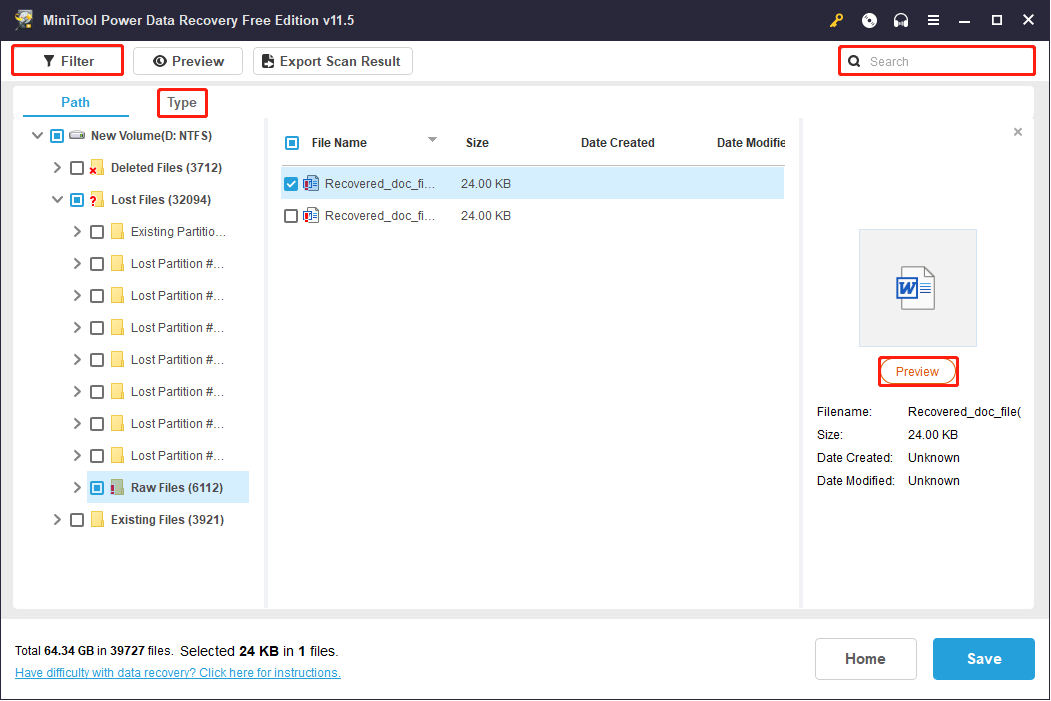
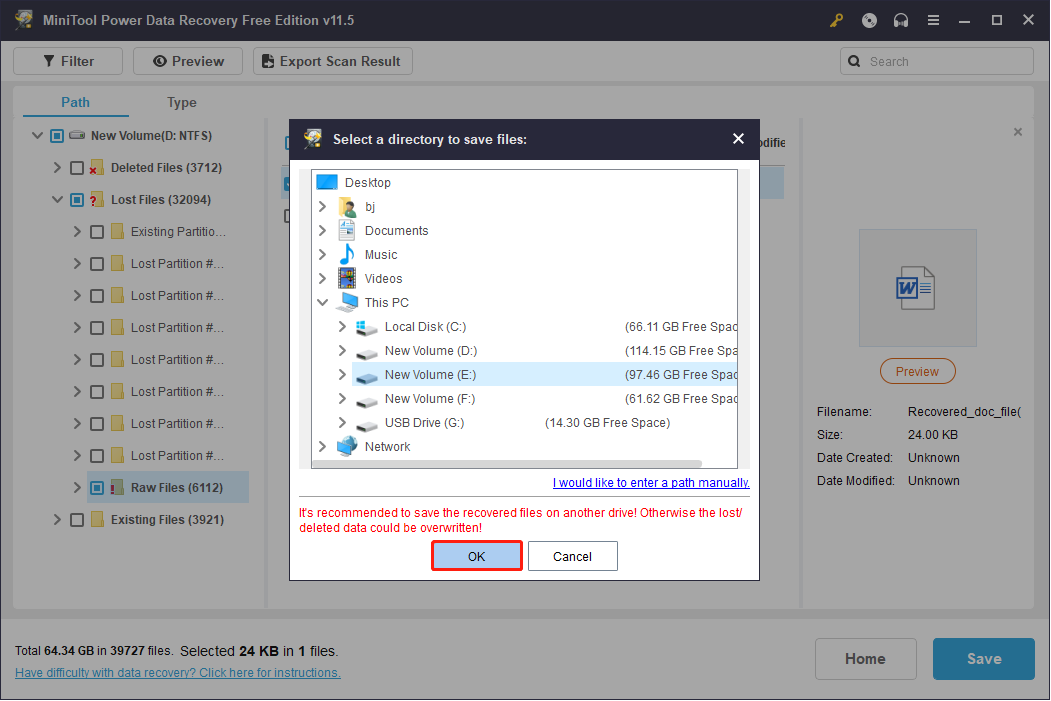
Step 5: Choose all your wanted files and click on the Save button.
Step 6: Select a path to save these files and click OK to confirm.
You can read this passage to know more about how to easily recover deleted/lost files on a PC.
If the data you want to recover is larger than 1GB, you can choose to upgrade your edition from this site. MiniTool Power Data Recovery provides Personal and Business editions for you. You can select one based on your needs.
Conclusion
This post puts forward two ways to help you remove folders from This PC. Then, it gives more information about how to remove files on Windows 11. A powerful data recovery software, MiniTool Power Data Recovery, is also recommended to help you rescue your important files.
MiniTool Power Data Recovery FreeClick to Download100%Clean & Safe
Hope this passage can give you some help. If you have any questions, please let us know via [email protected].
User Comments :