This MiniTool guide mainly explores SSD data storage principles, common causes of SSD data loss, and why SSD data recovery is challenging. It covers recovery methods using software and professional services, factors that affect success rates, and tips for protecting SSD data. It also discusses future developments in SSD recovery, including AI and emerging storage technologies.
Solid-state drives (SSDs) are the preferred file storage solution for their fast read/write speed and high durability. However, their unique way of storing data also presents challenges when it comes to data recovery. Unlike traditional mechanical hard disk drives (HDDs), which often allow data recovery tools to retrieve deleted data easily, SSDs are subject to TRIM, garbage collection mechanisms, and wear-leveling algorithms, which can cause files to be completely deleted and hard to recover.
This leads to an important question: Is SSD data recovery possible, and how to recover data from SSD? In this guide, I will focus on the details of SSD file restoration and the best solutions available.
Overview of SSD Disk Type & How It Stores Files
What exactly is an SSD? What kind of data storage method does it use and where do the files deleted from it go? You may have deep doubts about these questions.
What Is an SSD?
SSD is a solid-state storage device that uses integrated circuits to store data, sometimes called a semiconductor storage device. They have gradually replaced HDDs because they generally provide faster data read and write speeds (up to 7000 MB/s), lower data latency, enhanced resistance to physical shock, and low power consumption. Based on the interface type, it is divided into SATA SSD, M.2 NVMe SSD, U.2 SSD, etc., suitable for different computer types and data storage environments.
How Does an SSD Store Data?
SSDs store data in a different way than HDDs. HDDs store data using magnetic storage principles, where a magnetic head stores data as 0s and 1s on the surface of a platter. When the head reads data, it needs to move to the correct track and wait for the platter to rotate to the right position. SSDs have no mechanical parts, and they use the NAND flash chips to store data. This means that your data is stored in NAND flash cells in the form of electronic signals.
Where Do Deleted Files Go on an SSD?
Where deleted files go on an SSD is related to whether the SSD’s unique TRIM function (described in detail later) is enabled.
When TRIM is enabled, deleted data is immediately erased, and the original storage space is marked as free.
When TRIM is disabled, deleted files are only flagged as removable but their contents remain temporarily intact. However, SSD’s unique garbage collection mechanism may still gradually erase deleted data in the background.
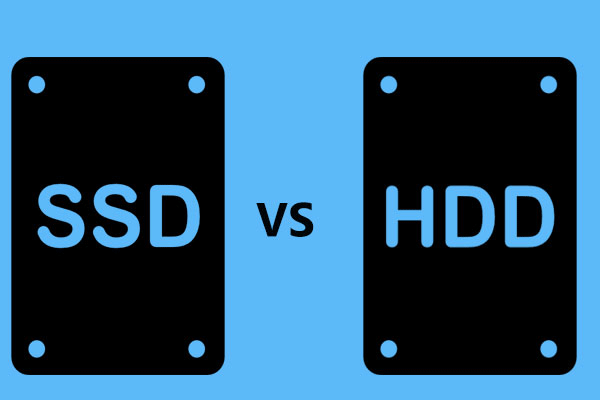
Why SSD Data Recovery Is Harder Than HDD?
I believe that through the previous brief introduction, you have already known that SSD data recovery is more challenging than HDD data recovery. The influencing factors mainly include the TRIM command, garbage collection mechanism, and wear leveling algorithm. Next, I will explain them one by one.
How Do TRIM & Garbage Collection Affect SSD Data Recovery?
TRIM is a command unique to SSDs. It is used to help the operating system tell the SSD which data blocks are no longer in use. Thus, the SSD knows which areas to erase to accommodate new data or improve disk performance.
If this command is enabled, free data blocks will be erased at the right time, and all files stored on them will be completely deleted and cannot be recovered.
How to check whether TRIM is enabled and how to enable or disable it?
Step 1. Type cmd in the Windows search box, right-click Command Prompt and select Run as administrator to open it with elevated privileges.
Step 2. Type fsutil behavior query disabledeletenotify and press Enter. If you see DisableDeleteNotify = 0, TRIM is enabled. If you see DisableDeleteNotify = 1, TRIM is disabled.
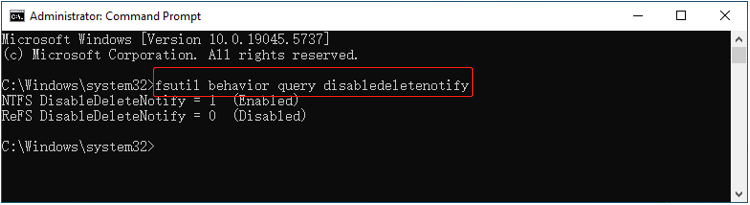
- To enable TRIM: Execute fsutil behavior set DisableDeleteNotify 0.
- To disable TRIM: Execute fsutil behavior set DisableDeleteNotify 1.
It should be noted that even if you disable TRIM immediately after data loss, it will not undo the erase operation that has been performed. Therefore, data loss on an SSD with TRIM enabled is almost impossible to recover unless you have a backup.
What is garbage collection? As mentioned earlier, TRIM can help find data areas that need to be marked as free. However, SSDs do not erase these areas immediately but usually erase them through background tasks when the system is idle. This process is called garbage collection (unique to SSDs). It is mainly to ensure that the SSD maintains efficient read and write performance, optimize disk storage space, and extend the life of the SSD. Once garbage collection is performed completely, the success rate of SSD data recovery is almost 0.
How Wear Leveling Makes SSD Data Recovery More Difficult?
Wear leveling is another important technology applied only to SSDs, mainly to extend the life of SSDs. Specifically, the flash memory cells of SSDs have a limited number of erase and write times, and wear leveling prevents overuse of certain areas by spreading data across different storage areas.
Since wear leveling spreads out the data on the SSD, it is difficult for data recovery tools to detect the lost data on the SSD, affecting the integrity of your files.
As you can see, the combination of TRIM, garbage collection, and wear leveling makes SSD file recovery almost impossible.
How Does Data Overwriting Affect File Recovery?
Data overwriting is mainly a concept for HDDs. When you delete files in an HDD, the operating system marks the storage area where these files are located as free space and temporarily retains the original data. New files are written to the location where the old data is located, causing the original data to be replaced. This is the process of data overwriting. The overwriting operation will reduce the possibility of recovering deleted files to nearly 0.
For SSDs, the structure and erase characteristics of flash memory determine that data cannot be overwritten directly, but is achieved through the process of erasing and writing. To be specific, when you write new data to an SSD, it will be written to another free block instead of directly overwriting the block where the old data is located. The old files will be erased through the garbage collection process.
Although HDDs and SSDs use different data overwriting or erasing methods, both greatly reduce the possibility of data recovery.
A simple table summarizing the above-mentioned content is as follows:
| Comparison Items | HDDs | SSDs |
| File storage method | Magnetic storage. Data is stored on the surface of the disk. | NAND flash memory. Data is stored in the electronic unit. |
| Data retention after deletion | Data is still on the disk, just marked as overwritable. | Data may be immediately erased if TRIM is enabled. |
| Difficulty of data recovery | Relatively easy, as long as the deleted data is not overwritten. | Extremely difficult. TRIM, garbage collection, and wear leveling may completely delete data. |
| Main factors affecting recovery | Data overwriting. Disk corruption. | TRIM. Garbage collection. Wear leveling. |
| Data coverage mechanism | Directly overwrite the new data at the original data location. | Write the new block first, then garbage collection is performed. |
| Recovery success rate | High. | Extremely low when TRIM is enabled. |
Now that you have a basic understanding of SSD data recovery and how it compares to HDD data recovery in terms of difficulty, the next step is to explore the causes of SSD data loss and the available recovery solutions.
Common Causes of SSD Data Loss
Accidental File Deletion and Disk Formatting
The most common causes of SSD data loss include disk formatting and accidental file deletion. Here is a true example of SSD formatting.
“I’m making a desperate and maybe senseless move to recover data from SSD because of my mistake. I fully formatted it due to some problem so it seems that it may be impossible because it may have been overwritten or that there could still be traces but I hope some of you can advise me or something I have no idea in recovering data and it seems that professional SSD data recovery after format is expensive and I may be just wasting my time.”answers.microsoft.com
Files are usually deleted by mistake, including human error, virus attack, third-party file management or cleaning software operation, etc. Usually, the deleted files are not directly removed, so the probability of recovery is very high.
There are two types of disk formatting: quick format and full format. Quick format only deletes the directory table of the file system, but the data itself is not completely deleted. Therefore, the possibility of data recovery is high. Full formatting not only deletes the file system directory table but also thoroughly checks the disk, making the files unrecoverable.
Data recovery success rate: High, unless the SSD is fully formatted.
Logical Corruption
SSD logical damage usually refers to problems with the file system or partition table, which may be caused by system crashes, virus attacks, improper removal, etc. When the disk is logically damaged, you may encounter the following situations:
- The files in the SSD are inaccessible or lost.
- The SSD shows the wrong size or available storage space.
- The operating system cannot load correctly when Windows is installed on the SSD.
- The SSD appears unformatted, or the file system becomes RAW, the disk is inaccessible, etc.
- The SSD partition disappears.
Data recovery success rate: High.
Physical Damage
Physical damage is exactly what it sounds like. It usually refers to a hardware failure of the SSD, such as a bad flash chip, a bad circuit board, or a faulty controller.
Physically damaged SSDs are usually more difficult to recover. However, if the problem is limited to a circuit board or interface failure but the flash memory chips are intact, seeking help from a professional data recovery company may maximize the chances of data recovery. However, it is usually expensive.
Data recovery success rate: Extremely low, unless the flash memory chip is intact.
Firmware Corruption
Firmware corruption refers to a failure of the program on the disk’s internal control chip, which causes the SSD to not work properly.
When the firmware is corrupted, you can try to update the SSD firmware using the disk manufacturer’s dedicated software or contact the manufacturer’s support team. After successfully repairing the firmware, the SSD may resume normal function and retain your data.
If the data is lost but not completely erased, there is still a chance to recover it.
Data recovery success rate: High.

Use SSD Data Recovery Software to Recover Files
After understanding the common factors that cause file loss on SSDs, you can continue reading to learn how to recover data from an SSD. In this section, I will explain how to use data recovery software to perform SSD data recovery free.
Watch the short video below to learn how to recover lost or deleted data from an SSD:
A Brief Introduction to SSD File Restore Software & How They Work
SSD data recovery software is specifically designed to recover deleted, lost, and existing files from SSDs. These tools typically scan the entire SSD or SSD partitions to identify data blocks that have not been completely erased. During this process, they often disregard the state of the file system. This means that even if your file system is corrupted, the software can still attempt to recover data from it.
However, it is important to note that these tools cannot bypass the limitations of TRIM, garbage collection, and wear leveling. They are typically only able to scan disk areas that have not been fully cleared and recover files that have not been completely deleted.
How to Choose the Best SSD Data Recovery Software?
When choosing an SSD file recovery tool, here are the key factors you should consider:
- Compatibility: A good SSD recovery tool should be highly compatible with various operating systems, file systems, file types, and disk brands.
- Adaptability: The tool should support a wide range of data loss scenarios so as to increase the likelihood of successful recovery. For instance, it should be able to recover files lost due to accidental deletion, disk formatting, virus infection, file system corruption, and more.
- Ease of Use: An intuitive and simple interface makes the recovery process faster and easier, even if you are new to data recovery.
- File Preview: The ability to preview files before recovery ensures that the files’ integrity and accuracy are maintained. This feature helps avoid recovering unnecessary files, saving both time and economic expenses.
- Price: While completely free SSD recovery software is rare, it is ideal to find a tool that offers a free edition with a generous amount of recovery capacity to reduce costs.
Considering all these factors, I recommend MiniTool Power Data Recovery for internal and external SSD data recovery. It supports recovering a wide range of file types, including documents, images, videos, audio files, emails, and archives, from SSDs across various brands and file systems (NTFS, FAT32, exFAT, Ext2/3/4, etc.). Its free edition allows you to recover up to 1 GB of files for free.
If needed, click the button below to download the free edition of MiniTool Power Data Recovery and follow the instructions to get started.
MiniTool Power Data Recovery FreeClick to Download100%Clean & Safe
Step 1. Scan the entire SSD or SSD partition.
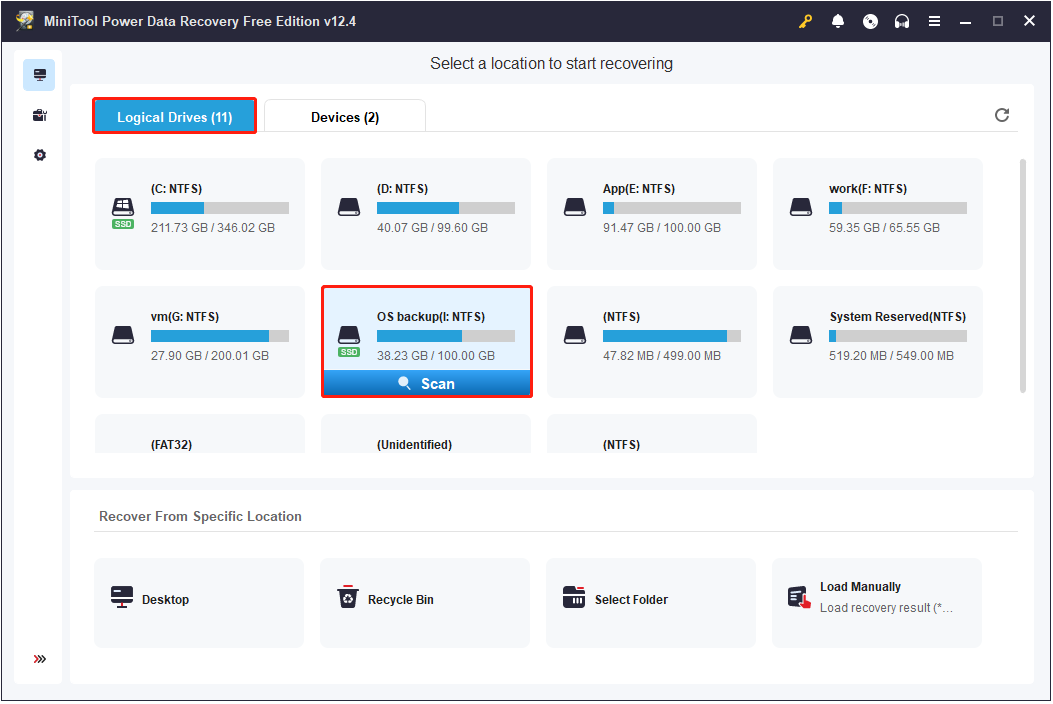
Launch MiniTool Power Data Recovery to get its main interface. Here you have three options to scan for SSD files:
- Logical Drives: Under this tab, all disk partitions on your computer, such as SSDs, HDDs, and removable drives, are displayed. SSD partitions will be marked with a green SSD icon under the disk icon. To start the recovery process, simply find the target partition, hover your mouse cursor over it, and click the Scan button. Note that you can only scan one partition at a time.
- Devices: This recovery module, located next to Logical Drives, displays all the storage devices connected to your computer. If you need to scan multiple SSD partitions at once, you can choose to scan the entire disk from this section.
- Recover From Specific Location: This feature allows for quick scans and recovery from specific locations, such as the desktop, Recycle Bin, or a specific folder.
You should choose the most appropriate scan module based on your needs. And, I opt for the SSD partition under Logical Drives to scan.
To get the best scan results, it is best to wait for the full scan to complete automatically rather than interrupt it midway.
Step 2. Locate and preview the target files.
Once the scan is complete, all found files will be categorized under Path, following their original folder structure in the scan results window. If things are good, you should see three main parent folders: Deleted Files, Lost Files, and Existing Files. This makes it easier to locate the files you want to recover. However, if the files have lost their original folder structure, the discovery process may become more challenging. To address this, the tool provides additional features to help you locate target files more efficiently.
- Type: This alternative file view organizes files by file type, such as Document, Picture, Audio & Video, and more. For instance, if you are looking for images, you can focus on the Picture section. Additionally, specific file formats are available under each category.
- Filter: This feature allows you to narrow down the file list by filtering files based on file type, file size, data modification date, and file category. By setting more precise filter rules, you can narrow down results effectively and locate your files faster.
- Search: This function enables accurate searches. Simply enter keywords from the file name into the search box and press Enter, and then all files containing the specified keywords will appear in the search results window.
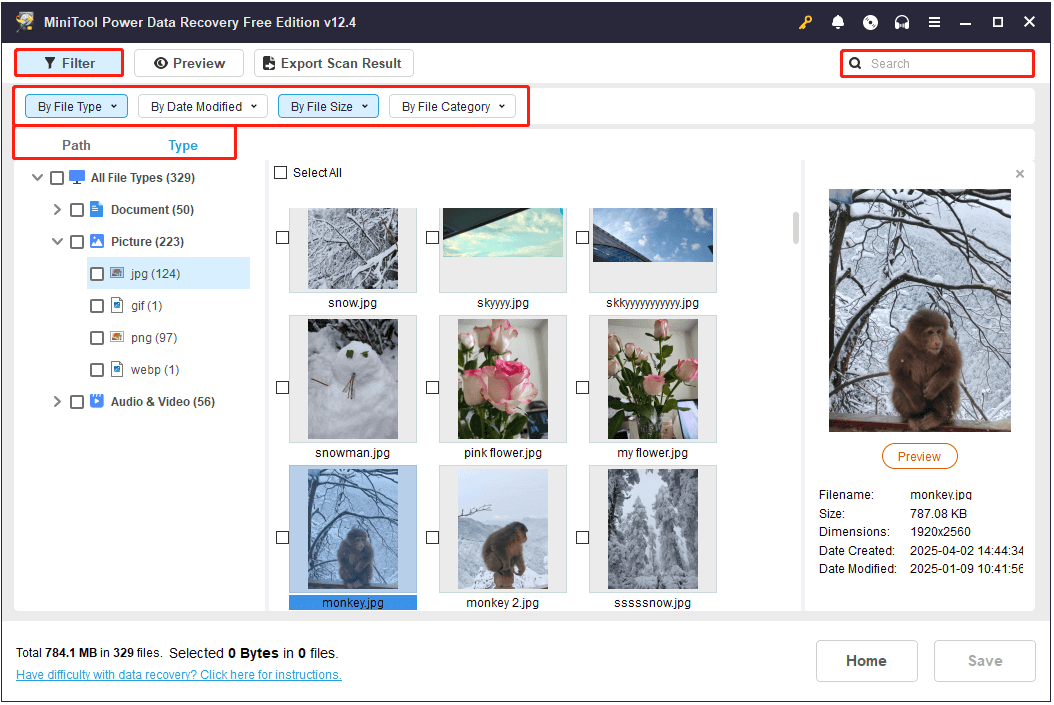
To avoid recovering unnecessary files, double-click on them one by one to preview their contents. Most files can be previewed without restrictions, but some files must be no more than 100 MB for previewing.
Step 3. Save the desired files.
Finally, make sure all wanted files are ticked, and then click the Save button. Then you will be prompted to select a directory to store the recovered files. Just do as it told but do not choose the original SSD as the destination location.
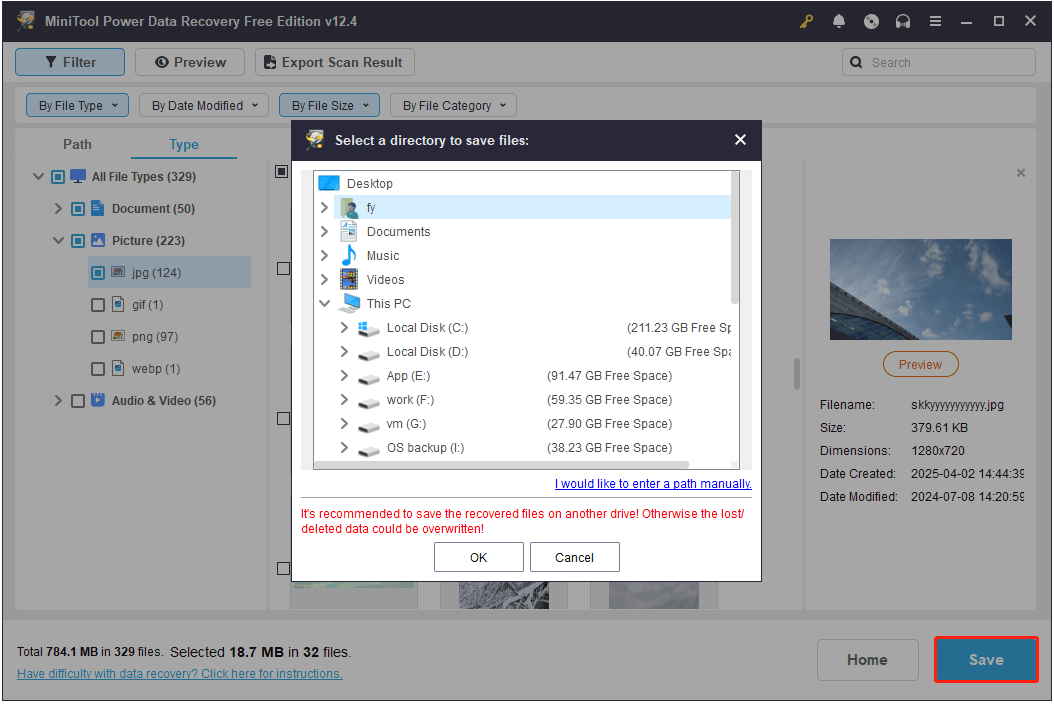
As mentioned before, this tool allows you to recover up to 1 GB of files for free. If you receive a prompt asking you to upgrade the software, it means that you have reached the free recovery limit. In this case, you will need to choose an advanced edition to recover the remaining files, and MiniTool Power Data Recovery Personal Ultimate is the most recommended one.
Choose Professional SSD Data Recovery Services to Recover Files
In addition to SSD data recovery software, SSD recovery services are also optional choices for recovering data on SSDs. When should you seek help from these services?
When Do You Need Professional Data Recovery Services?
Typically, if you are in the following situations, you need to seek help from professional SSD data recovery services:
- Severe Hardware Damage: If the SSD suffers significant hardware issues, such as circuit board damage or a malfunctioning control chip, typical data recovery software may not be able to retrieve your files. This type of damage requires professional recovery services.
- Failed Self-Recovery Attempts: If you have tried using data recovery tools but the attempt failed or the recovered data is unusable, this may indicate a deeper issue with the SSD. In such cases, it is recommended to consult a professional recovery service for more advanced recovery.
- Beyond the Reach of Data Recovery Software: Most data recovery software is designed to address logical issues, like ordinary file deletion or partition loss, and minor file system corruption. If the problem is beyond these scopes, recovery software does not work. For example, many data recovery tools do not support recovering files from an SSD in a RAID array.
- SSD Not Detected: If your SSD cannot be detected by your computer or recovery software, you cannot restore files by yourself. In this case, sending the SSD to a professional recovery center is the best choice.
- SSD Encryption Issues: Some SSDs come with manufacturer-specific self-encryption or are encrypted through BitLocker by yourself for data protection. If you are unable to decrypt the drive, data recovery software typically cannot bypass the encryption. Professional recovery services may have the tools and expertise to assist in these cases.
What Is the Process of SSD Data Recovery?
Different data recovery services may have variations in their processes, but most follow a general sequence of steps:
Initial Assessment and Consultation
The first step for you is to contact the recovery service by phone, email, or another method and explain the status of your SSD in detail. You may then need to send the SSD to their facility or bring it in personally. Once the service receives your SSD, they will conduct a preliminary assessment and provide an initial report, along with a quotation based on the extent of the damage and the recovery work required.
Data Recovery
After agreeing on the cost, the recovery service will perform a thorough testing and analysis of your SSD.
If the SSD can be recognized by the system and files are likely to be recovered, the next step is data extraction. The technician typically will create a mirror copy of the files on the damaged SSD to a new storage medium.
During this process, if there are any hardware issues, the recovery company may use specialized tools to fix them.
Data Backhaul
Once the recovery process is complete, the company may send you a portion of the recovered files for confirmation. After you verify the recovery results, they will deliver the full recovered data to you on an encrypted disk. At this point, payment will be required.
You don’t have to worry too much about data security because a reliable data recovery company usually protects your privacy through the following ways:
- Most companies will sign a confidentiality agreement with you.
- Professional services usually scan and recover your data in a secure and offline environment.
- The recovered data is often sent to you on an encrypted drive.
- After sending you the recovered data, the company will delete the copy within a few days.
How Long Does SSD Data Recovery Take?
The time required for data recovery can vary depending on several factors, including the complexity of the recovery, the urgency of the request, and the specific technologies used. Generally, the recovery process can take from 1 day to 4 weeks.
Many companies offer urgent recovery services, which can shorten the time to 24 – 48 hours. However, it is important to note that these expedited services typically come at a higher cost.
What Factors Affect the Success Rate of SSD Data Recovery?
Even professional data recovery agencies cannot guarantee 100% successful data recovery. The success rate is affected by many factors, including the degree of hardware damage, the type of data loss, the impact of the TRIM command, and the technical level of the recovery company.
Generally, the success rate is relatively high when you are in the following situations:
- The SSD only has a logical failure or a minor hardware failure.
- The TRIM feature is disabled when your files are lost.
- The SSD is in good health with no excessive wear.
- You find an experienced and technologically advanced company.
How to Protect Files on SSD?
Now that you know how to recover files from an SSD using the best free data recovery software and reliable recovery services, the next step is to learn how to protect your files on the SSD. Taking preventive measures can help eliminate the need for recovery in the first place.
Typically, there are three main methods for SSD data protection: choosing a durable SSD, making a data backup, and encrypting your data. In the following sections, I will explain each of these in detail.
Choose a More Durable SSD
Different models of SSDs vary in performance, lifespan, and durability. Poor-quality SSDs are more prone to damage and have a higher risk of data loss due to disk failure. Therefore, selecting a more durable SSD is a good way to prevent data loss from the start.
It is recommended to choose a well-known brand SSD with a high TBW (Terabytes Written) value. Additionally, if you perform frequent read and write operations, consider opting for an enterprise-level SSD.
Back up Files
Creating a backup file is the simplest and most effective way to protect your data, not just for SSDs but for other types of file storage media. Whether your files are lost due to accidental deletion, disk damage, or other unforeseen issues, having a backup ensures you can restore your data without the stress or cost of using data recovery software or services.
For SSD data backup, if you do not mind, you can simply copy and paste important files to another disk each time they are updated. Alternatively, you can upload significant files to cloud storage. This keeps your files safe on a remote server rather than your local disk. However, the best approach for SSD file backup is to use MiniTool ShadowMaker, a powerful and user-friendly Windows backup tool. It offers automated backup options to back up your files to internal or external hard drives, USB drives, or shared folders.
Now, I will show you how to back up your SSD files using MiniTool ShadowMaker.
Step 1: Download and install the trial edition of MiniTool ShadowMaker, which is free for 30 days.
MiniTool ShadowMaker TrialClick to Download100%Clean & Safe
Step 2. Launch the backup tool and click Keep Trial to enter its main interface.
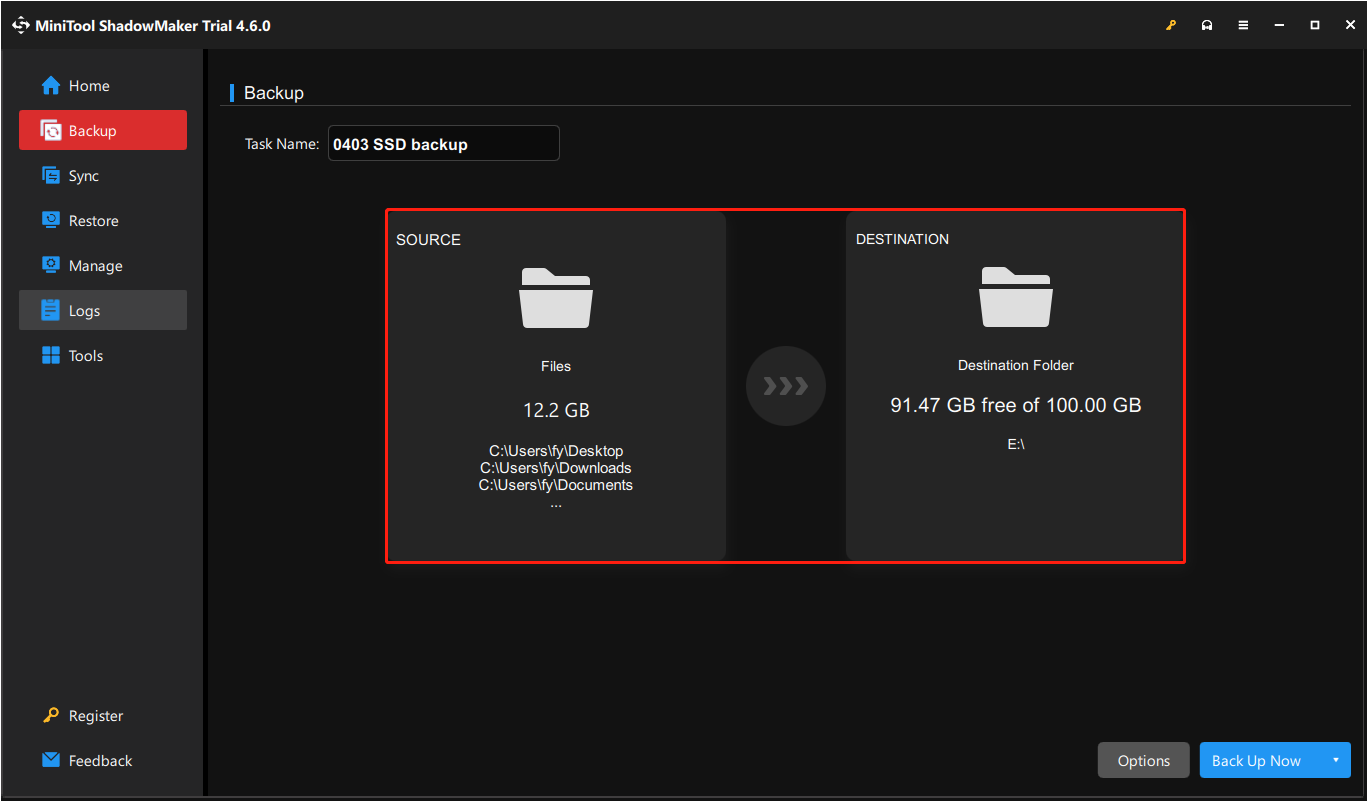
Step 3. Go to the Backup tab in the left menu bar. In the right panel, you can see two options: SOURCE & DESTINATION.
- SOURCE: Click this tab to select the files, folders, partitions, or disks that you want to back up.
- DESTINATION: Hit this tab to select a secure location on another disk where the backup files will be stored.
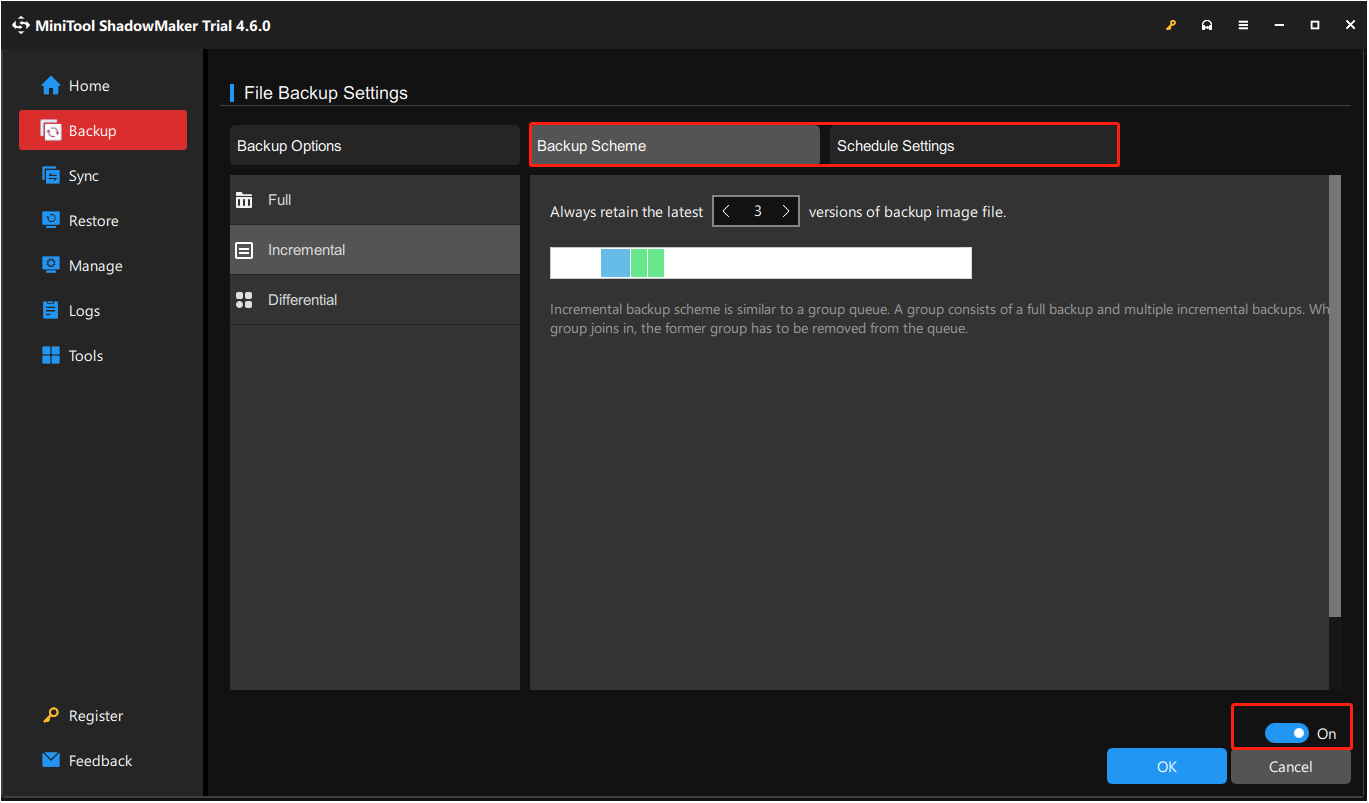
Step 4. (Optional) Set up backup schemes and schedule settings.
This powerful backup tool offers three backup schemes – full, incremental, and differential backup, to balance comprehensive data protection in terms of backup time and storage efficiency. The full backup saves everything, the incremental backup saves only changes since the last backup, and the differential backup saves only changed files or newly added data since the last full backup. You can click the Options button in the lower right corner to enable the Backup Scheme feature and configure your backup types.
Moreover, under the Schedule Settings tab, you can choose to back up your files automatically daily, weekly, monthly, or when on event.
Step 5. Once everything is set, click the Back Up Now button to start the backup.
How to restore the backup files? Go to the Restore tab, find the image file you want to restore, and then click the Restore button next to it.
Password Protect Files/SSDs
Setting a password for your files is not the same as backing them up, but it primarily helps prevent unauthorized access and data leakage. When your files or disks are password-protected, other users cannot access them without the password, thus reducing the risk of accidental deletion.
You can use Windows’ built-in BitLocker tool to perform full disk encryption to protect your entire SSD. Or, you can set passwords to encrypt individual files or folders based on your specific needs.
How to encrypt an entire partition with BitLocker:
Step 1. Open File Explorer and go to the This PC section.
Step 2. Right-click the target partition you want to encrypt and choose Turn on BitLocker.
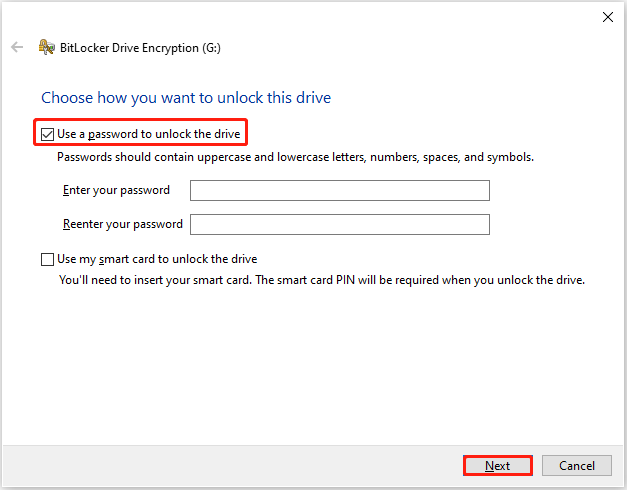
Step 3. In the new window, tick Use a password to unlock the drive, and set up a strong password. After that, click Next.
Step 4. Choose a way to back up the recovery key and click Next.
Step 5. Choose how much of your drive to encrypt and hit Next.
Step 6. Select an encryption mode and click Next.
Step 7. Click Start encrypting and wait for the process to complete. Finally, you will be required to restart your computer to apply this operation. Be sure to keep your password or recovery key safe, as losing them will result in losing access to your own disk.
How to protect an individual file/folder:
You can use the Windows built-in encryption feature to protect a file or folder:
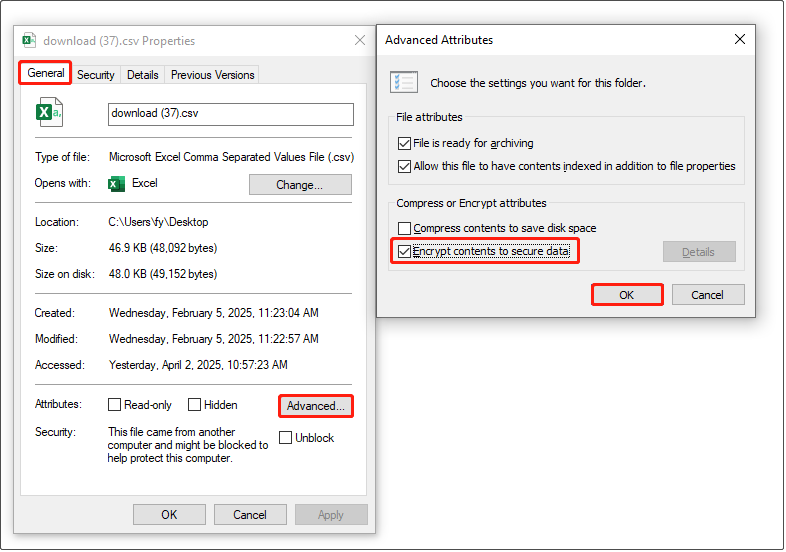
Step 1. Right-click a file/folder and choose Properties.
Step 2. Under the General tab, click Advanced. In the new window, tick the checkbox of Encrypt contents to secure data and click OK.
Your files will stay protected if someone tries to access them with a different account on your computer.
If this feature does not meet your needs, you can use third-party encryption software to protect your files or folders. There are many similar programs available on the market, both free and paid, such as WinRAR, 7-Zip, Folder Lock, and more. You can visit their official websites to download the software and access user guides for further instructions.
This is all about how to protect your SSD files from being lost permanently on Windows.
The Future of SSD Data Recovery
As you can see, currently, SSD data recovery faces challenges from TRIM, garbage collection, and other reasons. However, with the emergence and development of artificial intelligence and emerging storage technologies, SSD data recovery still has a future. I will reveal to you the possible future of SSD file recovery from three aspects: breaking through TRIM limitations, using AI, and developing new storage technologies.
Potential Breakthroughs to Overcome TRIM and Garbage Collection Limitations
Currently, it is nearly impossible to bypass TRIM and garbage collection when recovering data after file loss. However, after the TRIM command is issued, garbage collection does not erase the data right away, meaning that there could be a delay of several minutes to hours.
During this time gap, specialized techniques may directly read chips to extract data or employ freezing methods to delay garbage collection. These approaches could help preserve your data by “bypassing” the TRIM and garbage collection processes.
The Role of AI in Data Recovery
With the development of AI, it may break the traditional data recovery methods that rely on manual search and disk analysis. After analyzing a large number of data corruption cases, AI can quickly identify the extent of damage in SSDs and perform rapid data fragmentation reorganization. This reduces the impact of manual intervention on data recovery.
Additionally, with the integration of AI algorithms and cloud computing, you may be able to submit data recovery requests online in the future. Remote servers could then process and recover the data instead of requiring you to perform offline data scanning.
Emerging Storage Technologies and Data Recovery
With the increasing popularity of SSDs and the need for data recovery, some manufacturers may build redundant storage modules into SSDs in the future, that is, store part of the data in other flash memory units as a backup. When the data is lost, the SSD can try to recover the data from the built-in redundant unit without using external data recovery tools.
In addition, the quantum dot storage technology may also be widely used in SSDs in the future. It may greatly improve data storage density and disk durability, allowing SSDs to store more data and extend their life. Since this technology may bring higher durability and stability, it will reduce the probability of SSD data loss. However, due to its data density, it may make deleted file recovery more difficult.

Bottom Line
To sum up, this post explains the data storage methods in SSDs and the factors that make SSD data recovery more challenging than with traditional hard drives. The possibility of successful data recovery varies depending on the type of data loss. For most logical data loss situations, MiniTool Power Data Recovery is an ideal solution. However, in more complex data loss cases, professional data recovery services may be necessary.
To prevent data loss, it is crucial to protect your files on your SSD, and the best approach is to create regular full backups with MiniTool ShadowMaker.
In the future, advancements in SSD file storage and recovery technologies may make data more secure or make file recovery easier.
Finally, if you have any questions about MiniTool data recovery or backup software, feel free to reach out to the support team at [email protected].
About The Author

Position: Columnist
Shirley holds a bachelor’s degree in English and has been an editor at the MiniTool Team for many years. She specializes in IT-related content, with a focus on data recovery, file backup, disk management, and other technical topics. She is committed to delivering clear, accurate, and practical solutions to help users resolve common computer issues.
User Comments :