When you see the error message of This PC can’t run Windows 11, it usually means that you can’t install Windows 11 on your computer. But this doesn’t mean that you can never install this new system on your computer. Just try the solutions mentioned in this MiniTool post to help you out.
Timeline of Windows 11
In 2021, Microsoft’s breaking news is Windows 11:
- On June 15, 2021, the screenshots of Windows 11 were leaked, reflecting some information related to Windows 11.
- On June 24, 2021, Microsoft officially announced that there’s a new version of Windows: Windows 11.
- On June 28, 2021. Microsoft released the first Windows 11 Insider preview build 22000.51.
- On July 8, 2021, Microsoft released the second Windows 11 Insider preview build 22000.65.
- On July 15, 2021, Microsoft released the third Windows 11 Insider preview build 22000.71.
- On July 22, 2021, Microsoft released the fourth Windows 11 Insider preview build 22000.100.
- To be continued…
Windows 11 will be released to the public in October 2021. But now you could install/upgrade to Windows 11 Insider preview build as long as you meet the following requirements:
- Your computer meets the basic Windows 11 system requirements.
- You have joined the Windows Insider Program and in the Dev Channel.
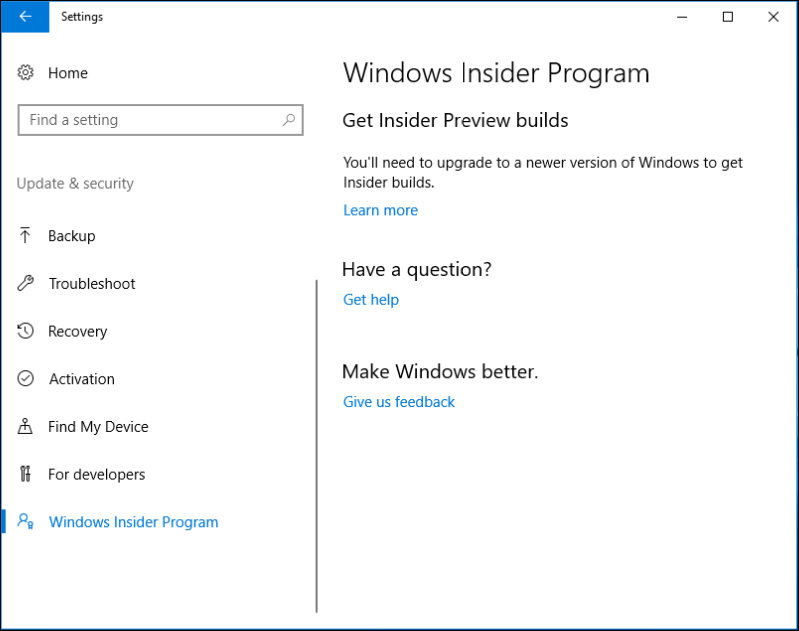
- Your Windows 10 version is not so old. If you see You’ll need to upgrade to a new version of Windows to get Insider builds, it means your Windows 10 version is too old. You need to update your Windows 10 beforehand: go to Start > Settings > Update & Security > Windows Update to check for updates.
This PC Can’t Run Windows 11
Can my PC run Windows 11? To get a quick answer, you might have used the now-disabled PC Health Checker app or an alternative to check your computer compatibility for Windows 11. The result might be not satisfactory: you see This PC can’t run Windows 11. You could also see this error message during the Windows 11 setup process.
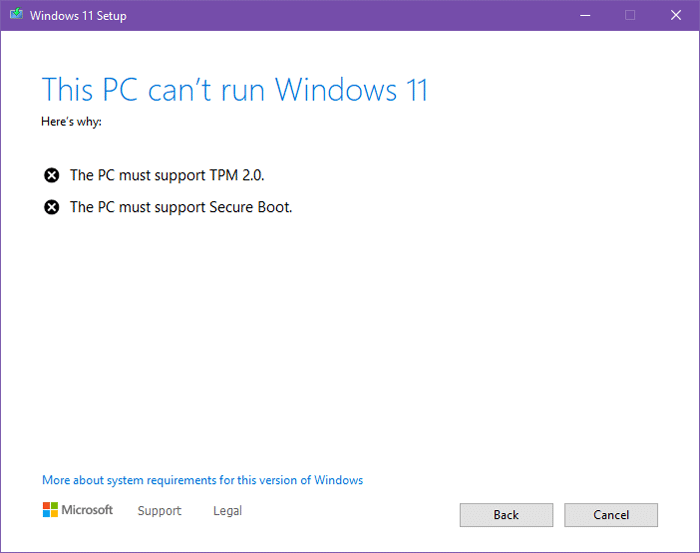
The error message interface always shows you the reasons for This PC can’t run Windows 11. Here are the collections:
- TPM 2.0 is a requirement for running Windows 11
- The system disk needs to be 64GB or larger
- The processor isn’t supported for Windows 11
- The PC must support Secure Boot
- The PC must support TPM 2.0
- Your PC Does Not Meet the Minimum Hardware Requirements for Windows 11
You know the reasons. So, the issue might be solved. In this post, we collect some useful and effective solutions. You could jump to the corresponding part to view the solution according to the case you are facing.
Case 1: TPM 2.0 Is a Requirement for Running Windows 11
TPM 2.0 is a requirement for running Windows 11 and The PC must support TPM 2.0 have the same meaning: your computer must support TPM 2.0 and it is ready for use (it has been enabled on your computer).
Step 1: Check Whether Your Computer Has TPM 2.0 for Windows 11
First, you should check whether your computer has TPM 2.0:
- Press Win + R to open Run.
- Type tpm.msc and press OK.
- Go to check the Status section to see whether TMP is ready for use and check its version in the TMP Manufacturer Information interface.
The following screenshot shows a qualified situation:
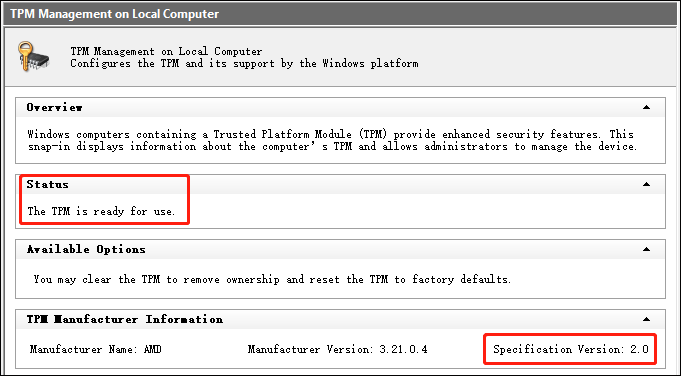
However, if you see the error of TPM 2.0 is a requirement for running Windows 11 and The PC must support TPM 2.0, it always means that TPM 2.0 is not enabled on your computer. After opening the TPM Management on Local Computer interface, you will see the following interface saying Compatible TPM cannot be found. In a situation like this, you might need to enable TPM 2.0 on your computer.

Step 2: Enable TPM 2.0 on Your Computer
- Go to Start > Settings > Update & Security > Recovery.
- Select Restart now under Advanced startup.
- Go to Troubleshoot > Advanced options > UEFI Firmware Settings.
- Click Restart and you will see Security Settings.
- Select Trusted Platform Module (TPM) and press Enter.
- Select Enabled and press Enter.
- Exit the UEFI settings.
- Restart your computer save the changes.
Case 2: The System Disk Needs to Be 64GB or Larger
Windows 11 update/installation will occupy disk space on your computer. According to this error message, Windows 11 needs 64GB or larger space on the system disk. Thus, you should go to check whether there is enough free space on the system disk (drive C).
How to Check the Free Space on C Drive?
- Press Win + E to open File Explorer.
- Right-click drive C and select Properties.
- Check whether the free space is larger than 64GB.
If there is not enough space, you will need to free up or extend disk space on drive C.
Case 3: The PC Must Support Secure Boot
Secure Boot is a security standard on your computer. It aims to boot your Windows device using only the firmware that is trusted by the Original Equipment Manufacturer (OEM). If you want to run Windows 11 on your computer, you should make sure that your computer supports secure boot and is enabled.
Check the Status of Secure Boot and Enable It
Step 1: Check the status of Secure Boot
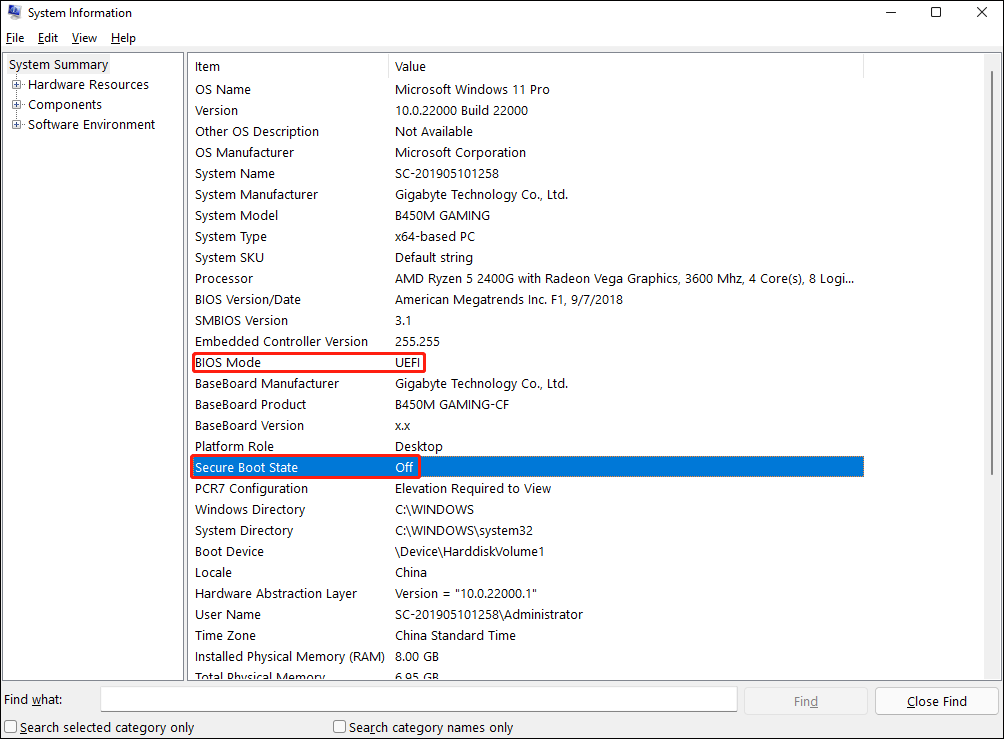
- Use Windows Search to search for msinfo32 and select the first result to open System Information.
- Under System Summary, check BIOS Mode and Secure Boot State. If BIOS Mode is UEFI and the Secure Boot State is Off, Secure Boot is disabled on your computer.
Step 2: Enable Secure Boot
- Uninstall the graphics cards, hardware, or operating systems (like Linux or previous versions of Windows) that are not compatible with Secure Boot.
- Go to Start > Settings > Update & Security > Recovery.
- Click the Restart now button under Advanced startup.
- Select Troubleshoot.
- Select Advanced options.
- Select UEFI Firmware Settings.
- Click Restart.
- Open the boot or security settings page.
- Select Secure Boot and press Enter.
- Select Enabled option and press Enter.
- Exit the UEFI settings.
- Restart the computer to save the changes.
This article shows you how to enable Secure Boot for Windows 11 installation/upgrade.Click to Tweet
Case 4: The Processor Isn’t Supported for Windows 11
According to the statement of Microsoft, Windows 11 only supports the following CPUs:
- Intel CPUs: 8th generation or later (see the list of Windows 11 Supported Intel Processors)
- AMD CPUs: Ryzen 2000 or later (see the list of Windows 11 Supported AMD Processors)
- Qualcomm CPUs: Snapdragon (see the list of Windows 11 Supported Qualcomm Processors)
You could go to check what CPU you have on your Windows 10 computer.
If your computer is using an older version like 7th generation Intel CPUs, you might not be able to upgrade your system to Windows 11. Microsoft might make some changes in the future. If your processor isn’t supported for Windows 11, you could wait until the official release of Windows 11 rolls out and see whether there are some changes. Or, you could purchase a new computer that supports running Windows 11.
Case 5: Your PC Does Not Meet the Minimum Hardware Requirements for Windows 11
If you want to run Windows 11 on your computer, you also need to make sure that your computer meets the minimum hardware requirements (check Windows 11 minimum hardware requirements). If your computer doesn’t meet the requirements, you could keep your Windows 10 up-to-date or buy a new computer that is compatible with Windows 11.
Upgrade to Windows 11 (Insider Preview Build Currently)
If your computer is prepared for Windows 11, you could upgrade to Windows 11 at any time:
Go to Start > Settings > Update & Security > Windows Update to check for updates.
The Windows 11 update process might last for hours and your computer will restart several times. You should wait patiently until the whole process ends.
Two possible cases you might encounter when upgrading your system to Windows 11:
- [SOLUTION] Windows 11 Update Downloading Stuck at 100%
- [Best Fixes] Windows 11 Installation Stuck at 35%/85%…
Recover Your Lost Data after Updating to Windows 11
Your data may get lost after upgrading to Windows 11. If you have backed up your computer in advance, you could restore your data from the backup file. However, if there are no available backups, what should you do to get your lost data back?
In a situation like this, you could use professional data recovery software to have a try. MiniTool Power Data Recovery is a good choice.
This tool is specially designed to recover all kinds of data from different data storage devices. The supported devices including internal hard drives, external hard drives, SD cards, memory cards, and more. You could use it on Windows 11/10/8/7.
It has a free edition, which allows you to recover up to 1GB of data. If it is the first time for you to use it, you could try this free file recovery tool first. If the result is positive, you could then use a full edition to recover more files.
MiniTool Power Data Recovery FreeClick to Download100%Clean & Safe
After downloading and installing this software on your Windows 11 computer, it’s time to use it to rescue your lost important files.
1. Open the software.
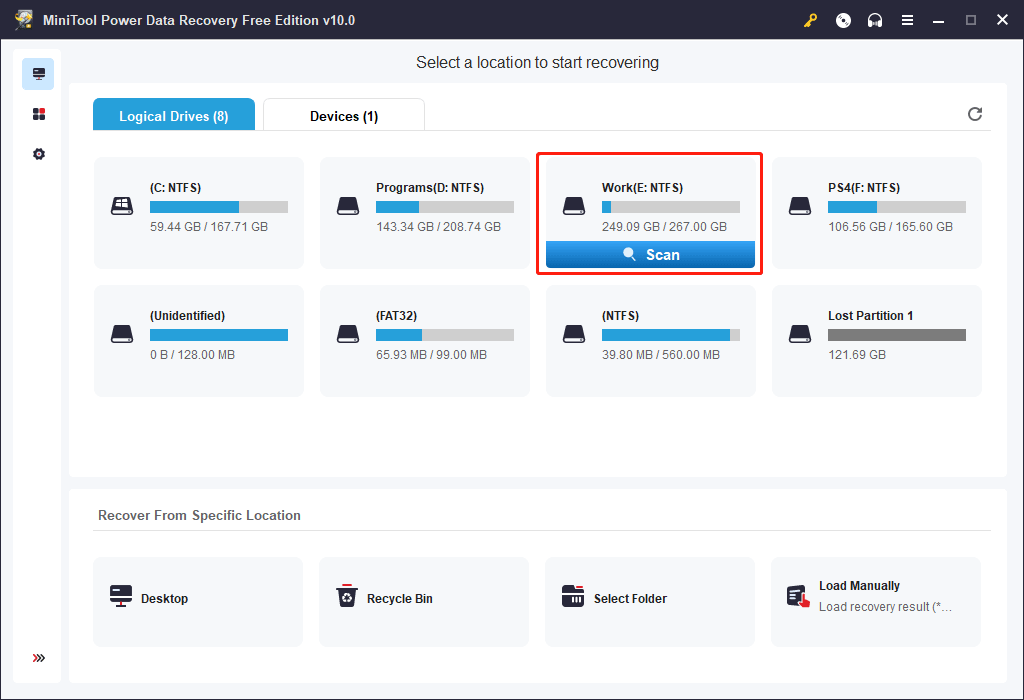
2. This software shows you all partitions it could detect under Logical Drives. Hover over the drive you want to recover data from and click the Scan button to start scanning that drive.
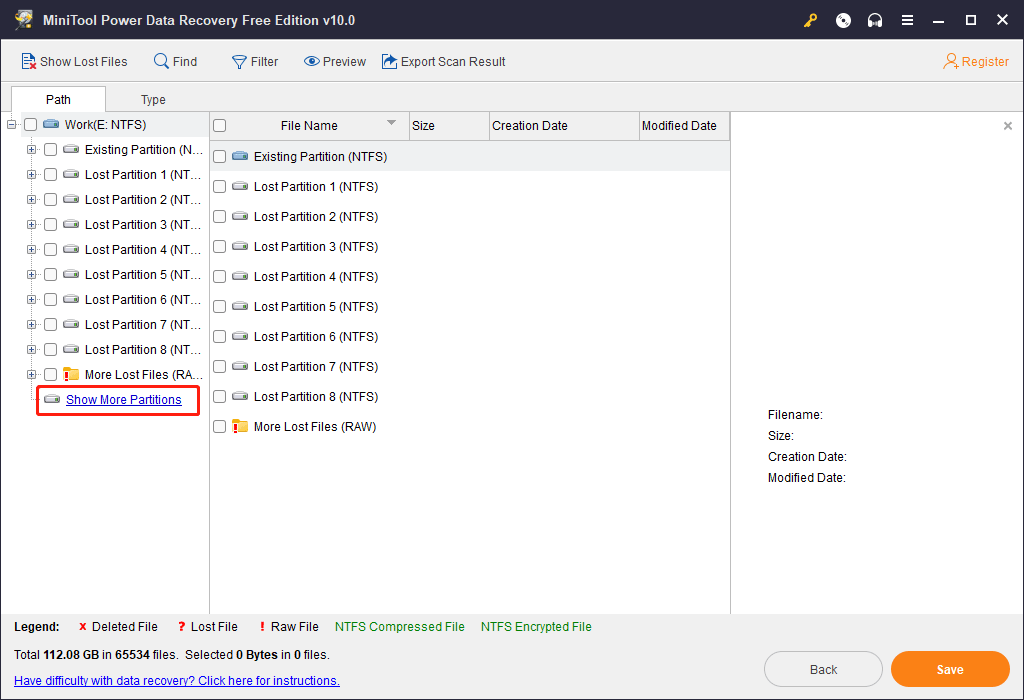
3. After scanning (to guarantee the data recovery effect, you’d better wait patiently until the whole scanning process ends), this software will show you all the partitions it detects. If there are more than 10 partitions, it only shows you the first 10. You could open each partition to find your needed files. If you couldn’t find them, you should click Show More Partitions to select another 10 partitions to be displayed and continue searching for your needed files.
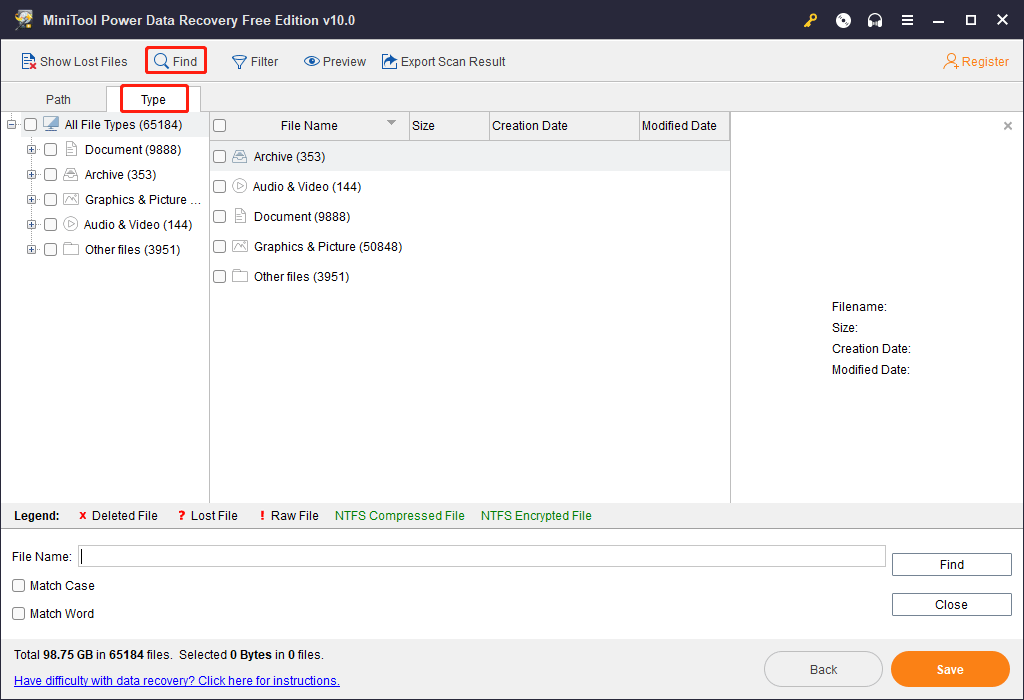
4. You could also use the Type feature to find your files by type or use the Find feature to directly locate your files by name.
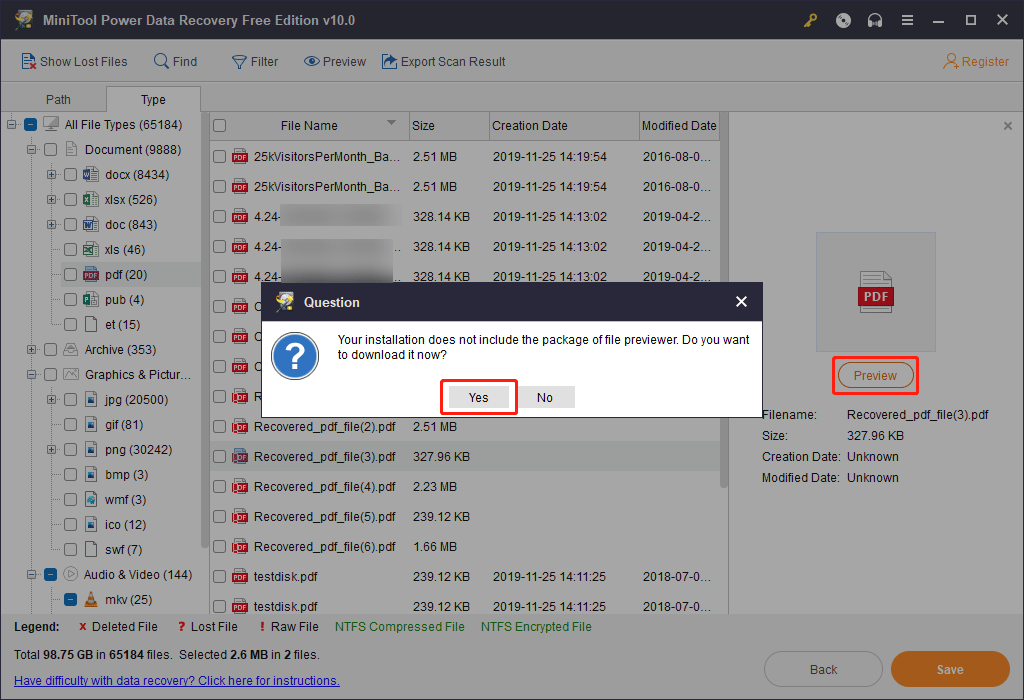
5. This software supports previewing up to 70 types of files. If you are not sure whether it is the file you want to recover, you could select that file and click the Preview button to preview it.
In the free edition, the previewer is not included. After clicking the Preview button, you need to click Yes on the pop-up window to download the package of the previewer. Then, you could preview files for confirmation.
6. Select your needed files.
7. Click the Save button (on the bottom-right corner).
8. Select a location to save your selected files. To prevent your lost data from being overwritten, the destination location should not be the original drive.
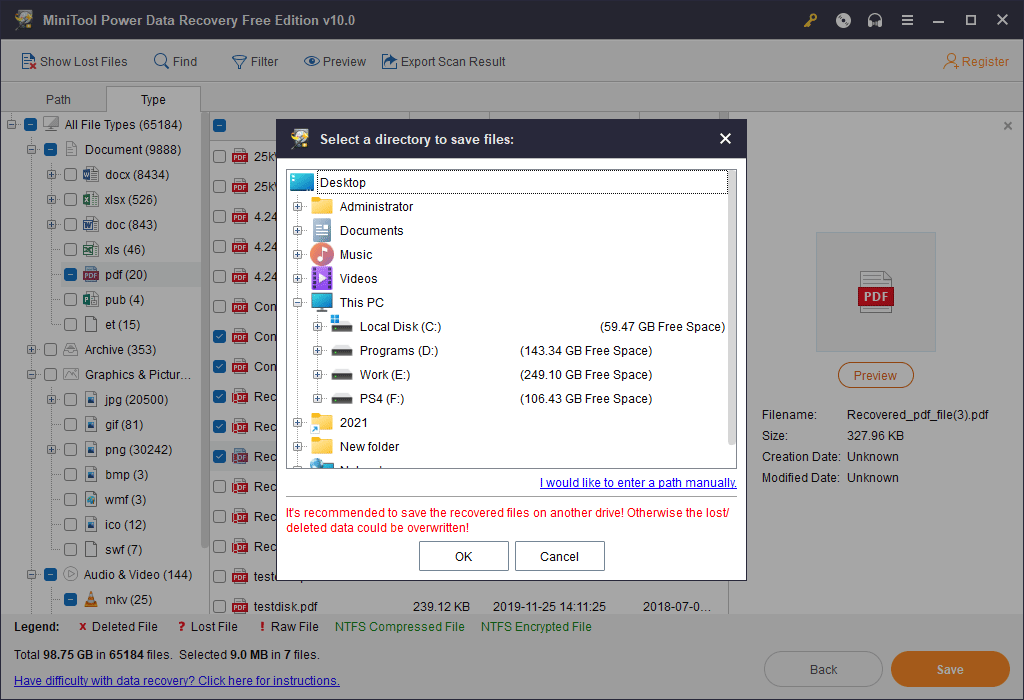
You could directly use the recovered files.
If you want to recover more than 1GB of files, you could go to the MiniTool official site to select an advanced edition and register the software (you don’t need to exit the software) to perform data recovery without limits.
Bottom Line
Bothered by this PC can’t run Windows 11? Don’t worry. This article shows you different situations and solutions. You could choose a corresponding solution according to the error message you see. Hope these methods are helpful to you.
Should you have other available solutions and suggestions, you could let us know in the comments. Besides, you could also contact us via [email protected] for a further discussion.
User Comments :