In today’s digital era, a USB flash drive is a common storage device for saving important photos, transferring work files, and even carrying your operating system.
Sometimes, you may face a situation where the USB drive cannot be opened, as shown below:
Hi, I had an issue with my USB drive. It’s most likely caused by unplugging while receiving data. Now I can see it in File Explorer, but upon trying to open it, I get the error “Insert the disk into the port”.www.reddit.com
The following section discusses this issue: USB drive detected but cannot be opened. Keep reading to get more details.
Issue: USB Drive Cannot Be Opened on Windows
If you can’t open a USB drive on Windows, there are various reasons. Below are three common cases for it:
| File System Becomes RAW | USB drives typically use file systems like NTFS, FAT32, or exFAT. However, issues like sudden power loss or virus infections may cause the file system to become RAW, which is not recognized by Windows. |
| Location Is Not Available | The error can occur due to permission restrictions, file system corruption, or hardware issues like faulty cables or a failing drive. |
| “Please Insert a Disk” Error | This error may stem from hardware issues like a faulty USB port, damaged cable, outdated drivers, or problems with the drive’s controller chip. |
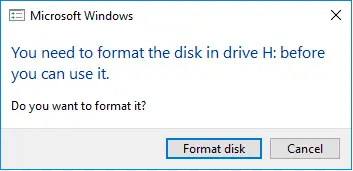
Case 1. Common Error Messages Indicating a RAW File System:
- “You need to format the disk in drive X: before you can use it”
- “The volume does not contain a recognized file system.”
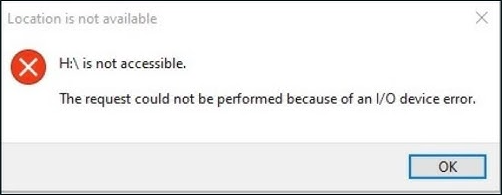
Case 2. Common “Location Is Not Available” Errors:
- “Location is not available. X: is unavailable.”
- “Location is not accessible. Access is denied.”
- “The request could not be performed because of an I/O device error.”
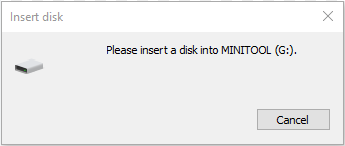
Case 3. Common “Please Insert a Disk” Errors:
- “Please insert a disk into X:”
- “There is no disk in the drive. Please insert a disk into drive X:”
After learning the common situations in which the “Windows cannot access the USB flash drive” issue happens, perform USB data recovery first.

Action 1. Recover Files From the USB Drive that Cannot Be Opened
To recover files from the USB drive that cannot be opened, MiniTool Power Data Recovery stands out as the top solution.
This data recovery tool can recover data from a range of storage devices, such as USB flash drives, hard disks, and SSDs, even if they are not accessible.
Key Features of MiniTool Power Data Recovery:
- RAW File System Support: It is particularly effective at recovering data from drives with RAW file systems.
- Wide Compatibility: It is compatible with over 2000 file formats, such as images (JPG, PNG), videos (MP4, MOV), documents (Word, Excel), and audio files. It supports Windows 11/10/8.1/8.
- User-Friendly Interface: The clean interface allows you to recover files in just a few steps, making it accessible even if you are not tech-savvy.
- High Success Rate: With a high recovery rate and 100% security for typical file types, it helps protect your files from further damage.
- Free Edition: This free data recovery software allows you to recover 1 GB of files for free.
Now, click the button below to download and install this tool on your PC.
MiniTool Power Data Recovery FreeClick to Download100%Clean & Safe
Here’s the breakdown to recover data from the inaccessible USB drive:
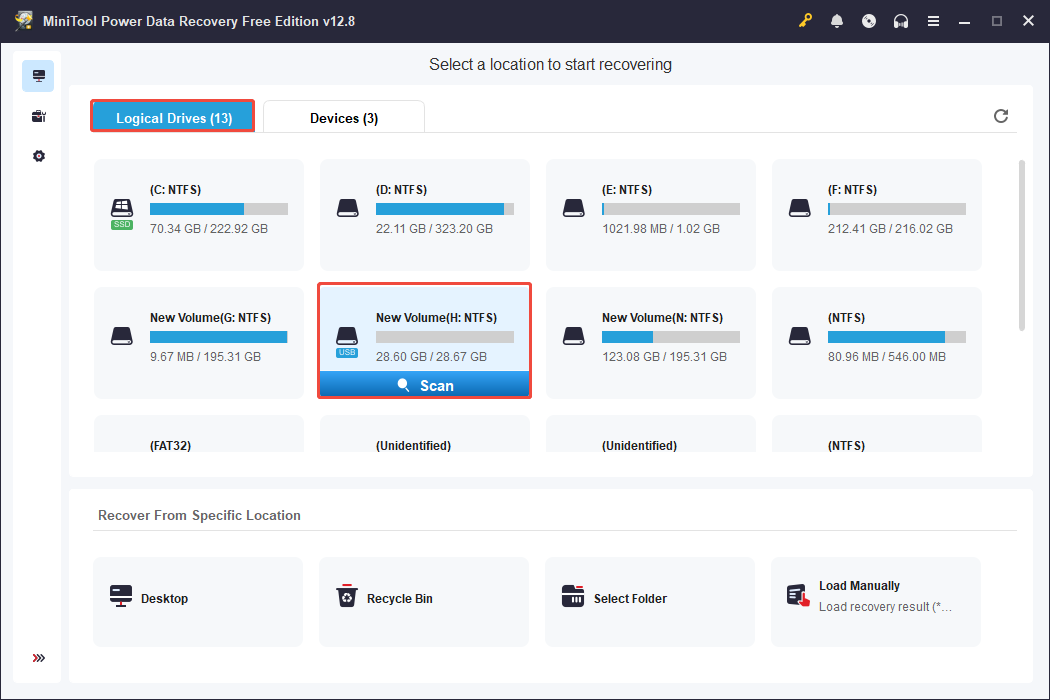
Step 1. Scan the USB Flash Drive
Launch MiniTool Power Data Recovery to enter its main interface. Under Logical Drives, select the inaccessible USB drive with a USB icon and click Scan.
Step 2. Locate and Preview Desired Files
After the scanning process is complete, preview the found files and select the ones you want to recover. This software offers two file viewing options:
- Path: Shows files in a tree structure. Under this section, expand folders and subfolders to locate the files you need.
- Type: Sorts files according to their type and format. This is useful when trying to recover particular file types such as pictures, documents, videos, emails, and more.
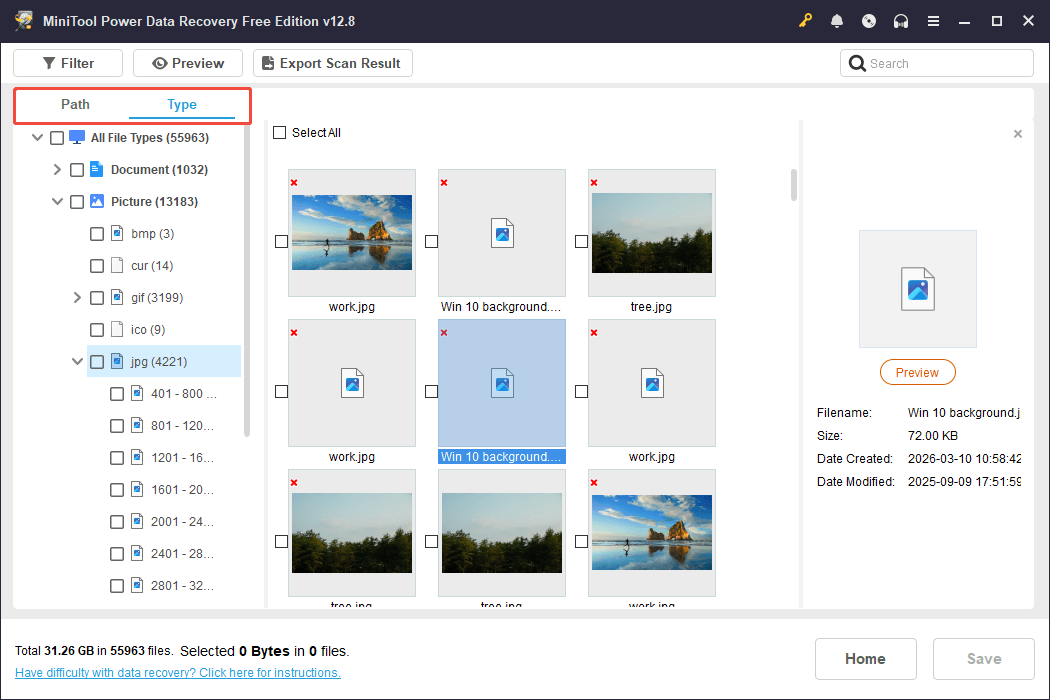
Additionally, to narrow down the scan results, this tool offers the following two features:
- Filter: Click the Filter button and adjust the settings for file type, date modified, file size, or file category to display only the files that match your specified criteria.
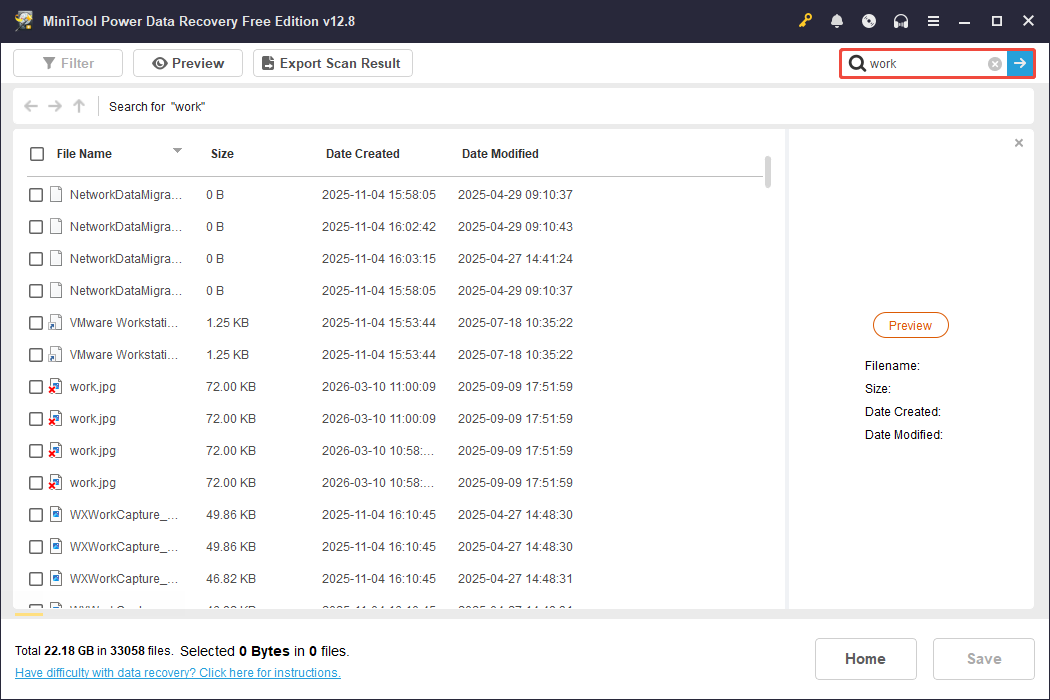
- Search: Type a complete or partial file name into the search field and press Enter to locate files that still have their original names quickly.
This data recovery software also features a Preview option that allows you to view the desired files before recovering them.
To preview a file, just double-click on it.

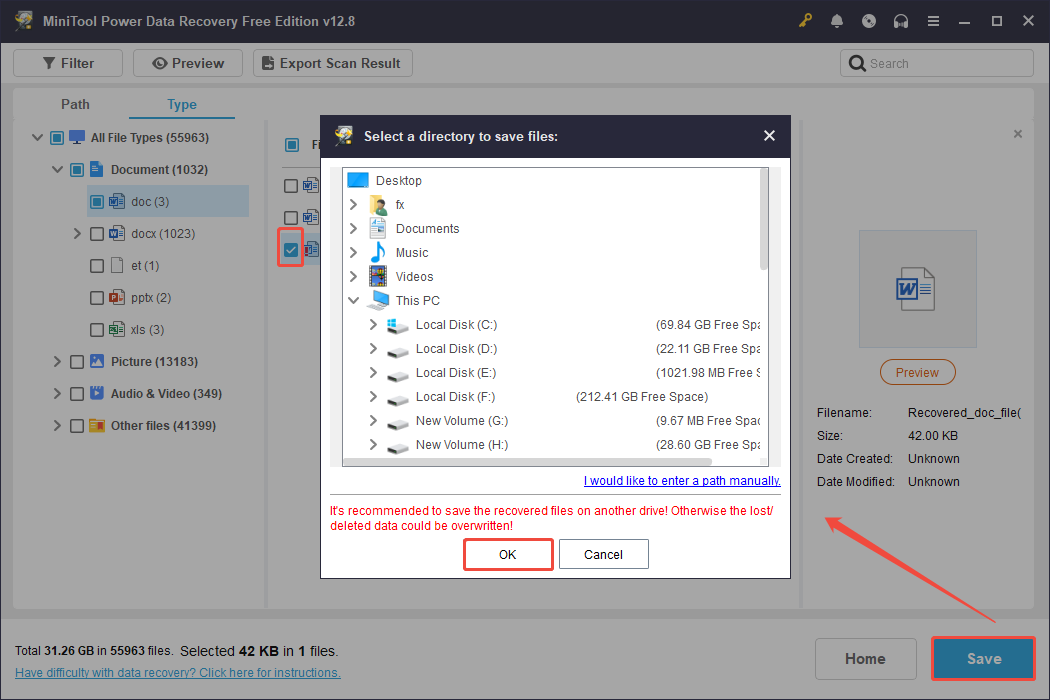
Step 3. Recover the Needed Files
Make sure to preview all desired files before clicking Save and selecting a secure location to save them in the pop-up dialogue. After that, click OK to confirm your choice.
By following these steps, you can ensure that your data is safe before attempting any fixes.
Now, continue to the next part to resolve the “USB drive not accessible” issue on Windows 11/10.
Action 2. Fix USB Drive Cannot Be Opened on Windows 11/10
Here are six effective troubleshooting methods for the “USB drive cannot be opened” error.
Immediate Troubleshooting Steps
Before using more complex solutions, consider these simple checks:
- Check hardware connectivity: Unplug the USB drive and plug it into a different USB port. If possible, use a USB 2.0 port instead of 3.0. Also, try a different USB cable or PC if it is available.
- Restart the computer: A simple restart can fix temporary glitches in the Windows operating system that might be interfering with the drive’s recognition.
If the USB issue still exists, try the following six step-by-step methods.
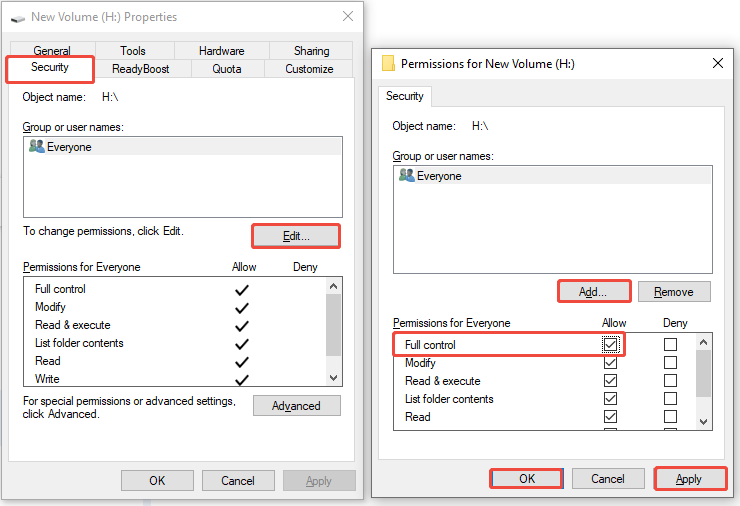
Fix 1. Modify Security Permissions
Sometimes, the USB drive not accessible issue happens simply because your user account lacks sufficient permissions to access the drive.
Follow these steps to get the full permission:
Step 1. Right-click on the USB drive if it appears in This PC and choose Properties.
Step 2. Navigate to the Security tab.
Step 3. Verify whether your username is included in the Group or user names section. If it isn’t, click Edit and then Add.
Step 4. Type your username and click Check Names, followed by OK.
Step 5. In the Permissions section, ensure you check the Allow box for Full control along with all other permissions.
Step 6. Click Apply > OK.
Fix 2. Unlock a BitLocker-Encrypted Drive
If your USB drive was encrypted using Windows’ built-in BitLocker feature, you will need the correct recovery key to unlock it.
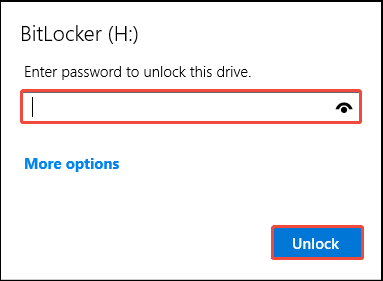
Option 1. Use the password
Step 1. Press Win + E to open File Explorer.
Step 2. Go to This PC and locate your encrypted USB drive.
Step 3. Right-click on the drive and select Unlock Drive.
Step 4. In the pop-up window, type the password and click on Unlock to access the drive.
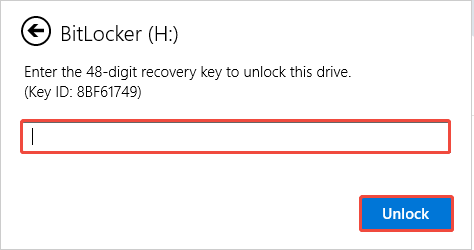
Option 2. Use the recovery key
Step 1. Launch File Explorer and go to This PC.
Step 2. Right-click on the locked USB drive and select Unlock Drive.
Step 3. In the password prompt, click More options > Enter recovery key.
Step 4. Type the 48-digit BitLocker recovery key and click Unlock.
Fix 3. Update/Reinstall Drivers
Outdated or corrupted device drivers are a common cause of hardware recognition issues for the USB flash drive.
In this situation, follow these steps to update or reinstall the driver:
Step 1. Right-click on the Start button and select Device Manager from the list.
Step 2. Expand the Disk drives section. Right-click your problematic USB drive and select Update driver.
Step 3. Choose Search automatically for drivers. Windows will search online for an appropriate driver.
Step 4. If updating doesn’t work, right-click the drive and select Uninstall device.
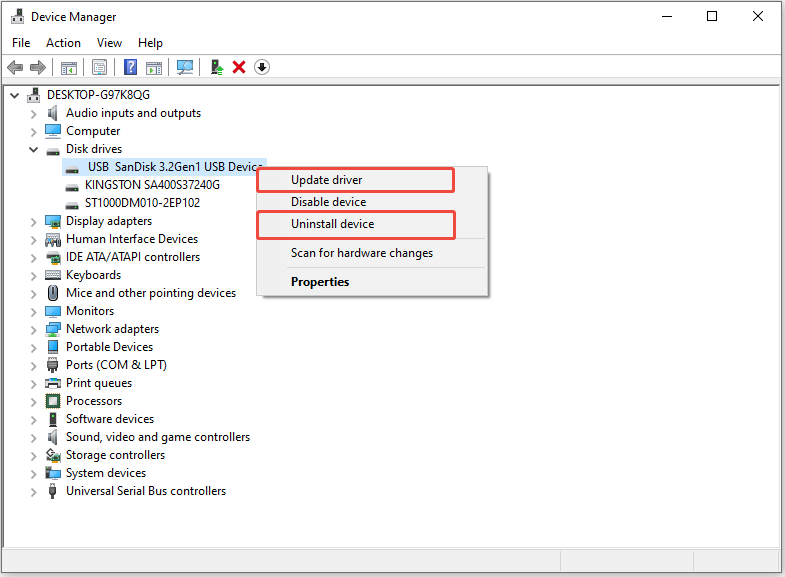
Step 5. Restart your computer. Windows will automatically reinstall the driver when it restarts.
Next, go to the File Explorer to check whether you can open your USB drive.
Fix 4. Run CHKDSK
If your USB flash drive has bad sectors or a corrupted file system, it may become inaccessible on Windows.
CHKDSK is a powerful Windows tool that scans the drive for file system errors and tries to isolate bad sectors. Follow the instructions to run CHKDSK.
Step 1. Press Win + S to open the Windows search bar, type Command Prompt, right-click it, and then select Run as administrator.
Step 2. Type the following command and press Enter, replacing H with the drive letter of your USB drive:
chkdsk H: /f /r
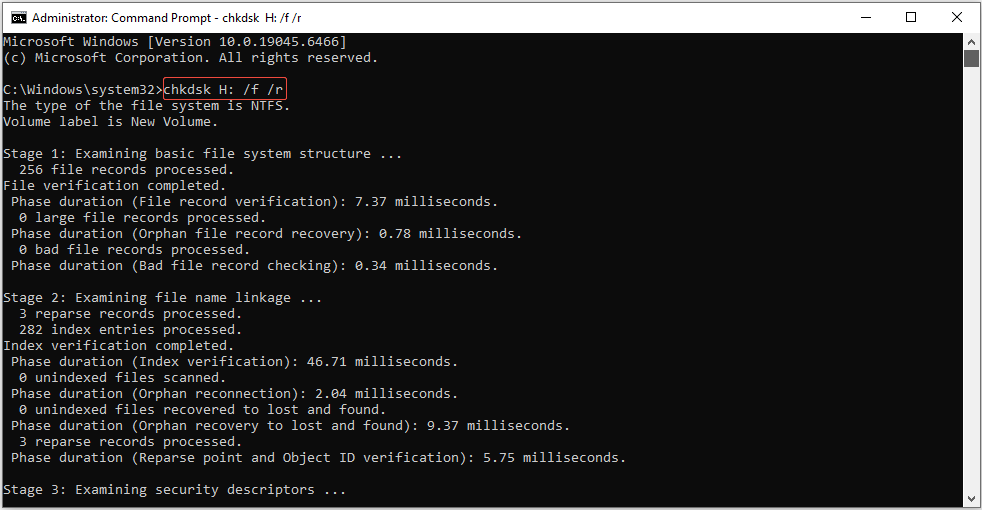
Once finished, remove the drive and plug it back in to test.
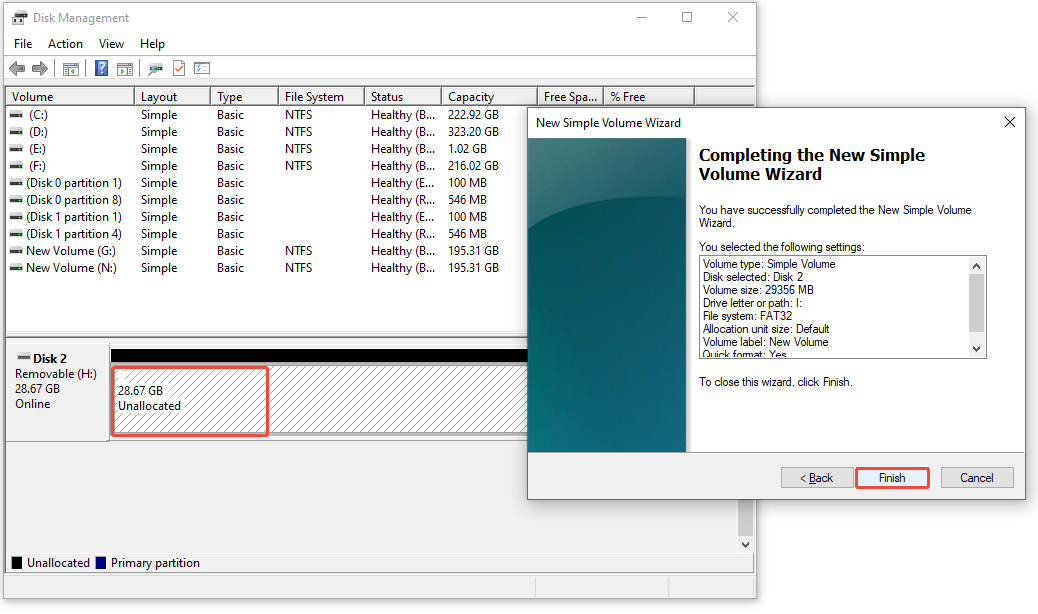
Fix 5. Create a New Partition
If the inaccessible USB drive issue is caused by a missing partition, consider using the Disk Management tool to recreate it.
Here’s how to do it:
Step 1. Press Win + X to open the Power User menu and select Disk Management.
Step 2. Locate your USB drive in the list. It may show as “Unallocated” or “No Media”.
Step 3. Right-click on the unallocated space and select New Simple Volume.
Step 4. Click Next and follow the New Simple Volume Wizard. Assign a drive letter, choose the file system, and click Next.
Step 5. Click Finish to complete this process.
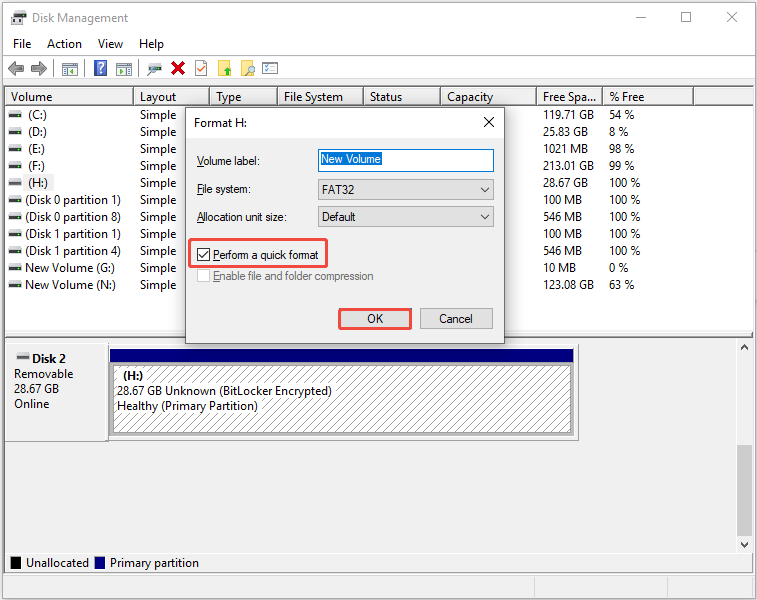
Fix 6. Format the USB Drive
If all the above methods fail to resolve the USB problem, the final solution is to format the drive. Follow these steps to do it:
Step 1. Press Win + X to open the Power User menu and select Disk Management.
Step 2. Locate your USB drive, right-click its volume, and select Format.
Step 3. Assign a drive letter, select the file system, set a volume label, then check the Perform a quick format option.
Step 4. Click OK.
Final Words
In short, to fix the “USB cannot be opened” issue on Windows, the first thing you need to do is recover data from the inaccessible USB drive.
After data recovery, try the mentioned solutions one by one, from easy to complex, until the problem is resolved.
For any questions about MiniTool Power Data Recovery, the technical support team can provide timely and detailed assistance. Feel free to contact them at [email protected].
About The Author

Position: Columnist
Sandy became an English editor after graduation. She is devoted to finding effective solutions for diverse IT problems and provides articles on data recovery, data backup, and computer partitions and drives. In her spare time, she likes listening to music and playing games.
User Comments :