USB drive not showing files and folders is usually caused by hidden file attributes, file system corruption, or malware infection. The files can often be restored by showing hidden items, repairing file system errors, or using data recovery software. Follow this MiniTool guide.
When you connect a USB drive to your computer and find that the files are missing, it can be frustrating, especially if the drive contains important data.
In most cases, a USB drive not showing files on Windows appears in the following situations:
- USB drive files are not showing but space is used
- Files are not showing inside folders
- The drive appears empty and shows no used space
When this issue occurs, you can try the following quick fixes:
- Reconnect the USB drive to ensure a stable connection
- Check the USB drive on another device, such as a phone or a Linux system
- Use a disk space management tool like TreeSize to detect hidden data
- Enable hidden files in File Explorer
- Remove hidden attributes from files
- Use data recovery software to restore missing files
- Repair file system errors using CHKDSK
- Scan the USB drive for viruses or malware
Part 1. Why Is My USB Drive Not Showing Files and Folders
If your pen drive data is not showing on Windows, it may be caused by the following reasons:
- Incorrect connection
- Hidden files
- Accidental deletion
- Virus infection
- Hardware issues
- Compatibility issues
- File system errors
After identifying the causes of the USB drive showing as empty, consider the following solutions.
Part 2. How to Fix USB Drive Files Not Showing Up
As mentioned above, to fix the issue, try connecting the USB properly, unhiding the files and folders, or checking for file system errors.
If you prefer a quick video guide, this video demonstrates how to fix a USB drive not showing files and folders:
Now, proceed to the detailed instructions for the effective methods.
Fix 1. Reconnect the USB Drive
To identify whether the issue is with your computer or the USB drive, the first step is to reconnect your USB to the PC.
If the USB still doesn’t show data on Windows, try connecting the flash drive to a Linux computer or your phone.
This will help you figure out if the problem is due to a defective USB port, system configurations, or the drive itself.
Fix 2. Use TreeSize
If your USB drive appears empty but still shows used space, you can use a disk analysis tool such as TreeSize to detect hidden files.
Steps to use TreeSize:
Step 1. Download and install TreeSize from Microsoft Store.
Step 2. Launch TreeSize and run it as administrator.
Step 3. In the interface, click Select Directory.
Step 4. Choose your USB drive, review the files and folders displayed, and check if the target files are there.
Fix 3. Check for Hidden Files
Hidden files occupy storage capacity, but they aren’t shown on the disk due to incorrect settings.
Therefore, try making the hidden files visible to resolve the “USB drive not showing files and folders” problem.
Here’s how to do it:
Step 1. Press Win + E to launch File Explorer.
Step 2. Navigate to the View tab and check the Hidden items option.
If this method fails to make files appear, read on to learn how to run the Attrib command to unhide files on Windows.
Fix 4. Run the Attrib Command
If the USB files are hidden due to hard drive corruption or malware infections, modifying the hidden file settings might not be effective.
Here’s how to show hidden files in USB using the Attrib command:
Here’s how to execute the Attrib command to unhide files:
Step 1. Press Win + S to open the Windows search bar, type cmd, right-click Command Prompt, and then select Run as administrator.
Step 2. Type attrib -h -r -s /s /d drive letter:\*.* (Replace “drive letter” with the letter of your USB) and press Enter.
After the command finishes, go to your USB folder to check whether your files and folders are visible.
If you don’t find your files or folders in your USB, proceed to the next solution.
Fix 5. Use MiniTool Power Data Recovery
If the above solutions fail to rescue your USB files, your files and folders may be lost. In this situation, you need to use data recovery software to recover them.
For USB data loss, here are some common scenarios:
- Accidental USB file deletion.
- File loss due to forced unplugging of the USB device during data transfer.
- Files may disappear due to the wrong disk format.
- System or disk errors can lead to USB file access issues.
If you don’t know which data recovery tool to choose, MiniTool Power Data Recovery is the most recommended tool for USB data recovery.
Here is an overview of its primary features and benefits:
- It can recover files from USB drives, SD cards, hard drives, SSDs, and other types of storage media.
- It is compatible with a range of file formats, including photos, videos, documents, archives, and more.
- It is particularly useful for scenarios involving accidental deletions, disk formatting, file system errors, and more.
- It offers the ability to preview various file types, such as photos and videos, before recovery.
- It supports the recovery of files up to 1 GB at no charge.
- It provides an easy-to-use and intuitive interface for secure data recovery.
Now, download this free data recovery tool and follow the steps below to scan your USB, preview the files, and recover them.
MiniTool Power Data Recovery FreeClick to Download100%Clean & Safe
For an intuitive guide, watch this quick video:
Here is a step-by-step guide to recover USB files using MiniTool Power Data Recovery:
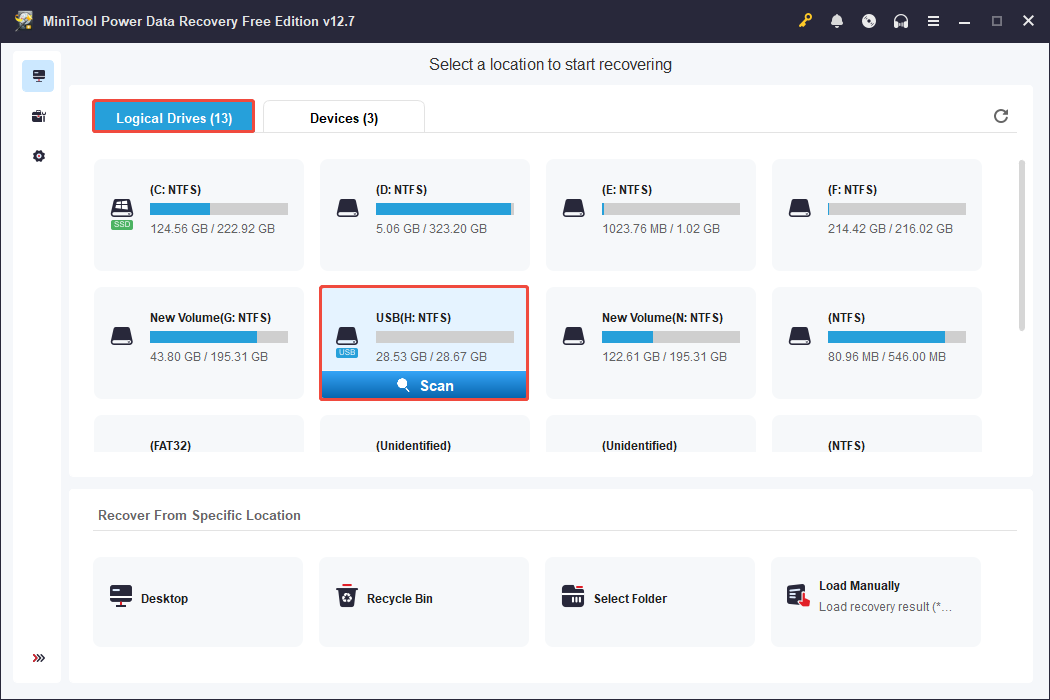
Step 1. Launch MiniTool Power Data Recovery to get its main window.
On this page, focus on the Logical Drives section, select your USB partition marked with a USB icon, and click Scan.
Step 2. Once the scan is complete, you can expand the folders and browse through the files listed under the Path tab.
Alternatively, you can change to the Type tab to see files organized by their types or formats.
Moreover, this tool offers two additional features for filtering files:
- Click Filter to set filtering criteria such as file type, modification date, file size, or file category.
- Type a file name or keyword in the search box and press Enter to locate specific files.

To make sure the files are correct, double-click each of them to preview their content before recovery.

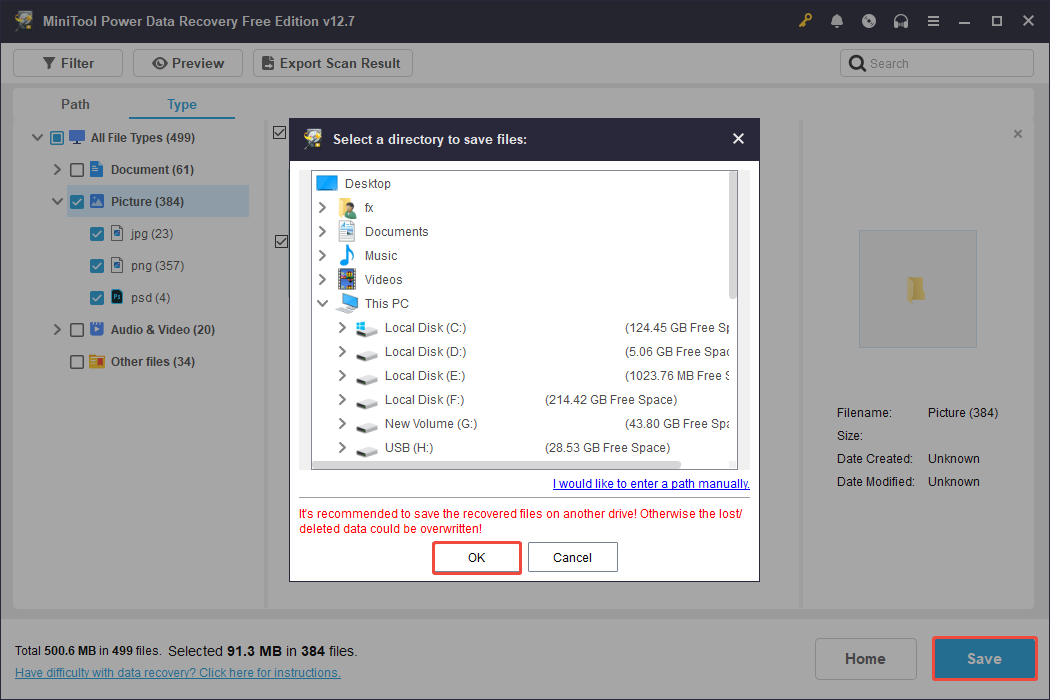
Step 3. Make sure all the desired files are checked, and then click the Save button.
In the pop-up window, choose a different location to save the recovered files and click OK.
Once the recovery is completed, you can view and use the recovered files in your USB.
Fix 6. Repair File System Errors
When facing technical or logical file system issues that impact the USB performance or bad sectors on the USB, using the CHKDSK utility is the advised solution.
To utilize CHKDSK to resolve the “USB data not showing” problem, follow these instructions:
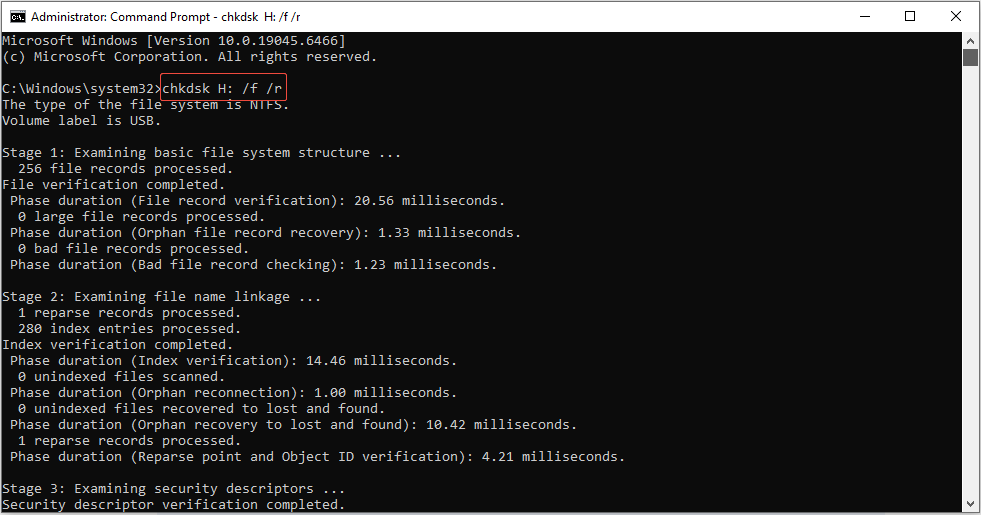
Step 1. Press Win + S to launch the Windows search bar, type cmd, and then right-click on Command Prompt to choose Run as administrator.
Step 2. In the command line window, type chkdsk [drive letter]: /f /r and press Enter (Substitute “[drive letter]” with your USB’s letter).
For instance, if the drive letter for the USB is H, you should type chkdsk H: /f /r.
- H represents the drive letter of the disk you wish to check.
- /f corrects errors in the file index or a damaged directory structure.
- /r includes all the capabilities of /f while additionally scanning for bad sectors and attempting to recover any readable data.
Fix 7. Check for Virus
To resolve the issue of “pen drive data not showing,” it is advisable to perform a virus scan using Windows Defender.
Here’s how to conduct a virus scan in Windows Defender:
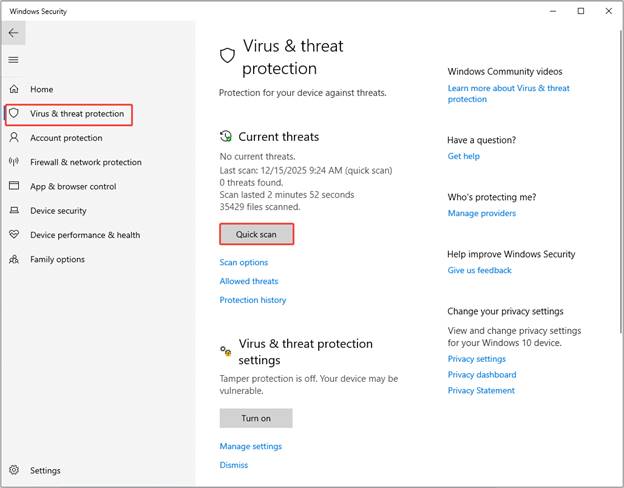
Step 1. Connect your USB. Press Win + I to access Settings.
Step 2. Navigate to Update & Security > Windows Security > Open Windows Security.
Step 3. Select the Virus & threat protection tab, then click the Quick scan option.
Moreover, your antivirus software might sometimes incorrectly identify your USB files as threats, leading to their quarantine.
To retrieve the USB files that Windows Defender has quarantined, follow these steps:
Step 1. Go to Windows Settings, then click on Update & Security > Windows Security > Virus & threat protection > Protection history.
Step 2. From the Filters drop-down menu, choose the Quarantined Items option.
Step 3. Select the item you wish to restore and click the Restore option.
Part 3. Conclusion
In conclusion, this article focuses on the matter of “USB drive not showing files and folders,” offering you several effective methods to unhide or recover them.
Try the mentioned methods one by one if your files are not really missing on your USB flash drive. If they are lost, MiniTool Power Data Recovery is a trusty tool to recover them.
If you need some help with MiniTool tools, feel free to contact [email protected].
About The Author

Position: Columnist
Shirley holds a bachelor’s degree in English and has been an editor at the MiniTool Team for many years. She specializes in IT-related content, with a focus on data recovery, file backup, disk management, and other technical topics. She is committed to delivering clear, accurate, and practical solutions to help users resolve common computer issues.
User Comments :