You try to open your drive to access your files, but a message pops up:
“You need to format the disk in drive before you can use it.”

You cancel the operation, hoping to avoid data loss. But another error message appears:
“The volume does not contain a recognized file system.”
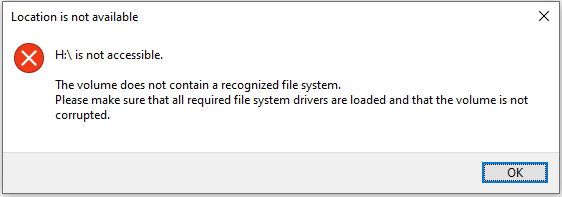
If you open Disk Management to check the drive’s status, you will most likely see it is listed as RAW and still inaccessible. That means you cannot open, view, or edit any files stored on the drive.
This issue is not limited to just one kind of drive, but can happen to any storage device, including:
- Internal HDDs/SSDs
- External hard drives
- USB flash drives
- SD cards
- …
So, what does this error actually mean? And what causes it to appear? Let’s take a closer look.
What Does the Error “The Volume Does Not Contain a Recognized File System” Mean
The “The volume does not contain a recognized file system” error indicates that your computer cannot understand how your files are organized on your storage device.
This can occur due to several reasons, such as file system corruption, improper formatting, etc.
What Is a File System?
A file system is a method your system uses to organize or manage files on a file storage device. It tells your system where data is stored and how it should be accessed.
Common file systems include NTFS, FAT32, exFAT, and others.
What Is a RAW File System?
RAW is not actually a file system like NTFS or FAT32. A RAW file system usually means that the file system is missing, damaged, or is not recognized by the current operating system.
When your drive becomes RAW, the computer cannot locate the file structure information. So, the drive cannot be opened.
What Causes “The Volume Does Not Contain a Recognized File System” Error?
Here are the common causes of the unrecognized file system error:
1. File system corruption
- Damage to file system structures prevents disk contents from being properly identified.
- Improper ejection or virus infection leads to file system information corruption.
2. Formatting problems
- The drive is formatted with an incompatible or unrecognized file system. For example, a drive formatted for macOS cannot be recognized by Windows.
- The format process is not completed.
3. Other factors
- The file system conversion process fails and results in an unrecognized file system.
- Sudden power loss or forced shutdown can cause the file system to damage.
- Physical damage to the file storage device may corrupt the internal structure.
- Outdated, missing, or corrupted disk drivers can prevent your system from recognizing the file system.
What should you do when you see this error message?
After understanding what this error means, the next step is to recover your files. Anything else you do may cause further damage to your drive.
Two Important Notes:
- Do not format the drive before recovering your files. Formatting usually makes the data recovery more difficult.
- Prepare another drive with enough free space to store the recovered files.
How to Recover Files From a Drive With an Unrecognized File System (Before Fixing)
In most cases, when you see the unrecognized file system error, the drive shows RAW in Disk Management. So, in the following content, I will use a RAW drive to show you the operations.
To recover files from a RAW USB drive, SD card, hard drive, etc., MiniTool Power Data Recovery is required. This file restore tool can identify a RAW drive and scan it for all lost, deleted, and existing files.
It supports recovering documents, pictures, videos, audio, emails, and other types of files. The free edition offers 1 GB of free data recovery capacity.
MiniTool Power Data Recovery FreeClick to Download100%Clean & Safe
With only three simple steps, you can recover your files easily:
- Select the RAW drive to scan.
- Preview and tick all required files.
- Recover files.
Below are the detailed steps to use this free data recovery software to get your data back.
Step 1. Scan the RAW Drive.
Run the software.
On the main interface, you will see all your internal and external drives. The RAW drive will appear as Unidentified.
Find your target drive by looking for this label and other drive information.
Hover your mouse cursor over the drive and click Scan. The scanning process will start right away.

Step 2. Preview and Tick Required Files.
Once the scan is 100% completed, you can start finding the files you want to recover.
There are two ways to view your files:
Option 1. Path
By default, files are organized by their original folder structure under the Path tab.
Expand folders and subfolders to locate your files.
This view lets you select entire folders for recovery.
Option 2. Type
Alternatively, switch to the Type tab to browse your files by their file type and format.
This is helpful if you want to recover specific file types.

Other Features to Help You Find Files Faster
- Filter: Click Filter to set filtering rules like file type, modification date, file size, and file category.
- Search: Enter a full or partial file name in the search box and press Enter to quickly find matching files.

How to preview files?
To preview a file, just double-click it, or select it and click the Preview button.
Which files can you preview?
MiniTool Power Data Recovery supports previewing many file types, including photos, videos, audio, documents, and more.

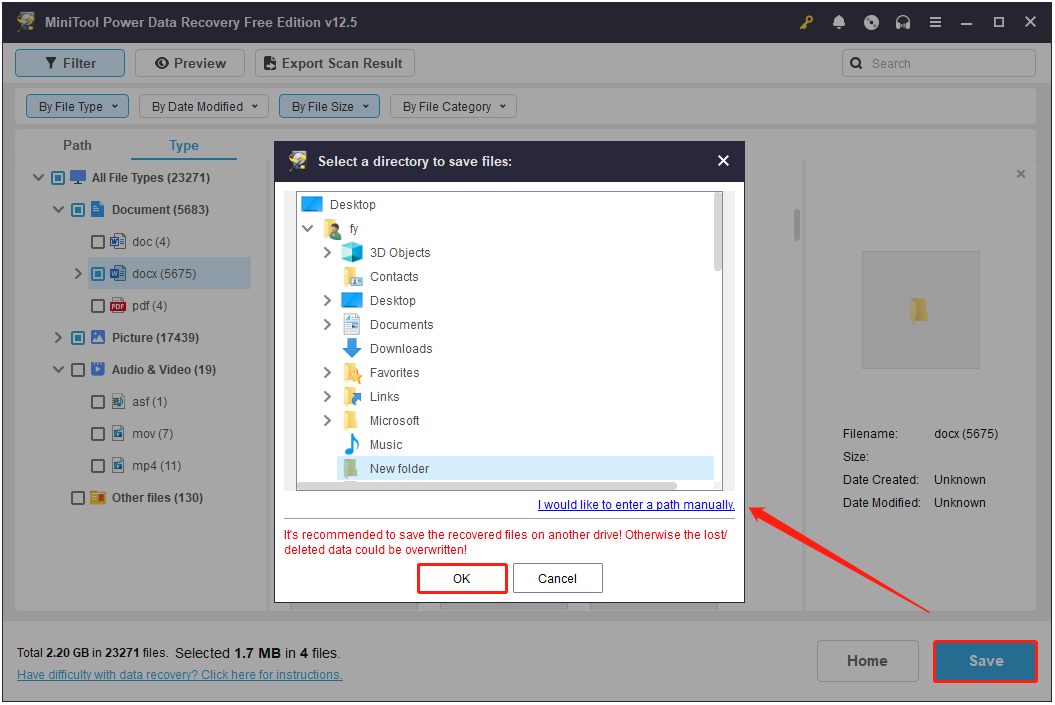
Step 3. Save Wanted Files.
Ensure that all the files you want to recover are checked. Then, click Save.
In the new window, choose a functioning and secure drive and click OK to store the recovered files.
What if you reach the 1 GB free recovery limit?
If you run out of the 1 GB free file recovery limit, you can upgrade the software.
After upgrading, you can recover the remaining files directly, without the need to rescan the drive.
How to Fix The Volume Does Not Contain a Recognized File System
After recovering your files, the next step is to fix the error and get your drive working again.
There are a few ways to do this. You can try to reconnect the drive, change a computer, update or reinstall your disk driver, or use CHKDSK to repair file system errors.
These methods can sometimes fix the volume does not contain a recognized file system without formatting.
If nothing works, formatting or repartitioning the drive may be necessary.
Let’s walk through each solution step by step.
Try Some Basic Checks
If the file system error occurs on a removable drive, here are two quick troubleshooting steps before using advanced methods:
1. Reconnect the drive.
Unplug the drive safely from your computer. Then, reconnect it to your device via a different USB port, cable, or card reader.
2. Check the drive in another device.
Try connecting the drive to another computer or device. For example, if the error appears on a memory card, insert it into a camera to see if it works normally.
If the drive still shows the unrecognized file system error, move on to the solutions below.
Solution 1. Update/Reinstall the Disk Driver
As the error message suggests, the disk driver may be the cause. So, you can try updating or reinstalling the disk driver to check if it helps.
You can use Device Manager to update the driver, or uninstall it and then let Windows find and install a new one automatically.
Here are the detailed steps to update/reinstall disk drivers:
Step 1. Open Device Manager.
Right-click the Windows logo button and choose Device Manager to open it.
Step 2. Locate the Disk Drives.
Expand the Disk drives category and right-click the problematic drive.
Step 3. Update/Uninstall the Driver.
- Click Update driver and choose Search automatically for drivers to update the disk driver.
- Click Uninstall device to uninstall the driver. Then, restart your computer, and Windows will attempt to reinstall the driver automatically.

Solution 2. Run CHKDSK Command (Not Applicable to RAW Drives)
The CHKDSK command is a built-in Windows utility. It is used to scan a hard drive for file system errors and bad sectors and attempt to fix them.
To run the CHKDSK command in Windows, open Command Prompt as an administrator. Then type chkdsk and the desired parameters like /f or /r to repair the drive.
Step 1. Open Command Prompt as an administrator.
In the Windows search box, type cmd. When Command Prompt shows up, right-click it and choose Run as administrator.
If the User Account Control window pops up, select Yes to continue.
Step 2. Execute CHKDSK.
Type this command and press Enter:
chkdsk drive letter: /f /r
Remember to replace the drive letter section with the actual drive letter of your partition. For example, if you want to scan the F drive, type chkdsk F: /f /r.

Solution 3. Format the Drive
If all the methods above fail to restore your drive to normal, you need to format it. This involves removing all files on the drive and creating a new file system.
Then, the corrupted or unsupported file system issue will disappear.
How to format a RAW drive? You can use either File Explorer, Disk Management, or MiniTool Partition Wizard to do that.
Use File Explorer
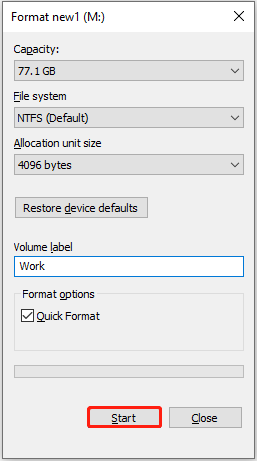
- Open File Explorer.
- Right-click the RAW drive and choose Format.
- Choose an available file system, type a volume label, tick Quick Format, and click Start.
- Click OK to continue.
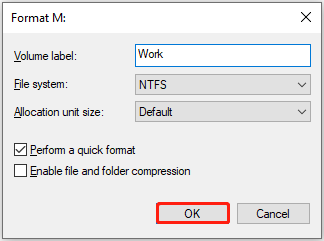
Use Disk Management
- Right-click Start and choose Disk Management.
- Right-click your drive and select Format.
- Input a volume label, choose a file system, tick Perform a quick format, and click OK.
- Click OK again to proceed.
Use MiniTool Partition Wizard
MiniTool Partition Wizard is a free partition manager designed for Windows operating systems to create/delete/resize/format/convert partitions.
Most of its features are free to use, including the Format Partition function.
MiniTool Partition Wizard FreeClick to Download100%Clean & Safe
How to use MiniTool Partition Wizard to format a drive? Here are the steps.
- Select the problematic disk partition.
- Click Format Partition from the left sidebar.
- Type a partition label, choose a file system, and click OK.
- Preview the format effect. Then, click Apply to make it take effect.

Solution 4. Clean and Repartition the Drive
If formatting does not work or runs into errors, try cleaning the drive and creating a new partition instead.
You can do this using the diskpart utility in Command Prompt.
This involves running Command Prompt as an administrator, using diskpart to select and clean the target drive, creating a new volume, and formatting it.
Step 1. Run Command Prompt as an administrator.
Type cmd in the Windows search box. Then right-click Command Prompt and choose Run as administrator.
In the User Account Control window, click Yes to continue.
Step 2. Clean the drive.
Type the following command lines and press Enter after each one:
- diskpart
- list disk
- select disk # (replace # with the actual disk number)
- attributes disk clear readonly
- clean
Step 3. Create a new primary partition and format it.
Type these commands and press Enter after each one:
- create partition primary
- format fs=ntfs quick (you can replace ntfs with another preferred file system)
- assign letter=E (you can change E to another drive letter)
Once all the commands are executed, your drive should be accessible and usable again.

How to Prevent File System Errors on Windows
Recovering your files and fixing the file system error is necessary to restore the normal functioning of your drive. But preventing them from happening in the first place is even better.
To avoid problems like an unrecognized file system, a RAW drive, or corrupted partitions, you can do many things. Common tips include:
- Keep the system and driver updated.
- Keep antivirus turned on.
- Back up files or disks.
- Check disk health regularly.
- Use and store disks properly.
Update the System and Driver
Windows system updates and device driver updates often include fixes for known issues or performance improvements. So, make sure to update the system and drivers timely.
Turn on Windows Defender
Sometimes, your disk or files are corrupted or missing due to a virus infection.
Enabling Windows Defender and turning on virus & threat protection can help protect against malware and viruses.
Back Up Files
Regularly backing up your important files to an external hard drive is the best option to prevent data loss from logical errors or hardware failures.
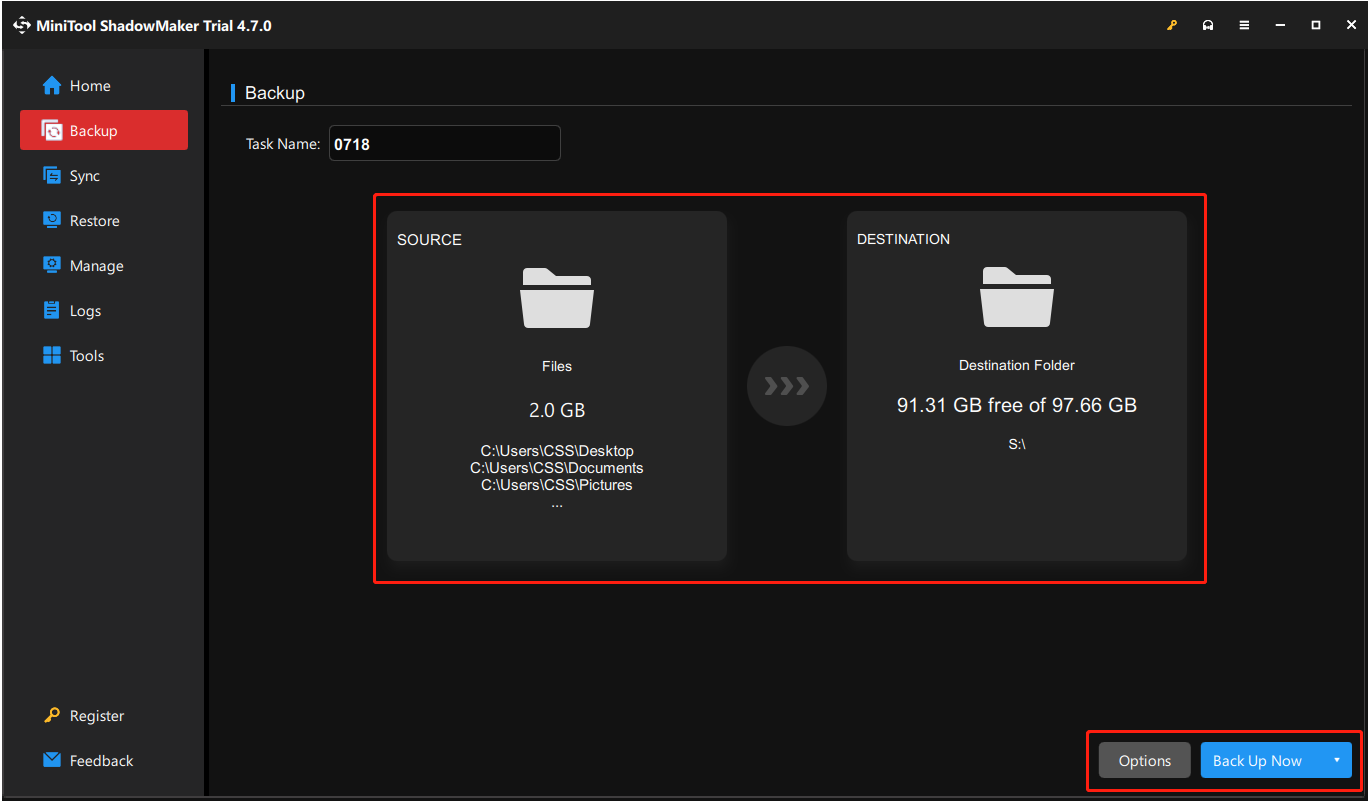
How to back up files on Windows? MiniTool ShadowMaker can help. It supports backing up files, folders, partitions, and disks for free within 30 days.
To do so, download and install this software, then open it and navigate to Backup. Choose the files you want to back up as the source, select a drive as the destination, and click Back Up Now.
MiniTool ShadowMaker TrialClick to Download100%Clean & Safe
Here are the detailed steps.
Step 1. Navigate to Backup.
Open the software and click Keep Trial to continue.
On the main interface of this tool, go to the Backup tab from the left sidebar.
Step 2. Choose Source.
On the right side, click the SOURCE tab.
Click Disk and Partitions to select the disks or partitions you want to back up.
Click Folders and Files to select the items you want to back up.
Step 3. Choose Destination.
Click the DESTINATION tab.
Then, choose a safe location with enough free storage space to store the backup data.
Step 4. Configure Backup Settings (Optional).
Click Options in the lower right corner.
Go to Backup Scheme and switch the button in the lower right corner to enable it.
Choose a backup scheme from full, incremental, and differential backups.
Go to Schedule Settings to enable it, and then choose a preferred backup interval from daily, weekly, monthly, or on-event.
Step 5. Start Backup.
Click Back Up Now to start the backup process.
How to restore a backup image?
Go to the Restore tab and click the Restore button next to the target backup image file.
Select a backup version and click Next.
Choose a destination path to store the recovered files and click Start.
Check Disk Health
Over time, bad sectors or file system errors can lead to disk logical or even physical failures.
To realize potential problems early, you need to run a disk health check regularly.
You can do this with tools like the CHKDSK command or Windows’ built-in error-checking tool.
How to run the error-checking tool?
Open File Explorer, right-click the drive, and choose Properties.
Go to the Tools tab.
Click Check under the Error checking section.
These tools scan the drive for errors and fix logical issues that may cause future problems.
Handle Disks Properly
Improper use of your storage devices is also a common cause of file system errors.
To prevent your disk from any logical or physical damage, pay attention to the following tips:
- Always eject external drives safely by using “Eject” or “Safely Remove Hardware” before unplugging them.
- Avoid sudden system shutdowns or power loss during file transfers.
- Avoid frequent disk disconnecting and reconnecting of your disks.
- Limit frequent disk formatting or repartitioning.
- Use CrystalDiskInfo or other disk monitor software to check the disk status.
- Choose reliable brands for file storage devices.
- Keep drives away from extreme heat, moisture, or physical shock.
Wrapping Things Up
What should you do when the “The volume does not contain a recognized file system” error appears?
First, use MiniTool Power Data Recovery to scan the drive and recover files.
Second, use various methods to repair the drive, including updating/reinstalling the disk driver, running the CHKDSK command, formatting the drive, or cleaning and repartitioning it.
Third, do some things like backing up files, monitoring disk health status, etc., to prevent the error from happening again.
If you need any help when using MiniTool products, please do not hesitate to contact our support team via [email protected]. We are always here to provide detailed assistance when you need it.
Volume Does Not Contain Recognized File System FAQ
If yes, try running chkdsk [drive letter]: /f /r to repair the drive. If it does not work, go to Disk Management and try changing a drive letter.
If none of these methods work, you may have to format the drive before you can use it. But before doing so, I recommend that you recover your files with secure data recovery services.
Run Command Prompt as an administrator.
Type convert drive letter: /fs:ntfs and press Enter. Replace the drive letter with the real one.
If you need to convert NTFS to FAT32, you need to use MiniTool Partition Wizard.
Open Disk Management, right-click your RAW drive, and choose Format.
Choose the NTFS file system from the drop-down menu.
Then click OK to format it.
If that does not help, formatting the drive to rebuild the file system is another option.
About The Author

Position: Columnist
Shirley holds a bachelor’s degree in English and has been an editor at the MiniTool Team for many years. She specializes in IT-related content, with a focus on data recovery, file backup, disk management, and other technical topics. She is committed to delivering clear, accurate, and practical solutions to help users resolve common computer issues.
User Comments :