Generally, to protect your privacy, it is necessary to erase personal information and important data on your Mac once you decide to sell the old Mac or give it away to others. But do you know how to wipe a MacBook and how to factory reset a MacBook? Read the following content to find answers.
What to Do Before You Sell, Give away, or Trade in a MacBook
Before talking about how to wipe a MacBook, I’d like to show you what you should do before erasing the Macintosh HD.
Section 1: Back Up Your Mac
Please ensure the security of your data on your Mac hard drive. You can choose to transfer files to another Mac/external hard drive or make a backup of the important files.
Back Up a MacBook:
- Back up with the built-in Time Machine: You can configure Time Machine to back up all your files automatically.
- Store your files in iCloud: iCloud and iCloud Drive are also used widely to back up important files like documents, photos, music, videos, and contacts.
- Use third-party software: You can also back up a MacBook/MacBook Pro/MacBook Air with third-party programs.
You can read this post to learn the exact steps for the above methods: 5 Ways: How To Backup Your Mac To An External Hard Drive.
Section 2: Sign out of iTunes, iCloud, and iMessage
>>Sign out of iTunes:
Step 1: Open iTunes on your Mac.
Step 2: Select Account from the menu bar, then choose Authorization > Deauthorize This Computer.
Step 3: Input your Apple ID and password to verify your identification. After that, you can choose Deauthorize.
>>Sign out of iCloud (macOS Ventura or later):
Step 1: Click on the Apple logo menu and select System Settings.
Step 2: Choose your name or Apple ID.
Step 3: On the right pane, scroll down to find and click on Sign out.
You will be prompted to decide whether to keep a copy on your Mac. Selecting Yes is a quicker option since you’ll erase all your data later. Alternatively, you can choose not to save a copy on your computer, which will take a longer time to erase the information.
>>Sign out of iMessage:
Step 1: Open the Messages app.
Step 2: Choose Messages > Settings > iMessage > Sign Out.
Section 3: Unpair All Bluetooth Devices
Please connect a USB keyboard and mouse in advance before following the steps if you’re using a desktop Mac: iMac, Mac mini, or Mac Pro.
Step 1: Select the Apple logo menu and choose System Settings/System Preference.
Step 2: Click on the Bluetooth option, then you can unpair your devices by clicking the Disconnect button or selecting the x button next to the device to remove it.
Section 4: Reset NVRAM
The NVRAM, formerly known as PRAM, refers to a small amount of special memory on Mac. This RAM type will keep data for users after their devices are powered off. If you are using a Mac with Apply silicon, you don’t need to follow these steps to reset NVRAM. If you have an intel-based Mac, please keep reading.
How to Reset NVRAM/PRAM Using Startup Command:
Step 1: Shut down your Mac completely.
Step 2: Turn on the Mac and press and hold Command + Option + P + R quickly for about 20 seconds.
You might find that your computer restarts. Afterward, you can change the system settings.
How to Reset NVRAM/PRAM Using Terminal:
Step 1: Close all the apps running on your Mac.
Step 2: Open Finder > Utilities > Terminal.
Step 3: Type sudo nvram -c and press Enter.
Step 4: Type the Administrator password and press Enter.
Step 5: Type sudo shutdown -r now and press Enter.
Wait for your Mac to restart.
Section 5: Factory Reset a MacBook
The last section is to format the Macintosh HD. But how to do it? The following content is explained carefully.
Factory Reset a MacBook
You need to perform two steps to reset a MacBook to factory settings: formatting the Mac hard drive (erasing all data on it) in Recovery Mode and reinstalling the macOS.
Part 1: Erase a MacBook
You can use the Disk Utility, a built-in tool, to wipe your data on the computer securely.
Step 1: Restart your Mac and press and hold the Command + R keys until you see an Apple logo to boot your computer into macOS Recovery mode.
Step 2: Select an account and input the password.
Step 3: You can see the macOS Utilities window, then select Disk Utility and click on the Continue button.
Step 4: Select Macintosh HD from the left side pane and click on the Erase option from the top toolbar.
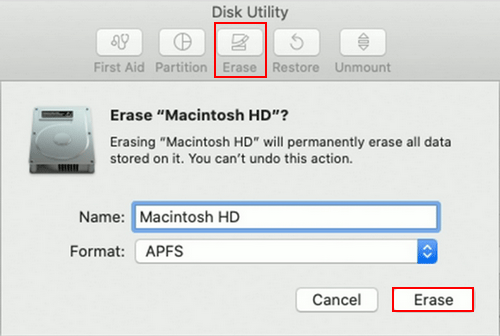
Step 5: In the popup window, you can choose to rename the Macintosh HD (or keep this name) and select the format from Mac OS Extended (Journaled) and APFS.
Step 6: After setting, choose Erase or Erase Volume Group.
Step 7: You need to enter the correct Apple ID if it asks you to provide one.
If you have created other internal volumes, you can erase the information on them with the same steps. When all the information is removed, you can exit Disk Utility.
Part 2: Reinstall macOS
Step 1: You will back to the macOS Utilities window, select Reinstall macOS Ventura and click Continue.
Step 2: Follow the on-screen instructions to finish the rest operations.
Bonus Tip: How to Recover Files from Mac HDD
It is possible for you to recover files from an erased Mac hard drive. If your important files are erased or deleted by accident, you can recover them safely with a few steps. Here I’d like to introduce you to a professional Mac data recovery software, Stellar Data Recovery for Mac. You can move on to the following steps to restore your files.
Step 1: Download Stellar Data Recovery for Mac and launch the software.
Data Recovery for MacClick to Download100%Clean & Safe
Step 2: Choose what types of files you want to recover by toggling the switch to On. You can turn On Recover Everything to select all types.
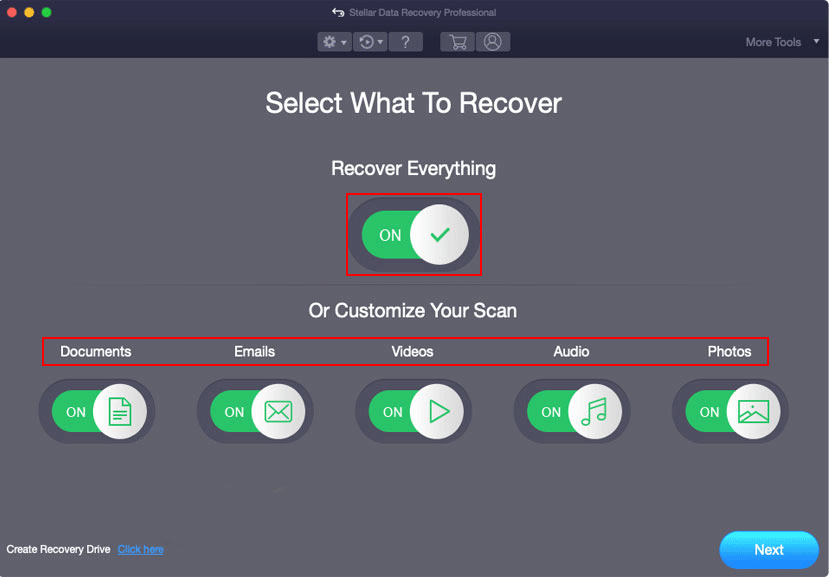
Step 3: Click the Next button on the right corner.
Step 4: Optionally, you can turn on the Deep Scan option on the bottom left to find more files. Then, choose macintosh HD and click Scan.
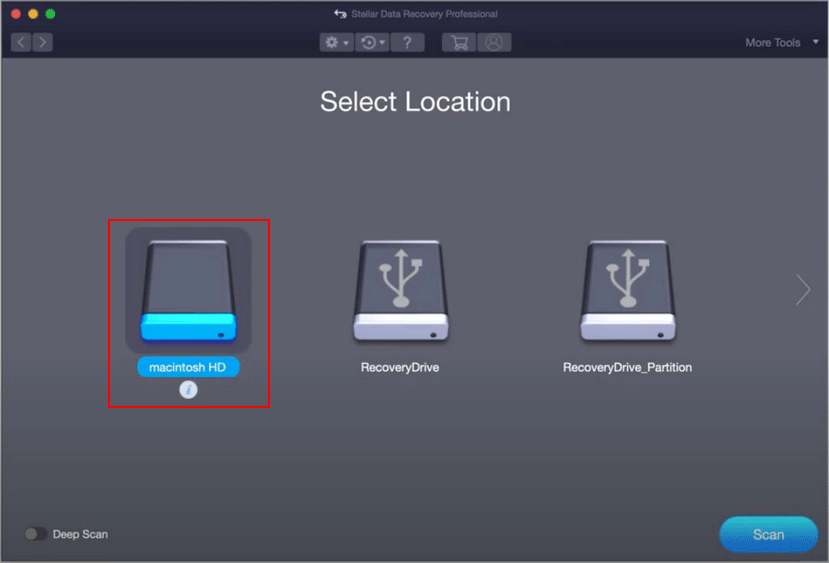
Step 5: Wait for the scan to complete and look for your wanted files.
Step 6: Choose all the files you need and click Recover.
Step 7: Select an appropriate destination for the files and click Save.
You can read this passage to learn how to recover data from a Mac that won’t boot: 4 Useful Methods For Getting Files Off Failing Hard Drive On Mac.
Format External Hard Drive on Mac
If you need to format an external hard drive on a Mac, the steps are similar to erase data on your Mac but you don’t need to boot into the Recovery Mode. Here is the step-by-step guide, you can work with it to erase the external hard drive and reformat it.
Step 1: Connect the external drive to your Mac.
Step 2: Open the Disk Utility app.
Step 3: Click on the View button in the upper left corner and select Show All Devices.
Step 4: Select the target drive from the left sidebar, then click the Erase button at the top toolbar.
Step 5: Rename the drive as you like and choose a supported format for the drive.
1. Mac OS Extended Journaled is suitable for macOS 10.12 and earlier versions.
2. APFS should be used in macOS 10.13 and later versions.
3. FAT (MS-DOS) and exFAT should be selected if you need to use the disk on Windows.
Step 6: Click Erase or Erase Volume Group.
Step 7: If asked, you should type the correct Apple ID.
Afterward, wait for the process to complete. You have formatted the external hard drive successfully.
If your external hard drive is not showing up on a Mac, you can read this article to find corresponding solutions: External Hard Drive Not Showing Up On Mac? Here’s How To Fix.
Format a Hard Drive for Mac on Windows
You can also format an external hard drive on Windows and select a file system that is supported by macOS, the FAT (MS-DOS) and exFAT file systems. Here are several ways.
Way 1: Format in File Explorer
Step 1: Connect the external hard drive to your computer and press Win + E to open File Explorer.
Step 2: Click on This PC and right-click on the target drive.
Step 3: Select Format from the context menu.
Step 4: Choose FAT or FAT32 as the file system and finish other settings, then click Start.
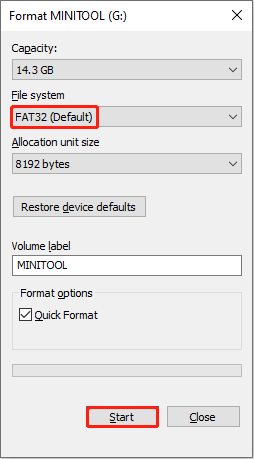
Step 5: Click OK to start formatting.
Way 2: Format in Disk Management
Step 1: Connect the external hard drive to the computer, then press Win + X and choose Disk Management from the WinX menu.
Step 2: Right-click on the drive of your external disk and choose Format.
Step 3: Choose FAT or FAT32 as the file system and click OK.
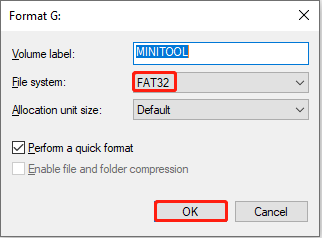
Step 4: Click OK again to confirm.
Way 3: Format in MiniTool Partition Wizard
MiniTool Partition Wizard is a professional partition management tool for Windows. Compared with making changes in Disk Management, MiniTool Partition Wizard is more secure for common users because it allows you to preview the change and provides you one more chance to recorrect the operation.
Step 1: Download and install MiniTool Partition Wizard.
MiniTool Partition Wizard FreeClick to Download100%Clean & Safe
Step 2: Connect the external hard drive and launch the software.
Step 3: Select the target disk and choose Format Partition on the left pane.
Step 4: Choose FAT32/exFAT as a file system and complete other settings.
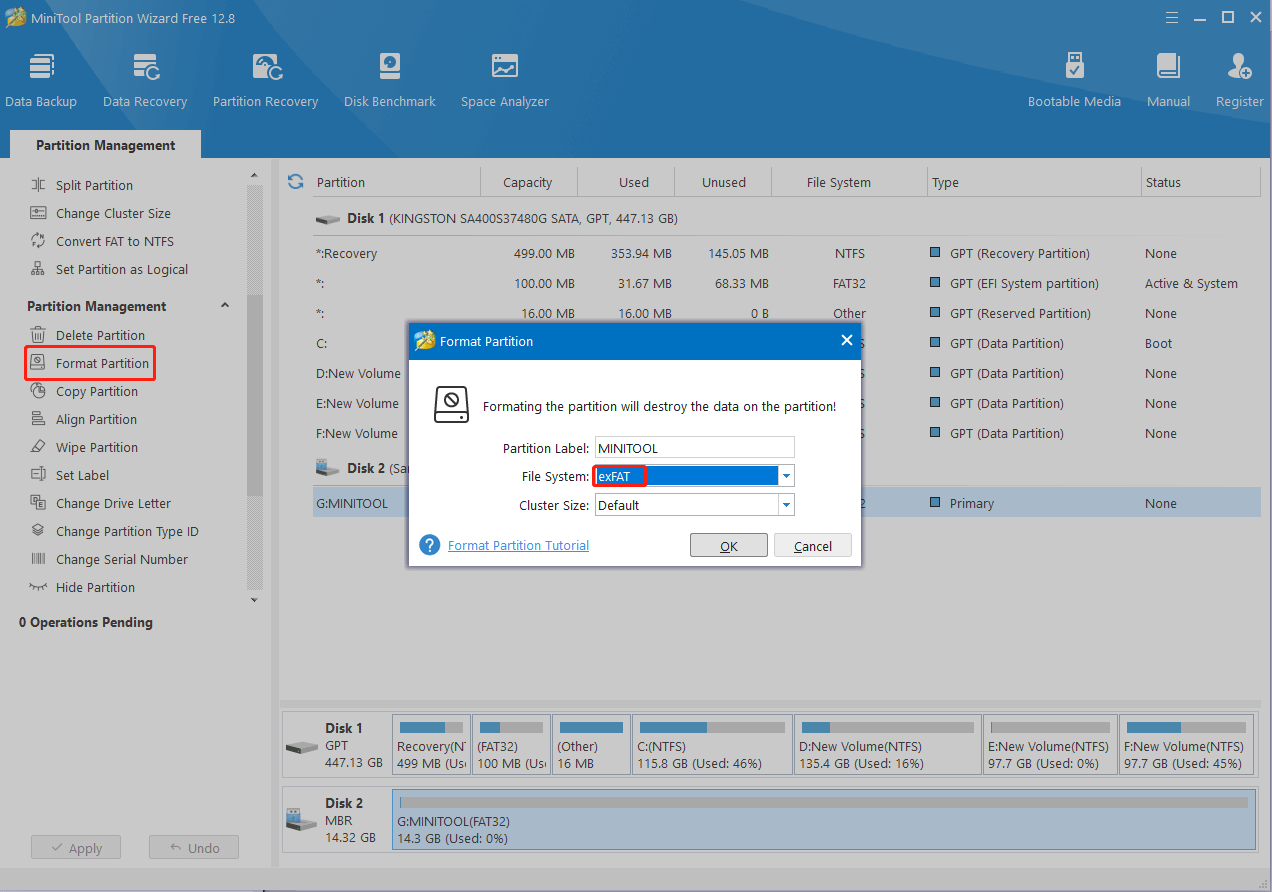
Step 5: Click OK, then press Apply on the bottom left to finish the suspending change.
Secure Erase Solid State Drive
Is Secure Erase Necessary
As you know, the new Mac models ship with Solid State Drives (SSDs). According to Apple, the Secure Erase and Erasing Free Space will be not available in the Disk Utility. They are not needed anymore since the standard erase will clean up the data and make it irrecoverable. Therefore, you only need to do a simple erasing on your SSD.
How to Secure Erase SSD on Mac
If you still want to perform secure erase on their SSDs, ignoring Apple’s word, you should open Terminal and type diskutil secureErase freespace VALUE /Volumes/*.
- The word VALUE should be replaced by a number between 0 and 4, representing different erasing methods.
- The symbol * represents the name of the target drive.
This process may take a very long time.
Besides, there’s another way to protect your data on SSD – using FileVault, which is a disk encryption program built-in Mac OS X 10.3 and later. Please go to this page to learn how to encrypt Mac data with FileVault.
Conclusion
After buying a new Mac, most of you may want to sell/donate/trade in the old MacBook. Before you take action, you should wipe the MacBook to prevent information leakage. This post shows you specific information on how to factory reset a MacBook. You can follow these instructions to erase your data. Hope this passage can resolve your puzzles in time. Any problems you have encountered when using MiniTool software are welcome to let us know via [email protected].
User Comments :