
Recently, an iPhone user asked us for help:
“My daughter forgot her passcode for her iPhone. What should I do to unlock it? Is it possible to recover data from a locked/disabled iPhone? Can you help us? I really appreciate it.”
This user’s experience is not a rare issue.
For the sake of information security, most of you choose to set a password for your iPhone to prevent strangers from using your device. The password you use is usually complex enough to avoid being cracked by other people.
In addition, some of you even change your iPhone password regularly to improve safety. On one hand, this encryption behavior brings you a sense of security; but on the other hand, it also brings you a kind of risk of forgetting your iPhone password unexpectedly.
This guide explains whether an iPhone can be unlocked without a passcode, how to unlock a disabled iPhone using Apple’s official tools, and what options are available for recovering data from a locked device.
Is It Possible to Unlock an iPhone Without a Passcode
Yes, it is possible to unlock an iPhone without entering the passcode, but the device must be erased during the process.
Apple’s security system is designed to protect user privacy and prevent unauthorized access. As a result, there is no legitimate way to bypass an iPhone passcode while preserving all data stored on the device.
If you cannot remember the passcode, the only solution is to erase the iPhone and set it up again.
How to Unlock a Disabled iPhone
Method 1. Unlock iPhone via Apple Devices or Finder
You can unlock a locked iPhone through Recovery Mode by using Apple Devices on Windows or Finder on Mac.
Before you begin, make sure you have:
- A Windows PC with Apple Devices installed or a Mac computer.
- A compatible USB cable.
- A stable internet connection.
Step 1. Turn off the iPhone and put the iPhone into Recovery Mode.
Step 2. Launch Apple Devices on Windows or open Finder on your Mac.
The application should automatically detect your iPhone in Recovery Mode and display options to update or restore the device.
Step 3. Select the Restore option. The software will download the latest iOS firmware and erase all data and settings from the iPhone, including the forgotten passcode.
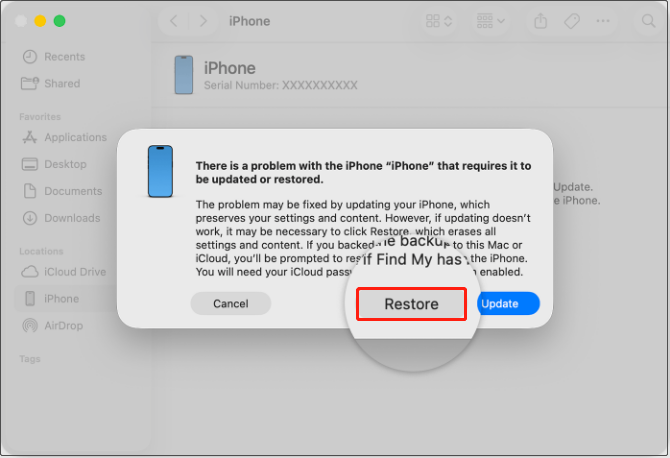
Image source: support.apple.com
Step 4. Once the restoration is complete, you can set up the iPhone as a new device.
Method 2. Unlock iPhone Using PhoneRescue for iOS
In addition to Apple’s official solutions, you can use PhoneRescue for iOS to remove screen locks from disabled iPhones.
It supports removing 4-digit passcodes, 6-digit passcodes, Touch IDs, and Face IDs, and supports all iOS devices with iOS version 5 and above.
Phone Rescue for iOS (Windows)Click to Download100%Clean & Safe
Phone Rescue for iOS (Mac)Click to Download100%Clean & Safe
How to unlock an iPhone:
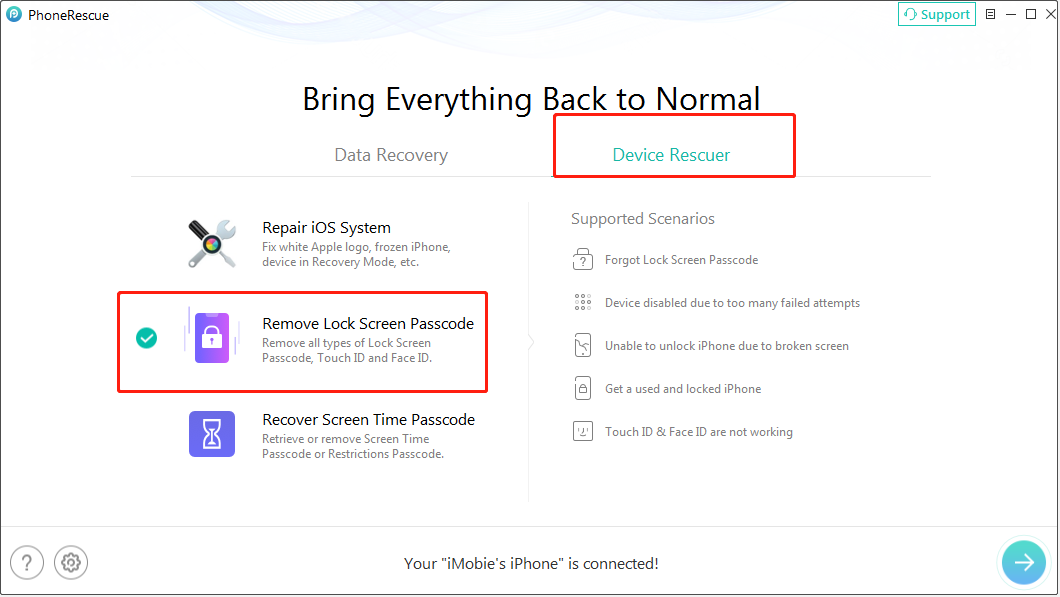
Step 1. Open PhoneRescue for iOS on your computer and choose Remove Lock Screen Passcode.
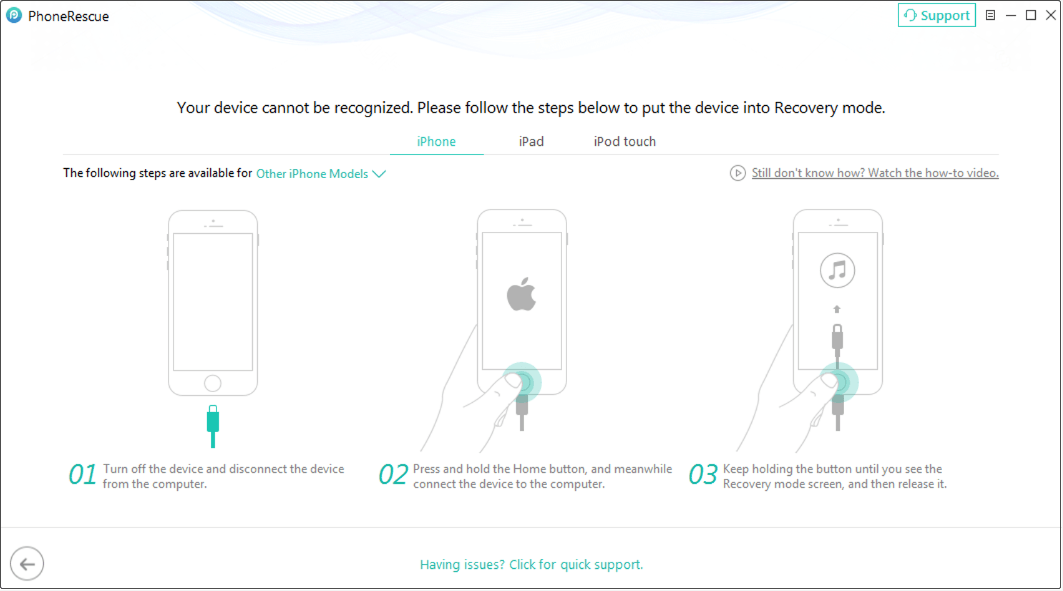
Step 2. Connect your iPhone to the computer and follow the on-screen instructions to put your device into Recovery Mode.
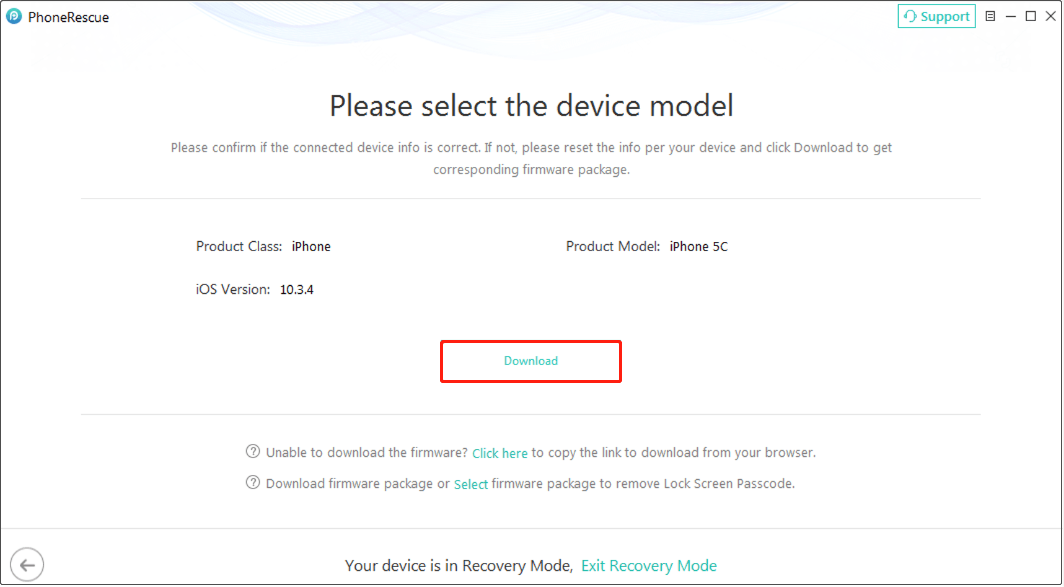
Step 3. Confirm your device information and click Download to get the required firmware package. Once the firmware package is downloaded, PhoneRescue will automatically start removing the screen lock passcode.
Step 4. Finally, you can set up your iPhone as a new device.
How to Recover Data from a Locked iPhone
Can You Recover Data from a Locked iPhone
For many users, unlocking the device is only part of the problem. The larger concern is often how to recover important photos, messages, contacts, notes, and other personal files stored on the locked iPhone.
The answer depends largely on whether a backup exists.
In most situations, data recovery from an erased or locked iPhone is possible only if the information has previously been backed up to iTunes or iCloud.
Method 1. Restore Data Directly From an iCloud or iTunes Backup
Restore iPhone from an iTunes Backup:
Step 1. Connect your iPhone to the computer where the backup was created.
Step 2. Open iTunes (Windows or older macOS versions) or Finder (newer macOS versions).
Step 3. Select your iPhone and click Restore Backup.
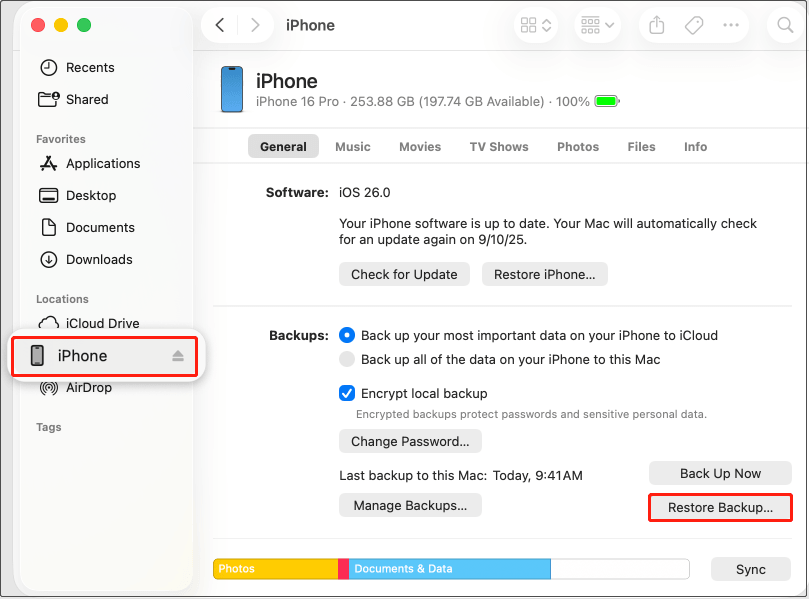
Image source: support.apple.com
Step 4. Choose the backup you want to restore and wait for the process to complete.
Restore iPhone from an iCloud Backup:
Step 1. Go to Settings > General > Transfer or Reset iPhone > Erase All Content and Settings, then follow the instructions to erase your device.
Step 2. On the Transfer Your Apps & Data screen, select From iCloud Backup.
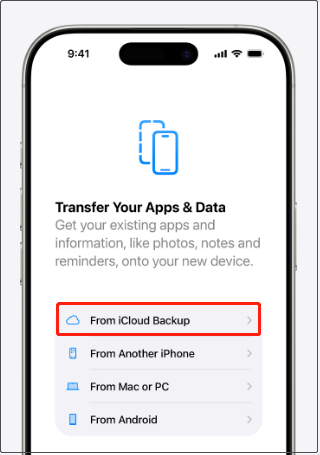
Image source: support.apple.com
Step 3. Sign in with your Apple Account, choose the backup you need, and restore your iPhone.
Method 2. Selectively Recover Data Using PhoneRescue for iOS
Some users do not want to restore an entire backup because doing so may overwrite existing data or transfer unnecessary files back to the device.
PhoneRescue for iOS offers selective recovery capabilities that allow you to preview and recover specific files from available backups.
Phone Rescue for iOS (Windows)Click to Download100%Clean & Safe
Phone Rescue for iOS (Mac)Click to Download100%Clean & Safe
Recover data from iTunes backup:
Step 1. Choose a recovery mode
From the main interface of PhoneRescue for iOS, select Recover from Backup and click the Arrow button to continue.
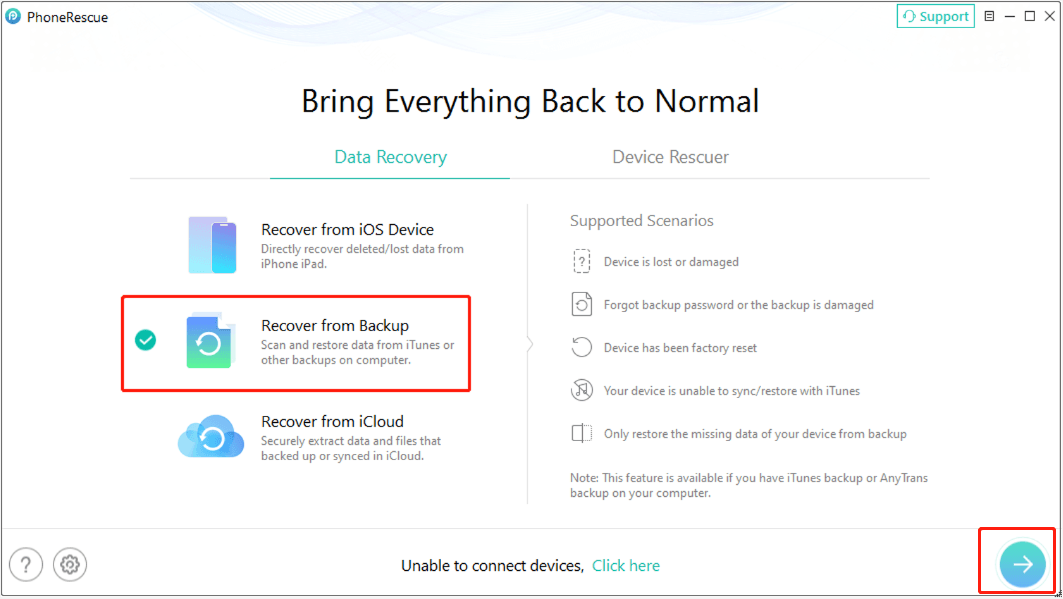
Step 2. Choose an iTunes backup to scan
The software will automatically detect all available iTunes backups stored on your computer. Select the backup you need according to its creation date, then click the Arrow button.
When a pop-up window appears, choose Only Scan Backup.
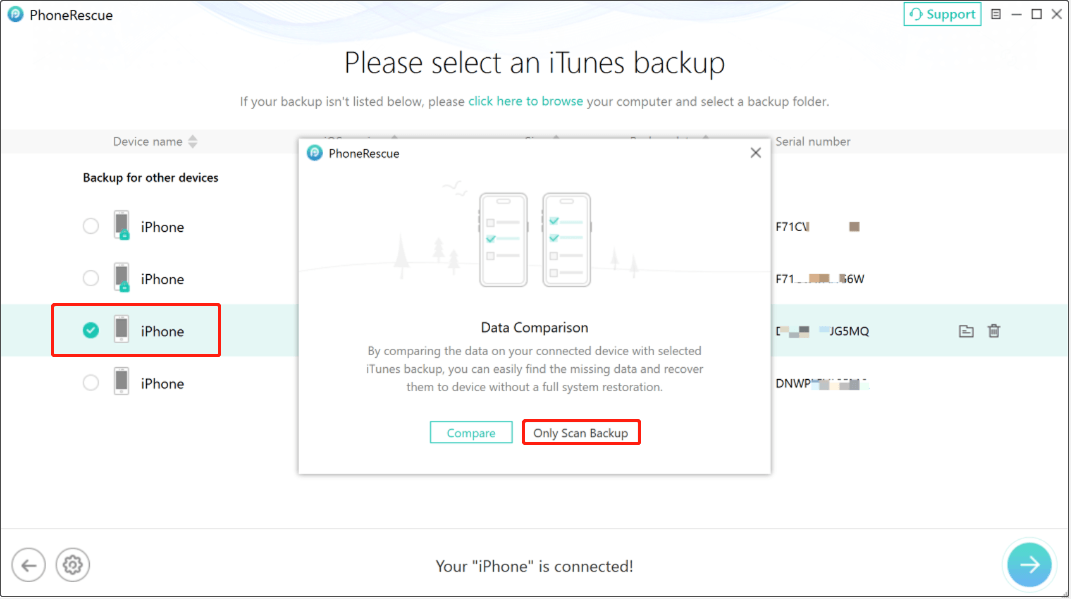
Step 3. Select the data type to scan
Select the data type you want to scan from the selected iTunes backup.
Step 4. Recover wanted files
After the scan is complete, preview the detected files, select the files you want to recover, and click Restore to computer or Restore to device.
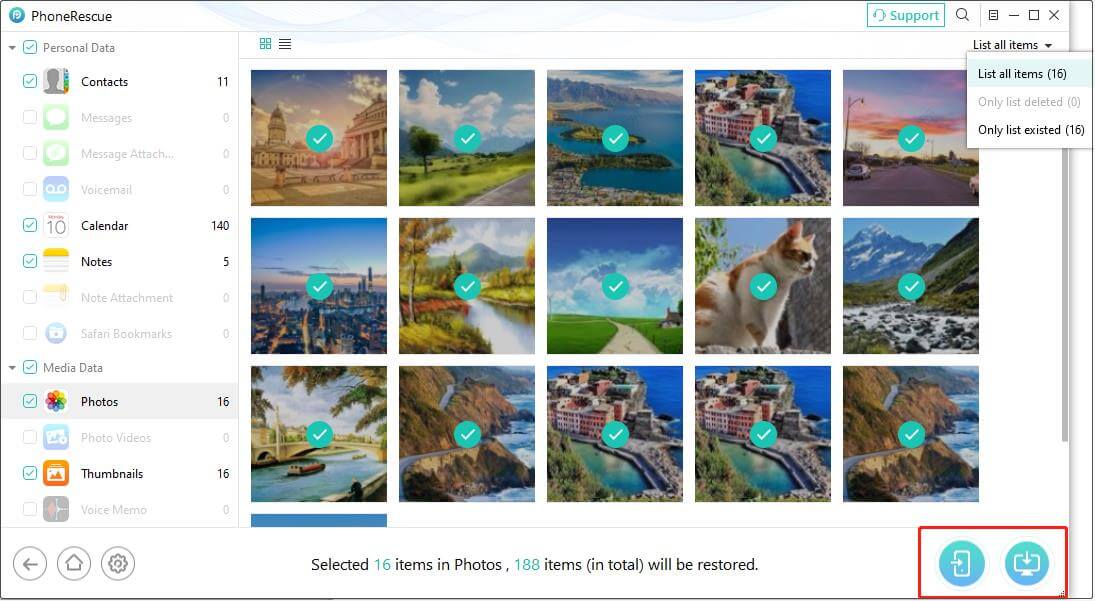
Recover data from iCloud backup:
Step 1. Launch PhoneRescue for iOS and choose Recover from iCloud.
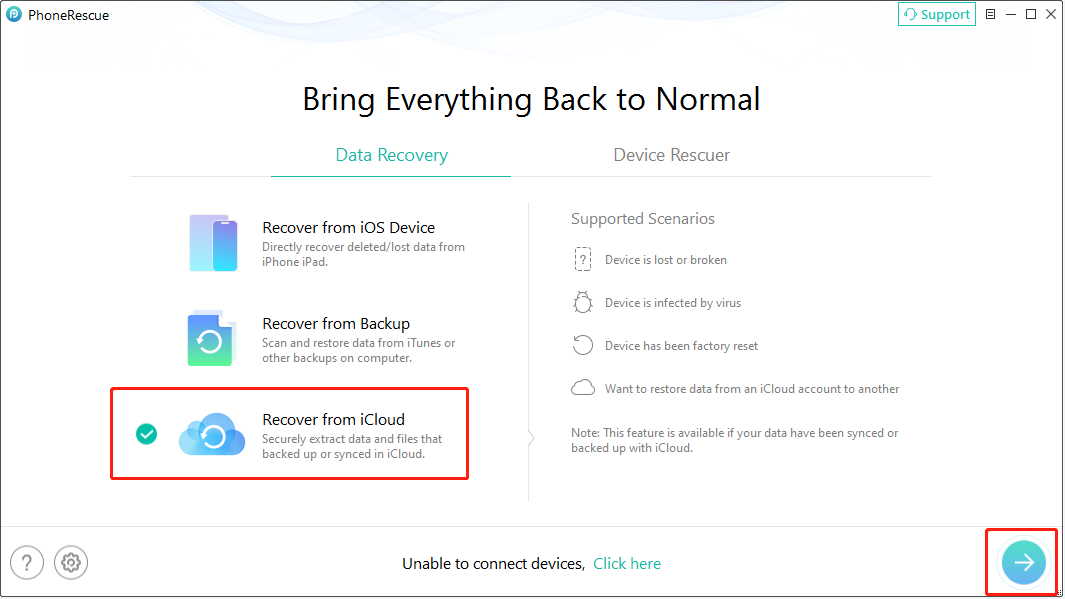
Step 2. Log in to your iCloud account using your Apple ID and password. Then select a category to recover from iCloud, including contacts, notes, photos, photo videos, calendar, and reminders you ever synced to iCloud.
To recover more types of data, choose iCloud Backup.
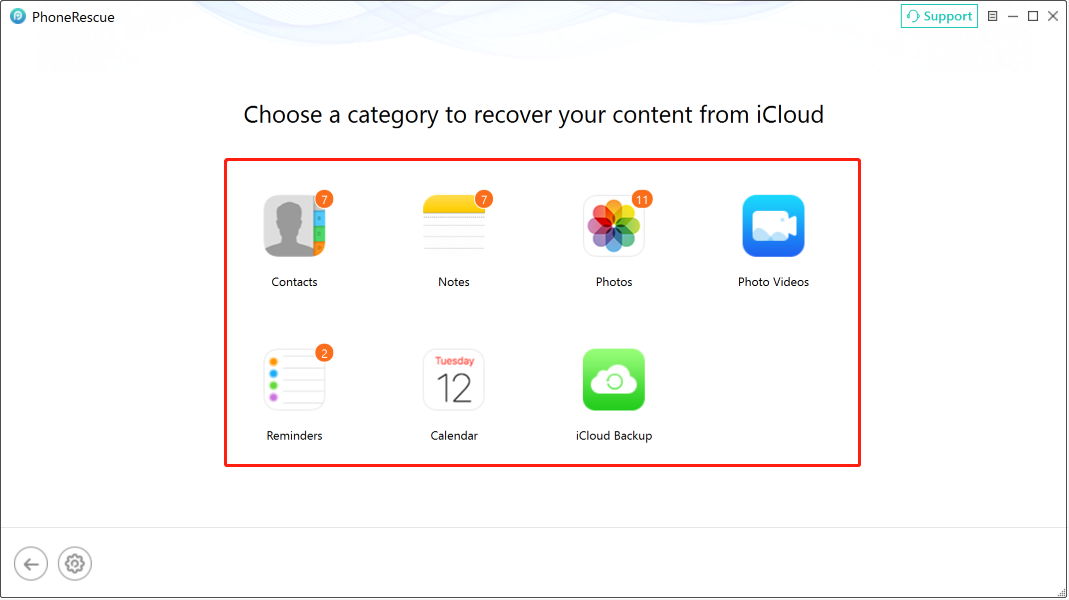
Step 3. Choose the iCloud backup and download it, then click the Arrow button to scan the downloaded backup.
Step 4. When the scan process is complete, preview the files, select the ones you need, and save them to your computer or iPhone.
Some Useful Tips
Setting up password for your iPhone is a good idea, but you’d better write it down and keep it to a safe place so that you can get it again after you forgot it
Besides, you should form a good habit of making a backup of your iPhone regularly through both iTunes and iCloud in order to increase your possibility of iPhone data recovery if you ever forget the password for your iPhone.
In addition, you can let iCloud automatically back up your device every day:
- Go to Settings > iCloud > Backup and make sure that iCloud backup is turned on.
- Keep your iPhone is powered on.
- Guarantee that your iPhone is connected to Wi-Fi.
- Make sure that your iPhone’s screen is locked.
- Check that there is enough available space in iCloud for making a backup of your iPhone.
Bottom Line
In this post, we show you some useful information on how to recover data from a lock/disabled iPhone as well as some other relative issues like how to back up a lock/disabled iPhone and how to unlock an iPhone. Hope these solutions can solve your issue.
Should you have any questions when dealing with the locked/disabled iPhone data recovery issue, you can just let us know in the comment or contact us via [email protected].
Recover Data from Locked/Disabled iPhone FAQ
Download and install the software on your computer.
Connect your iPhone to the computer and open the software.
Use the Recover from iOS Device module to scan your device.
Select the data you want to restore and save them to a suitable location.
About The Author

Position: Columnist
Shirley holds a bachelor’s degree in English and has been an editor at the MiniTool Team for many years. She specializes in IT-related content, with a focus on data recovery, file backup, disk management, and other technical topics. She is committed to delivering clear, accurate, and practical solutions to help users resolve common computer issues.
User Comments :