Bad sectors are unreadable areas on a hard drive. In this guide, MiniTool introduces the types of hard drive bad sectors and the common symptoms, and provides several methods to check a disk for bad sectors, protect data, and prevent further bad sectors.
Understanding of Hard Drive Bad Sectors
Hard drives are non-volatile storage devices that store your photos, documents, music files, videos, and other files. However, a disk can develop bad sectors, threatening data security.
Understanding bad sectors requires analyzing how a Hard Disk Drive (HDD) organizes and access data.
Working Principle of an HDD
#1. Physical structure
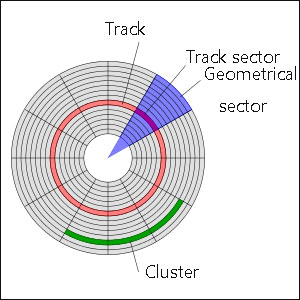
An HDD stores data on rapidly spinning, magnetically coated platters. The surfaces of each platter are logically organized into concentric circles called tracks. Each track is further divided into smaller, addressable segments called sectors.
A sector is the smallest, fundamental physical unit of storage on a hard disk, typically 512 bytes or 4096 bytes (4KB) in size.
#2. Reading and writing
An actuator arm moves the read/write head across the surface of the spinning platters to find the right tracks for data access and transfer.
The disk controllers use LBA (Logical Block Addressing) to identify the specific location of data.
Types of Bad Sectors
A bad sector is simply a sector on the hard drive that is unreadable or unwritable.
Depending on the working principle, bad sectors fall into two main categories: physical bad sectors and logical bad sectors.
#1. Physical Bad Sectors
Physical bad sectors refer to permanently damaged areas on a storage drive. Since the damage involves actual hardware failure, these bad sectors are irreparable.
What Causes Physical Bad Sectors
- Manufacturing defects: Flaws during production can leave sectors damaged.
- Head crashes: The read/write head touches the spinning platters and physically scratches them, causing bad sectors.
- Physical shock: Throwing and dropping the drive can cause the head to strike the platters, resulting in immediate surface damage.
- Contamination: Dust, dirt, debris, or particles can enter the sealed drive, ruining internal sectors.
- Overheating: Excessive heat may damage computer components, including the hard drive, and accelerate wear, triggering bad sectors.
How a Drive Handles Physical Bad Sectors
Modern drives have spare sectors that the drive’s firmware uses for sector remapping.
In detail, when a physical (hard) bad sector is found, the controller maps the bad sector’s Logical Block Address (LBA) to a new physical location in the spare pool.
Remapping happens automatically, often without notifying the system. Generally, the drive uses S.M.A.R.T. (Self-Monitoring, Analysis, and Reporting Technology) to track bad sectors.
However, a drive has a finite number of spare sectors. Although there may be thousands, they will eventually run out.
Once the spare pool is depleted, the drive will no longer remap new bad sectors. The operating system will receive some errors when attempting to use these sectors, potentially causing system crashes or total data loss.
You may see an increase in “reallocated sector count” or “pending sector count”. This indicates the drive should be backed up immediately and considered for replacement.
#2. Logical Bad Sectors
Logical bad sectors, also known as soft bad sectors, are areas on a hard drive that seem damaged or inaccessible. The storage medium is physically intact. These sectors stem from software issues rather than physical damage, as they are repairable.
What Causes Logical Bad Sectors
- Improper shutdowns: A power outage when the drive is writing may leave sectors in an inconsistent or corrupted state, resulting in data that is out of sync with its ECC.
- System crashes: File system errors caused by system freezes or software errors can make the operating system identify healthy sectors as “bad”.
- Malware & viruses: Malicious software sometimes corrupts data structures, giving rise to logical inaccessibility.
- Excessive read/write activities: Excessive defragmentation or constant large-scale downloads may overwhelm the drive’s controller, leading to file corruption.
How a Drive Copes with Logical Bad Sectors
Every sector, in addition to holding data, includes a dedicated area called Error Correction Code (ECC).
When writing data to a sector, the drive calculates an ECC code. While reading data, the drive recalculates the ECC and compares it to the stored code.
If the calculated and stored values don’t match, ECC algorithms attempt to fix the error. If a sector is unreadable after multiple retries, the drive marks it as “pending” and waits for a write operation to that sector.
If the write fails, the drive finally remaps or reallocates the sector, moving the data to a spare sector and making the original sector permanently unusable.
The CHKDSK /r command or a full format can force a rewrite of zeros to allow the drive to reallocate logical bad sectors if necessary.
#3. Bad Blocks (in SSDs)
For an SSD (solid-state drive), we often call the bad areas “bad blocks”. This is more accurate since it doesn’t have physical sectors on a magnetic platter but stores data in NAND flash memory cells.
Causes of Bad Blocks
- NAND wear and tear
- Manufacturing defects
- SSD’s firmware issues
- Extreme temperatures
- Severe impacts or vibrations
- Power loss
How SSDs Handle Bad Blocks
SSDs come with extra flash memory (Over-Provisioning), reserved solely for the controller’s use to reallocate blocks and maintain the drive. This reserved, inaccessible space is hidden in the operating system.
The controller uses a technique called wear leveling to distribute writes evenly across all NAND flash blocks to prevent premature wear.
When a block fails, the controller marks it bad in the BBT (Bad Block Table) and moves data to a spare block.
Once an SSD runs out of spare blocks to replace failing ones, it enters read-only mode to protect existing data and allows for a final backup.
#4. Physical Bad Sectors VS Logical Bad Sectors
The following table summarizes the differences between physical bad sectors and logical bad sectors.
| Feature | Physical Bad Sectors | Logical Bad Sectors |
| Reason | Physical damage. | Software issues. |
| Nature | Actual physical damage to the disk surface. | An error in the file system, not physical damage. |
| Repairability | Cannot be repaired; reallocated to spare sectors and marked the original as unusable. | Often fixed by CHKDSK or a full format. |
| Symptoms | Clicking noises, drive not recognized, and a high frequency of new bad sectors. | File read errors, file corruption, and system crashes. |
| Common Causes | Physical shock, dust, manufacturing defects, and severe wear & tear. | Improper shutdown, malware, and file system corruption. |
| Replacement | Requires replacing the drive. | Can be repaired and reused. |
How Bad Sectors Develop and Lead to Failure
The progression of hard drive bad sectors typically follows a predictable trajectory, from a minor software issue to terminal hardware failure.
The following are 4 stages:
- Initial errors: A few logical bad sectors may appear due to a sudden power loss and system crashes. At this time, the hardware is healthy, and bad sectors can be fixed by overwriting.
- Reallocation phase: If the damage is physical, the drive’s firmware identifies the bad sectors and attempts to move data to a spare sector for remapping. At this stage, the drive can continue to function normally, but the performance may begin to drop.
- Spreading phase: With continued use, the physical damage or flash memory wear often worsens. Bad sectors often appear in clusters rather than individually.
- Critical failure: The drive can no longer hide physical defects once the spare sector pool is exhausted. The system begins to frequently encounter Cyclic Redundancy Check (CRC) errors. The drive may become read-only and even manifest as a repetitive clicking sound (for HDDs).
Common Symptoms of Bad Sectors
A small number of bad sectors can be normal and remapped by the firmware. However, constantly increasing bad sectors indicate the drive is failing, which puts data at risk.
Recognizing the early warning signs of a failing hard drive is critical to safeguard against potential data loss.
The common symptoms include performance issues, file problems, and unusual sounds. The following is the breakdown.
#1. Performance and Stability Issues
- Slowdowns: When the drive repeatedly tries to access bad sectors or seek to spare sectors, significant delays occur. You may notice that the computer becomes noticeably sluggish, with delayed response times during startup or routine operations.
- Frequent freezing and crashing: A drive spends time attempting to read a bad sector, and sometimes it fails repeatedly. When trying to open files, transfer data, or run specific programs, the system may freeze, hang, or crash.
- Blue screen of death (BSOD): Frequent BSOD errors, especially those associated with file system failures or input/output (I/O) operations, often appear. The common error codes include UNMOUNTABLE_BOOT_VOLUME and KERNEL_DATA_INPAGE_ERROR.
- Failed boot: If critical system files are stored on bad sectors, the computer fails to boot. Some boot errors can display on the screen, or the system gets into a boot loop.
#2. Data & File Problems
- Corrupted or missing files: Documents, photos, videos, or other files become unreadable & garbled, or show strange characters, or disappear unexpectedly.
- Slow file access: It may take an excessively long time to copy or open files and folders. The progress bar may show an unusually long time.
- Read/write errors: When accessing data, some error messages appear, such as “The file or directory is corrupted and unreadable” and “Data error (cyclic redundancy check)”. The failures happen if the drive head cannot read or write data to the damaged sector.
#3. Drive & System Behavior
- SMART errors: Hard drives equipped with the SMART technology may trigger warnings to indicate declining drive health. For example, the system alerts you to a “bad” status or a rising bad sector count.
- Drive not detected: The entire drive may be inaccessible or not show up in File Explorer, but become uninitialized/raw in Disk Management if extensive sector damage occurs.
- Unusual noises: Clicking, grinding, whirring, buzzing, or beeping sounds from a hard drive signal a mechanical issue, indicating bad sectors. They are often from the actuator arm or heads, trying to read data.
How to Test Hard Disk Bad Sectors
Testing a hard drive for bad sectors is a critical maintenance practice that helps identify issues early. Then, you can isolate and manage physical or logical damage before it escalates into total drive failure and data loss.
A disk test can be accomplished through the CHKDSK tool, a manufacturer-specific diagnostic utility, or third-party software.
#1. CHKDSK
CHKDSK is a built-in Windows command-line tool that can scan hard drives for file system errors and bad sectors.
Once the inconsistencies in the directory structure, file allocation, and metadata are found, CHKDSK can effectively fix errors. Moreover, CHKDSK attempts to recover readable data from problematic sectors and mark them unusable to prevent future data loss.
This utility plays an important role in ensuring data integrity and maintaining the health of drives.
Here is how to check for bad sectors on hard drives with CHKDSK:
Step 1: Open an elevated Command Prompt.
- Type cmd to the Search box.
- Right-click Command Prompt and choose Run as administrator.
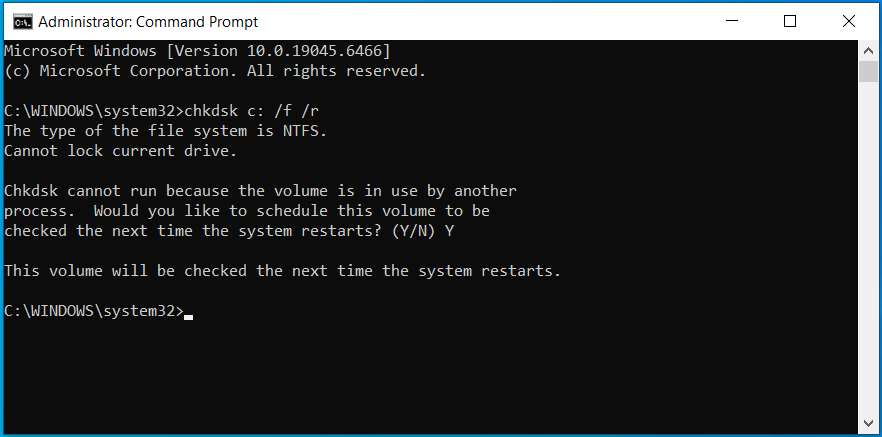
Step 2: Execute the CHKDSK scan.
- Type chkdsk c: /f /r.
- Press Enter.
Step 3: If the drive is currently in use, confirm to schedule the volume to be checked the next time the system reboots.
- Type Y.
- Press Enter.
CHKDSK parameters explained:
- /f: Checks a disk for file system errors and repairs them.
- /r: Performs a thorough surface scan, including empty space, to locate bad sectors. Then, it attempts to recover data from identified bad sectors and mark those sectors as unusable. This parameter includes the functionality of /f to fix file system errors.
Step 4: Restart your computer, and Windows will automatically perform a disk check.
#2. Manufacturer Utility: Seagate SeaTools
Some vendors offer specialized utilities to test, analyze, and manage bad blocks on HDDs and SSDs, such as Seagate SeaTools.
SeaTools is a suite of free tools from Seagate, used to diagnose hard drives and monitor SSDs.
To be specific, it helps test the health of Seagate and non-Seagate drives to identify physical media issues, bad sectors, and potential drive failure.
Seagate SeaTools is available for Windows, Linux, and bootable DOS versions.
It provides various test options, including:
- Quick Tests (Short Self Test & Short Generic Test)
- Extended Tests (Long Self Test, Long Generic Test, and 2 Minute Generic Test)
- Fix All (Long & Short)
According to Seagate, Short Self Test is adequate for most situations, while Short Generic is similar and tests various areas on the drive. For a more comprehensive test, consider Long Generic. This option helps check all sectors but takes hours.
Use Fix All cautiously. Before running it, ensure you have backed up your data, as data will be lost when SeaTools reallocates the problematic sectors.
Follow these steps to test HDD for bad sectors:
Step 1: Download Seagate SeaTools from its official website and run the executable file to install it on your PC.
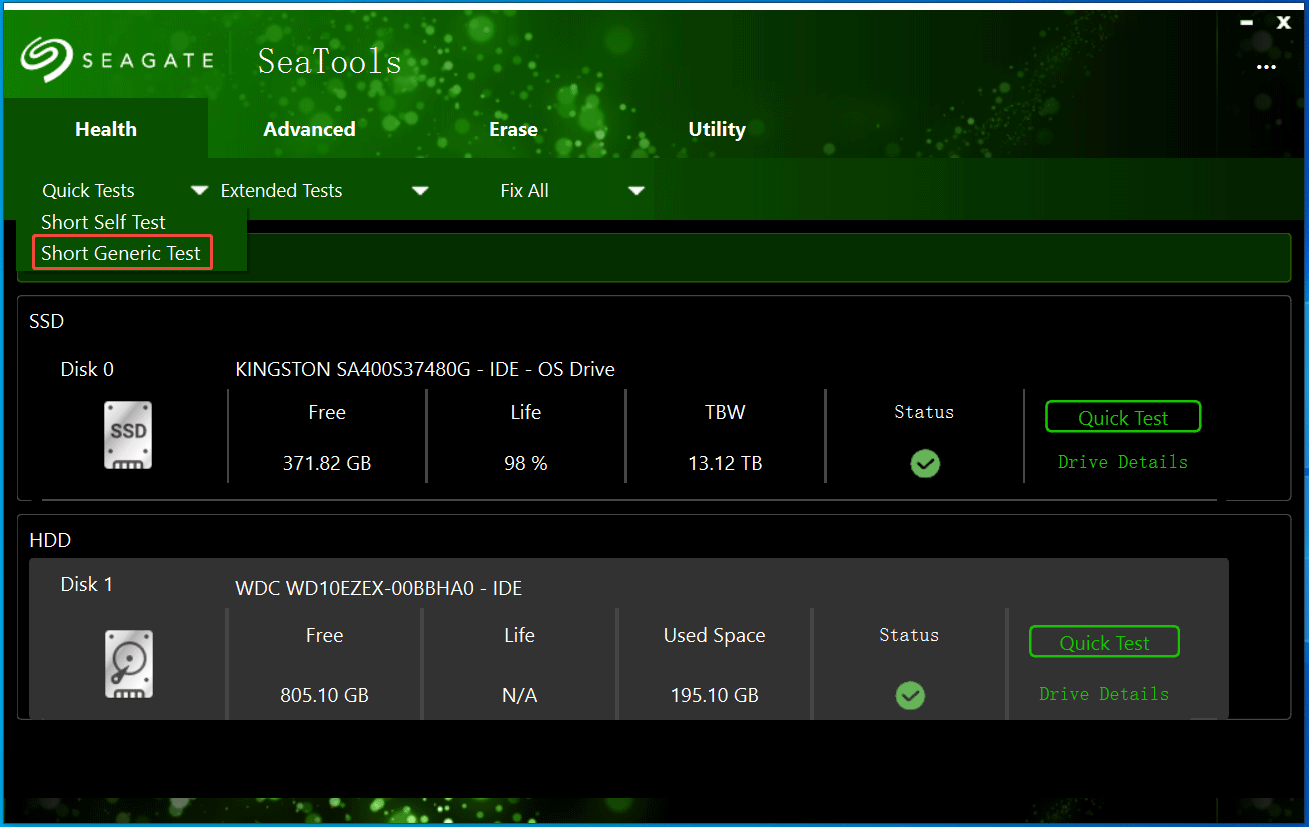
Step 2: Launch SeaTools to enter its main interface and choose the drive you want to test.
Step 3: Select a test option, such as Short Generic Test under Quick Tests, to proceed.
Step 4: Click OK, and the utility begins the test process.
Step 5: If the tool detects bad sectors, the test will halt. Click Fix All > Long to force the drive to reallocate those bad sectors to its reserved spare sectors.
#3. Third-Party Software
Some third-party utilities support checking an HDD or SSD for bad sectors. There are 3 recommended tools: MiniTool Partition Wizard, HDDScan, and CrystalDiskInfo.
The following are details.
Option 1: MiniTool Partition Wizard
MiniTool Partition Wizard, a professional partition manager designed for Windows, is widely used to manage partitions and disks.
It supports checking a file system for errors and fixing them, which is similar to the CHKDSK /f functionality. Additionally, this tool offers the Surface Test feature to perform a deeper physical scan and identify bad sectors.
Learn how to check for bad sectors on hard drives:
Step 1: Download, install, and launch MiniTool Partition Wizard.
MiniTool Partition Wizard FreeClick to Download100%Clean & Safe
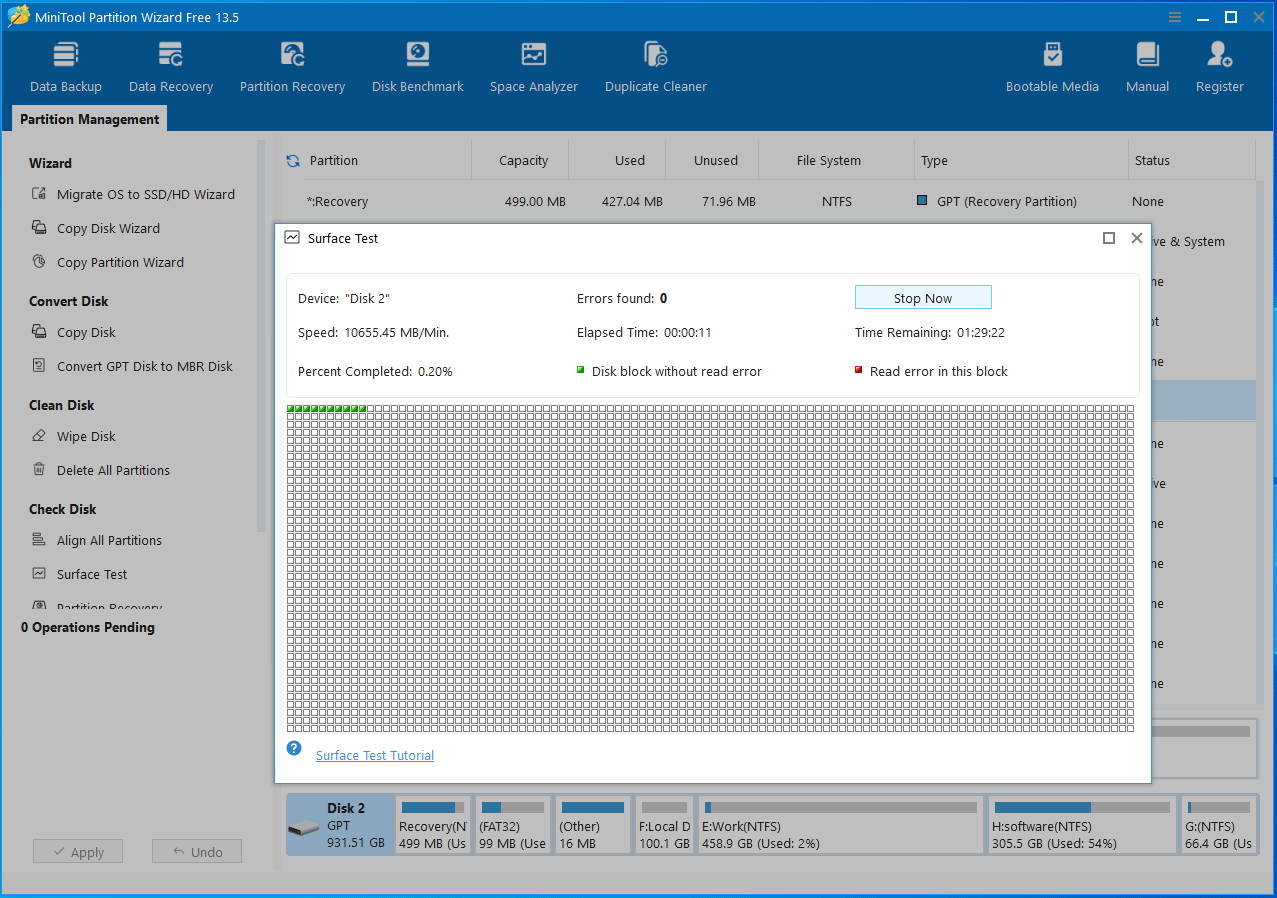
Step 2: Select the hard drive you want to test, right-click on it, and choose Surface Test.
Step 3: Click Start Now to begin the disk surface test.
MiniTool Partition Wizard marks healthy blocks in green and problematic ones (that have read errors) in red.
Since file system errors often manifest as or are closely related to logical bad sectors, it is recommended to run MiniTool Partition Wizard to check the file system.
To perform a file system check:
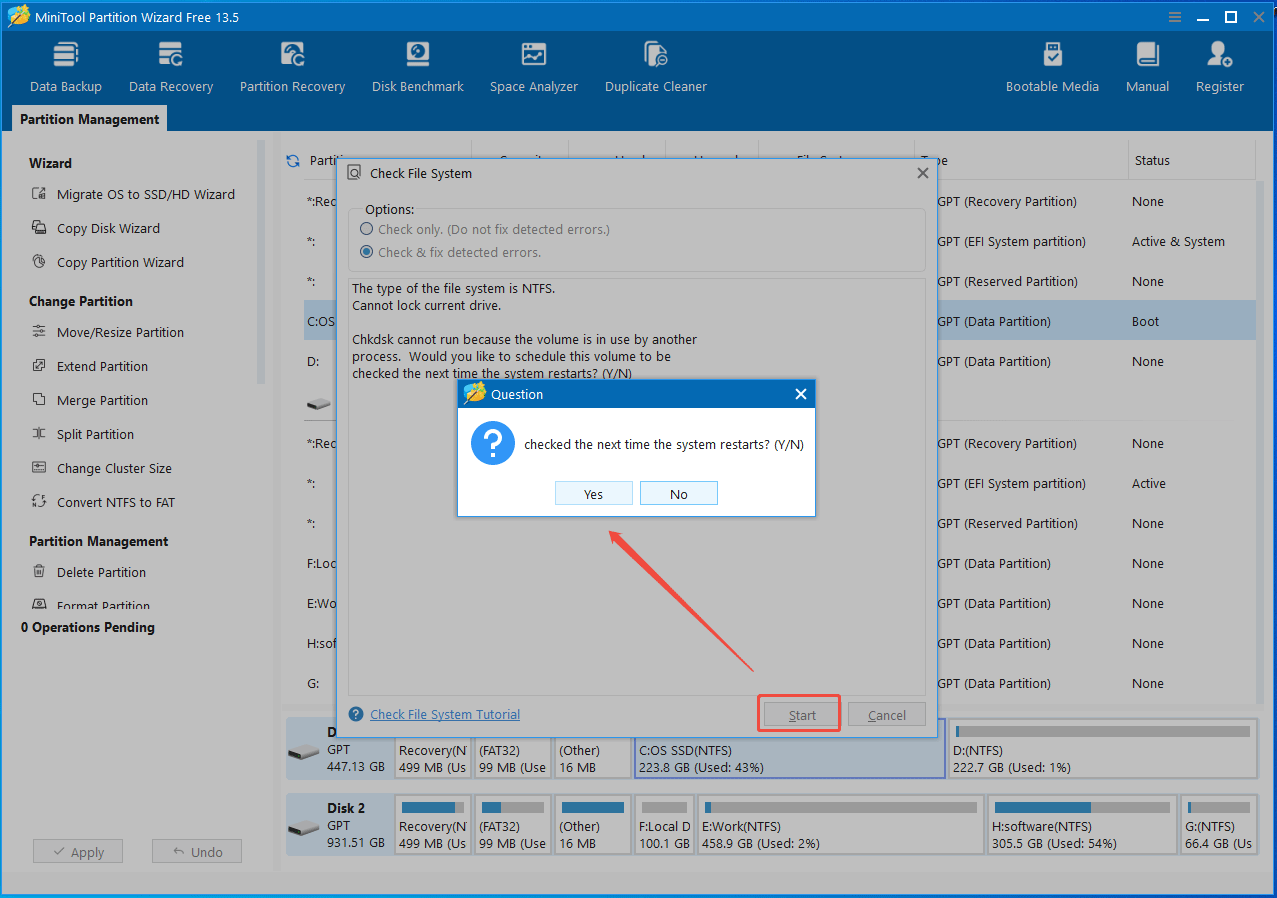
Step 1: Locate the partition, such as the C drive, right-click on it, and choose Check File System.
Step 2: Select Check & fix detected errors.
Step 3: Click Start, then Yes to confirm scheduling the check for the next system restart.
Step 4: Reboot Windows to perform the check.
Option 2: HDDScan
In terms of HDD bad sector check software, HDDScan is highly recommended. It is a free diagnostic tool that monitors the health of storage devices, including SSDs, HDDs, USB flash drives, and RAID.
HDDScan can analyze SMART attributes to show drive health, temperature, and wear. Moreover, it performs a disk surface test to detect bad blocks or sectors through several options:
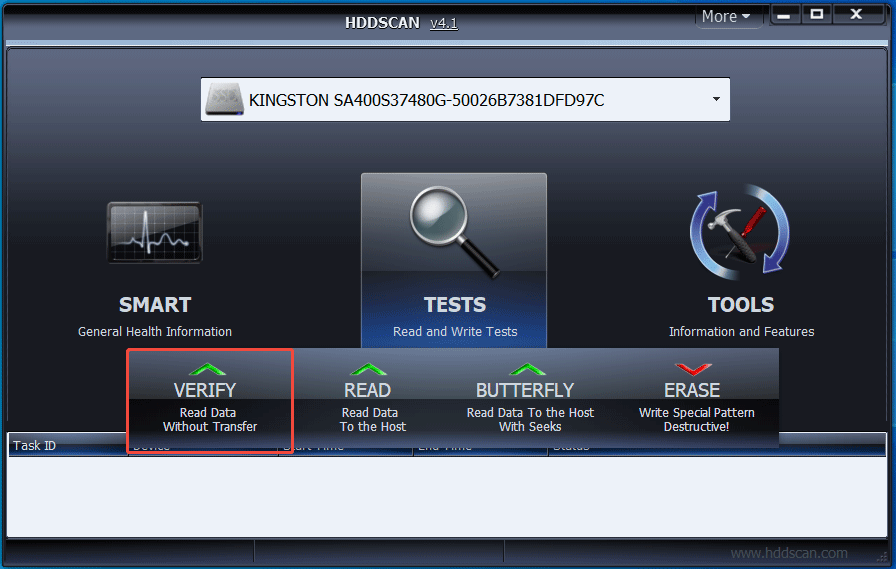
- Verify: Reads data block into the drive’s internal buffer and checks for consistency, without transferring data to the PC. The program tests blocks one by one, from minimum to maximum.
- Read: Reads data blocks one by one and transfers data to the host controller through the interface. The program reads blocks into a temporary buffer and measures operation time.
- Butterfly: Similar to Read, but tests blocks by pairs.
- Erase: Prepares a data block field with a special pattern and an LBA number and sends the block to the drive. Then, the drive writes the block, permanently overwriting the existing data with the pattern. All blocks will be tested one by one from minimum to maximum.
To sum up, HDDScan is particularly useful to identify potential drive failures.
Follow these steps to check hard disk bad sectors:
Step 1: Download and install HDDScan on a computer.
Step 2: Launch this utility, choose a disk, and click TESTS to continue.
Step 3: Select a test option to proceed.
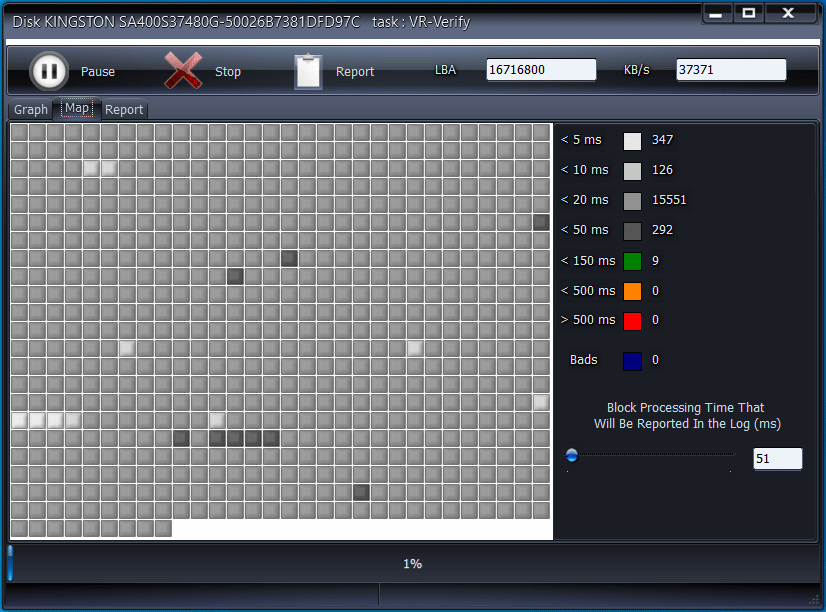
Step 4: Press the Next button to add the test to a task’s queue. Then, the test process begins.
Step 5: To check test details, right-click the task from the list and choose Show Details.
If bad sectors are found, this program marks them in blue.
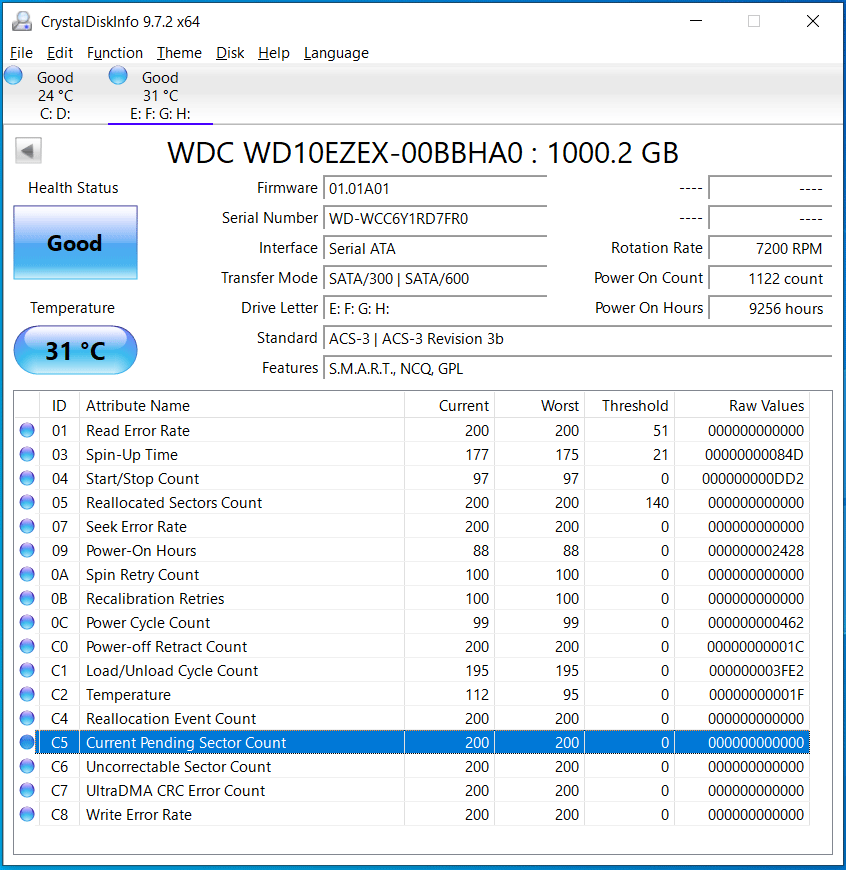
Option 3: CrystalDiskInfo
CrystalDiskInfo is a free, open-source utility that monitors hard drives and reads SMART data, offering details on the drive’s health status, temperature, and performance. It is strongly recommended to help detect potential drive failures before data loss.
It doesn’t perform a direct surface scan but uses SMART attributes, especially Reallocated Sectors Count and Current Pending Sector Count, to report overall drive health.
It flags “Caution” or “Bad” when reallocated or pending sectors rise, signaling impending failure and prompting immediate data backup and drive replacement.
Follow these steps to check for pending sectors (unstable drive areas that might be bad).
Step 1: Download, install, and launch CrystalDiskInfo on a computer.
Step 2: Select the drive you want to check from the Disk menu.
Step 3: Check the health status. Also, look for SMART data in the list.
- Current Pending Sector Count: Shows unstable sectors waiting to be remapped.
- Reallocated Sector Count: Shows sectors that have already moved to the spare pool.
How Many Bad Sectors Are Too Many
It is also important to understand how many bad sectors are considered acceptable.
Ideally, a healthy drive should have zero bad sectors.
However, some HDDs often leave the factory with a small number of bad sectors (under 50 is common). If the count doesn’t grow, it is recommended to monitor the drive.
The real concern is a growing number of bad sectors. If they grow rapidly over days or weeks, it is often not acceptable. The drive may be experiencing a cascade failure where internal debris is causing further damage.
350-500 bad sectors indicate that the drive is physically degrading and approaching the end of its functional life. This constitutes a high risk to data security and integrity.
How to Protect Data When Bad Sectors Occur
To prevent data loss due to bad sectors, take some proactive steps. Key measures include monitoring SMART data, regularly backing up files, and replacing a drive.
Option 1: Monitor Drive Health
Using SMART tools such as CryStalDiskInfo to monitor the drive health is crucial. As stated above, it can help track if reallocated sectors and current pending sectors increase over a week of regular use.
It acts as an early warning system, allowing for data backup before a hard drive completely fails.
Option 2: Back Up Accessible Data
If there are many hard drive bad blocks, backing up the crucial data is essential.
In terms of a long-term prevention step, the best backup practice is the 3-2-1 rule. In detail, maintain at least three copies on two different media types, with one copy kept offsite.
It is recommended to copy documents, photos, financial records, and other files to an external hard drive and cloud.
As for a cloud backup, sync important files or folders to OneDrive, Google Drive, Dropbox, or another cloud storage server. For details, refer to the “backing up a computer to the cloud ” guide.
Additionally, backing up a computer to an external hard drive is an excellent approach to keep data safe. For this, use the free backup software, MiniTool ShadowMaker.
Designed for Windows 11/10/8/7 and Windows Server 2025/2022/2019/2016, this utility can satisfy individual users and businesses. It supports various data types, including a disk, partition, system, folder, and file.
Importantly, it allows for scheduling a plan for regular backups and helps back up only changed data, saving much time and storage space.
Here is how to create a data backup to avoid data loss caused by bad sectors.
Step 1: Connect an external hard drive to the computer with bad sectors.
Step 2: Download MiniTool ShadowMaker and follow the instructions to install it.
MiniTool ShadowMaker TrialClick to Download100%Clean & Safe
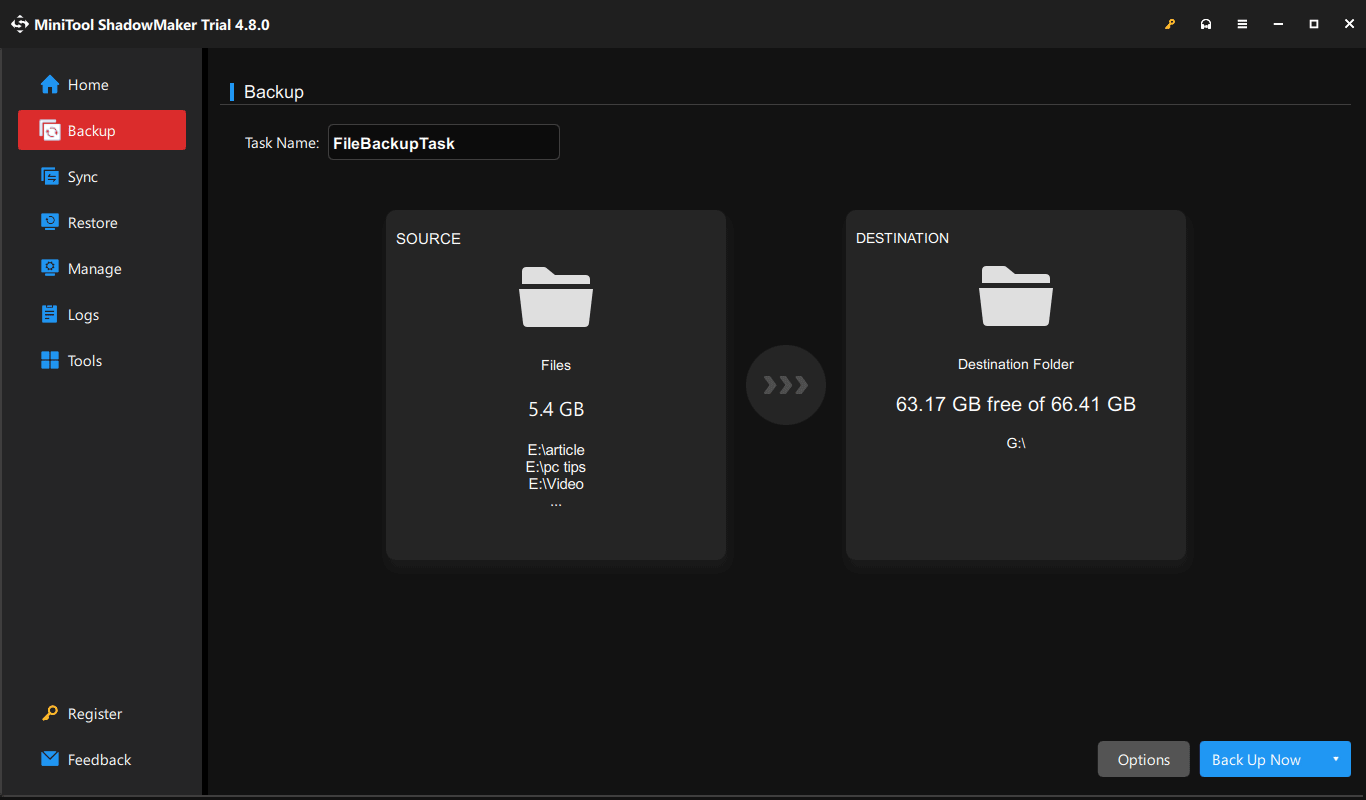
Step 3: Launch this backup software and head to its Backup page.
Step 4: Specify the backup source and target.
- Source: Click SOURCE > Folders and Files > Computer, and browse the device to select files or folders you wish to back up. Then, click OK to confirm.
- Target: Enter the DESTINATION section, choose the connected external drive, and select OK to proceed.
Step 5: Start the backup process by clicking the Back Up Now button.
Option 3: Recover Files from a Drive with Bad Sectors
A drive may become inaccessible, unreadable, or show as a RAW format when bad sectors appear. To minimize data loss, run MiniTool Power Data Recovery.
It is a free data recovery software for Windows, helping recover files from various situations, such as accidental deletion, inaccessible drives, system failure, and other drive issues.
Follow the instructions to recover files from a drive with bad sectors.
Step 1: Download, install, and launch MiniTool Power Recovery.
MiniTool Power Data Recovery FreeClick to Download100%Clean & Safe
Step 2: In the main interface, locate the disk that has bad sectors under Devices, and click Scan to begin a scan.
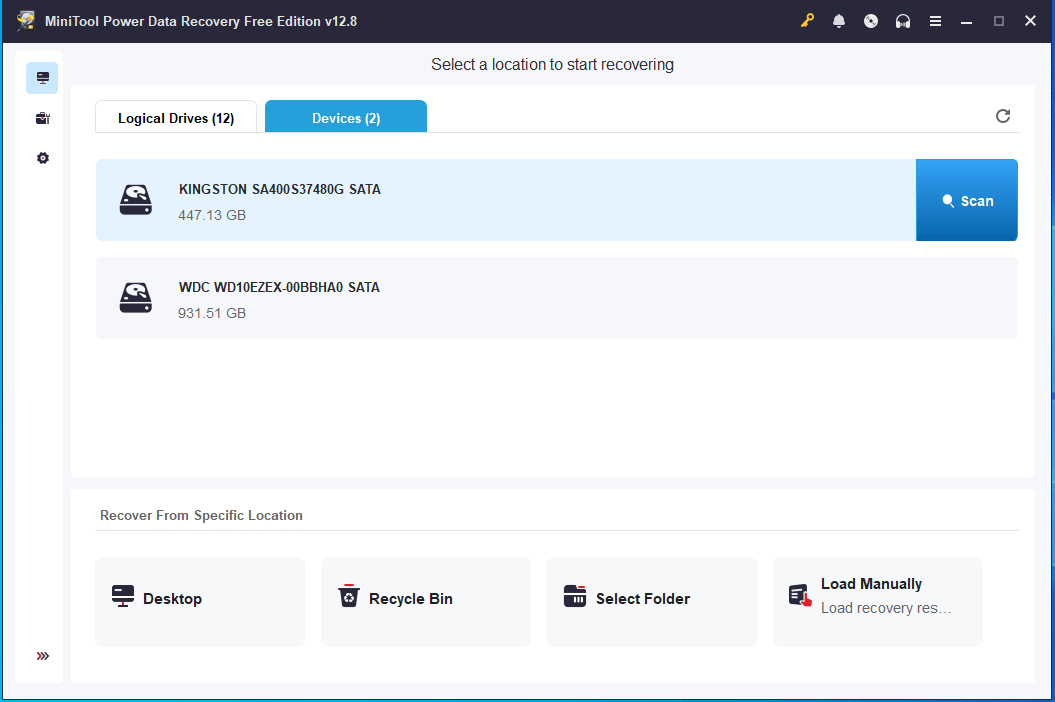
Step 3: Wait until the scan finishes. Then, choose the files you want to recover and click Save to restore them to a safe location.
Option 4: Replace the Drive
If you hear clicking, grinding, or other sounds, or the system reports an increase in bad sectors, consider replacing the drive. They are primary indicators of mechanical failure and imminent drive death.
In this case, stop using the drive immediately because further use can cause additional stress on the damaged disk and worsen the damage. Next, replace the hard drive with a new one.
#1. Clone a Drive
To migrate all data from the old disk to the new one, consider disk cloning and then install the cloned drive to your PC.
MiniTool ShadowMaker is an all-in-one backup, recovery, and cloning solution.
Its Clone Disk feature can clone HDD to SSD and move Windows to another drive with ease. Everything, including system files, registry, apps, personal data, and other files, is transferred. The cloned drive is bootable, allowing for running Windows from it.
Follow the instructions:
Step 1: Use a USB adapter to connect a new hard drive to the computer that has numerous bad sectors.
Step 2: Download, install, and open MiniTool ShadowMaker.
MiniTool ShadowMaker TrialClick to Download100%Clean & Safe
Step 3: In the Tools tab, choose Clone Disk to proceed.
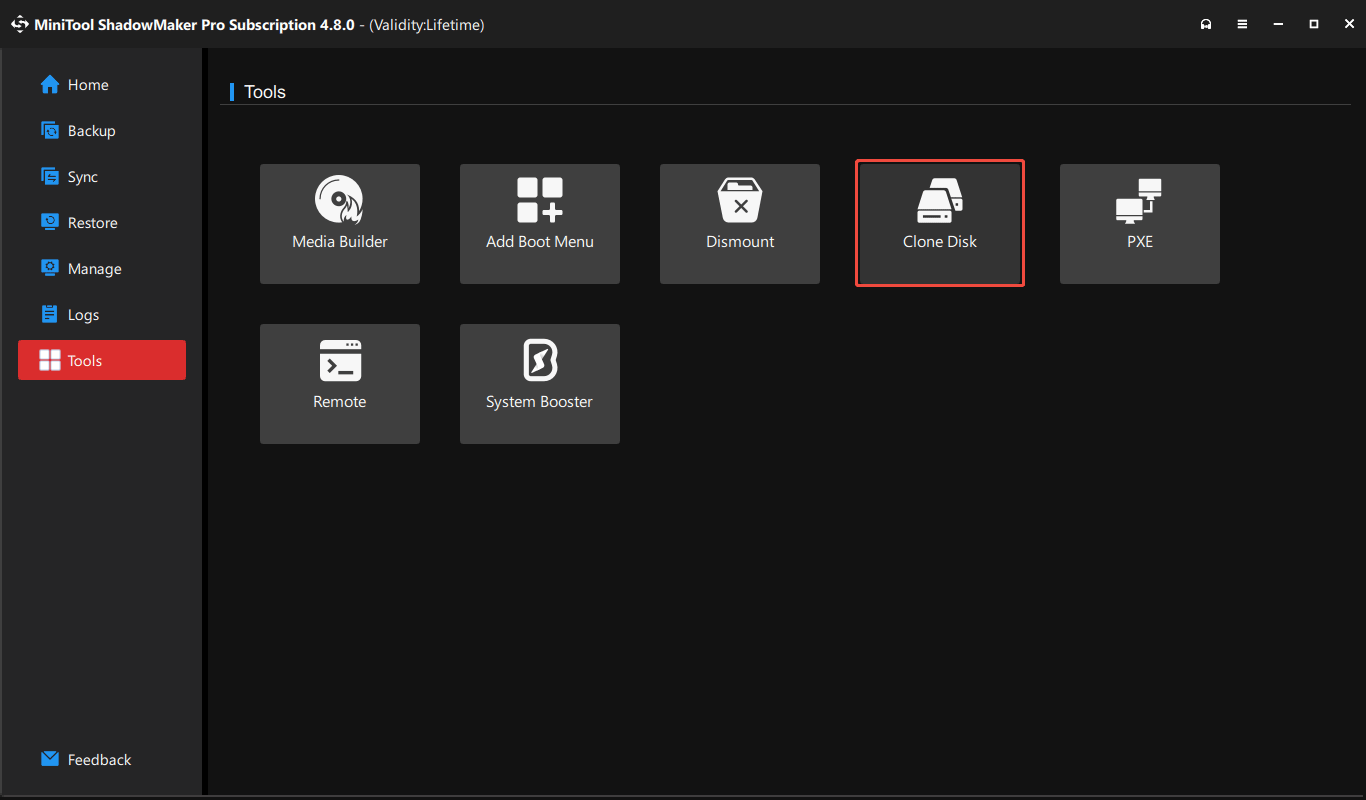
Step 4: Select the system disk as a source drive and the new disk as a target drive.
Step 5: Click Start to begin disk cloning.
#2. Install a Drive in a PC
Once cloning finishes, replace the damaged drive with the cloned one.
Step 1: Turn off the PC completely and unplug the power cord.
Step 2: Remove the computer case.
Step 3: Locate the old hard drive in its bay, unplug its power cable and SATA data cable, unscrew it, and pull it out.
Step 4: Place the new drive in the bay, secure it, and reconnect cables.
Step 5: Reassemble the case, connect the power cord, and power on the PC.
For the detailed steps after cloning a hard drive, refer to our disk copy guide.
#3. Perform a CHKDSK Scan
After installing the cloned drive, run CHKDSK on the new drive to check and fix file system errors that may have been carried over during the cloning process.
Avoid running intensive disk checks on the failing source drive, as repeated read attempts on bad sectors may worsen damage or lead to data loss.
Step 1: Run Command Prompt with admin rights.
Step 2: Execute the chkdsk c: /f /r command. Replace c: with your drive letter.
Repeat the same step for all partitions on the new hard drive.
How to Prevent Bad Sectors in the Future
Some bad sectors on a hard drive are often unavoidable, often resulting from natural aging or manufacturing defects. Taking some preventive steps, including proper hardware care and software maintenance, is crucial to significantly slow their progression.
#1. Physical Care and Handling
- Avoid physical shock: While your hard drive is spinning, avoid dropping, shaking, or bumping it. For an HDD, a sudden shock can cause the read/write head to crash into the platters, causing physical damage that is often not repairable.
- Keep the drive cool: Excessive heat can result in component failure and sector corruption. Ensure the computer has adequate ventilation and keep it in a cool, clean environment. If necessary, use a cooling pad for laptops or regularly clean out dust from fans and vents with compressed air.
- Ensure proper shutdowns: Do not perform a hard reset by pressing the power button unless it is necessary. This action can interrupt writing processes and may lead to logical bad sectors. Always shut down the PC properly so that the drive can finish writing data and safely park its heads.
- Use surge protectors: Sudden power outages or surges can result in write errors and electrical failure. It is crucial to use a high-quality surge protector or a UPS (Uninterruptible Power Supply).
- Safely eject external devices: For external hard drives or USB flash drives, always use the eject option to unplug the connection, preventing corruption.
#2. Software & System Maintenance
- Run disk scans regularly: Use the built-in chkdsk /f /r command to scan the drive and fix file system errors. Additionally, it can locate potential bad sectors and mark them unusable, then the system stops writing to them.
- Defragment mechanical drives: For HDDs rather than SSDs, regular defragmentation can significantly reduce wear and tear on the drive heads. This action organizes fragmented files into contiguous sequential blocks. That way, the head doesn’t need to jump around the platters to locate files, minimizing mechanical strain.
- Enable TRIM for SSDs: Constantly overwriting data to SSDs can hasten the wear on NAND flash memory cells, which can lead to the development of bad blocks. Enabling the TRIM command allows the system to inform the SSD which data blocks are no longer needed, eliminating the unnecessary overwrite process.
- Avoid overfilling SSDs: Leave at least 20% of SSD space to allow for effective wear leveling. This is an effective step to prevent extreme performance drops and premature failure due to accumulated bad blocks.
- Ensure adequate RAM: Low RAM can force the system to use the paging file on a hard drive for swapping. This can cause high write operations, particularly wearing out SSDs.
- Use antivirus software: Some logical bad sectors are caused by viruses and malware that corrupt the file system and data structures. Run an reputable antivirus program to prevent these logical errors.
Conclusion
Physical and logical hard drive bad sectors and SSD blocks can occur due to manufacturing defects, physical damage, wear, sudden power loss, and overheating.
If your PC encounters common signs such as performance issues, file errors, and clicking and beeping sounds, the drive may fail. To confirm the drive’s condition, follow the steps to check a disk for bad sectors.
A rapidly growing number of bad sectors indicates imminent drive failure; therefore, back up data with MiniTool ShadowMaker and replace the drive.
To slow bad sector growth, take some preventive steps.
Moreover, if you experience some issues when using MiniTool software, contact us at [email protected].
Bad Sectors FAQ
The sector is not yet physically damaged and may still be readable, acting as a warning sign that requires monitoring. After a write operation, a weak sector is often reallocated to a spare area by the drive’s controller.
About The Author

Position: Columnist
Vera has been working at the MiniTool Team for over 10 years as a technical editor and content writer. She mainly focuses on disk and partition management, data recovery, Windows backup and restore, and PC troubleshooting. Through in-depth software testing and hands-on experience, she has helped users solve a wide range of computer problems and better protect their data on Windows devices.
User Comments :