What is virtual memory? How to set it? Read this post to get answers.
Virtual memory is a memory management technique that is implemented by using both hardware and software. It makes the application think it has a contiguous and available storage space or address space. However, in fact, virtual memory usually is divided into several physical memory fragments, and some of them are stored on the external disk storage which can be used to exchange data when needed. Currently, most operating systems use virtual memory, like the Windows family’s “virtual memory”, or the Linux “swap space”.
If you find the Windows 8/8.1 operating system gets stuck in the Windows logo page when starting it and you are unable to enter the system, you have to force shutdown and then restart it. After that, you can adjust the virtual memory to fix this problem.
Recommend: Want to know more information about operating system stuck in Windows Logo? Here, I guess you might be interested in this post: How Do You Fix “Window 10 Stuck on Loading Screen” Issue.
Introduction
Computers need memory (it is a temporary storage area which holds the data and instructions that the CPU needs) to execute all programs. Thus, the more programs memory holds, the less free space memory has. Therefore, Windows operating systems like adopting the virtual memory technology to increase computer’s memory capability.
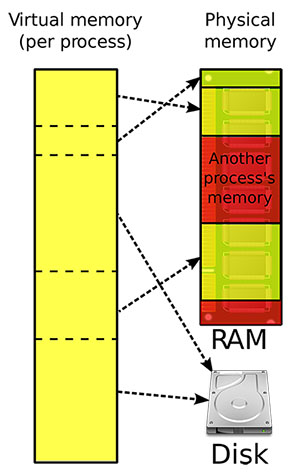
This technology will leave a part of hard disk space to act as memory. If the system is low on memory, the virtual memory will play its full part. Virtual memory combines your computer’s RAM with temporary space on your hard disk. When RAM runs low, virtual memory helps to move data from RAM to a space called a paging file. Moving data to paging file can free up the RAM so your computer can complete its work.
In general, the more RAM your computer has, the faster the programs run. If the computer is running pretty slow since there is little free space on the RAM, you can increase virtual memory to fix the problem. However, your computer can read data from RAM much more quickly than from a hard disk. So increasing the capacity of RAM is a better solution.
Virtual memory is, in fact, a giant file called PageFile.Sys, which is invisible in most cases. To see the file, you need to open the Explorer and then close the system file protection function. Therefore, virtual memory sometimes is also known as “page file”.
Recommend: You should not delete the Page Files. Read this post: Solutions to Deleting Drive C, EFI System Volume, Recovery/OEM Volume, etc to find more details.
Memory will play a big role during the process of running computer because computer needs it to execute all programs. Thus, Windows would like to use virtual memory to improve computer’s memory. Virtual memory exists in the PAGEFILE.SYS file.
Reasonable Setting
How to verify the size of virtual memory?
Novice to Virtual Memory
Since Linux needs complicated commands, we take Windows 10 for example to show how to set virtual memory.
1: Open “File Explorer”, right click “This PC”, and select “Properties”.
2: Select “Advanced system settings” in the pop-up window.
3: In the “System Properties” window, click “Advanced” tab, and then click “Settings” under “Performance”.
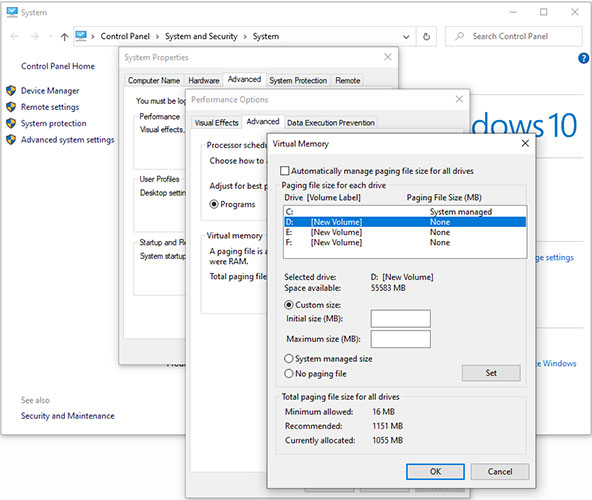
4: In the “Performance Options” window, click “Advanced” tab, and then click “Change” under “Virtual memory”.
5: In the “Virtual Memory” window, uncheck “Automatically manage paging file size for all drives” and then choose a relatively free space to store the Pagefile.sys file.
6: Check “Custom size” and then type a new size in megabytes in the Initial size (MB) or Maximum size (MB) box. Here, the recommended size is equivalent to 1.5 -3 times the amount of RAM on your system.
7: Click “Set”, and then click “OK”.
Veteran to Virtual Memory
In fact, setting virtual memory size strictly according to the 1.5 to 3 times multiple relationships is not science. We had better set it according to actual needs. In the process of setting virtual memory size, you may turn to the Windows built-in performance monitor (taking Windows 10 as an example).
1: Press “Windows + R” keys to call out “Run” box, type “perfmon.msc”, and press “Enter”.
2: In “Performance Monitor” window, expand “Data Collector Sets”, right-click on “User Defined”, and choose “New” > “Data Collector Set”.
3: In the new window, type a name (“paging file” as an example), check “Create manually (Advanced)”, and click “Next”.
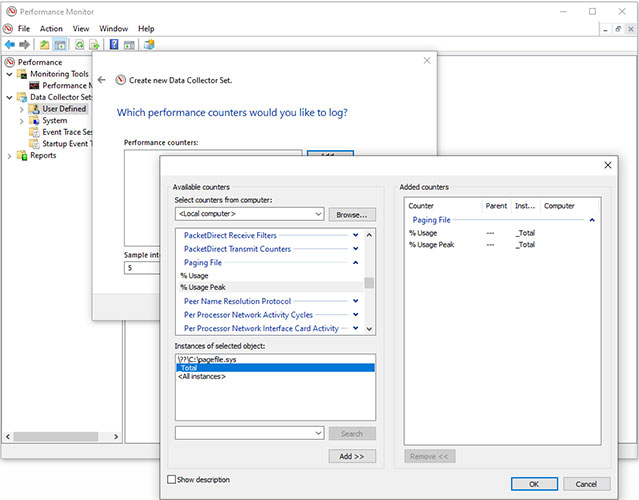
4: Check “Performance counter” under “Create data logs” section and click “Next”.
5: Click “Add” button to add counters. In the upper left box, find and expand “Paging File”. Highlight items under it, highlight “Total” in the lower left box, and then click “Add>>” button to add the two counters into the right box one by one. Then, click “OK” button.
6: Please change “Sample interval” to a proper number, according to your need. Then, click “Next”.
7: Choose where you like the data to be saved. Then, click “Next”.
8: Make sure that “Save and close” option is checked and then click “Finish”.
9: Expand “User Defined” under “Data Collector Sets” and you will find the new data collector set you created just now. Right-click on it and choose “Start”.
10: Make your daily operation on computer, and run all different applications and games that you use frequently. After using it for a few hours, the new data collector set can make a basic and complete assessment of your usage.
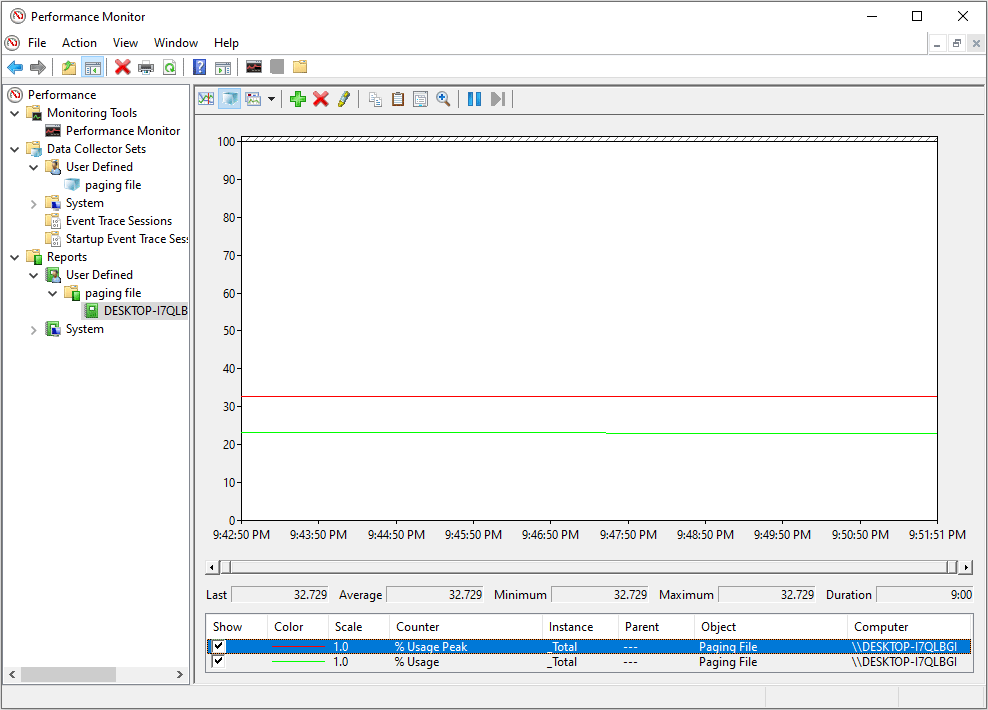
11: At this time, right-click on the paging file data collector set and choose “Stop”. Then, go to “Reports” > “User Defined” > “paging file”. Under “paging file”, there is a report about virtual memory usage. Click this report to view it.
12: What you should note here is that the value in the report refers to the percentage of the paging file amount in use. That is to say, according to report, you will find that although system leaves 2GB paging file, only 25% paging file will be used. Therefore, the maximum size of the paging file is set to 512MB to save free space.
Related Information
The Location of Virtual Memory
It’s also important to notice that you had better put the paging file on the drive which does not contain operating system or applications if you have more than one disk. Keeping applications and paging files on different disks not only can minimize the usage of disk but also can improve the efficiency of disk. However, if you have only one disk and you put the paging files on a different volume in the same disk, it will not improve the efficiency of disk.
Virtual Memory Paging File and Disk Fragmentation
Virtual memory combines your computer’s RAM with temporary space on your hard disk. The hard disk may contain disk fragmentation since its files are written in a non-sequential way. Therefore, if the paging file or the virtual memory partition is patchy, the disk seeking time may be increased but disk performance may be decreased.
Some people think that there will be disk fragments if Windows frequently read the pagefile.sys file. Actually, it’s not. Once pagefile.sys is created, its distribution type in the partition will be fixed. Reading and writing file will not influence the size of pagefile.sys file. However, the system will create temppf.sys after running out of the pagefile.sys, which will result in disk fragmentation. In Linux operating system, if you divide a separate partition to act as the memory, you can basically eliminate the effects brought by disk fragmentation.
Different Ways for Fixing “Tool Little Virtual Memory”
In general, Windows XP uses the free space of C drive to act as the virtual memory by default. Thus, the larger free space the C drive has, the faster the system runs. Virtual memory will change dynamically as you use the C drive. Therefore, the C drive is easy to generate disk fragmentation to affect system operation speed. So well, you had better set another volume like D: as the virtual memory.
Steps to Check the Location of Virtual Memory
Here, we take Windows XP for example. Right-click “My Computer” icon and choose “Properties” from the bottom. From the System box, click “Advanced System Settings”, and then view “Advanced” tab, and click “Settings” under Performance. In the Performance Options box, select the “Advanced” tab, and click “Change” button under Virtual memory. After that, you can see the Virtual Memory dialog box.
As a matter of fact, you had better set a fixed value for the virtual memory to avoid disk fragmentation. And the specific values depend on your physical memory size. And it is 1.5 times to 3 times the size of physical memory. For instance, if you have 512MB memory, you can set 256-768MB virtual memory (the total size of RAM and virtual memory is generally above 256MB). If your memory size is over 2GB, you need no virtual memory.
But, in some special situations, you also need the virtual memory. For instance, your system is low on memory when playing large 3D games and making large pictures, you can consider setting virtual memory. Setting method as follows:
Let us suppose that you have 256M memory and you want to set D drive as the virtual memory. At this time, you should remove the default virtual memory (C drive) at first, and leave the C drive selected. Next, choose the “No paging files (N)” and click the “Set” button to remove the C drive virtual memory. After that, select the D drive, and click “Customer Size”. And then, type 512 in the following “Initial Size” and “Maximize size” box and click “Set” button. Finally, click “OK” button. Now, the system will be restarted to make this change take effect.
Setting Method
Manual Setting
Here, we take Windows XP for example to show how to set the virtual memory.
1: Right-click “My Computer” icon and choose “Properties” from the bottom.
2: From the System box, click “Advanced System Settings”, and then view “Advanced” tab, and click “Settings” under Performance.
3: In the Performance Options box, select the “Advanced” tab, and click “Change” button under Virtual memory.
4: Choose a suitable drive, and check the “Customer size”, and then write the accurate values in the “Initial Size” and “Maximize size” box. Next, click “Set” and “OK”. After that, restart the computer. After restarting, all work has been done.
Adjust the Pagination Location
The Win386.swp file (swap file) is saved in the root directory C. In fact, the Win386.swp file can be stored in any partition. If the system volume C doesn’t have enough free space, you can store it on another partition. However, how to complete this task? Firstly, you should open the System.ini file (under the C: Windows) via the Notepad. Then, in the [386Enh] section, change the location of Win386.swp file. For instance, you can change “Paging Drive= C: WindowsWin386.swp” to “Paging Drive= D: WindowsWin386.swp”.
Windows 2000/XP users can click “Control Panel-System-Advanced-performance”, and then click “Settings-Advanced-Change” to open the virtual memory dialog-box. At this time, if you want to store the Win386.swp file on another partition, you have to remove the paging file from the original partition, and then choose the desired partition you need. (By default, the system partition contains paging file.)
Windows XP requires 256 MB physical memory at least. If you like paying large 3D games but your Windows XP system is low on memory, don’t panic since the system will automatically adjust virtual memory size.
Disable Paging Executive
If your RAM is larger than 1GB, you don’t have to use paging file. And you can disable it. Steps: click “Start” and choose “Run”, and then type “Regedit”. Next, choose “HKEY-LOCAL-MACHINE\\SYSTEM\\CurrentControlSet\\Control\\SessionManager\\MemoryManagement”. Now, select the “Disable Paging Executive” and type 1 in its value data.

If your RAM is larger than 4GB, virtual memory will make very little impact. If you don’t receive the insufficient memory warning in the daily use, you can rest easy.
Clear Page File
At the same place, you can see a “ClearPageFileAtShutdown” choice. Here, the “Clear” refers to “clean” and arrange the pagefile.sys file instead of completely removing it. Microsoft notes that this is a safe option and it will not influence the performance.
Advanced topics: Windows 2000/XP/2003 users can turn to SweepRAM (a memory optimization program) to free some unused RAM since this free application aims to empty all processes working sets. Working set is a concept in computer science which defines the amount of memory that a process requires in a given time interval. When a process is running, Windows will automatically adjust working set.
To be specific, the frequently visited page will be leaved in the memory, and other pages may be removed from the working set and temporarily stored in the memory “Conversion list” since there is no more free space. When the application accesses a page again, operating system will automatically add these removed pages into the working set.
SweepRAM is a piece of little freeware that will very quickly free some unused RAM, which can help to improve system performance.
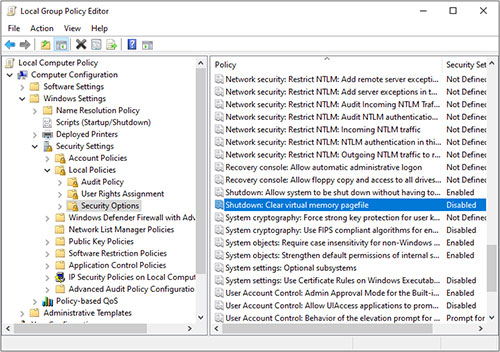
Shutdown Helps to Clear Virtual Memory Pagefile
1: Click “Start” and choose “Run”, and then type “gpedit.msc”.
2: In the Local Group Policy Editor, choose “Computer Configuration – Windows Settings – Security Setting – Local Policies-Security Options – Shutdown: Clear virtual memory pagefile”.
3: Right-click the “Properties” and click “Enabled” and click “OK”.
If there is no local group policy editor, you can try another approach. As follows:
1: Click Win & R, and then type “regedit” to open the Registry Editor.
2:Choose“HKEY-LOCAL-MACHINE\\SYSTEM\\CurrentControlSet\\Control\\SessionManager\\MemoryManagement”. And then, double click the “ClearPageFileAtShutdown”.
3: In the Edit DWORD Value dialog box, type 1 in the Value data, and then click “OK” button.
4: Restart the computer to make this change take effect.
About The Author

Position: Columnist
Linda has been an editor at MiniTool for seven years. She continuously learns about computers and puts her knowledge into practice. Moreover, she is particularly knowledgeable in disk management, data recovery, system installation, and PDF editing. Her articles typically reference multiple examples or are based on her own experience, providing users with the most suitable solutions.
User Comments :