In an update to Windows 10, some users encounter the Windows update error 0x80073701. Microsoft also tries its best to fix the error 0x80073701. And this post will show you how to fix the Windows update 0x80073701 with 3 solutions.
3 Solutions to Windows Update Error 0x80073701
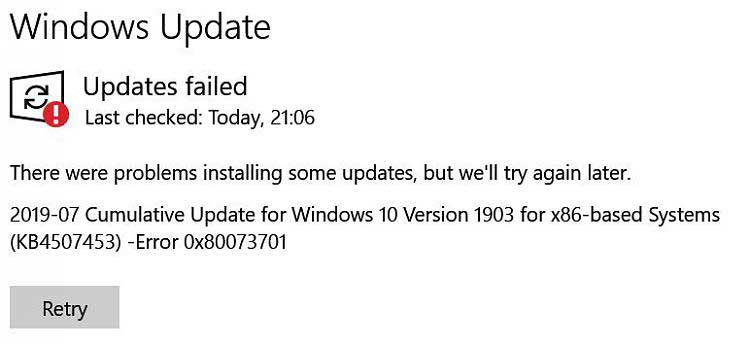
In the Windows 10 Update, some users complain that they encounter a Windows update error 0x80073701 and fail to install some updates, as shown in the following picture:
In order to keep data and PC safe, you had better try MiniTool software to back up computers before upgrading Windows.
And in the following section, we will demonstrate you how to fix the error 0x80073701 Windows 10. As a matter of fact, the error 0x80073701 is not a severe one. The error 0x80073701 is error_sxs_assembly_missing, which means that there are some system files are missing, leading to the Windows update installation failure.
Thus, to fix the problem, you can refer to the following solutions.
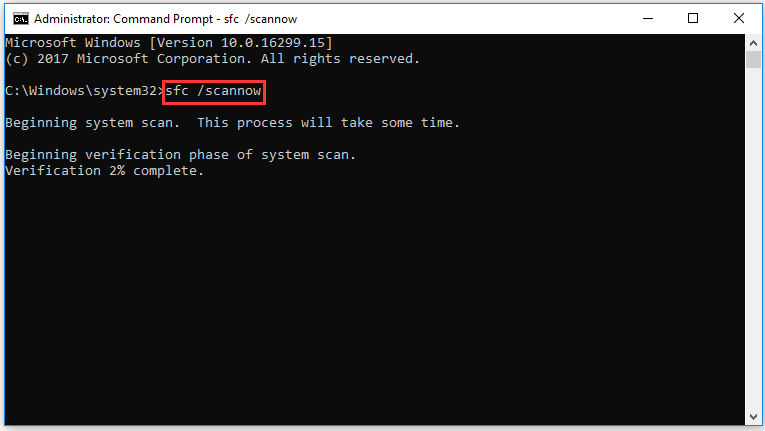
Solution 1: Run System File Checker
As mentioned in the above section, the error 0x80073701 may be caused by the missing system files. So in order to solve the issue, try System File Checker.
Step 1: Open Command Prompt
- Type Command Prompt in the search box of Windows 10 and choose the best-matched one.
- Right-click it to choose Run as administrator.
Step 2: Type the command
- In the popup window, type the command sfc /scannow and hit Enter to continue.
- Don’t close the command prompt windows until you see the message verification 100% complete.
When the process is finished, you can run Windows Update again to check whether the 0x80073701 error is solved.
Quickly Fix – SFC Scannow Not Working (Focus on 2 Cases)
Solution 2: Run DISM Tool
Here, we will demonstrate the second solution to 0x80070301 error. You can run the DISM tool to fix the corrupted system files.
Step 1: Open Command Prompt
Open the Command Prompt and run it as administrator. For detailed ways, please refer to the first solution listed above.
Step 2: Type the command
In the pop-up window, type the command DISM /Online /Cleanup-Image /RestoreHealth and hit Enter to continue. Also, you can use the command – DISM /Online /Cleanup-Image /Startcomponentcleanup.
Next, restart your computer to take effect and check whether the Windows update 0x80073701 error is solved.

Solution 3: Check Logs and Remove Patches
Now, this part will show the third method to fix the error code 0x80073701. In this method, you need to check the CBS.log and remove the patches.
CBS.log is a file that includes logs about components when they get installed or uninstalled during updates. So, when you encounter the error 0x80073701, you can check the CBS.log. Thus, open the CBS.log, search the error_sxs_assembly_missing and check if there is any KB update related with it. Then reinstall it and run Windows update again to check whether the issue 0x80073701 is solved.
If there is no error of the CBS.log, you should execute the following command.
DISM /Online /Cleanup-Image /ScanHealth
This command can check for component store corruption. So when it is finished, run Windows Update again to check whether the Windows update error 0x80073701 is solved.
Related article: 7 Solutions to Windows Update Error 0x80070002[Step-by-Step Guide]
Final Words
To sum up, this post has introduced how to fix the error 0x80073701 in three different ways. If you encounter the same Windows updater error 0x80073701 Windows 10, try these solutions.
User Comments :