You may want to add SharePoint to File Explorer so that you can access and deal folders easily. Well then, how to add a SharePoint folder to File Explorer in Windows 10/11? It can be done in some ways and here MiniTool will show you some details in this guide.
Necessity: Add SharePoint to File Explorer
Windows Explorer is a tool that you are very familiar with and you can easily find, click and open files you need. It is so simple, right? Certainly, when all your files and folders are saved to your computer, things become easy.
But for SharePoint, it is not as simple as File Explorer. This tool helps to sync, store and share files in the cloud. For organizations, SharePoint is a good option. To know it, refer to our previous post – What’s SharePoint? How to Download Microsoft SharePoint.
To access SharePoint folders, online access to Office 365 is required. To let things easier, you can choose to use local File Explorer to edit documents saved in SharePoint. In the following part, let’s see how to add SharePoint to File Explorer in Windows 10/11.
How to Add SharePoint to File Explorer Windows 11/10
Add SharePoint to File Explorer via Internet Explorer
If you only want to open SharePoint to copy or move files, this way is very useful but it is a temporary method. After closing a SharePoint folder, it will disappear. That is, the folder won’t store on the hard drive and you need to restart the connection every time you access SharePoint.
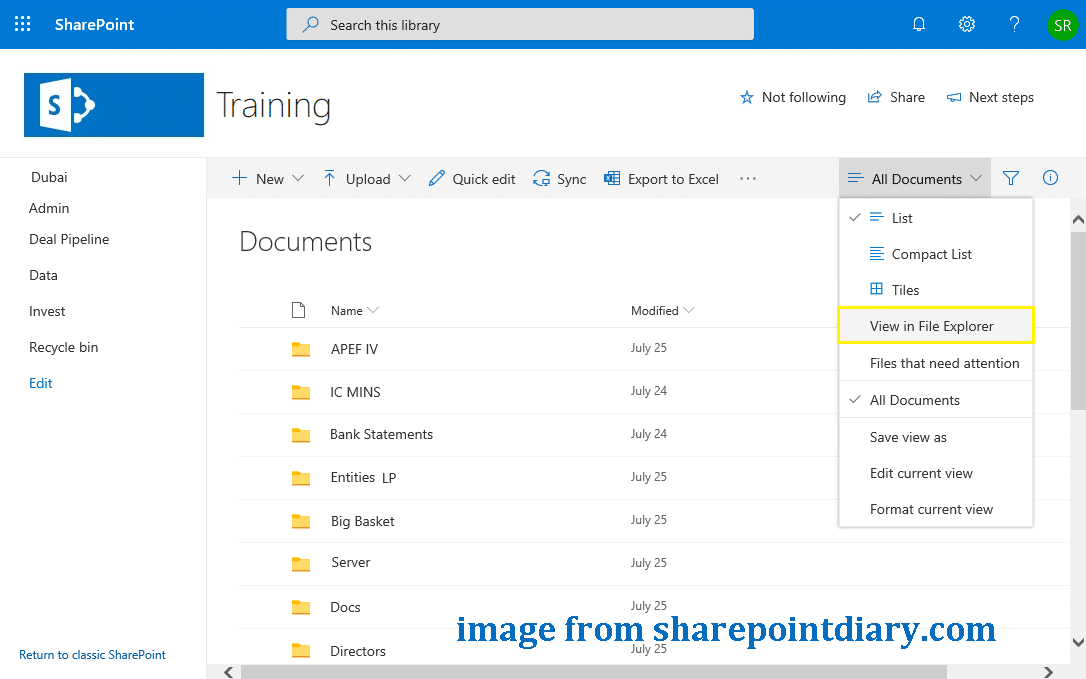
Step 1: In Internet Explorer, open the SharePoint Online document library.
Step 2: Click All Documents > View in File Explorer. This can open the library of SharePoint in File Explorer on Windows 11/10.
Add SharePoint to File Explorer via Sync or Add Shortcut to OneDrive
How to add SharePoint to File Explorer in Windows 11/10? Two features in SharePoint are very useful and let’s go to see what you should do:
Step 1: Open SharePoint Online and go to its document library.
Step 2: You can find two available options that can add shortcuts in File Explorer to the SharePoint library. One is Sync (adds a separated shortcut in File Explorer to SharePoint) and another is Add shortcut to OneDrive (adds SharePoint icon in the OneDrive section). Just choose one and finish the process by following the instructions on the screen.

Some of you may wonder how to add a SharePoint folder to File Explorer. In terms of a specific folder, right-click on that folder and choose Add shortcut to OneDrive. Then, this folder will be added to your personal OneDrive and you can access it in the OneDrive folder in Windows Explorer.
Further Reading:
If you want to add your synced SharePoint document library to Quick Access, it is allowed. Just right-click on this library and choose Pin to Quick access. Also, you can send the document library to your desktop for quick access by right-click on it and choosing Send to > Desktop.

Final Words
It is easy to add SharePoint to File Explorer in Windows 10/11. If you have a need, follow the ways above to do this work so that you can access your SharePoint folders locally. If you have any other ways for this task, you can let us know by writing a comment below. Thanks.
About The Author

Position: Columnist
Vera has been working at the MiniTool Team for over 10 years as a technical editor and content writer. She mainly focuses on disk and partition management, data recovery, Windows backup and restore, and PC troubleshooting. Through in-depth software testing and hands-on experience, she has helped users solve a wide range of computer problems and better protect their data on Windows devices.
User Comments :