MiniTool Solution shows you how to add a printer in Windows 11 PC to scan and print your documents – you can connect your USB printer to the computer and set up it for printing or installing a wireless printer in Windows 11. To get details, go on reading the guide below.
To print documents, a printer is necessary. You need a computer that has a printer so that you can open the file to print on that PC. If your machine doesn’t have a connected printer, how can you do this printing task? Adding a printer is required.
For Windows 11, the user interface is changed largely. If you just upgrade to Windows 11 from Windows 10, you may not be familiar with this new operating system, let alone add a printer in Windows 11. Don’t worry and you can find detailed steps for this task from the following part.
Related article: How to Connect a Wireless Printer to Windows 10 PC
How to Add a Printer in Windows 11
Automatically Set up a Printer in Windows 11
Windows can automatically detect your printer if you connect it and you only need a few clicks to install it on your PC settings. Follow the steps below.
Step 1: Connect your printer to your computer via a wired cable or wirelessly.
- Plug the USB cable of your printer into an available USB port on your PC. The physical connection varies by the printer and make sure the cable and port are matched.
- To install a wireless printer in Windows 11, you first need to connect your printer to the wireless network. Note that the printer and PC are on the same network.
Step 2: Go to Settings in Windows 11 by pressing Win + I on the keyboard.
Step 3: Navigate to Bluetooth & devices and click Printers & scanners on the right side.
Step 4: In Add a printer or scanner, choose Add device.
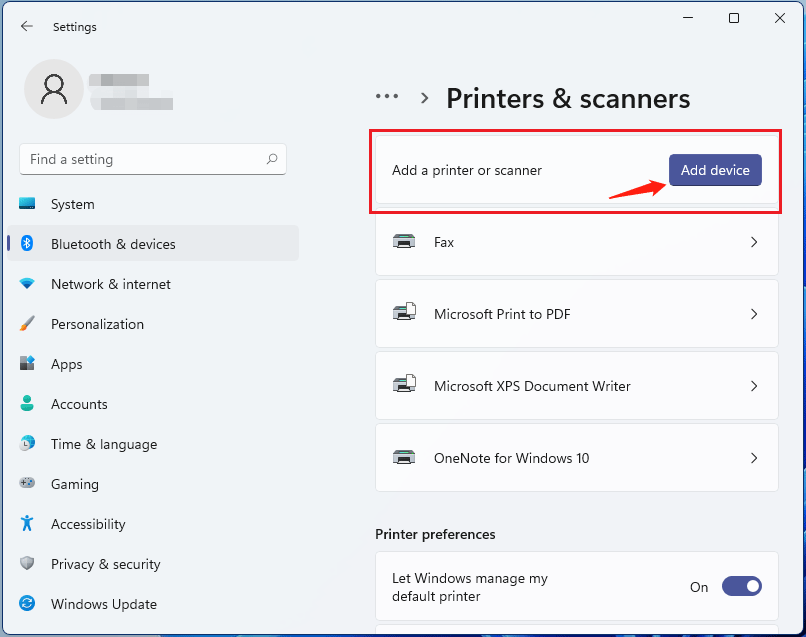
Step 5: After a few seconds, Windows will automatically detect the devices connected to the computer. Locate the printer and click Add device to install your wired or wireless printer to Windows 11.
Manually Add a Printer in Windows 11
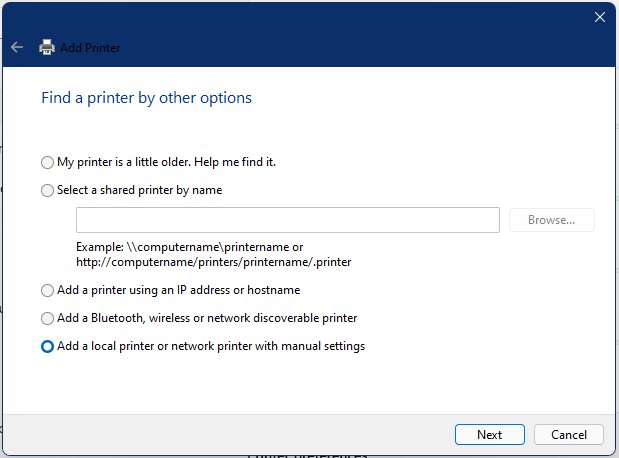
If Windows cannot find your wired or wireless printer and you get the message “The printer that I want isn’t listed”, you need to manually set up the printer by following these steps below.
Step 1: In Windows Settings, go to Bluetooth & devices > Printers & scanners > Add device > Add manually.
Step 2: There are many options for you to find your printer.
Add a wired printer:
1. Choose Add a local printer or network printer with manual settings to continue if your printer is connected locally to your computer.
2. Check Use an existing port and choose the port that the printer is connected to from the list.
3. Choose a printer and click one button to install the printer to your PC – Have Disk or Windows Update.
4. Finish the installation by following the wizards on the screen.
Add a wireless printer in Windows 11:
1. If your printer is connected wirelessly, choose Add a Bluetooth, wireless or network discoverable printer.
2. Follow the on-screen instructions to finish the installation.
Final Words
That’s all the information about how to add a printer in Windows 11. It is easy to set up a printer no matter it is connected to your PC via a cable or Wi-Fi. Just follow the steps above to do this task if you have a need.
About The Author

Position: Columnist
Vera has been working at the MiniTool Team for over 10 years as a technical editor and content writer. She mainly focuses on disk and partition management, data recovery, Windows backup and restore, and PC troubleshooting. Through in-depth software testing and hands-on experience, she has helped users solve a wide range of computer problems and better protect their data on Windows devices.
User Comments :