Clearing the Windows 10 update cache manually will solve most of the problems you may have installed the latest Windows 10 update on your computer. This post from MiniTool introduces how to clear Windows update cache.
If you have trouble running Windows Update, it is likely that there is a problem with the update file, or the file is not completely cleared for download or is damaged. Windows update cache location is C:\Windows\SoftwareDistribution\Download. All installation files for Windows updates are stored here.
MiniTool System Booster TrialClick to Download100%Clean & Safe
How to Clear Windows Update Cache
There are 3 ways for you. You can choose one based on your needs. Here is how to do that:
Way 1: Clear Windows Update Cache via File Explorer
First, let’s see how to clear Windows update cache via File Explorer.
Step 1: Type File Explorer in the Search box to open it.
Step 2: Find and right-click Local Disk (C) to choose Properties.
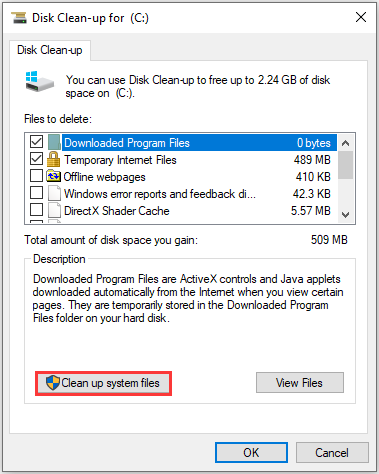
Step 3: Then, click Disk Clean-up. After that, click the Clean up system files option.

Step 4: Then, check the Windows upgrade log files and Temporary Windows Installation files boxes and click OK.
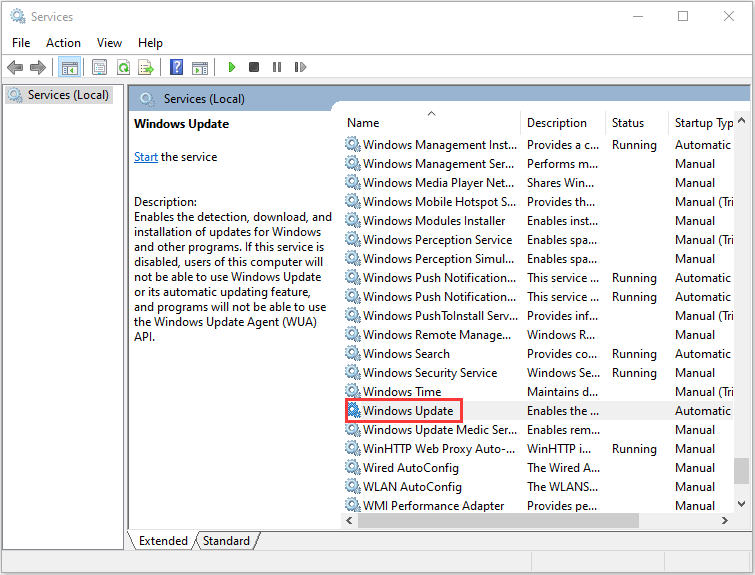
Step 5: Press the Windows and R keys at the same time to open the Run dialogue box. Type services.msc and click OK to open the Services application.
Step 6: From the list of applications, right-click Windows Update to select Stop.

Step 7: Next, open File Explorer and go to C:\ > Windows > SoftwareDistribution. Remove all the files in the folder.
Then, you have cleared the Windows update cache successfully.
Way 2: Clear Windows Update Cache via Command Prompt
The second method for you to reset Windows updates cache is via Command Prompt. The detailed steps are as follows:
Step 1: Type Command Prompt in the Search menu. Then right-click it to choose Run as administrator to open it.
Step 2: Type net stop wuauserv and press the Enter key in the Command Prompt window.
Step 3: Type C: and press Enter. Type cd %Windir%\SoftwareDistribution and press Enter. Type del /f /s /q Download and press Enter.
Then, all of the windows 10 cache files on your machine will now be deleted.
Exclusive 50% OFF Glary Utilities
Way 3: Clear Windows Update Cache via Script
You can also try to clear Windows Update Cache via Script. Follow the instructions below:
Step 1: Open Notepad and Insert the below code in bold
@Echo On
net stop wuauserv
C:
cd %Windir%\SoftwareDistribution
Type del /f /s /q Download
pause
Step 2: Save the file as Cleardown.cmd on your desktop.
Step 3: Right-click the Cleardown.cmd file and select run as administrator.
Step 4: When the Script has finished it will pause so you can see the output of what it has done.
How to Reset Windows Update Cache
You may also wonder how to reset Windows update cache. Here are the steps:
Step 1: Type Command Prompt in the Search menu. Then right-click it to choose Run as administrator to open it.
Step 2: Type the following command one by one:
net stop wuauserv
net stop cryptSvc
net stop bits
net stop msiserver
Step 3: Next, run the following command one by one.
ren C:\Windows\SoftwareDistribution SoftwareDistribution.old
ren C:\Windows\System32\catroot2 Catroot2.old
Final Words
This post has introduced how to clear Windows update cache and how to reset Windows update cache. I hope that this post can be helpful to you.


User Comments :