You can defrag Windows 10 with these 3 steps to optimize your Windows 10 PC hard drive to make the computer work smoother and start up faster. Check how to defrag Windows 10 hard drive below. To manage Windows 10 hard drive, you can use MiniTool’s flag product – MiniTool Partition Wizard.
How to defrag Windows 10 computer hard drive?
If your Windows 10 computer becomes slower and slower, it may be because the files on the hard disk drive are fragmented. Your computer has to check different places in the hard drive for those pieces.
To get your computer go back to a normal status and run more smoothly and quickly, you can repair Windows 10 by defragging Windows 10 PC hard drive to optimize its performance. Windows 10 provides a built-in free disk defrag tool to help you accomplish this Windows 10 defragment task.
Like Windows 8 and Windows 7 defragment, Windows 10 also automatically defragment files on a regular time, once a week by default, but sometimes it may not run as expected. When you find that it takes much longer to open a file, you may consider to defragment Windows 10 PC hard drive manually.
3 Steps to Defrag Windows 10 Computer Hard Drive
As for how to defrag hard drive in Windows 10, you can follow the 3 simple steps below to do it.
Step 1. Open Windows 10 Defragment and Optimize Drives Tool
You have two ways to open this best free defrag software – Windows 10 Defragment and Optimize Drives.
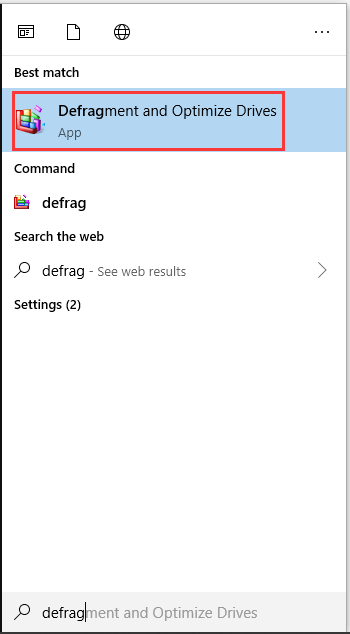
You can click the search bar in Windows 10 taskbar and enter defrag, and choose Defragment and Optimize Drives to open this app.
Alternatively, you can also click Start, and type Defragment and Optimize Drives, and select the top result to open this app.
Step 2. Select and Analyze the Hard Disk Drive You Want to Defrag
Before you defrag Windows 10 drive, normally you can analyze the hard drive first to see if your Windows 10 computer hard disk drive needs optimization.
You can select a drive on your Windows 10 computer and click Analyze button to let it analyze the disk fragment rate. After the analysis is completed, you can check the percentage of fragmented files.
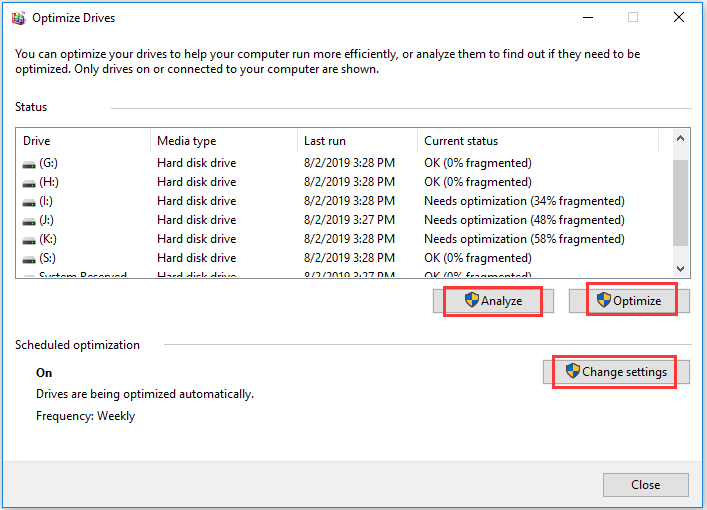
If the result shows that the drive is less than 10% fragmented, then you don’t have to optimize the drive, if not, you can defrag the Windows 10 drive. Besides, if you want to make the fragmentation rate lower, you can also do the Windows 10 defragment task even if it is under 10%.
Note: If you have an SSD, the Analyze button is grayed out. SSD doesn’t need to be defragmented. For SSDs, you don’t need to worry about disk defragmentation.
Step 3. Defrag Windows 10 PC Hard Drive
Then you can select the target drive and click Optimize button to defragment Windows 10 PC with the best free defrag software.
After the defragment process is finished, the target drive should display 0% fragmented in Optimize Drives app.
You may also like: 9 Ways to Clean up Disk Space in Windows 10
How to Change Windows 10 Disk Defrag Schedule
If you want to change the frequency of the optimization for your Windows 10 computer, you can follow the steps below.
Step 1. Follow the same guide in Step 1 above to enter into Optimize Drives app.
Step 2. Click Change settings button, and set the frequency to run the disk defragmentation on a schedule. You can choose Daily, Weekly (default), or Monthly.
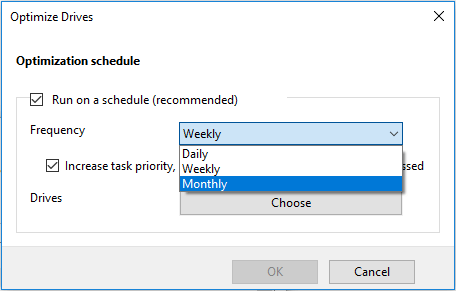
Step 3. Click Choose button to select the drives you want to apply the new disk optimization schedule. And click OK to carry out the changes.
Bottom Line
Windows 10 disk defragment can prolong the life span and improve performance of your Windows 10 computer hard disk drive. If you find the files are hard to open and load, you can follow the 3 steps above to defrag Windows 10 hard drive with ease.
If you’d like to wipe all Windows 10 PC hard drive data, you can refer this post: Top 10 Free Hard Disk Drive Data Wipe Software for Windows 10/8/7.
User Comments :