How to defrag Windows 11 hard drive to boost your computer’s performance? This post offered by MiniTool shows you three simple ways to defrag your PC to make it work smoother. If you find the computer runs slowly, try one way now to optimize the hard drive by defragging.
Need to Defrag Windows 11
Sometimes you find your PC running Windows 11 gets slower and slower and one of the reasons for this is that the hard drive files are fragmented. Over time, files are saved, re-saved, or deleted, and small information packets are stored in random locations on the hard drive.
Since more and more data is written and deleted, more and more fragments are created. On the HDDs, these files take longer to find because the read head must move to various locations to access these files.
One reliable solution is defragmentation. This can eliminate the gap between files to avoid movement to offer fast reading and writing speed of your PC. Not only HDDs but also SSDs (just not as much frequently as HDDs) need defragmentation.
Well then, how to defrag a Windows 11 PC to get better PC performance? 3 ways are introduced below.
3 Ways to Defrag Hard Drive on Windows 11
Defrag Windows 11 with Drive Optimization
Windows 11 comes with a defrag tool to defragment your hard drive. With it, you can custom something to automatically run defragmentation to optimize your PC hard drive. The following is how to defrag Windows 11 PC.
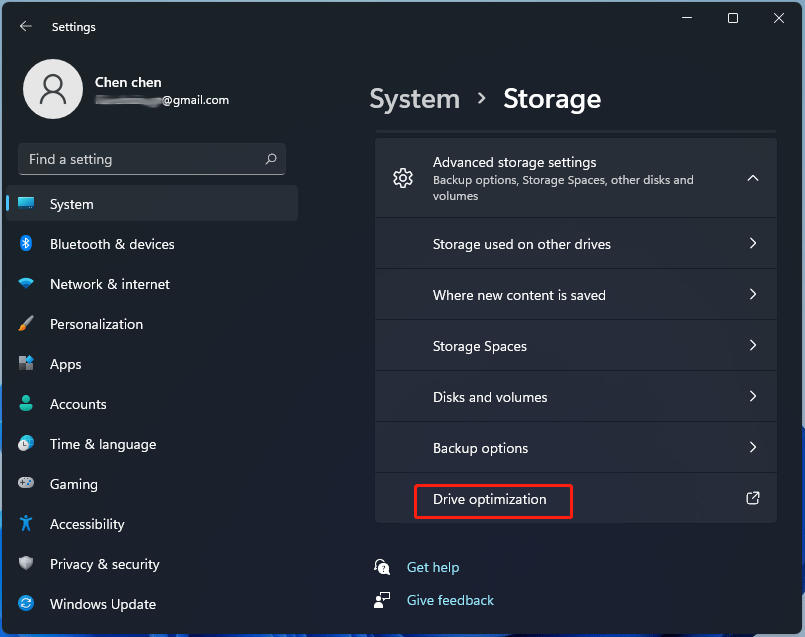
1. Open the Windows Settings app via the shortcut combination Win + I.
2. Under the System tab, go to click Storage from the right section.
3. Scroll down and click Advanced storage settings.
4. Choose Drive optimization and the Optimize Drives window will open.

5. Choose the drive that you want to defrag and click Optimize to begin the defragmentation.
If you wish, you can let Windows automatically defrag the hard drive on your Windows 11 PC to maintain the PC performance.
Here is how to do this task:
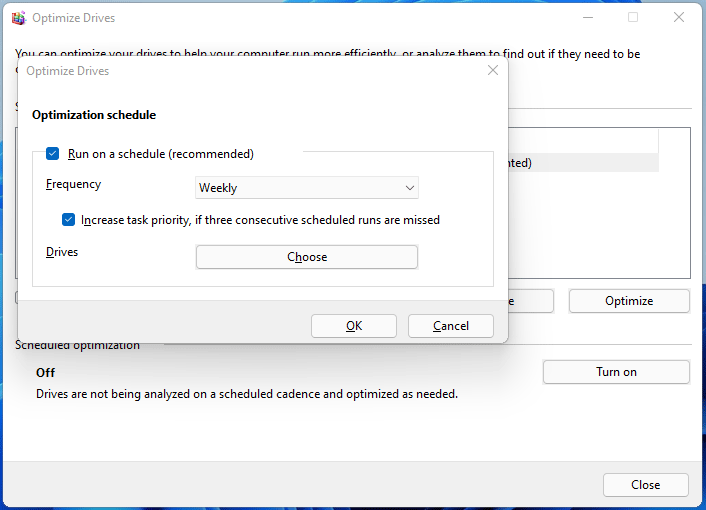
- In the Optimize Drives interface, click Turn on from the Scheduled optimization
- Check the box of Run on a schedule, and choose the frequency of the schedule – Daily, Weekly, or Monthly.
- Make sure the option of Increase task priority, if three consecutive scheduled runs are missed is ticked.
- Click the Choose button and then select the drives you want to optimize on a regular schedule. Ensure you select Automatically optimize new drives and then click OK.

The hard drives will be automatically and periodically defragmented to improve the performance of the PC.
Defrag Windows 11 via Command Prompt
There is another way to defragment your hard disk and it is using Command Prompt.
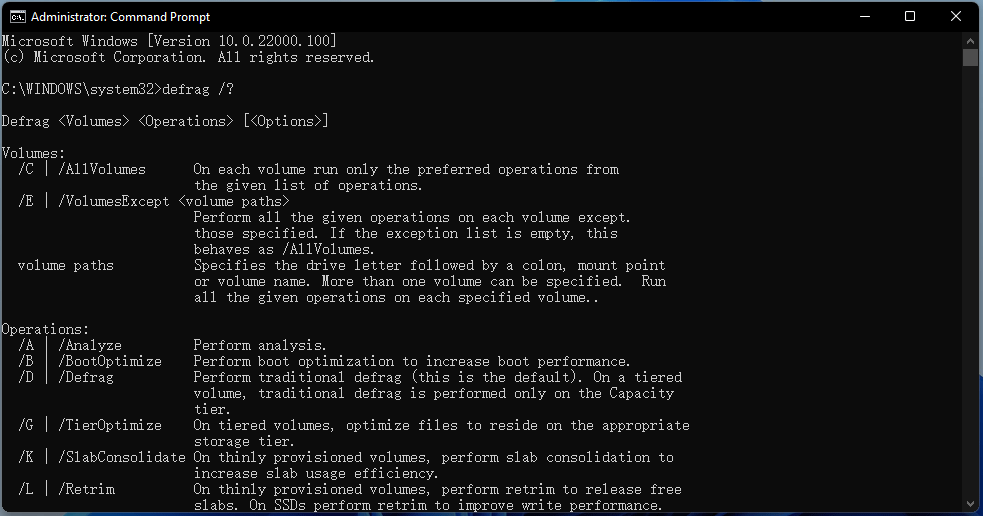
- Launch Command Prompt (CMD) in Windows 11.
- In the CMD window, type defrag /? and press Enter. This can list all the options supported by the defrag. To use defrag, enter the command – defrag [drive letter] [parameter] [extra parameters].

For example, if you want to simply defrag your drive C, use the command defrag C:. To analyze your C drive if it needs the defrag or not, type defrag C: /A. To defrag all your drives at once, type defrag /C and press Enter. Just use the correct command line based on the given parameters on the CMD window.
Defrag Hard Drive Using Batch file in Windows 11
In addition, you can defrag Windows 11 hard disk using a batch file, and here is how to perform the task.
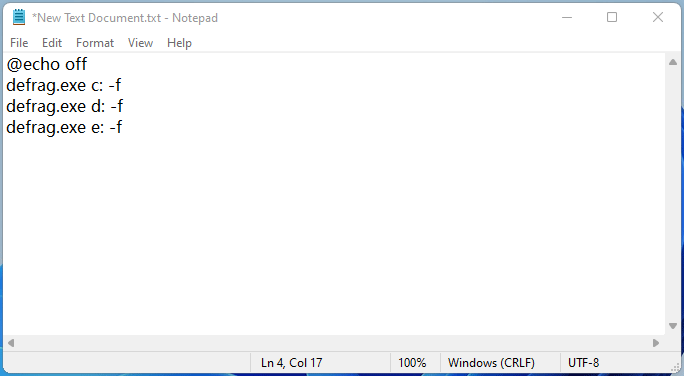
1. Press Win + R, type notepad, and click OK.
2. Open File Explorer to see which drives your PC has (my PC has C, D, E drives). Then, type the following words to the text editor:
@echo off
defrag.exe c: -f
defrag.exe d: -f
defrag.exe e: -f

3. Save the file as a .bat file.
4. Run this file with admin privileges to defrag the hard drive.
That’s all the information about how to defrag Windows 11 hard drive. Just choose one for defragmentation to boost the performance of your computer. If sometimes you cannot defrag your disk, refer to this post to get solutions – Windows Defrag Not Working: Here’re Top 5 Solutions.

User Comments :