An Introduction to Windows Startup Repair
This section explains what the Windows Startup Repair is and how it works.
What Is Windows Startup Repair
Startup Repair is a built-in automatic repair component in Windows operating systems that diagnoses common issues when a computer fails to boot normally.
This tool is usually triggered automatically when the system detects consecutive startup failures, or it can be manually launched from the Windows Recovery Environment (WinRE).
How Does the Startup Repair Work
This feature operates in two steps: checking for boot issues and attempting repairs.
Phase 1. Diagnostic phase:
It checks the following key points in sequence:
- Is the partition table (MBR/GPT) corrupted?
- Is the Boot Configuration Data (BCD) abnormal?
- Are critical system files missing or corrupted?
- Did recent updates, drivers, or registry changes cause boot failure?
- Is there an error in the disk file system?
Phase 2. Repair phase:
Based on the detected problems, it attempts to:
- Repair the Boot Record.
- Repair the BCD.
- Replace corrupted system files.
- Roll back failed updates or drivers.
- Restore a backup copy of the registry.
- Repair file system errors.
Final result:
- If the problem is within its capabilities, the system will automatically restart and boot into the desktop.
- If the problem is too severe (e.g., physical hard drive damage, complete BCD loss), it will suggest using System Restore, Command Prompt, or resetting the computer.
Supplementary Notes: What Is Quick Machine Recovery
Windows 11 24H2 and later versions introduced a recovery feature called Quick Machine Recovery.
This feature is designed to handle large-scale or severe startup failures. It is more intelligent than Startup Repair, but it relies more heavily on the network.
Here are the advantages of this feature:
- Automation: Automatically triggers when a serious startup failure is detected, requiring no manual intervention.
- Cloud support: Obtains the latest fixes through Windows Update, offering broader coverage.
- Enhanced recovery capabilities: Resolves complex problems that traditional Startup Repair cannot handle.
- Enabled by default: Automatically enabled in Windows 11 Home, requiring no additional user configuration. For Windows Pro and Enterprise editions, it is disabled by default. Access Settings > Recovery > Quick machine recovery to enable it.
After understanding how Startup Repair works, learn how to fix boot issues on Windows 10/11 using Startup Repair.
Case 1: Run Startup Repair When Your PC Can Boot to Windows
When the computer can boot into Windows, use Settings, the Power menu, Command Prompt, or PowerShell.
Option 1: Via the Settings App
Here is how to run Startup Repair on Windows 10/11 from Settings:
Run Windows 10 Startup Repair:
Step 1: Press Win + I to open the Settings app.
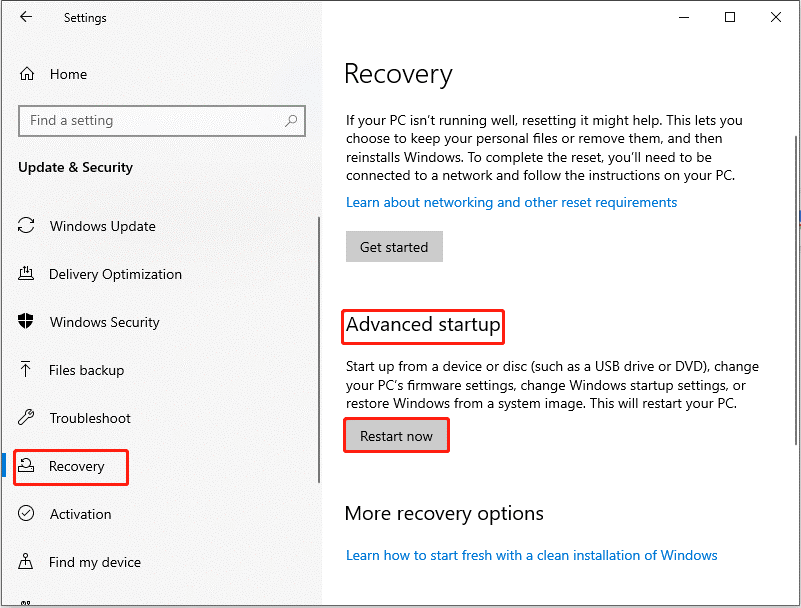
Step 2: Click Update & Security > Recovery.
Step 3: Click the Restart now button under Advanced startup.
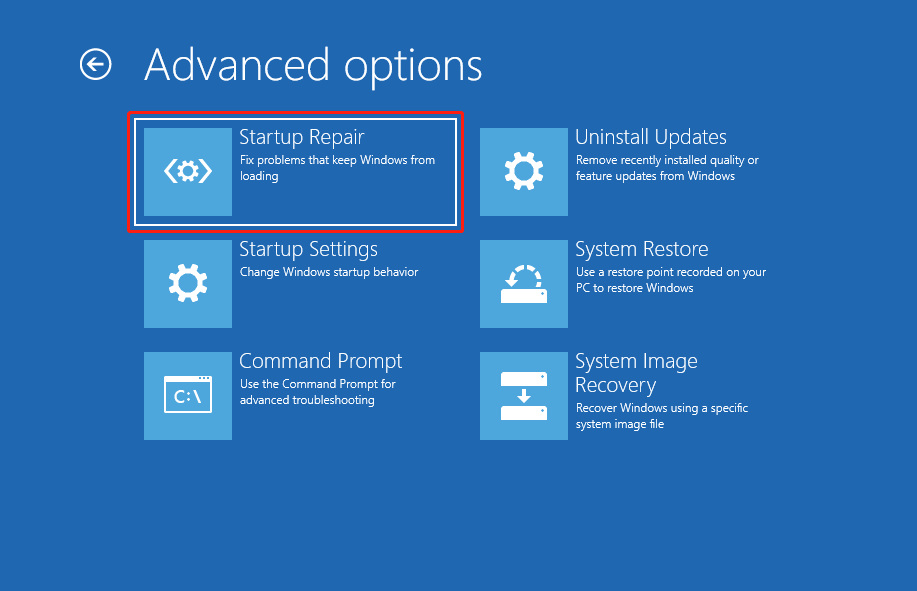
After your PC restarts, you will enter WinRE. Now, select Troubleshoot > Advanced options > Startup Repair.
Run Windows 11 Startup Repair:
Step 1: Press Win + I to open Settings and then click System > Recovery.
Step 2: Under Advanced startup, click Restart now.
After your PC restarts, select Troubleshoot > Advanced options > Startup Repair.
Wait for the process to complete.
Option 2: Through the Power Menu
Here is how to run Startup Repair through the Power menu:
Step 1: Press and hold the Shift key on your keyboard.
Step 2: Click the Windows button and select Power > Restart.
When the device restarts, select Troubleshoot > Advanced options > Startup Repair in WinRE.
Option 3: With Command Prompt
Learn how to perform Startup Repair using Command Prompt:
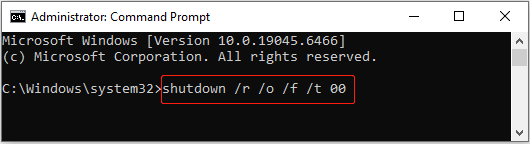
Step 1: Type Command Prompt in the Windows search bar, right-click the best match, and select Run as administrator.
Step 2: In the Command Prompt, type shutdown /r /o /f /t 00 and press Enter.
Step 3: When accessing WinRE, click Troubleshoot > Advanced options > Startup Repair.
Wait for the repair process to finish.
Option 4: With PowerShell
Learn how to run Startup Repair using PowerShell:
Step 1: Right-click the Windows button and choose Windows PowerShell (Admin).
Step 2: Input shutdown /r /o /f /t 00 and press Enter.
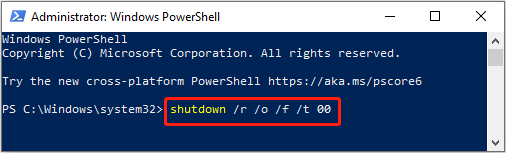
Step 3: In WinRE, select Troubleshoot > Advanced options > Startup Repair.
Wait until the system repair is fully done.
Case 2: Run Startup Repair When the Computer Cannot Boot Normally
When the computer cannot boot normally, use the Power button or installation media to perform Startup Repair.
Option 1: Use the Power Button
Here is how to use the Power button to run Startup Repair:
Step 1: Repeat the following steps:
- Hold down the Power button for 10 seconds to force your PC to shut down.
- Press the Power button again to start the computer.
- Once it powers on, press and hold the Power button for another 10 seconds to turn it off.
Step 2: When the Automatic Repair page shows, click the Advanced options button.
Step 3: Then, select Troubleshoot > Advanced options > Startup Repair.
Option 2: Use an Installation Media
When the system fails to boot normally, booting from the installation media is also a viable option. Here is how to use it to run this feature:
Step 1: Prepare installation media
Plug a USB drive into a working PC. Download Windows Media Creation Tool. After downloading, run the tool and follow the wizards to create bootable Windows installation media.
Step 2: Boot from the installation media
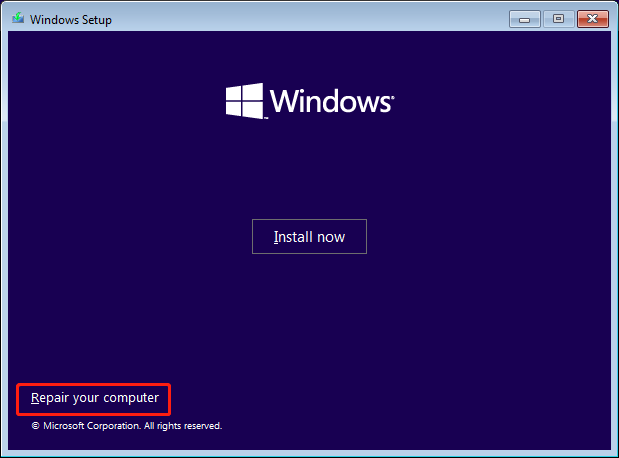
Insert the USB drive into your unbootable computer. Set the boot order in BIOS/UEFI to boot from this media. After powering on, the Windows Setup interface will pop up. Select your language and keyboard layout, and click Next.
Step 3: Enter WinRE
On the installation interface, click Repair your computer in the lower left corner to enter WinRE.
Step 4: Perform Startup Repair
In WinRE, select Troubleshoot > Advanced options > Startup Repair.
When the repair is done, check if the issues are fixed.
MiniTool Power Data Recovery FreeClick to Download100%Clean & Safe
Wrapping Things Up
In a word, this post teaches you how to run Startup Repair with the help of Settings, the Power menu, Command Prompt, PowerShell, and the installation media.
If you have any questions about the MiniTool product, contact us at [email protected].
About The Author

Position: Columnist
Chelsea graduated from university with a major in English. She has a strong interest in English writing. It is this passion for writing that led her to become an English editor. Her articles mainly focus on data recovery and other computer industry news. As an energetic and outgoing girl, Chelsea enjoys listening to music, singing, riding bikes, and eating in her spare time.
User Comments :