What Is Windows 10 AutoPlay?
Windows AutoPlay is a Windows snap-in feature. It can examine the connected CDs, DVDs and devices on your Windows 10 computer and automatically play music, view images, install software, and play games.
Windows 10 AutoPlay not working has many situations like:
- AutoPlay not working when an external device is connected.
- DVD autoplay not working in Windows 10.
- AutoPlay is enabled but not working.
- USB AutoPlay not working in Windows 10.
No matter which situation you are facing, you can just try the following solutions to help you out.
How to Fix Windows 10 AutoPlay Not Working?
- Re-enable AutoPlay in Windows 10
- Reset the AutoPlay Settings
- Remove all USB devices
- Use Command Prompt
- Modify the Registry key
- Modify Shell Hardware Detection Service
- Change Notification settings
- Modify the Group Policy
- Update Windows 10
#Fix 1: Re-enable AutoPlay in Windows 10
Use Settings
- Click Start.
- Go to Settings > Devices > AutoPlay.
- Turn off the button for Use AutoPlay for all media and devices and then turn it on. However, if it is not enabled, it should be the reason for AutoPlay not working in Windows 10. You need to enable it and then check whether it can work normally.

Use Control Panel
If Autoplay doesn’t pop up, you can also use Control Panel to enable Windows AutoPlay.
1. Use Windows search to search for control panel and select the first result to open it.
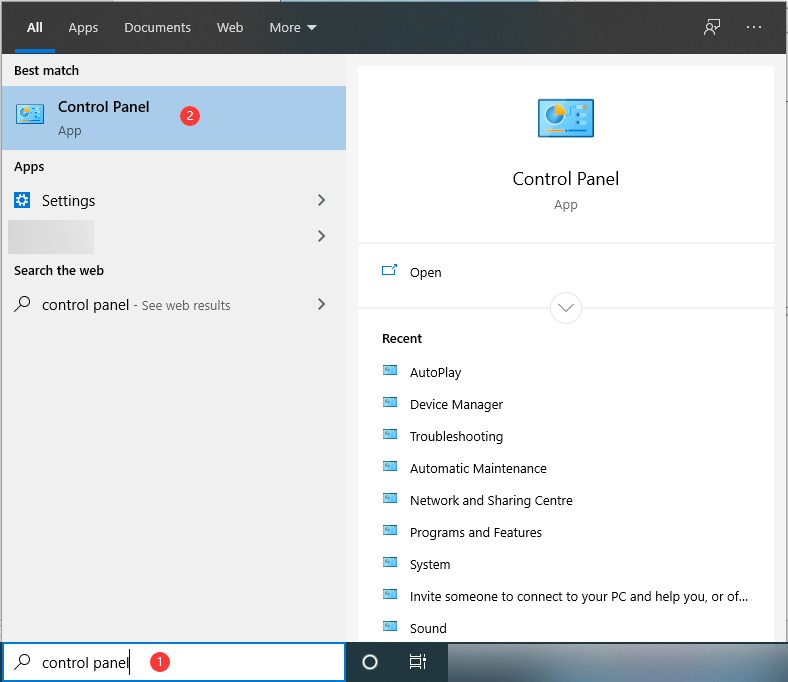
2. Click AutoPlay.

3. Uncheck Use AutoPlay for all media and devices and then check it again.
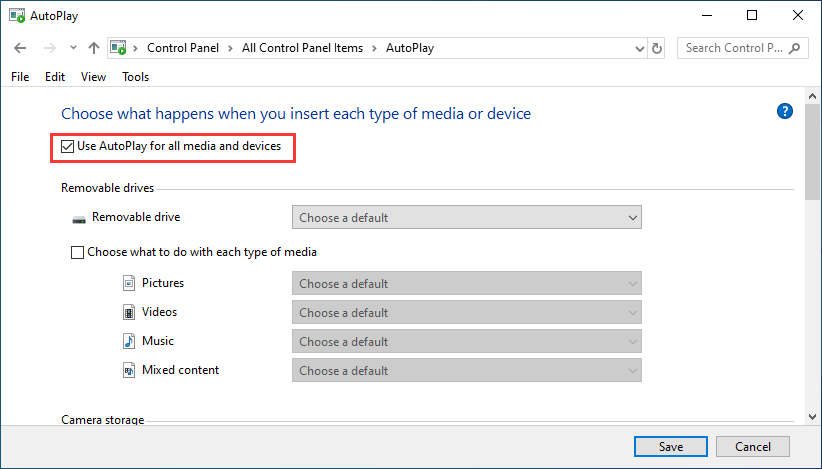
4. Click Save.
#Fix 2: Reset the AutoPlay Settings
- Open Control Panel.
- Click AutoPlay.
- Scroll down to the bottom of the AutoPlay settings interface and click the Reset all defaults button.

#Fix 3: Remove All USB Devices
Some users reported that their Windows 10 AutoPlay not working issue is caused by a connected USB device. Perhaps, it is also the cause of your issue. You can disconnect all USB devices and then re-connect them one by one to find which one is the culprit.
#Fix 4: Use Command Prompt
- Run Command Prompt as administrator.
- Type net start shellhwdetection and press Enter.
- Restart your computer.
You can also do these things using Windows PowerShell.
#Fix 5: Modify the Registry Key
Before modifying the registry key, you’d better back up the registry key for safe.
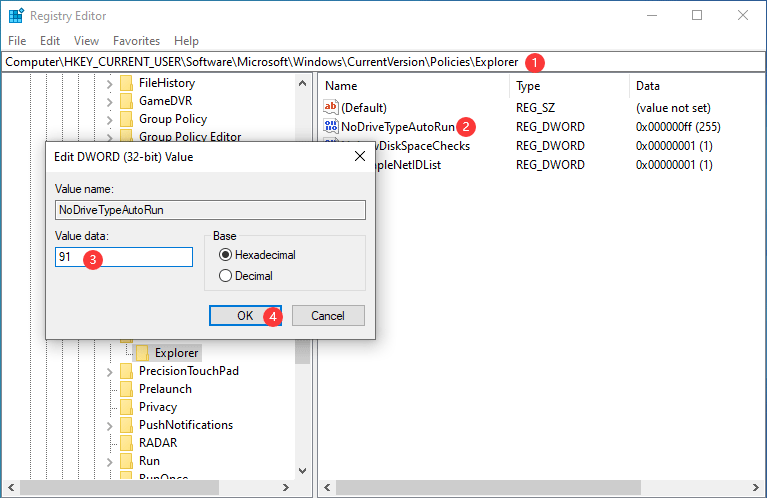
1. Press Win+R to open Registry Editor.
2. Type regedit and press Enter to open Registry Editor.
3. Go to this path: HKEY_CURRENT_USER\Software\Microsoft\Windows\CurrentVersion\Policies\Explorer.
4. Double-click NoDriveTypeAutoRun and change to value data to 91.
5. Click OK to save the change.
6. Go to HKEY_LOCAL_MACHINE\Software\Microsoft\Windows\CurrentVersion\Policies\Explorer and change the value data to 91 for NoDriveTypeAutoRun as the above steps tell you to do.
#Fix 6: Modify Shell Hardware Detection Service
- Press Win+R to open Run.
- Type services.msc and press Enter to open Services.
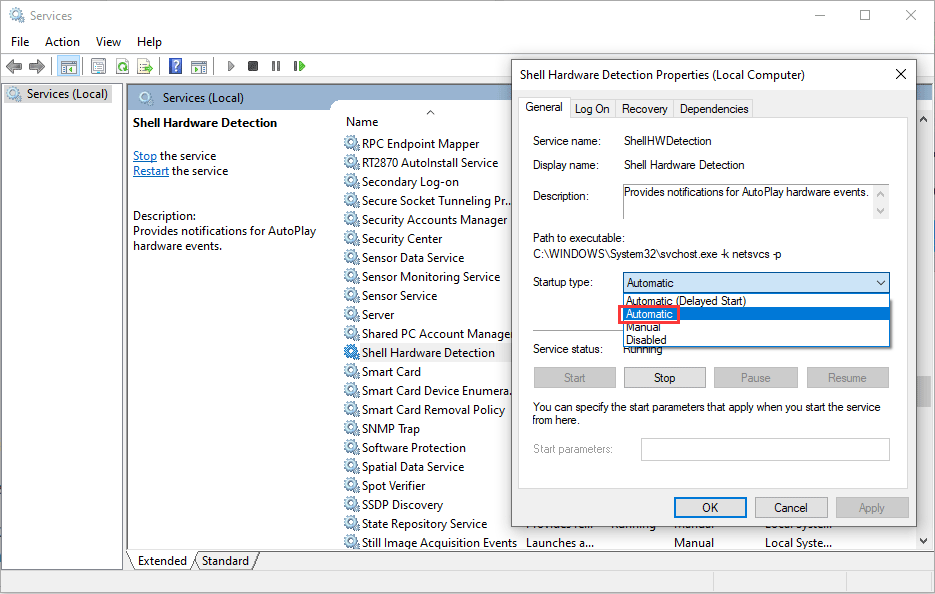
- Scroll down to find Shell Hardware Detection and double-click it.
- Select Automatic for Startup type. If Shell Hardware Detection is not running, you need to click the Start button to run it.
- Click OK.
- Close Services.
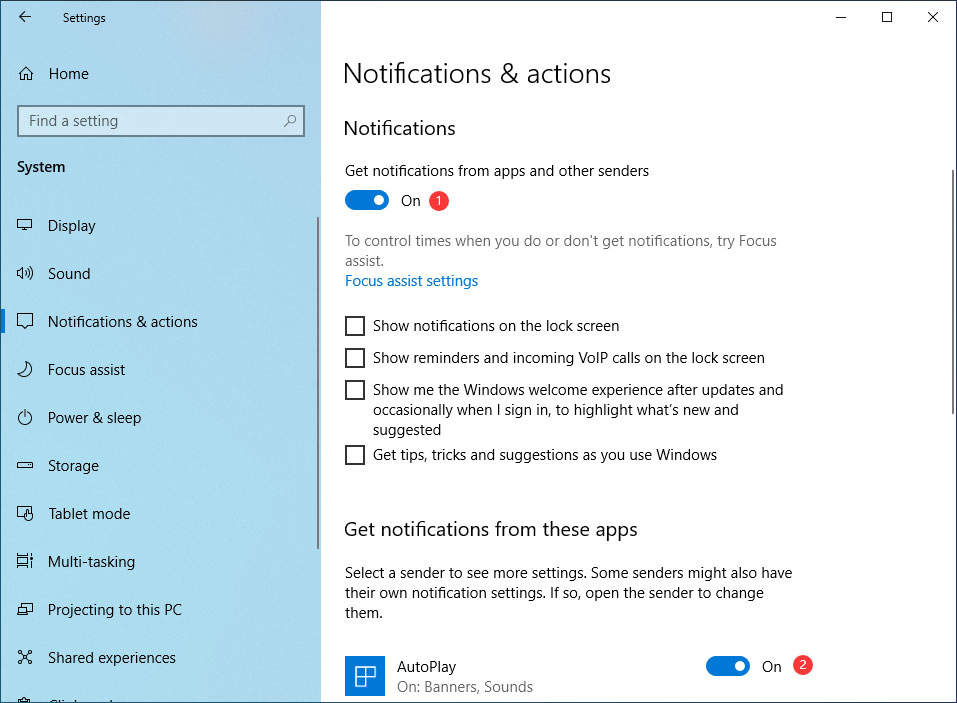
#Fix 7: Change Notification Settings
You can also enable AutoPlay in Windows 10 in Notifications & actions.
- Go to Start > Settings > System > Notification & actions.
- Turn on the button for Get notification from apps and other senders if it is not enabled.
- Scroll down to find AutoPlay and turn it on.
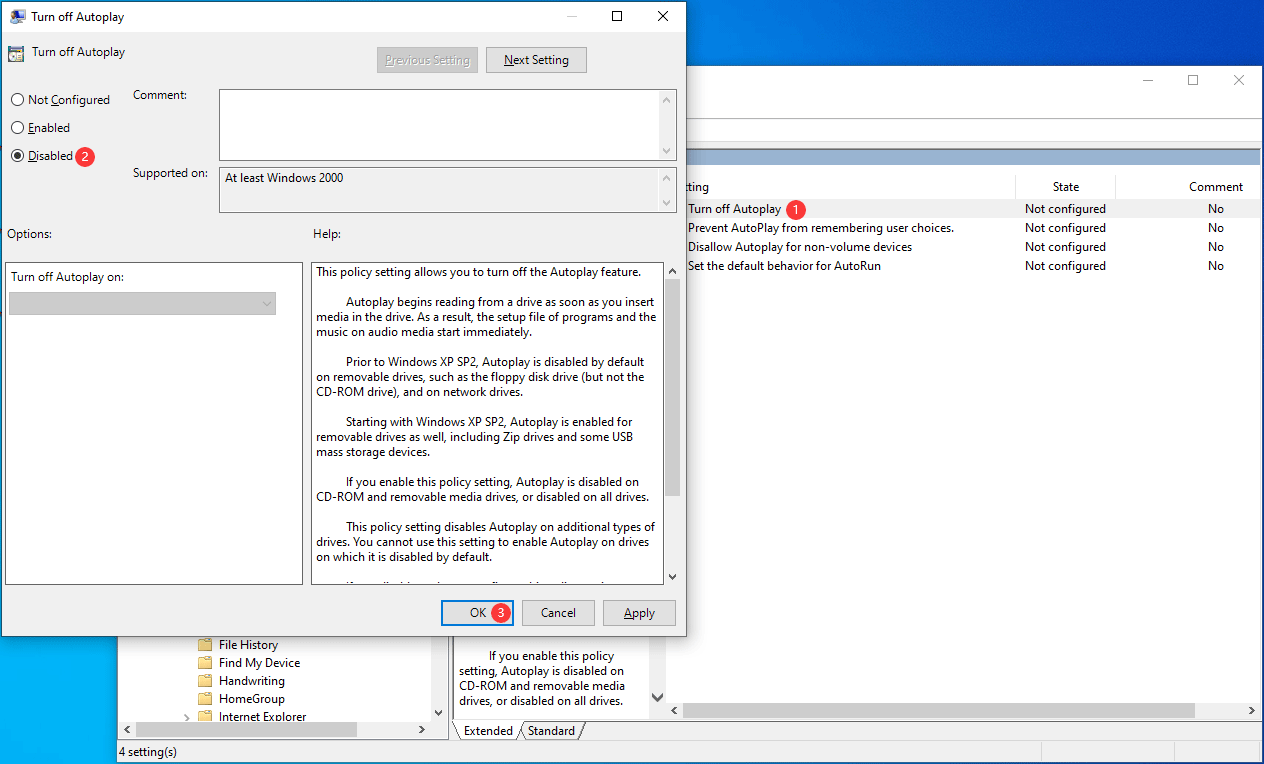
#Fix 8: Modify the Local Group Policy
Local Group Policy is only available in Windows Pro or more advanced editions. It is not available in Windows 10/11 Home editions.
- Press Win+R to open Run.
- Type gpedit.msc and press Enter to open Local Group Policy Editor.
- Go to Computer Configuration > Administrative Templates > Windows Components > Autoplay Policies.
- Double click AutoPlay Policies to open it.
- Select Disabled on the pop-up interface.
- Click Apply and OK to save the change.
If the issue persists you can go to User Configuration > Administrative Templates > Windows Components > Autoplay Policies and use the same steps mentioned above to modify the group policy.
#Fix 9: Update Windows 10
An outdated Windows 10 can also cause Windows 10 AutoPlay not working. You can go to Start > Settings > Update & Security to upgrade your Windows to the latest version.
View video guide:
Bottom Line
We hope you can find a suitable solution to solve Windows 10 AutoPlay not working or Autoplay doesn’t pop up from this post. If you are facing some other related issues, you can let us know in the comments.
About The Author

Position: Columnist
Stella has been working in MiniTool Software as an English Editor for more than 8 years. Her articles mainly cover the fields of data recovery including storage media data recovery, phone data recovery, and photo recovery, videos download, partition management, and video & audio format conversions.
User Comments :