What is Google Public DNS? When do you need it? How to set it up on your device? Follow the detailed guidelines in this post on MiniTool Website, and your search performance will be improved.
Google Public DNS
There are probably no fastest DNS servers in your local internet service provider and that may slow down your browsing speed. Therefore, when you are encountering some troubleshooting issues during a game or using Google apps, it is strongly recommended to change your DNS configuration to a third-party DNS server to improve performance issues.
In this case, Google Public DNS might be the best option for you because it can speed up your browsing, improve your security and get the desired results with no redirection. This post will show you how to change your DNS configuration to Google DNS on devices including Windows, Mac, PlayStation, Xbox, and Nintendo Switch step by step.
How to Set up Google Public DNS on Your Device?
On Windows
Step 1. Press Win + I to open Windows Settings.
Step 2. Go to Network & Internet > Status > Network and Sharing Center > Change adapter settings.
Step 3. Right-click on the connection for which you want to configure Google Public DNS and select Properties in the drop-down menu.
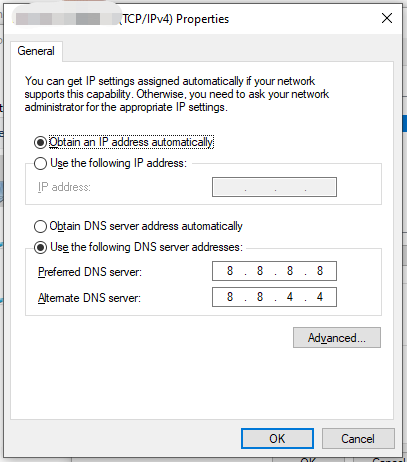
Step 4. In the Networking tab, hit Internet Protocol Version 4 (TCP/IPv4) or Internet Protocol Version 6 (TCP/IPv6) and then hit Properties.
Step 5. Tick Use the following DNS server addresses and write down any existing DNS server entries for future reference. Replace the IP addresses with the following:

For IPv4
- Preferred DNS server: 8.8.8.8
- Alternate DNS server: 8.8.4.4
For IPv6
- Preferred DNS server: 2001:4860:4860::8888
- Alternate DNS server: 2001:4860:4860::8844
Step 6. Press OK.
On Mac
Step 1. Click on the Apple icon on the top-left side of your screen and choose System Preferences in the context menu.
Step 2. Go to Network and select the connection for which you desire to configure Google Public DNS.
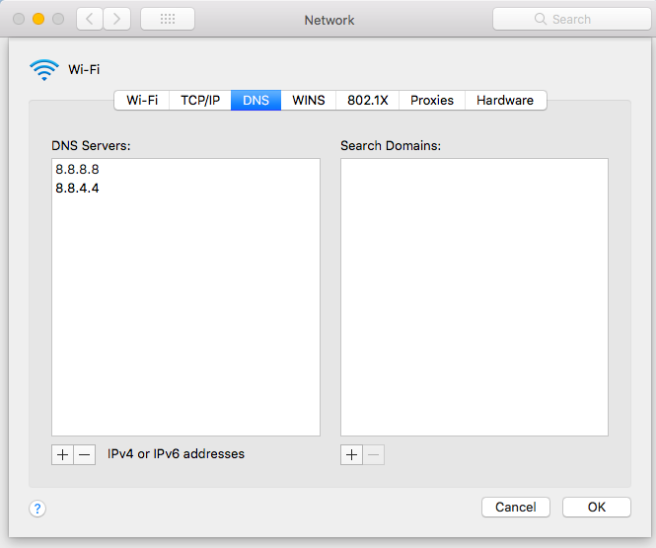
Step 3. In the Advanced menu, hit DNS and you will see your default DNS address.
Step 4. In the left pane, hit the + icon beside IPv4 or IPv6 addresses to add Google Public DNS. Type the following DNS addresses:

For IPv4
- Preferred DNS server: 8.8.8.8
- Alternate DNS server: 8.8.4.4
For IPv6
- Preferred DNS server: 2001:4860:4860::8888
- Alternate DNS server: 2001:4860:4860::8844
Step 5. Hit OK > Apply to save the changes.
On PlayStation
Step 1. Go to Settings > Network > Set Up Internet Connection.
Step 2. Select Wifi/LAN > Custom.
Step 3. In Custom, change some settings as follows:
- IP Address Settings: Automatic
- DHCP Host Name: Do Not Use
- DNS Settings: Manual
Step 4. Type the following IP addresses and change the following settings:
- Primary DNS: 8.8.8.8
- Secondary DNS: 8.8.4.4
- MTU Settings: Automatic
- Proxy Server: Do Not Use
Step 5. Select Test Internet Connection.
On Xbox
Step 1. Go to Settings > General > Network Settings > Advanced settings > DNS settings.
Step 2. Set the DNS settings to Manual and then type the following content:
- Primary DNS: 8.8.8.8
- Secondary DNS: 8.8.4.4
On Nintendo Switch
Step 1. Go to Home > System Settings > Internet Settings > Connection Settings.
Step 2. In the connection settings screen, select the connection file.
Step 3. Click Change Settings > DNS.
Step 4. If prompted by a message that says Auto-Obtain, hit No.
Step 5. Select Detailed Setup and enter the following IP addresses:
- Primary DNS: 8.8.8.8
- Secondary DNS: 8.8.4.4
Step 6. Hit OK to save the changes.
Also read: 5 Best DNS for Gaming (Including PS4 and Xbox One)

User Comments :