A clean boot runs Windows with only the essential drivers and programs, allowing it to isolate software conflicts and troubleshoot issues. This MiniTool guide explains how to perform a clean boot and identify the problematic program or service.
About Windows 11/10 Clean Boot
Because many settings, drivers, and programs interact simultaneously, troubleshooting Windows 11 or 10 can be complex. In such a varied environment, software conflicts can occur.
Conflicts can manifest in various ways, such as system instability, performance issues, application failures, and boot issues. Usually, they occur when two or more programs interfere with each other, often leading to app crashes.
Performing a clean boot is an effective way to locate software conflicts.
What Is a Windows Clean Boot
A clean boot is a troubleshooting technique that starts Windows with a minimal set of drivers and startup programs.
As the name suggests, a clean boot disables all non-Microsoft startup programs and services, loading only essential Windows components.
This method is particularly useful for identifying which background applications or services are causing a problem. After pinpointing the problematic program or service, uninstall it to resolve the issue.
Does a Clean Boot Delete Files or Applications
Some users are concerned about data loss during the clean boot. A clean boot is a diagnostic tool to troubleshoot issues by finding the conflicting software. It is a safe process and does not delete your personal files, documents, installed apps, and other data.
This is different from a factory reset or clean installation, which removes personal files and settings. Therefore, you don’t need to worry about data loss. Perform a Windows clean boot to troubleshoot software conflicts.
When Should You Perform a Clean Boot
Running a clean boot in Windows 11 or 10 is primarily used to address system and application issues. The following are typical scenarios in which a clean boot is necessary.
- Applications or games not working properly: When a specific program or game freezes, crashes, or closes unexpectedly, consider a Windows clean boot. This helps determine if a background program or service is the cause.
- Software conflicts: When you have multiple programs running, they sometimes interfere with each other, causing problems. A clean boot allows you to find the program or service causing the conflict.
- Slow performance issues: If your computer is running slowly, a clean boot can help isolate whether the problem stems from a background program. This app may be consuming too many resources.
- Startup problems: Your PC sometimes doesn’t start normally or shows persistent error messages during the startup process. In this case, you can do a clean boot to see if a startup program triggers the issues.
- Frequent crashes: Your system may be crashing frequently. A clean boot helps eliminate software conflicts as the source of the instability.
- Failed Windows updates: This boot mode can troubleshoot issues where a Windows update fails to install correctly if the software conflicts block the installation.
- Issues after new installations: After installing a new program or driver, some problems may appear. The boot option easily lets you see if the new addition is conflicting with an existing program.
Clean Boot vs Normal Boot
What’s the difference between a clean boot and a normal boot?
To sum up, the primary difference lies in the number of programs and services that are loaded when Windows 11/10 starts up. Aside from this, they differ from each other in several aspects, such as purpose, performance, and user case.
The following table summarizes the differences in detail.
| Features | Clean Boot | Normal Boot |
| Purpose | Primarily for diagnosing and resolving software conflicts and other issues. | Standard operating mode for regular, daily use. |
| Startup items | Loads only the bare minimum of Microsoft drivers and services. Disables all third-party services and non-essential startup programs. | Loads all standard system services, drivers, and programs configured to run at startup. |
| Performance | Faster startup time and reduced resource usage as fewer programs are running in the background. | Slower startup time since this mode includes all third-party apps and services configured to run during startup. |
| Use Case | Identifies if a third-party program is causing issues, like errors, crashes, slow performance, etc. | Daily computer use, such as work, gaming, and browsing. |
| Method | Manually configure the system to access the clean boot state using the msconfig command and then manually restore to a normal boot afterward. | Default setting; Does not require any special user intervention. |
| System state | A diagnostic environment with limited functionality. | A standard and full-featured operating environment ready for user tasks. |
Clean Boot vs Safe Mode
Windows has another mode called Safe Mode, which is also a diagnostic mode to address some problems when you can’t get into the system.
How does it differ from Clean Boot?
Safe Mode loads core Windows drivers and services to fix Windows or driver issues. A clean boot disables third-party startup programs and services and identifies software conflicts.
You can take a look at some differences in the table below.
| Feature | Clean Boot | Safe Mode (Safe Boot) |
| Purpose | Resolves software conflicts from third-party applications and services. | Troubleshoot problems with core Windows components or drivers. |
| What it disables | All non-Microsoft services and startup items. | All except for the most basic drivers and services necessary for Windows to run. |
| Appearance | Looks like a regular Windows environment, just with fewer programs running in the background. | Offers a basic user interface with low resolution and displays “Safe Mode” in the corners of the screen. |
| Control | Gives you more control to selectively disable or enable third-party services and programs to isolate software conflicts. | Provides a fixed and minimal set of options. |
| When to Use | When you suspect a software conflict while a program crashes or won’t install correctly, Windows functions poorly, or you encounter other issues. | When the system won’t start normally, or has a suspected virus or hardware-related driver issues. |
| Access | Manually configured using msconfig when in a normal startup. | Accessed via the Advanced Startup Options in WinRE when the system fails to boot up. (Learn other ways to enable Safe Mode.) |
Now you know so much information about a clean boot, including what it is, when to use it, the differences between a clean boot and a normal boot & Safe Mode.
Next up, we will walk you through a comprehensive guide to learn how to perform a clean boot in Windows 10/11.
How to Clean Boot Windows 11/10
Preparation Work
Before you proceed, we suggest you prepare your system for a clean boot. Preparation includes granting admin privileges, backing up important data, and recording current startup items.
#1. Check Your Account
A clean boot requires an administrative account since disabling startup programs and services is a system-level action.
Without admin rights, you cannot modify these system settings in the System Configuration window. If you are not sure whether you have admin permissions, check it via these steps:
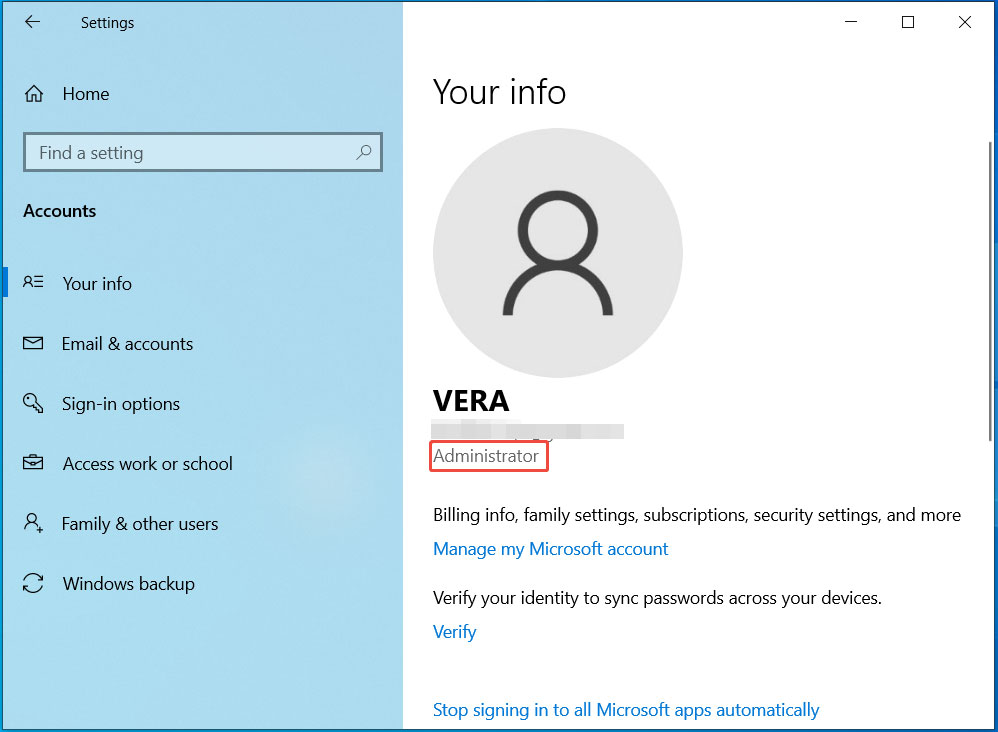
Step 1: Press Win + I on your keyboard to open Settings.
Step 2: Click Accounts in the menu. Then, check the information under your name (in Windows 10, you need to go to Your info).
- If it says “Administrator”, this means you have admin rights.
- If it displays “Standard User”, you don’t have admin permissions.
When you don’t have an admin account, you can create a new one.
- In Windows 10, go to Settings > Accounts > Family & other users > Add someone else to this PC. Then, create a Microsoft account by following the on-screen instructions.
- In Windows 11, navigate to Settings, click Accounts > Other users > Add account, and follow the on-screen instructions to complete setup.
#2. Back up Important Data
A clean boot is safe and doesn’t lead to data loss. Nevertheless, it is wise to back up important files before proceeding as a precautionary measure.
Ensure all documents and files are saved before starting the backup process.
We advise that you back up important data to the cloud using Google Drive, OneDrive, or other services, or to an external hard drive. For cloud backup, refer to this guide on how to back up computer to cloud drive.
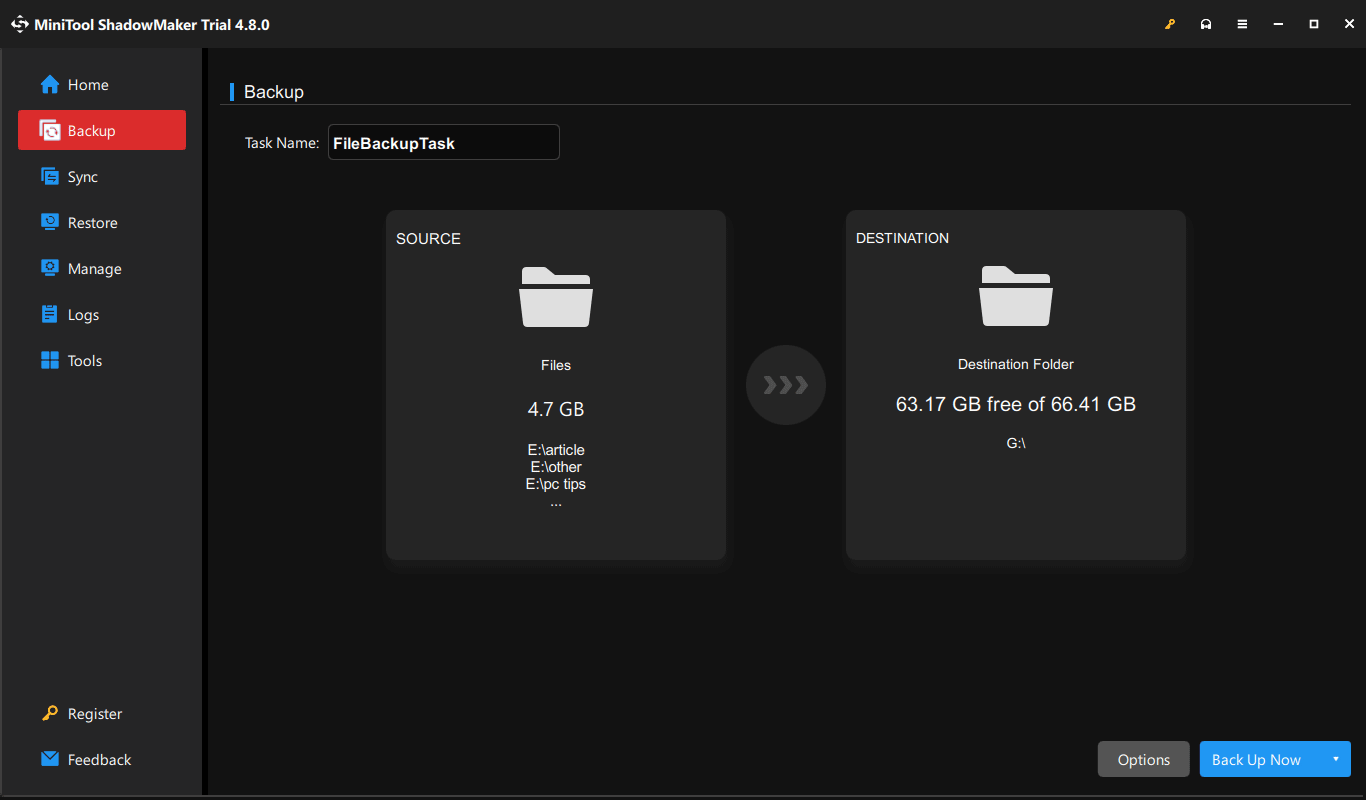
To back up your computer to an external drive, run MiniTool ShadowMaker. As an all-in-one backup software, it allows you to create backups of disks, partitions, systems, files, and folders.
Besides, this program supports setting up a schedule to perform backups automatically, without manual intervention. Moreover, you can run it to back up only the changed or newly added data by setting up the incremental or differential backup type.
Without further ado, let’s start a file backup.
Step 1: Download MiniTool ShadowMaker from the MiniTool website. Then, run the .exe file and complete the installation.
MiniTool ShadowMaker TrialClick to Download100%Clean & Safe
Step 2: Connect an external hard drive to your PC. Then, launch this freeware and head to its Backup tab.
Step 3: To select files or folders you wish to back up, click SOURCE > Folders and Files, tick the desired items, and click OK.
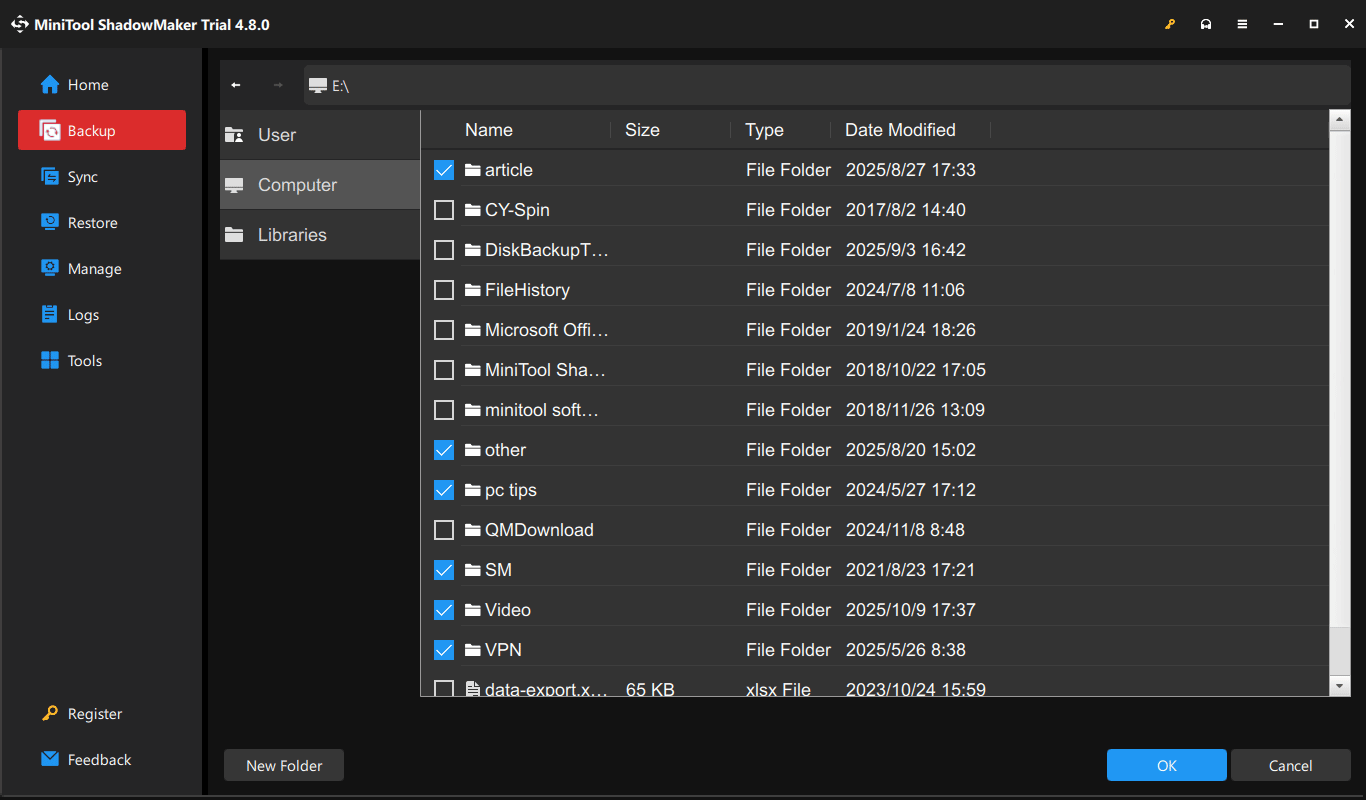
Step 4: Under DESTINATION, pick an external drive, and click OK.
Step 5: Click Back Up Now to implement the data backup immediately.
Depending on the data size, the backup time varies. Wait patiently.
#3. Create a List of Startup Programs
Another task you should perform before a clean boot is recording the current startup programs. This helps you restore the original startup configuration later.
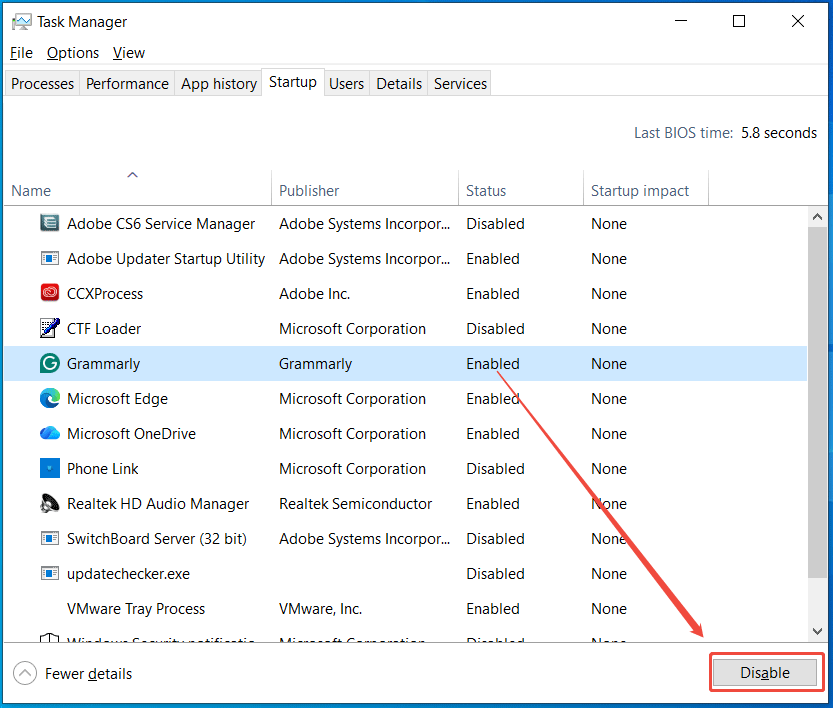
Just open Task Manager via the Win + X menu, navigate to the Startup tab, and check the startup programs.
Next, take a screenshot to record the original settings.

#4. Exit Running Programs
You should exit all running programs and close all open windows to ensure a proper restart. This can prevent any unsaved data from being lost due to forced termination during the clean boot process.
Once preparation is complete, you can proceed with performing a clean boot.
How to Do a Windows Clean Boot
This process includes opening System Configurations, disabling services, and disabling startup programs.
See the breakdown.
Step 1: Open System Configuration.
The System Configuration tool, also known as MSConfig, is a built-in tool. It allows you to modify boot parameters, disable startup items, manage startup, and adjust other startup-related settings.
To open this utility:
- Option 1: Type system configuration in Windows 11/10 Search and choose the best match.
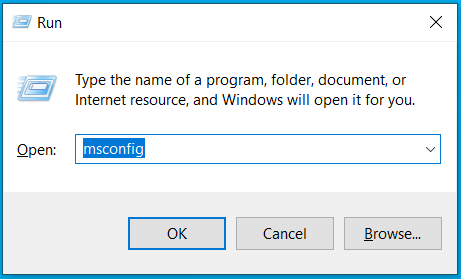
- Option 2: Press Win + R to open Run, type msconfig, and click OK.

Matters needing attention:
According to Microsoft, network policy settings may block you from following these steps if the PC is connected to a network.
You should not use the System Configuration utility to change the advanced boot options unless a Microsoft support engineer guides you to do this. Otherwise, doing this may make the computer unusable.
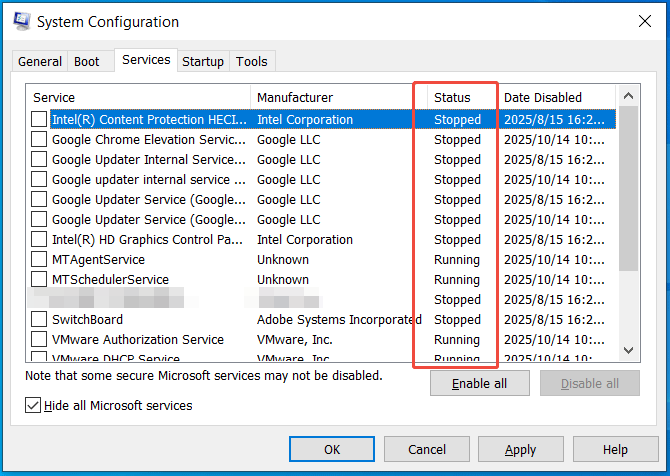
Step 2: Disable Non-Microsoft Services.
Non-Microsoft services are applications or processes that run on a Windows computer that are not provided by Microsoft. They include third-party software, drivers, or other third-party components.
Disabling these services temporarily helps isolate software conflicts.
To disable these services:
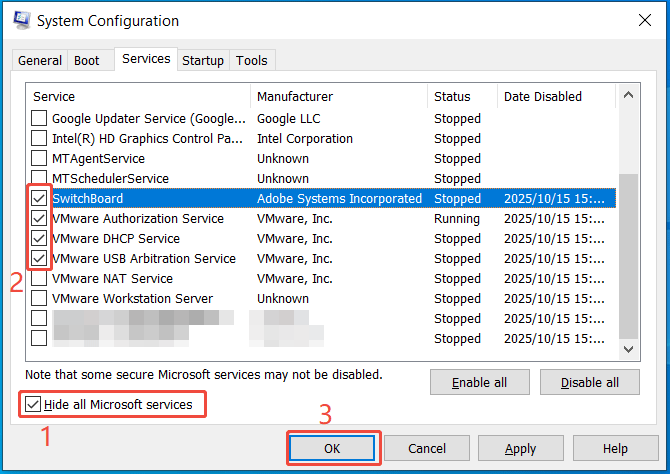
- Go to the Services tab.
- Check Hide all Microsoft services.
- Click Disable all.

Step 3: Disable Startup Programs.
Startup programs refer to applications that automatically launch when a computer starts. To disable them:
- Navigate to the Startup tab, then click Open Task Manager.
- Choose each enabled startup item and click Disable.
- Close Task Manager.
Step 4: Apply and Restart.
- Return to the System Configuration window and click Apply > OK.
- Click the Restart button to confirm the reboot.
After a restart, the computer is in a clean boot environment. You can now troubleshoot issues by following the steps in the “install, uninstall, or run an application” section.
Install, Uninstall, or Run an Application
Before a Windows clean boot, you may encounter different issues related to an application. After performing the clean boot, the troubleshooting steps differ.
Here, we list two situations: unable to uninstall/install/update an app or run an app correctly.
Check if the Windows Installer Service Is Running
In the System Configuration utility, you may untick the checkbox of Load system services, which leads to the Windows Installer service not starting.
Follow these steps to make it run in a clean boot environment:
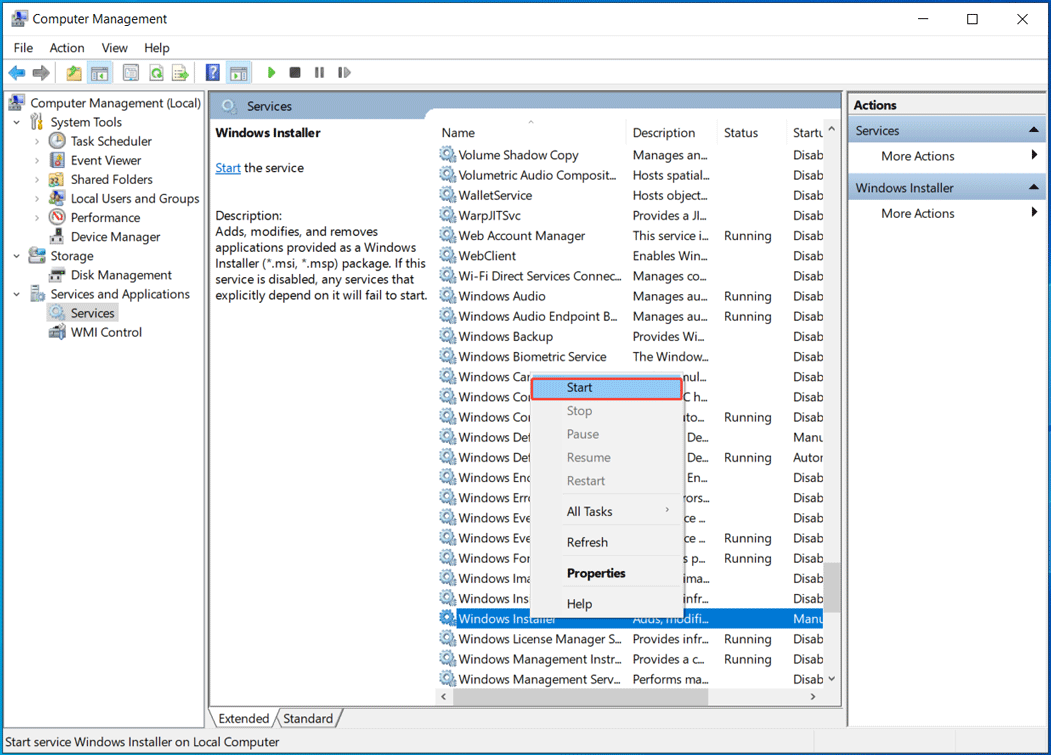
Step 1: Right-click on the Windows icon and select Computer Management from the context menu.
Step 2: Expand Services and Applications and click Services.
Step 3: Locate Windows Installer, right-click on this service, and choose Start.
Case 1: Unable to Install, Uninstall, or Update an App
If you fail to install or uninstall an application or update, try to install or uninstall it again.
To install an app:
Step 1: Download the app installer from the official website.
Step 2: Run the installer you have downloaded.
Step 3: Follow the on-screen instructions to finish the installation.
To install an app update:
Step 1: Check for an available update in the program itself.
Step 2: Install the update.
To uninstall an app:
Step 1: Type Control Panel in Windows 11/10 Search and press Enter to open this utility.
Step 2: Set View by to Category.
Step 3: Locate the Programs section and click Uninstall a program.
Step 4: In the Programs and Features window, find the target program, and click the Uninstall button.
Step 5: Confirm the uninstallation if needed. Then, start the process.

If you still fail to install or uninstall an app, it means the issues are not related to the interference from an app or service. In this case, contact the app vendor for support.
If you successfully install or uninstall a program, the issue is fixed. You need to restore the computer to a normal boot. We will introduce it to you in the corresponding part below.
Case 2: Unable to Run an App
If you fail to run an app, run this app again in the clean boot environment to see if it works.
- The application still doesn’t run as expected: This means the interference from another service or app doesn’t trigger your issue. If this is the case, contact the app manufacturer for assistance.
- The app runs properly: It indicates that a software conflict causes your problem. In this situation, you should find out which app or service is causing the issue. To do this, take the steps mentioned in How to Find the Culprit in Clean Boot.
How to Find the Culprit in Clean Boot
The issues you are experiencing may not occur in a clean boot environment because it isolates potential software conflicts.
According to Microsoft, you should try to systematically turn on or off services and programs and restart the computer. This helps isolate the specific one causing the issue.
Enabling a single startup item or service and rebooting the system each time will find the problematic one in the end. However, this method is inefficient because it requires many restarts.
Microsoft recommends disabling half of the non-Microsoft services and startup programs at a time, rebooting the computer, and re-testing the remaining half.
This approach effectively narrows down potential causes by approximately half at each step.
Here are the detailed steps for how to isolate the problematic app or service:
Step 1: Sign in to the computer with administrator rights.
Step 2: Launch the System Configuration window by typing msconfig in the Search box and selecting the best match.
Step 3: Choose the Services tab and select Hide all Microsoft services.
Step 4: Enable half of the previously disabled non-Microsoft services, ensuring you can track which services are enabled for testing.
Step 5: Select OK and then click Restart to apply the changes.

Step 6: After restarting Windows 11/10, determine whether your issue persists.
Then, continue the steps depending on the different situations.
Case 1: If the issue recurs, one of the services you enabled is causing the problem. Proceed by narrowing down the problematic service using the next steps.
- Repeat steps 1 to 6.
- In step 4, disable the lower half of the services you enabled in the previous test.
Case 2: If the problem disappears, the enabled services are not the cause. You should now test the remaining disabled services to identify the culprit.
- Repeat steps 1 to 6.
- In step 4, enable the upper half of the services you previously disabled to narrow down the problematic service.
Repeat these steps until you blame the problem on a single service, or until you are certain that no service is the cause of the problem.
When checking only one service and you experience the issue, the issue lies within that service. Then, you should go to step 10. If none of the services result in the problem, go to steps 7 and 8 to enable startup programs.
Step 7: Navigate to the Startup tab and select Open Task Manager.
Step 8: Choose the upper half of the disabled startup programs one at a time and click Enable.
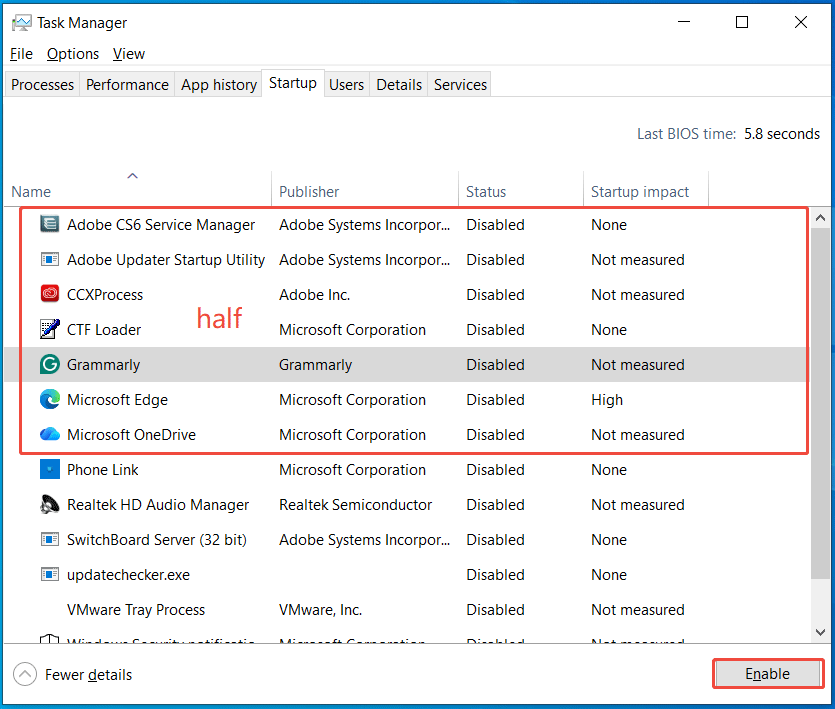
Step 9: Restart Windows 11/10 and follow the appropriate action based on whether the issue occurs:
- If the issue still occurs: The enabled startup items are causing the problem. Disable the lower half of the enabled items in the last test to identify the culprit.
- If the problem doesn’t appear: The remaining disabled startup programs are likely causing the issue. Disable each enabled item from the previous test, then enable the other half of the previously disabled programs to isolate the culprit.
- If the problem persists after enabling only one startup program, this specific item causes that issue. No further steps are needed; proceed to step 10.
- If no startup program leads to the problem, a Microsoft service may be responsible.
Learn what you should do from this Microsoft tutorial on recovery options in Windows.
Step 10: Now you have identified the service or startup program that gives rise to the problem.
Next, visit the website of your app manufacturer and contact it to determine whether it can address the problem. Or, start the Windows system with the service unselected or the startup program disabled.
What to Do After a Clean Boot
Once you finish troubleshooting your issue in the clean boot, try to restore the computer to its normal startup environment.
In addition, we recommend performing regular maintenance, such as updating the system, cleaning up temporary files, and creating a restore point.
Here is a breakdown.
#1. Reset the Computer to Start Normally
Once you have finished troubleshooting in the clean boot environment, ensure that the computer is restored to its normal startup state.
Follow the instructions below to restore it to a normal startup:
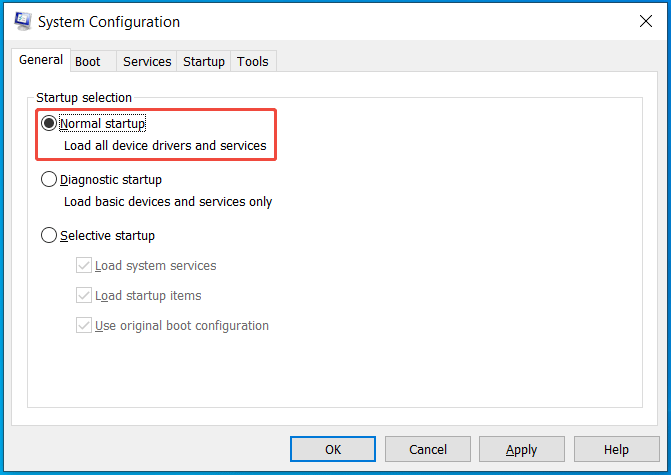
Step 1: Open System Configuration by searching for msconfig in the Windows Search box and pressing Enter.
Step 2: In the General tab, select Normal Startup under Startup selection.
Step 3: Go to the Services tab, uncheck the checkbox for Hide all Microsoft services, select Enable all, and click Apply.
Step 4: Navigate to Startup and select Open Task Manager.
Sep 5: In Task Manager, select all of the startup items you disabled previously one by one, and click Enable.
Step 6: In System Configuration, click OK and choose Restart in the pop-up window.
Once the system restarts, all services and programs are reverted to their normal state.
#2. Update Windows 11/10
Installing Windows updates is recommended to deliver new features, bug fixes, and improvements. If you ignore updates, this can leave the system vulnerable to viruses and other threats and cause compatibility issues.

Updates can improve the security, performance, and reliability of the computer, so keep the operating system updated to the latest version.
Step 1: Access the Settings app by pressing Win + I on your keyboard.
Step 2: Select Update & Security > Windows Update (Windows 10) or directly go to the Windows Update tab (Windows 11).
Step 3: Click Check for updates to find some available updates. Wait patiently until the downloading and installation processes finish.
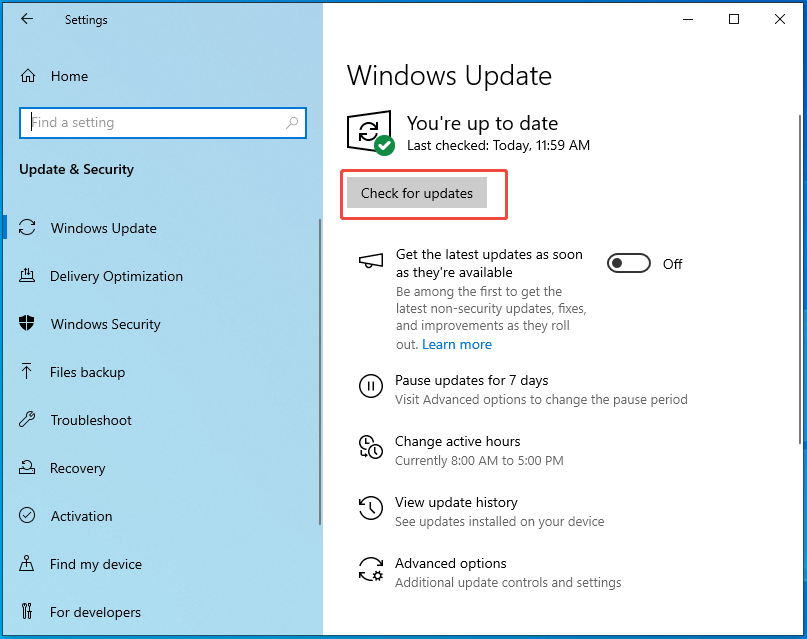
Step 4: Restart the computer to apply these updates.
#3. Run a System File Check
It is recommended to run System File Checker to scan for and repair any corrupted system files to maintain the system.
To do this:
Step 1: Type cmd in the Windows Search box, right-click on Command Prompt, and select Run as administrator.
Step 2: In the command window, type sfc /scannow and press Enter to begin the scan.
Wait until the scan completes and check the result to see if damaged system files are repaired.
#4. Update Drivers
Ensure your drivers, especially your graphics card driver and network driver, are up-to-date to troubleshoot compatibility issues.
Do this through Device Manager:
Step 1: Open Device Manager via the Win + X menu.
Step 2: Expand Display adapters, right-click on your graphics card, and select Update driver.
Step 3: Choose Search automatically for drivers to begin the driver update.
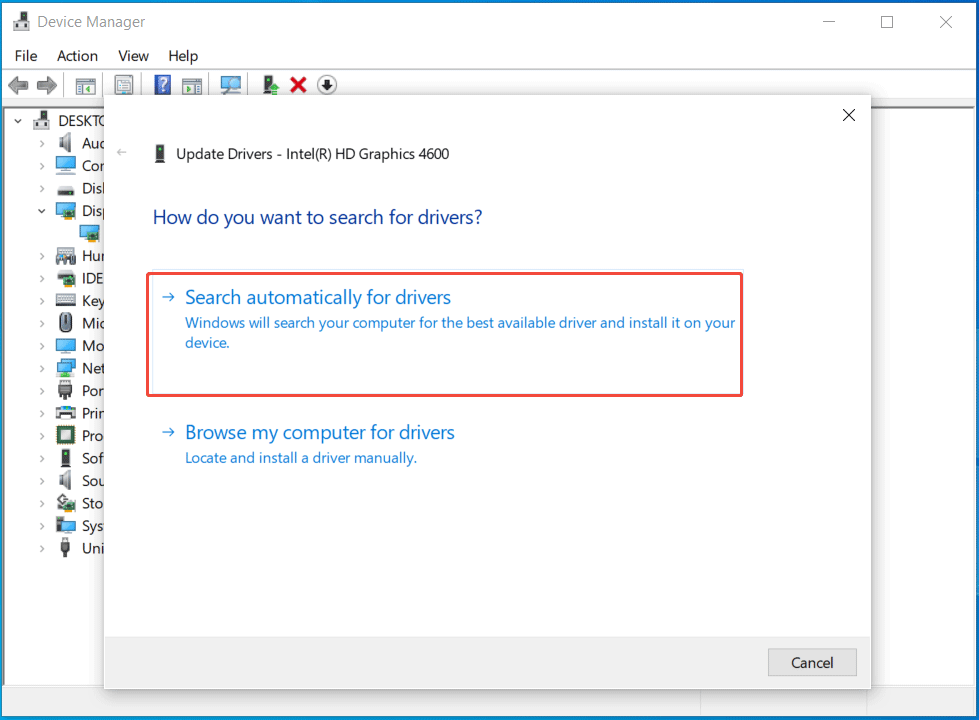
Step 4: Expand Network adapters, right-click on your network, and choose Update driver. Then, let Windows automatically search for and install the available driver.
#5. Run Disk Cleanup
Consider running Disk Cleanup after a clean boot to free up disk space and improve system performance.
To perform a cleanup task:
Step 1: Open File Explorer by pressing Win + E.
Step 2: Right-click on the drive you wish to clean up, for example, C, and choose Properties. Then, choose Disk Cleanup.
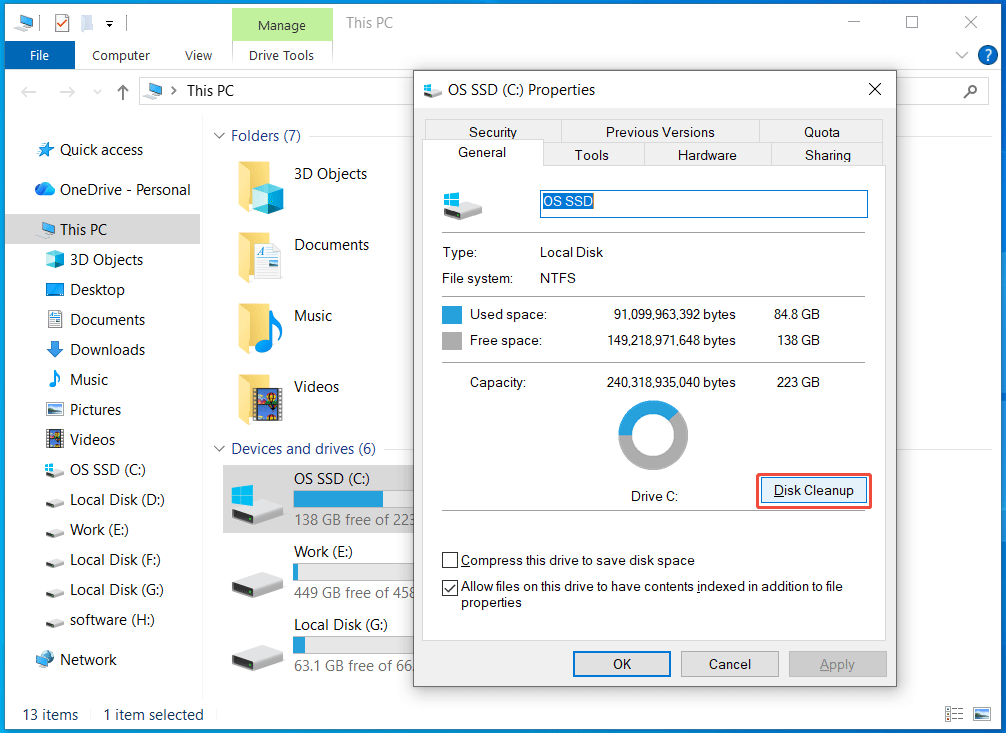
Step 3: Tick the checkboxes for all files you need to delete and click OK > Delete Files.
Step 4: Click Clean up system files and complete the cleanup by following the prompts.
#6. Create a Restore Point
After performing the necessary troubleshooting steps in a clean boot environment, the system is in a stable state suitable for creating a restore point.
Do that:
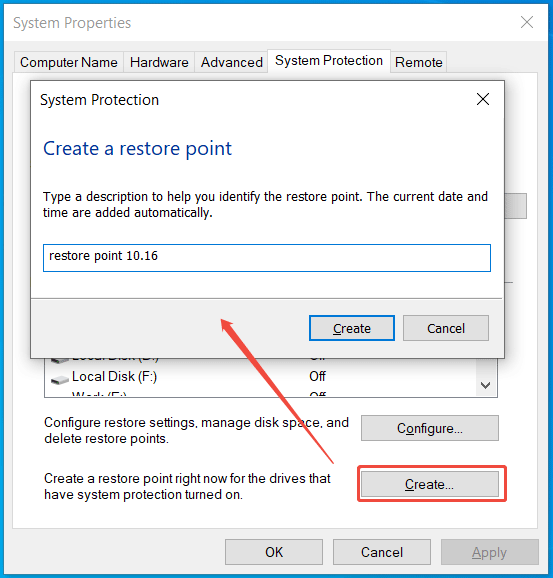
Step 1: Type create a restore point in the Search box and press Enter.
Step 2: Ensure you enable system protection for the C drive. If not, click Configure, tick Turn on system protection, and click OK.
Step 3: Click the Create button, type a description for the restore point, and click Create to begin the process.
Additionally, you can run MiniTool ShadowMaker to create a system image for system recovery in case of system issues.
Just launch this software, go to Backup, choose the backup target like an external hard drive, and begin the system backup.
Conclusion
From this post, you can find much information about a Windows clean boot, such as what it is, when and how to perform it, how to find the problematic service or app, and what you should do.
By following the step-by-step guide, troubleshooting software conflicts can be simplified.
Moreover, back up your important data before a clean boot as a wise precaution. As for the issues with MiniTool software, contact us at [email protected].
Clean Boot FAQs
Normal Startup loads all device drivers and services. Diagnostic Startup loads basic drivers and services. Selective Startup allows you to choose which services and startup items to load.
About The Author

Position: Columnist
Vera has been working at the MiniTool Team for over 10 years as a technical editor and content writer. She mainly focuses on disk and partition management, data recovery, Windows backup and restore, and PC troubleshooting. Through in-depth software testing and hands-on experience, she has helped users solve a wide range of computer problems and better protect their data on Windows devices.
User Comments :