The Hyper-V is a built-in feature in both Windows 10 and Windows 8 to replace the previous Microsoft Virtual PC. By enabling Hyper-V, you’re allowed to run multiple operating systems on the same local device. This post teaches you how to disable Hyper-V and enable it when necessary.
Please use MiniTool software to solve disk problems and recover lost files.
Hyper-V, also known as Windows Server Virtualization previously, now becomes an optional feature in Windows 10. The Hyper-V feature was introduced firstly in Windows Server 2008 to replace the hardware virtualization component of the client editions of Windows NT – Windows Virtual PC (there’s no inbuilt type two hypervisor in Windows 7). Microsoft makes Hyper-V a free feature since Windows Server 2012 and Windows 8.
The Public Preview Of Windows Virtual Desktop Is Announced.
Can You Disable Hyper-V
With the help of Hyper-V, users can finally run multiple operating systems as different virtual machines on a single Windows OS. They are allowed to do a lot of things in the virtual operating system: create virtual hard drives of different types, do virtual switches, etc. But can you disable Hyper-V when you don’t need the hardware virtualization service? Of course, you can. I’ll show you how to manage Hyper V Windows 10 step by step.
How to Disable Hyper V
There are mainly 3 ways to disable Hyper-V Windows 10.
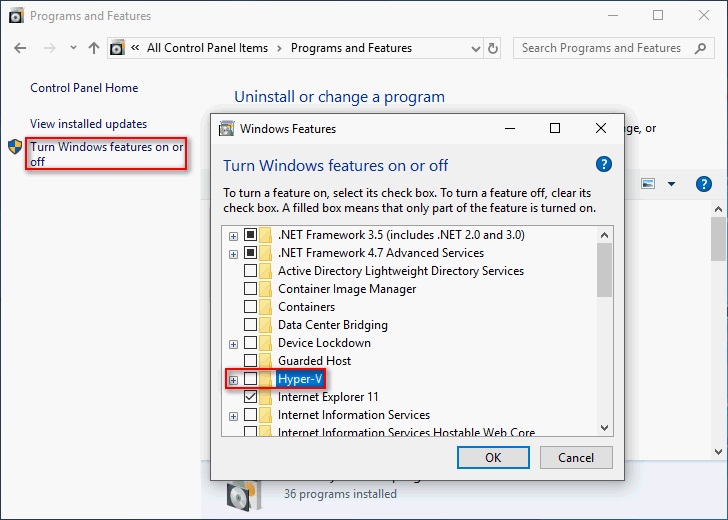
Method 1: use Windows Features.
- Click on the Windows button in the lower left corner.
- Scroll down to find Windows System folder and expand it.
- Choose Control Panel under it.
- Select to View by Large icons or Small icons.
- Find and click Programs and Features option from All Control Panel Items window.
- Click Turn Windows features on or off in the left sidebar.
- Look for the Hyper-V option and uncheck it.
- Click on the OK button below to save changes.
- Restart your computer.

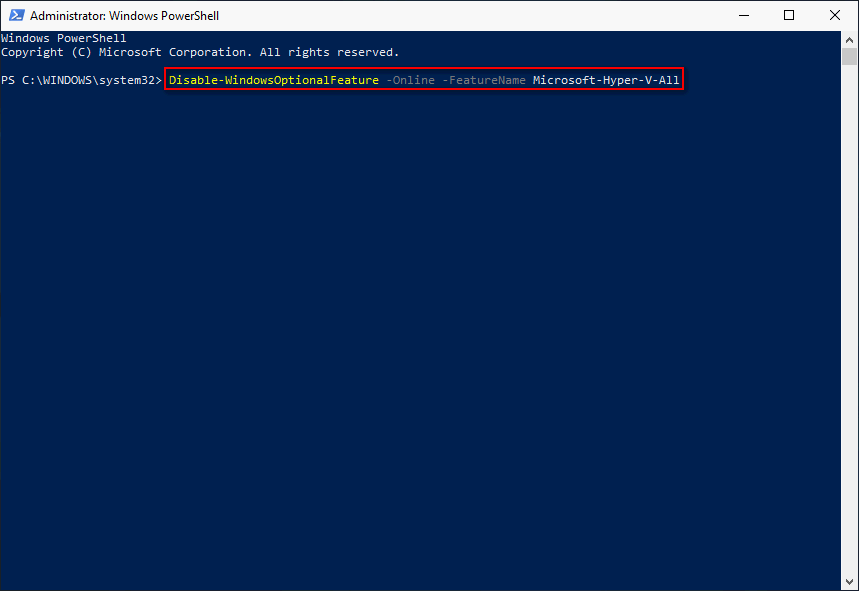
Method 2: use Windows PowerShell.
- Right click on the Windows button.
- Choose Windows PowerShell (Admin) from the WinX menu.
- Click on the Yes button if you see a User Account Control (UAC) window that asks for your permission to make changes.
- Type this command or copy & pates it into PowerShell: Disable-WindowsOptionalFeature -Online -FeatureName Microsoft-Hyper-V-All. Then, hit Enter.
- Wait for the command to finish and then reboot your PC.

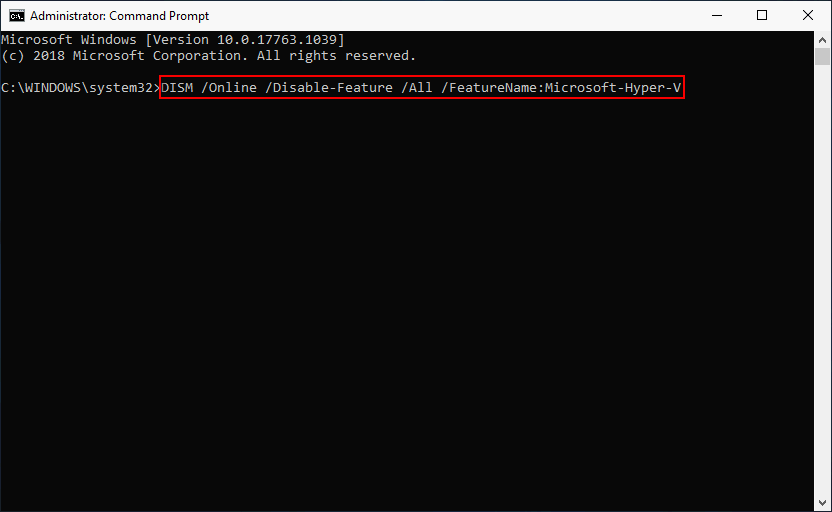
Method 3: use Command Prompt.
- Press Windows + S to bring up search window.
- Type cmd into the textbox.
- Right click on Command Prompt from search result.
- Choose Run as administrator.
- Click Yes in UAC window.
- Type DISM /Online /Disable-Feature /All /FeatureName:Microsoft-Hyper-V and press Enter on the keyboard.
- Wait for the command to complete automatically. Then, restart your computer.

How to Enable Hyper-V Windows 10
You can use the tools mentioned above to enable Hyper V when you need the feature.
Method 1: Programs and Features.
- Choose Apps and Features from WinX menu.
- Scroll down in the right panel to find Programs and Features and click it.
- Click Turn Windows features on or off in the left sidebar.
- Look for the Hyper-V option and check it manually.
- Click on the OK button and restart your computer.
Method 2: Windows PowerShell.
- Open Windows PowerShell (Admin).
- Choose Yes in UAC window.
- Type Enable-WindowsOptionalFeature -Online -FeatureName Microsoft-Hyper-V-All and hit Enter.
- Wait for the command to end and reboot PC.
Method 3: Command Prompt.
- Run Command Prompt as administrator.
- Click Yes in UAC window.
- Type DISM /Online /Enable-Feature /All /FeatureName:Microsoft-Hyper-V and press Enter on the keyboard.
- Wait for the command to accomplish and reboot PC.
Do you know that Command Prompt can also be used as a tool to recover lost files on your PC?
User Comments :