My Mouse Is Lagging in Windows 11/10
Computer lag is a common issue that has been mentioned in our previous article – 10 Reasons for Computer Lagging and How to Fix Slow PC. In addition, when using a computer, you can also experience another lagging problem – mouse lag.
It often happens when scrolling a mouse cursor with a wireless mouse. This situation is common if you switch to Windows 10/11 operating system or play games. Then, you may ask: why is my mouse lagging. Mouse stuttering or lag is mainly caused by mouse driver, outdated graphics card, Internet problem, etc.
Now, the important thing is fixing the laggy mouse. So, the following is on how to fix mouse lag in games on Windows 10/11.
Solutions to Wireless Mouse Lag
Reinstall or Update Your Mouse Driver
Before starting the issue fix, you can try your mouse on another PC to check whether the lagging issue still occurs. If it works well, it is possible that there is a faulty mouse driver on your computer, causing the lagging mouse in Windows 10/11. Reinstalling or updating the driver could be a solution.
Step 1: Press the Windows logo and X keys to open the Start menu, and then choose Device Manager.
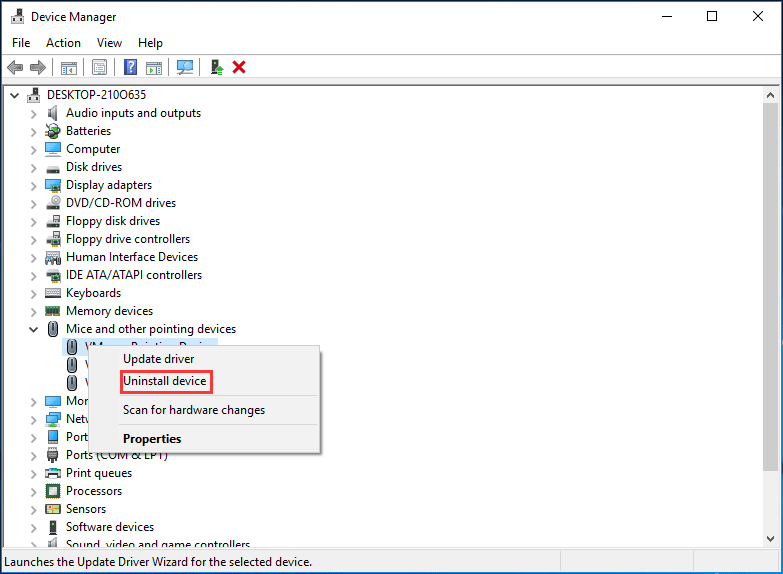
Step 2: Expand Mice and other pointing devices, right-click your mouse driver and choose Uninstall device.

Step 3: Restart your computer and Windows 10 will automatically install a driver.
Alternatively, you can right-click your mouse driver, click Update driver and follow the on-screen instructions to update the mouse driver to fix your lagging mouse.
Update Your Graphics Card Driver
As mentioned above, the mouse lag issue can be caused by an outdated graphics card driver, so the solution is to update this driver. The steps are also very simple.
Step 1: Go to Device Manager (as described in method 1).
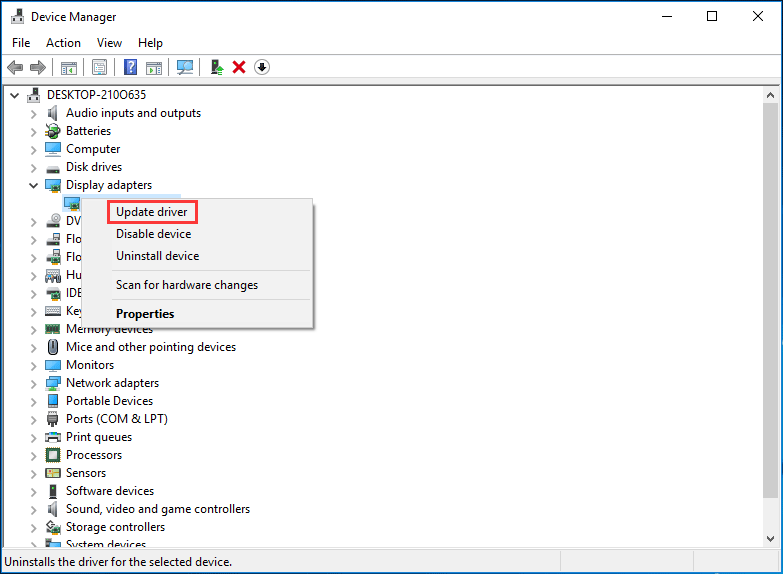
Step 2: Click Display adapters, right-click on your graphics driver and choose Update driver.

Step 3: Automatically search for updated driver software and install. After that, check if you have solved Windows 10 mouse lag.
Disable Scroll Inactive Windows Feature
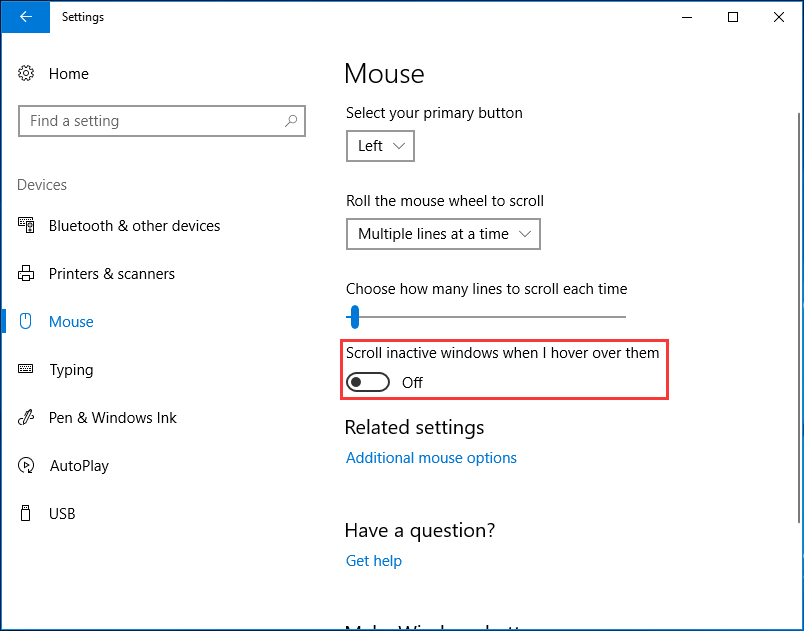
In Windows 10/11, you can simply hover over an inactive window with a mouse pointer and then use the mouse wheel so as to scroll such a window. And the contents of the inactive window can be scrolled. Disabling this feature might be useful to fix the wireless mouse lag issue.
Step 1: Go to Start > Settings > Devices.
Step 2: Under the Mouse tab, locate to the Scroll inactive windows when I hover over them option and turn it off. Then, check if your issue is solved.

End Realtek Audio Process
Realtek audio card might interfere with your mouse, causing the lagging issue. So you can terminate or end the Realtek audio process to fix this problem.
Step 1: Right-click on the Start button to choose Task Manager in Windows 10.
Step 2: Find the Realtek audio.exe process from the Processes tab and right-click it to choose End Task.
Other Options
Now, we have shown you four common methods to fix Windows 10 mouse lag. Additionally, you can try other solutions.
- Disable Cortana
- Disconnect other USB devices
- Change Power Management settings for USB
- Disable Fast Startup
Hope you can easily fix the issue of wireless mouse lag after trying these methods.


User Comments :