Is your Sleep option missing from the Power menu? How do you enable Sleep mode in Windows 10/8/7? This post from MiniTool Solution is written to help you and you can try these methods mentioned in the following parts to get rid of the issue of no Sleep option.
No Sleep Option Windows 10
Sleep mode is sometimes called Suspend or Standby mode. If your PC is set to sleep mode, little energy is consumed. Simply put, Sleep mode is a power-saving mode of operation in which your PC is switched off until needed. Note that the PC doesn’t shut down but goes to sleep.
Sleep mode is important for Windows operating system. So you will be very frustrated when Sleep mode is missing from the Power menu after update. The reasons for Windows 10 no Sleep option may include the Local Group Policy configuration, the video card issue, power menu settings, etc.
Actually, many users reported that problem. Where did Sleep go? How can you restore Sleep mode? Fortunately, this is not a difficult issue to fix and you can easily get the Sleep option reappeared by following the methods below.
How to Fix No Sleep Option Windows 10
Here are four methods that are proved to be useful for fixing the no Sleep option issue. Now, let’s see how to enable Sleep mode by following them.
Method 1: Check Power Options Settings
In some cases, Windows 10 Sleep mode missing is caused by incorrect power settings. To get rid of the issue, you should make sure Sleep mode is enabled in the Power options setting.
A quick guide for you here:
- Go to the search box, input control panel and click this app to open it.
- View all the items by large icons and then choose Power Options.
- Click the Choose what the power buttons do link from the left panel.
- Click Change settings that are currently unavailable.
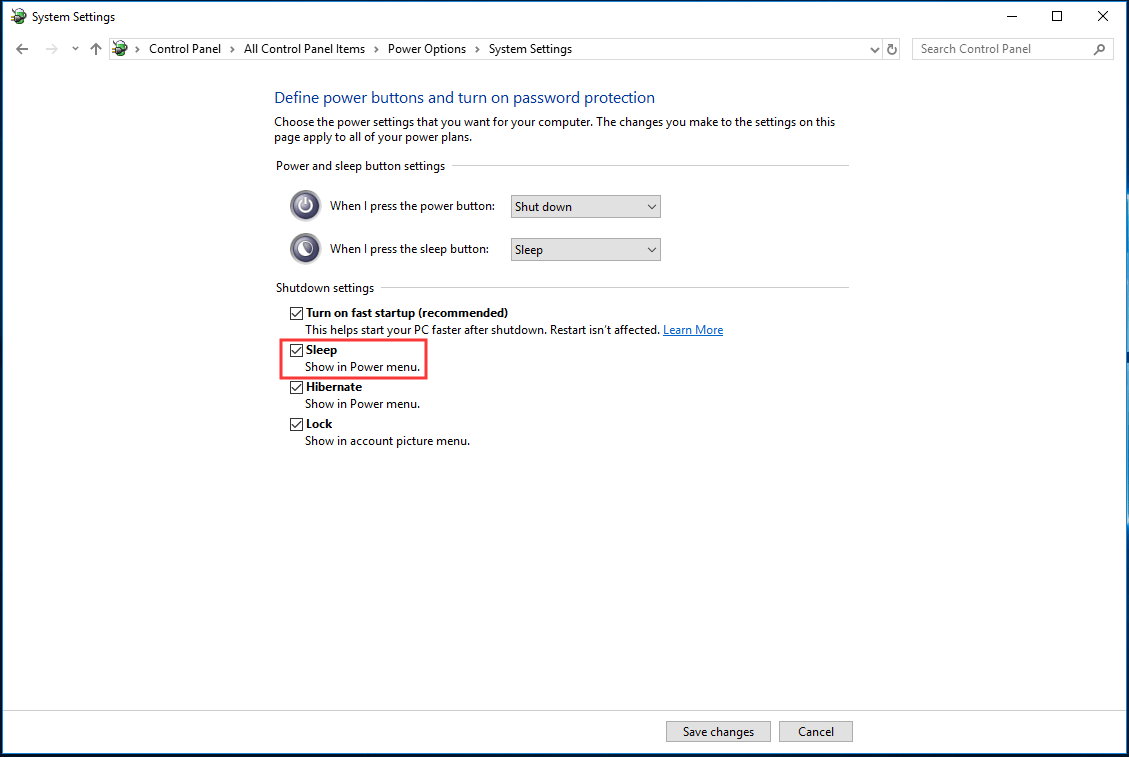
- In the new window, make sure Sleep is checked under the Shutdown settings section.
- After clicking Save changes, restart your PC to check if the Sleep option appeared in the Power menu.
Method 2: Modify Local Group Policy to Enable Sleep Mode
If you are encountering the issue of Windows 10 no Sleep option, you can try fixing it by editing your Local Group Policy. In this editor, you can find a dedicated policy for showing the Sleep option in the Power menu. Once it is turned off, you may find this option is missing.
To enable it, follow these steps below:
- Input gpedit.msc to the search box in Windows 10 and click Edit group policy.
- In the popup, go to Computer Configuration> Administrative Templates > Windows Components > File Explorer.
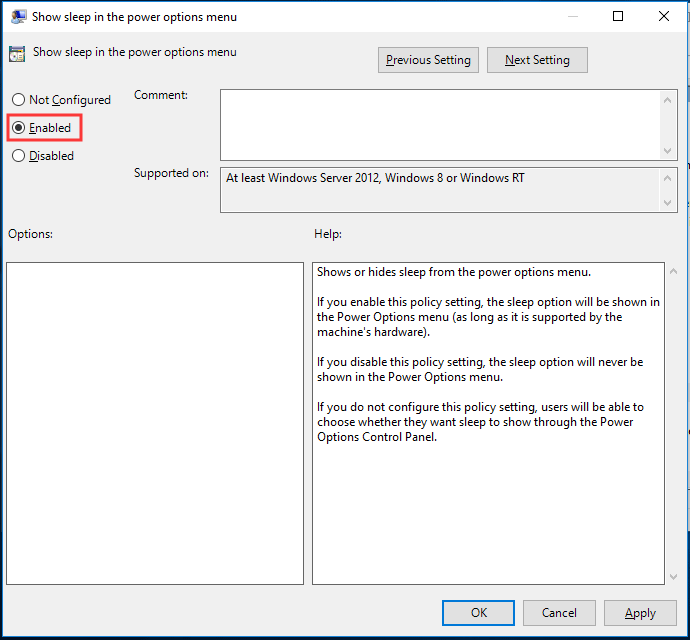
- Find Show sleep in the power options menu from the right pane and double-click it.
- Make sure the policy is set to Enabled, click Apply and then OK.
After that, restart your computer and see if the Sleep option is in the Power menu.
Method 3: Turn on InstantGo to Fix No Sleep Option Windows 10
InstanGo, formerly known as Connected Standy, is a smart feature of Windows 10 and 8 that can let your computer maintain network connectivity in Sleep mode. When experiencing the issue of Sleep option missing Windows 10, perhaps the feature is disabled.
To enable Sleep mode, follow these steps:
- Launch the Run window, type regedit and click OK.
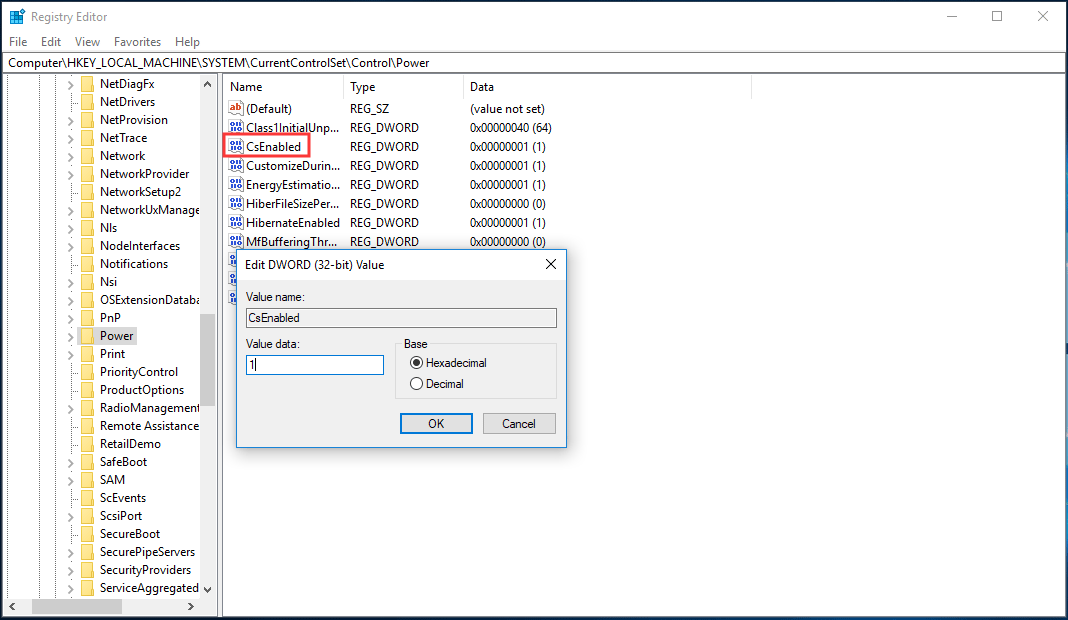
- In Registry Editor, go to HKEY_LOCAL_MACHINE\SYSTEM\CurrentControlSet\Control\Power.
- Double-click CsEnabled from the right pane and set its value data to 1.
Method 4: Install the Latest Video Card Driver
The Sleep option may be missing because of the video card driver, so you can try installing the latest driver to fix the issue.
- Go to the website of a manufacturer and search for your card driver.
- Download and install it on your PC.
- Reboot Windows and see if the issue is resolved.
The End
Is Sleep mode missing from the Power menu? How to add Sleep option in Windows 10? After reading this post, you clearly know the solutions to fix the issue of no Sleep option Windows 10 and you can easily solve the issue after trying them.

User Comments :