A good way to secure your computer is to set a BIOS or UEFI password. This is able to help you prevent unauthorized access to your operating system. The password setting is needed especially when there’s confidential or private data on a computer. Today, I’m going to tell you how to set the BIOS or UEFI password on Windows step by step.
What Is BIOS or UEFI Password
As everyone knows, a password helps a lot to prevent people from accessing your device without your permission. This is a good way to control access and protect privacy. By setting a BIOS or UEFI password, you can:
- Prevent people from logging into the certain operating system.
- Prevent booting from any removable devices.
- Prevent others from changing BIOS or UEFI settings.
- Prevent others from installing another operating system.
- …
Yet, the access to other systems is still available.
FYI: what if you run into operating system not found error?
BIOS or UEFI Password vs. Login or Account Password
Some people may ask what the difference is between the BIOS or UEFI password and the login or account password since both of them are used to prevent malicious access and protect data.
- Indeed, though the login password or account password is built in the Windows to help ensure data security, it can be easily bypassed by using third-party tools. What’s worse, in some cases, even the third-party tool is not necessary.
- Well, the BIOS or UEFI password is lower-level password, which can’t be bypassed by people. So you can enjoy high data security through BIOS or UEFI password setting.
>> Related articles:
How to Set a BIOS or UEFI Password on Windows 10
If your PC is pre-loaded with Windows 8, Windows 8.1 or Windows 10, it is very likely that it supports UEFI. Otherwise, it will be BIOS for sure. The BIOS or UEFI password setting process varies a little from computer to computer, manufacturer to manufacturer, and system to system. Yet, the basic steps are the same. Here, I’ll show you how to set a BIOS or UEFI password on a Win10 computer.

Set a BIOS Password
1. Turn on your computer and press corresponding button (usually Del, F2, Esc, F10, or, F12) to enter BIOS. If you are not sure about the key, you can look at the screen carefully when computer boots or contact the manufacturer.
2. Search for Security or Password section in the BIOS setting. You can navigate between different sections by making use of the arrow keys.
3. Under the Security or Password section, you should look for any entry similar to:
- User password
- System password
- A general password
- Supervisor password
- Master password for the hard drive
4. Click on the correct password option to set a strong password.
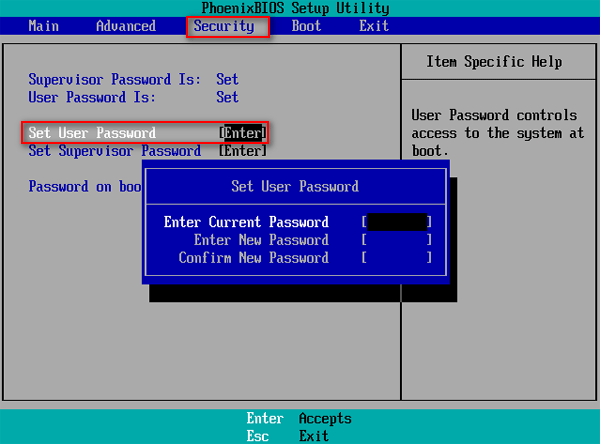
If you find more than one password under the Security or Password section (for instance, you find both Set User Password and Set Supervisor Password), you may set a password for each to enhance security.

Set a UEFI Password
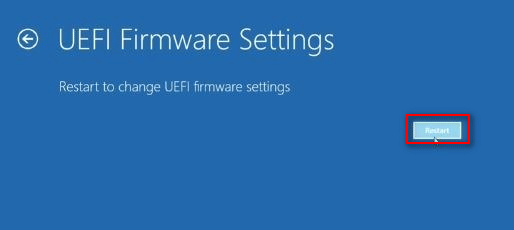
Step 1: Enter UEFI firmware settings. The process to enter UEFI firmware settings is totally different from accessing BIOS. You should do the following things to access UEFI firmware settings:
- Open Settings
- Select Update & Security.
- Shift to Recovery tab in the left-hand panel.
- Find Advanced startup and click on the Restart now button here.
- Click on the Troubleshoot option in the Choose an option window.
- Click on the Advanced options in the Troubleshoot window.
- Click on the UEFI Firmware Settings option in the Advanced options window.
- Click on the Restart button in the UEFI Firmware Settings window.
- Wait for the restart and then you’ll enter UEFI firmware settings.
Step 2: Look for Security or Password section (sometimes, the Security option may be included in the Settings section).
Step 3: Look for the password entry.
Step 4: Click on the correct password option to set a strong password.
User Comments :