Sleep mode is a wonderful feature built into all versions of Windows operating systems to help users save power for their electronic devices. Recently, I find many people complaining about the same issue: Windows 11 won’t sleep. What causes it? How to fix the problem when sleep mode is not working on a Windows 11 PC?
Windows 11 PC Won’t Go to Sleep
Sleep mode is a feature you can find easily in electronic devices like computers and mobile phones; it refers to a low power mode (or standby mode) used to save significantly on power consumption. Putting your device to sleep mode means to suspend its status to RAM. The screen and hard disks are turned off and stop working; however, the memory (RAM) chips are continued to refresh to keep their data.
- Sleep mode can help you save a lot of power when compared to leaving a device fully on.
- You don’t need to reissue instructions or to wait for a machine to reboot.
- It’s easy & quick to resume your work from the point where you left off last time.
Here comes the question: Windows 11 won’t sleep as it’s expected to. Users do what they do as usual to put their computer to sleep mode, but disappointedly find Windows 11 won’t go to sleep. They want to solve the problem, but don’t know how to do. The following content shows you some useful methods for fixing Windows 11 sleep mode not working.
19 Useful Tips For You To Save Battery On Windows 10.
MiniTool Power Data Recovery TrialClick to Download100%Clean & Safe
Sleep mode vs. Hibernation Mode
The sleep mode and hibernation mode are used frequently by Windows users to put their computer into a state of rest without shutting it down completely. However, they are different things:
- Sleep mode is a power-saving mode designed for saving power and preserving users’ activities.
- Though the hibernation mode can also conserve power, it stores users’ information on the hard disk, so that all of the energy they would have consumed would be saved while users power off the computer.
Troubleshoot Windows 11 Won’t Sleep
Don’t be anxious when your Windows 11 won’t go to sleep mode; just try the following methods one by one to fix the issue.
Check the Sleep Mode Settings
Check Screen and sleep settings:
- Press Windows + I to open the Settings app.
- Make sure System is selected in the left panel.
- Browse the items in the right panel and select Power.
- Locate the Screen and sleep section and expand it.
- Check the time selected for “When plugged in, turn off my screen after” and “When plugged in, put my device to sleep after”.
- If it’s set to Never, please select a time interval of inactivity after which you want your computer to enter sleep mode.
How To Fix When Your Windows 11 Settings App Is Not Working?
If you’re using a laptop, you may need to open Settings -> select System -> click Power & battery -> expand Screen and sleep -> select a time interval for “On battery power, put my device to sleep after” and “When plugged in, put my device to sleep after”.

Edit Power plan settings:
- Press Windows + S.
- Type Choose a power plan and press Enter.
- Select Change when the computer sleeps in the left panel.
- Choose a desired time to put your computer to sleep.
- Click Save changes.
Edit Network Adapter Properties
- Open Device Manager.
- Expand Network adapters.
- Right click on the network adapter which seems to cause the issue.
- Select Properties.
- Go to the Power Management tab.
- Check Allow the computer to turn off this device to save power.
- Click OK.

Disable Hybrid Mode
- Open Control Panel.
- Go to Hardware and Sound -> Power Options.
- Click Change plan settings next to the plan you’re using.
- Click Change advanced power settings.
- Expand Sleep -> Allow hybrid sleep.
- Change the settings to Off.
- Expand Multimedia settings -> When sharing media.
- Select Allow the computer to sleep.
- Expand PCI Express -> Link State Power Management.
- Change the settings to Off.
- Click OK.
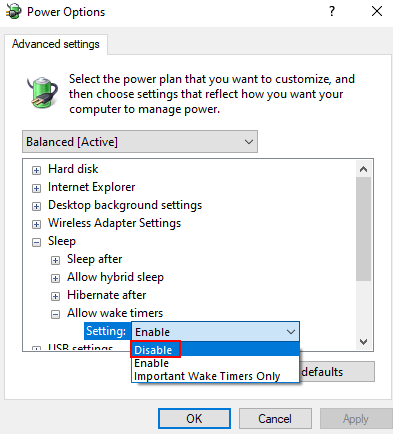
Disable Wake Timers
- Repeat step 1 ~ 4 mentioned in above methods.
- Expand Sleep -> Allow wake timers.
- Select Disable.
- Click OK.

Turn Off Screensaver Mode
- Press Windows + S.
- Type Change screen saver and press Enter.
- Select None under Screen saver.
- Click OK.
What else to do when your Windows 11 won’t sleep?
- Disable fast Startup
- Perform a clean boot
- Run the power troubleshooter
- Scan computer for virus or malware
- Remove battery
- Remove all unnecessary peripheral devices
- Update drivers
- Check for power requests
- Update Windows 11
User Comments :