There are no fixed disks to show is an error message you may receive when you use diskpart in Windows 10, Windows 8/8.1 and Windows 7. This always happens when the hard drive is not recognized leading to computer unbootable. But, you can still boot your computer from a Windows installation medium.
Reasons for There Are No Fixed Disks to Show
We collect some causes of this diskpart there are no fixed disks to show error that can help you better understand this question.
- The hard drive is connected to your computer improperly: this is the most common reason for diskpart no fixed disks to show. When there is something wrong with the SATA or ATI data cable, or they are not connected to your computer properly, this error can occur.
- The VMware driver is missing: if a NAT is crashed when you are using a VMware virtual machine, this issue is likely to happen because of a kernel panic.
- The BCD data is corrupted: some users have reported that the list disk there are no fixed disks to show issue is caused by the corruption of some system files.
- Initialization error: an initialization error is also a top reason for diskpart no fixed disks to show. You will need to use Windows Automatic Repair to fix this issue.
Now, you know the causes of diskpart there are no fixed disks to show. Then, it’s time to solve this issue. In the following contents, we will show you some solutions that are proved to be effective.
How to Fix There Are No Fixed Disks to Show
- Reconnect the hard drive
- Install the missing VMware Driver
- Fix the corrupted BCD data
- Perform a Windows Auto Repair
Fix #1: Reconnect the Hard Drive
This is the easiest way to fix the diskpart there are no fixed disks to show error.
No matter you are using a desktop computer or a laptop, you need to power off your device completely in advance. If you are using a laptop, you need to put the device onto a soft and flat surface to do the job.
Fix #2: Install the Missing VMware Driver
This fix is for the error generated by a missing VMware driver.
You need to follow these steps to get rid of the error:
1. Open the Vmware workstation.
2. Go to VM > Install VMware tools > Mount.
3. Press Windows + R to open Run.
4. Type cmd into the Run box and press Ctrl + Shift + Enter to open the elevated CMD prompt.
5. When seeing the User Account Control (UAC) interface, you need to press the Yes button to continue.
6. Type the following command and press Enter: (X stands the drive letter where your VMware is installed)
drvload “X:\Program Files\VMware\VMware Tools\Drivers\pvscsi\Win8\amd64\pvscsi.inf”
7. When the above command is successfully processed, you need to type the following command and press Enter to see whether diskpart can work normally: (X stands the drive letter where your VMware is installed)
X:\windows\system32>diskpart
If you can use it normally, the issue should be solved.
Fix #3: Fix the Corrupted BCD Data
Since the computer is unbootable, you need to create a Windows installation medium in a normal working computer and then boot your computer from the bootable medium. Then, the following guide will lead you to fix the corrupted BCD data:
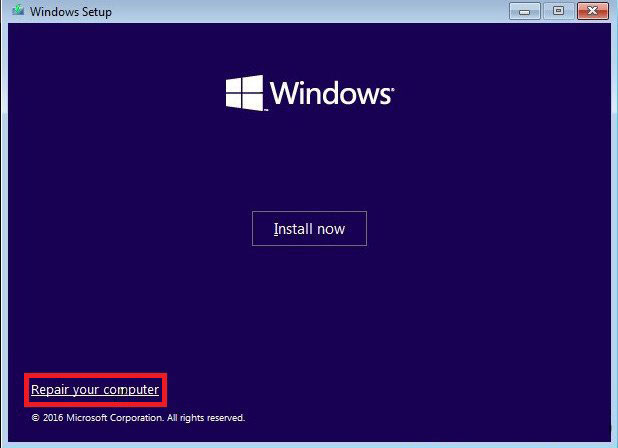
1. After booting the device from the bootable medium, you will see the Install Now Here, you need to click the Repair your computer button to continue.

2. Go to Troubleshoot > Command Prompt.
3. Type the following command lines and press Enter after each input:
Bootrec /scanos
Bootrec /fixMBR
Bootrec /fixBoot
Bootrec /rebuildBCD
4. Reboot your computer to see whether the issue is solved.
Fix #4: Perform a Windows Automatic Repair
If all the above solutions don’t work, you can try a Windows automatic repair to have a try. To do this work, you still need to use the Windows installation medium:
After booting your computer from the installation medium, you need to go to Repair your computer > Troubleshoot > Automatic Repair. Then, your Windows repair process will start automatically. You need to wait patiently until the entire process ends.
At last, you can go to check whether the diskpart there are no fixed disks to show error goes away.
Bottom Line
We hope these solutions can effectively solve the diskpart there are no fixed disks to show issue. Should you have any questions when deal with this issue or using MiniTool software, you can let us know in the comment or contact us via [email protected].
There Are No Fixed Disks to Show FAQ
- Run Command Prompt as Administrator.
- Type diskpart in the pop-out interface and press Enter.
- Type list disk and press Enter.
- Type select disk * (* stands the number of the invalid disk) and press Enter.
- Type online disk and press Enter.
- Rebuild MBR.
- Repair your computer with Windows Installation Disc.
- Fix boot-related files with bootrec.exe tool.
- Fix disk error using CHKDSK.
- Use System File Checker to repair missing or corrupted system files.
- Perform a System Restore.
You can find more information in this article: Fix: The Drive Where Windows Is Installed Is Locked (6 Ways).
User Comments :