When you open Task Manager to check and you may find that your memory usage is running at 100%, and most of it is occupied by WaasMedic Agent Exe. Now, this post from MiniTool tells you how to fix the WaasMedic issue.
WaasMedic is also called WaasMedic Agent Exe, which represents the Windows Update Medic service. WaasMedic is part of the Windows 10 operating system. The main purpose of it is to ensure that the Windows update process is smooth and uninterrupted so that users can receive the latest patches without any problems.

Sometimes, you may encounter the WaasMedic high disk issue. Now, let’s see how to fix the issue on Windows 10.
Fix 1: Disable All Antivirus Applications Temporarily
Misconfiguration and conflict with antivirus software installed on your computer are one of the reasons for the WaasMedic.exe high CPU issue. Your PC is constantly monitored by all antivirus software and the antivirus software tries to block any suspicious activity.
As one of the antivirus applications, Avast was reported that it had a lot of false positives and disrupted access to your profile.
You can disable or uninstall your antivirus temporarily, read this post to get the methods – Multiple Ways to Disable Avast for PC and Mac Temporarily/Completely. Then restart your computer after disabling and see if you access your profile without any problems.
Fix 2: Perform Disk Cleanup
Almost all versions of Windows have integrated the Disk Cleanup feature. The Disk Cleanup feature makes it easy to delete unnecessary files on your computer and save space. Thus, this solution is to perform Disk Cleanup. Here are the steps:
Step 1: Press the Windows + S keys at the same time to open the search. Then type Disk Cleanup and select the first option.
Step 2: Select the drive on which Windows has been installed and click OK to continue.
Step 3: Click the Clean up system files option and click OK to start cleaning.
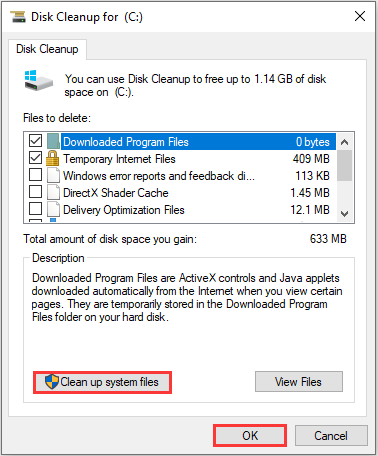
This will delete broken registry items on Windows you can check if the WaasMedic issue has gone.
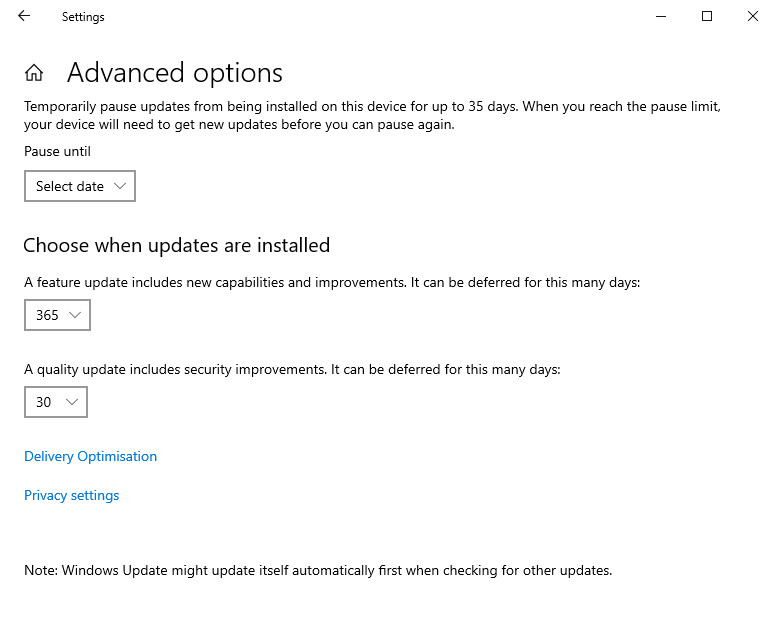
Fix 3: Pause Windows Updates for 365 Days
By pausing Windows update settings you can fix the WaasMedic issue. And it is rather easy to do this job.
Step 1: At Windows Start menu, choose Settings > Update & Security.
Step 2: In the new emerging window, scroll down the right panel until you see the Advanced options below.
Step 3: This option enables you to disable Windows 10 update for 365 days at most. However, please note that when this setting reaches its expiry date, your computer will need to get the latest update before it can be paused again.
Fix 4: Disable WaasMedic
The last method for you is to disable WaasMedic. Follow the guide to do that:
Step 1: Download Windows Update Blocker and extract the file.
Step 2: Launch Windows Update Blocker. Then, go to the Menu.
Step 3: Select Windows Service from the context menu.
Step 4: Then the Services window will be called out and look for Windows Update Medic Service. Then copy the service’s name.
Step 5: Go back to the folder where you extracted the Windows Update Blocker.
Step 6: Open the ini file with Notepad and look right under dosvc=2,4. Paste the service name there and add =3,4 in the back of it.
Step 7: Go back to the Windows Update Blocker window. Click Apply Now to confirm the changes.

Final Words
That is all information on methods to fix the WaasMedic issue. If you want to fix the issue, but don’t know how to do it, you can try the above solutions one by one. I believe that one of them can help you fix your issue.
User Comments :