DirectX is arguably one of Windows 11’s most important software libraries. It is a series of application programming interfaces, or APIs, for tasks that deal with different types of media on Windows computers. However, some users report that they meet the Windows 11 DirectX errors. The following are some solutions.
Way 1: Check DirectX Version
First, you can try to check the DirectX version. If you have not installed DirectX 12 installed, it is recommended that you download the latest version from Microsoft. Here is how to check it.
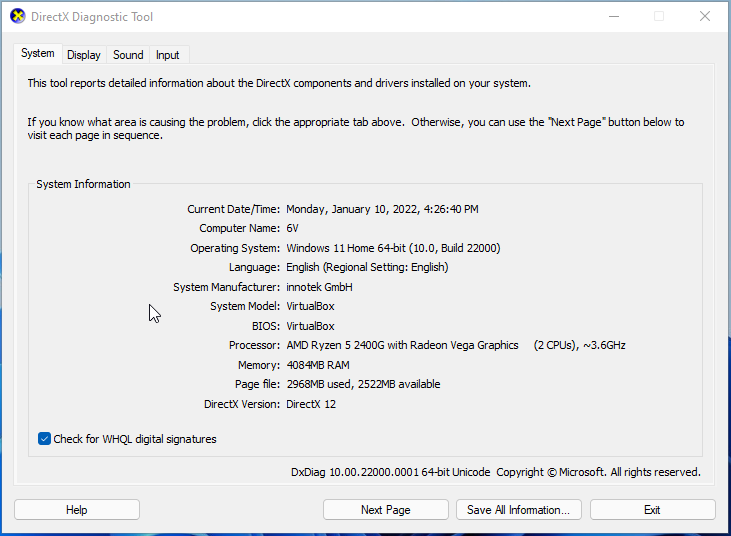
Step 1: Type dxdiag in the Search box and click Open in the right panel.
Step 2: Under the System tab, check the DirectX version.
Way 2: Download the Latest DirectX Version
It’s recommended to download the latest DirectX version. You can go to its offcial website to download it.
Way 3: Update Windows 11 to the Latest Version
Windows updates can help you fix a lot of system issues and bugs. When you encounter the DirectX 12 not working on Windows 11error, you can try installing the latest Windows updates.
Step 1: Press the Windows + I keys together to Open Settings.
Step 2: Click the Windows Update section, click the Check for updates button to check if there are any new updates. Then Windows will search for available updates. Just follow the on-screen instructions to finish the process.

Way 4: Update the Graphics Driver
You have to ensure that you are using the latest version of the graphics driver. You will meet the “DirectX 12 not working on Windows 11” issue if you have incompatible, corrupt, missing, or outdated drivers. To solve the issue, you need to update the driver.
Step 1: Open the Run box and type devmgmt.msc. Then press Enter to go to Device Manager.
Step 2: Double-click Display adapters to expand it. Then right-click your graphics card driver and choose Update driver.
Step 3: You will be asked how you want to search for drivers in the pop-up window. You should choose Search automatically for updated driver software and then follow the instructions to complete the process.
Way 5: Perform a Clean Boot
Performing a Clean Boot can help you start Windows through a minimal set of drivers and startup programs, which can avoid software conflicts. To perform a clean boot, you need to do:
Step 1: Type msconfig in the Run box (pressing the Windows +R keys to open Run box), and press Enter.
Step 2: Then go to the Services tab. Check the Hide All Microsoft Services box.
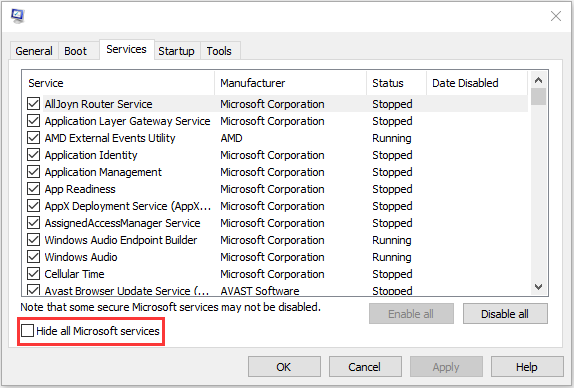
Step 3: Now, click the Disable all button, and click Apply to save the change.
Step 4: Navigate to the Startup tab and click Open Task Manager.
Step 5: In the Task Manager tab, select the first enabled application and click Disable. Here you need to disable all enabled applications one by one. After disabling all programs, close Task Manager and click OK.
Way 6: Run System File Checker
SFC (System File Checker) is a Windows built-in tool used for replacing damaged, lost, or changed system files with good system files. Running this tool can fix Windows 11 DirectX errors. To do that, you just need to open Command Prompt and then type sfc /scannow and press the Enter key. Then, you can check if the error has been fixed.
Final Words
To sum up, this post has shown 6 ways to fix the “Windows 11 DirectX errors” issue. If you come across the same error, try these solutions. If you have any different ideas to fix it, you can share them in the comment zone.
User Comments :